

Barduck
-
Content Count
355 -
Joined
-
Last visited
Posts posted by Barduck
-
-
Better pictures (in a new post) to come, proof the design works:
 MOC UP 1111 SD70ACE by Barduck12, on Flickr
-
3 hours ago, LEGO Train 12 Volts said:Great attention to detail and complex construction techniques for that front!

I also like the use of 61409 slopes for the rear grilles (would be interesting to see exploded views of how to build).
My favorite livery is the dark blue one with the yellow muzzle and the white roof!
Thx. It took several attempts to get it to work, sometimes the slopes were overlapping, sometimes it was impossible to get them in the needed position. To know how I did it you’ll have to get the instructions 😎, it’s one of the features on this design that took to much work to just reveal. There’s so much snot and weird construction solutions in it that I had several times that I was thinking; “WTF did I get myself in to” but it all comes together rather nicely (like all the grills that are offset by 1/3th to 1/2 of a plate). The CSX (the one you like most) and BNSF required some extra work because of the 1x2 brick with grille not existing is the needed colours, again making sure they stick out the same as with those bricks. I agree that the CSX is nice to see in that colour combination, my personal favourites though are the UP, Virginian and BNSF (and the unbuildable UP C&NW because of the missing bricks in dark green, but as I said, Chinese companies have those so I’m tempted to build it regardless)
-
A non-buildable version, UP C&NW 1995 Chicago & North Western. Lego does not have all needed parts in dark green (some Chinese companies do actually so really tempted, it’s a to beautiful livery)
-
24 minutes ago, bogieman said:Well done, especially like the bogies! Clever use of the "Slope 18 2 x 1 x 2/3 with Grille" for the dynamic brake intake, at least that's what I think you used.
Dave
Indeed they are. Took a whole lot of headaches and try and error to get it to align just right but the the look it gives is just mesmerising. Almost everyone uses either 1x2 bricks with grille or 1x2 tiles with grill to do things like that, I really wanted to pull it to the next level. If one really wants to you can even make almost completely see-through by using clear parts inside (and not bothering that Lego doesn’t have all of the used pieces in transclear)
-
1 hour ago, LEGOTrainBuilderSG said:Beautifully shaped nose mate! The proof of concept looks great. How does it hold up?
Bars and robot arms
-
Ages ago (or so it feels like) in 2016 I posted my build of an SD70 on this forum:
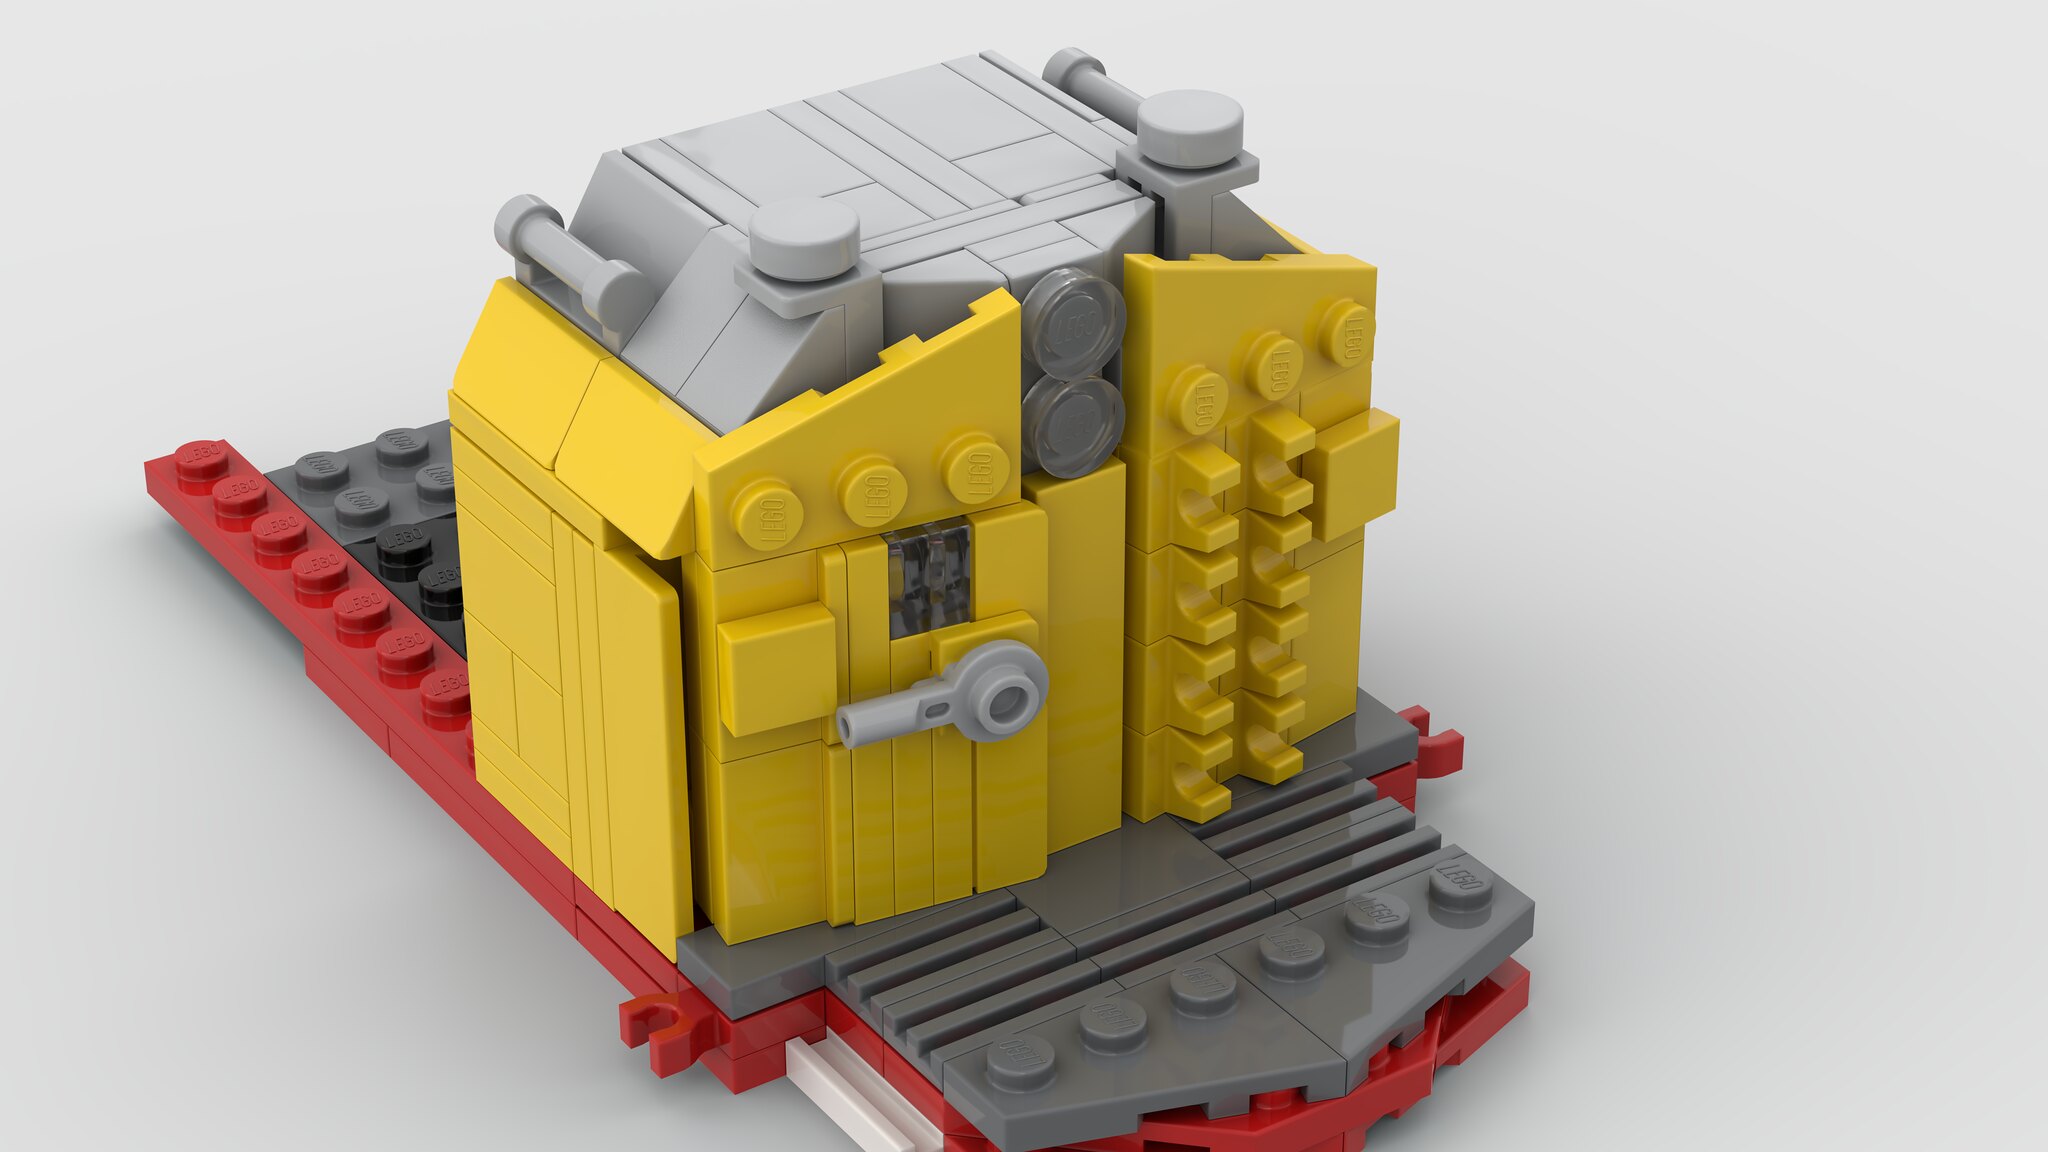
With the build of the Union Station being at a halt for the moment (some other things that take precedence) and having a bit of a designers block since the start of the year (as in; really not finding engines I wanted to try and build) I started looking on my own Flickr account at the locomotives I used to own (used too but lost in the fire in 2020), just thinking if I'd actually would rebuild one. My last "recent" diesel was the ES44AC line I did and since then I haven't done any new other more recent diesel engines, that's mainly due to the M10005 and it's coaches that I've done (and still need to finish 4 to complete that consist). So, my eye dropped on my old SD70 version and I was thinking; "not going to rebuild that, better redesign her" and thus I started by choosing which SD70 version I'd want to do and settled on the Ace.
First start was slow, I had the basic floor from the older model that I lengthened by 2 studs and then started tinkering with a nose setup. If I could get a good looking nose, I figured the rest would go easy. I had done a nose for a SD90MAC-H and wanted something in the same style, but obviously without the door.
 crazy nose by Barduck12, on Flickr
The end result for that tinkering was this:
 UP SD???? by Barduck12, on Flickr
and I knew I had to test build it first as there are a few things I wasn't really sure about if it would work
 SD70Ace WIP by Barduck12, on Flickr
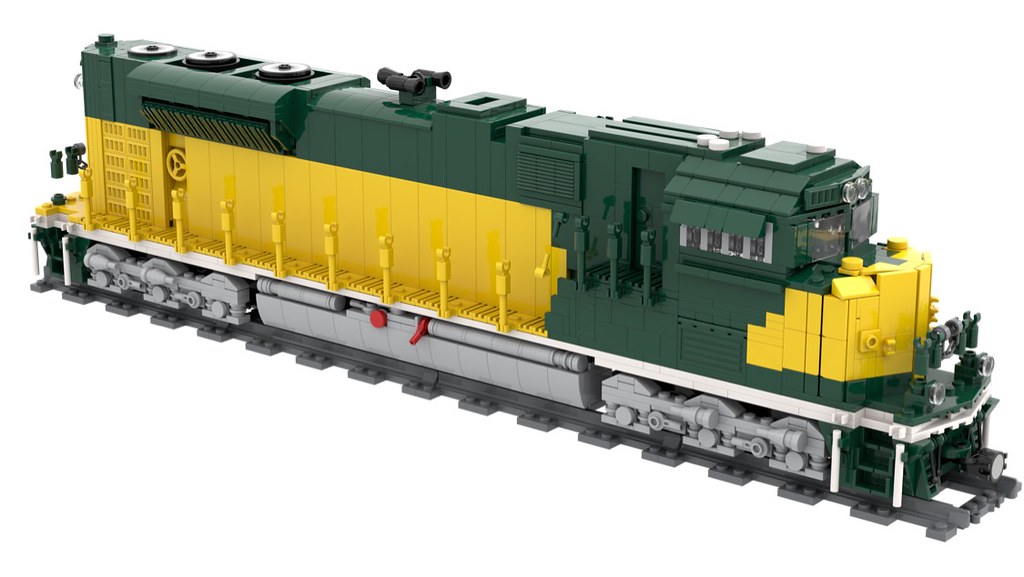
Even there I changed a few things later to give it a smoother look. It was going to work and all I had to do was choose the initial livery. At that time I was just chatting with someone from Godbricks.com and decided to do a livery that would be unbuildable in genuine LEGO because of the colors used (bright light blue mostly and there's not much available in that color) so my initial design would become an exclusive for them (actually waiting on the parts to arrive to test build that and to see how decals can be done but that's another story for another time as she is still a secret). With the design in that livery ready I then began changing her in to 9 other liveries and those are the ones I'm showing here today. I intend to build at least the UP version for myself and then decide between the BNSF or the Virginian for a second, won't be doing all 9 myself.
The designs (in alphabetical order):
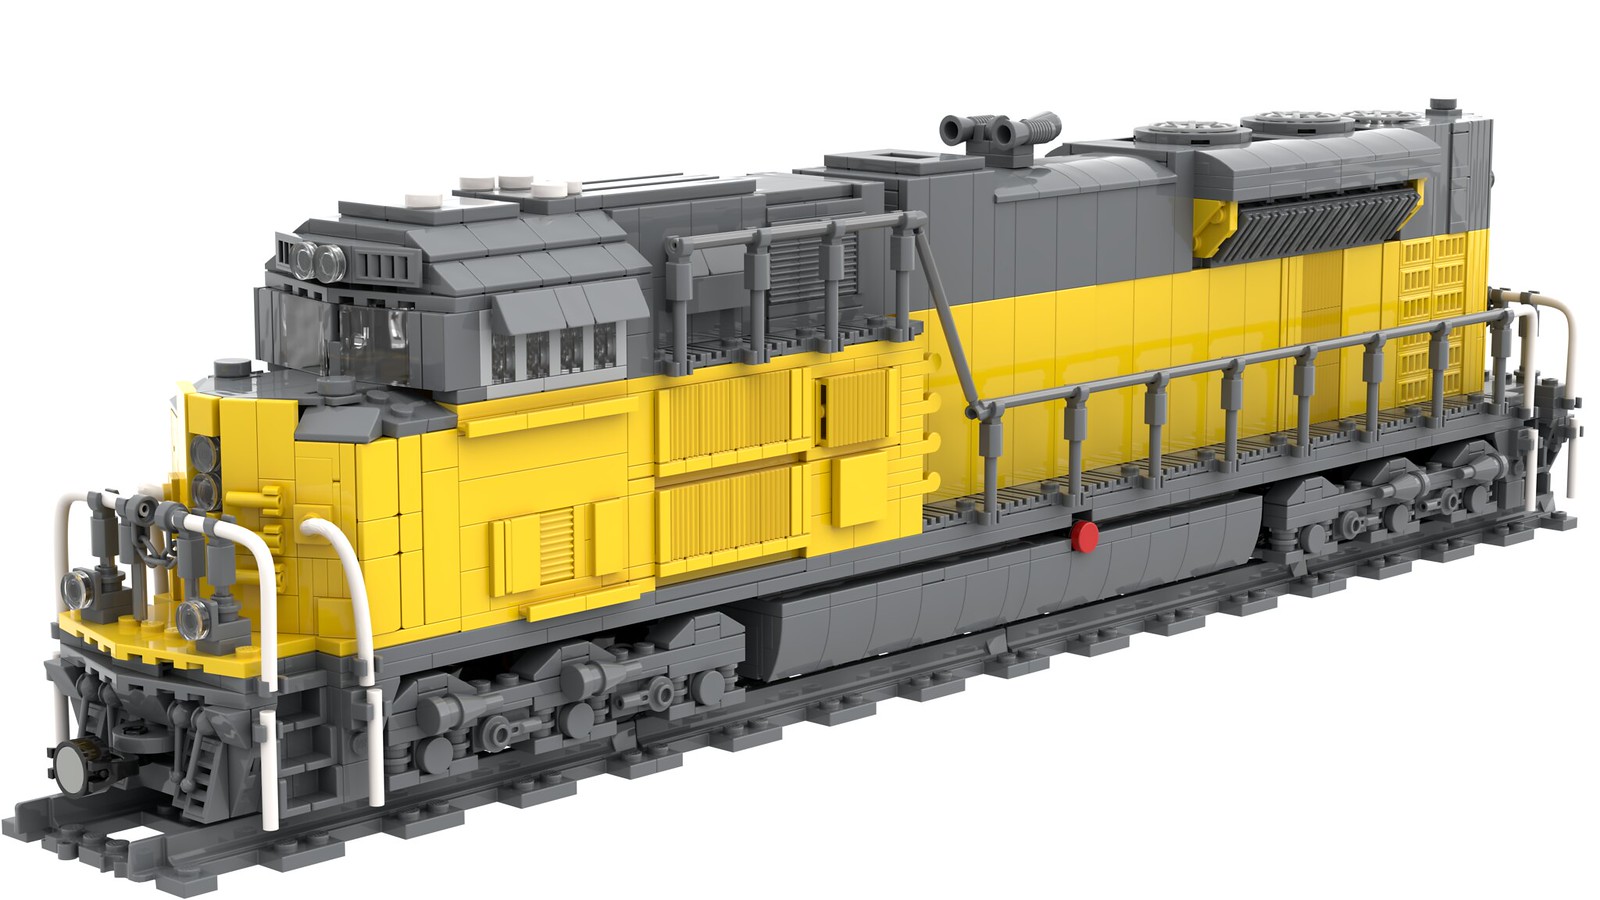
BNSF
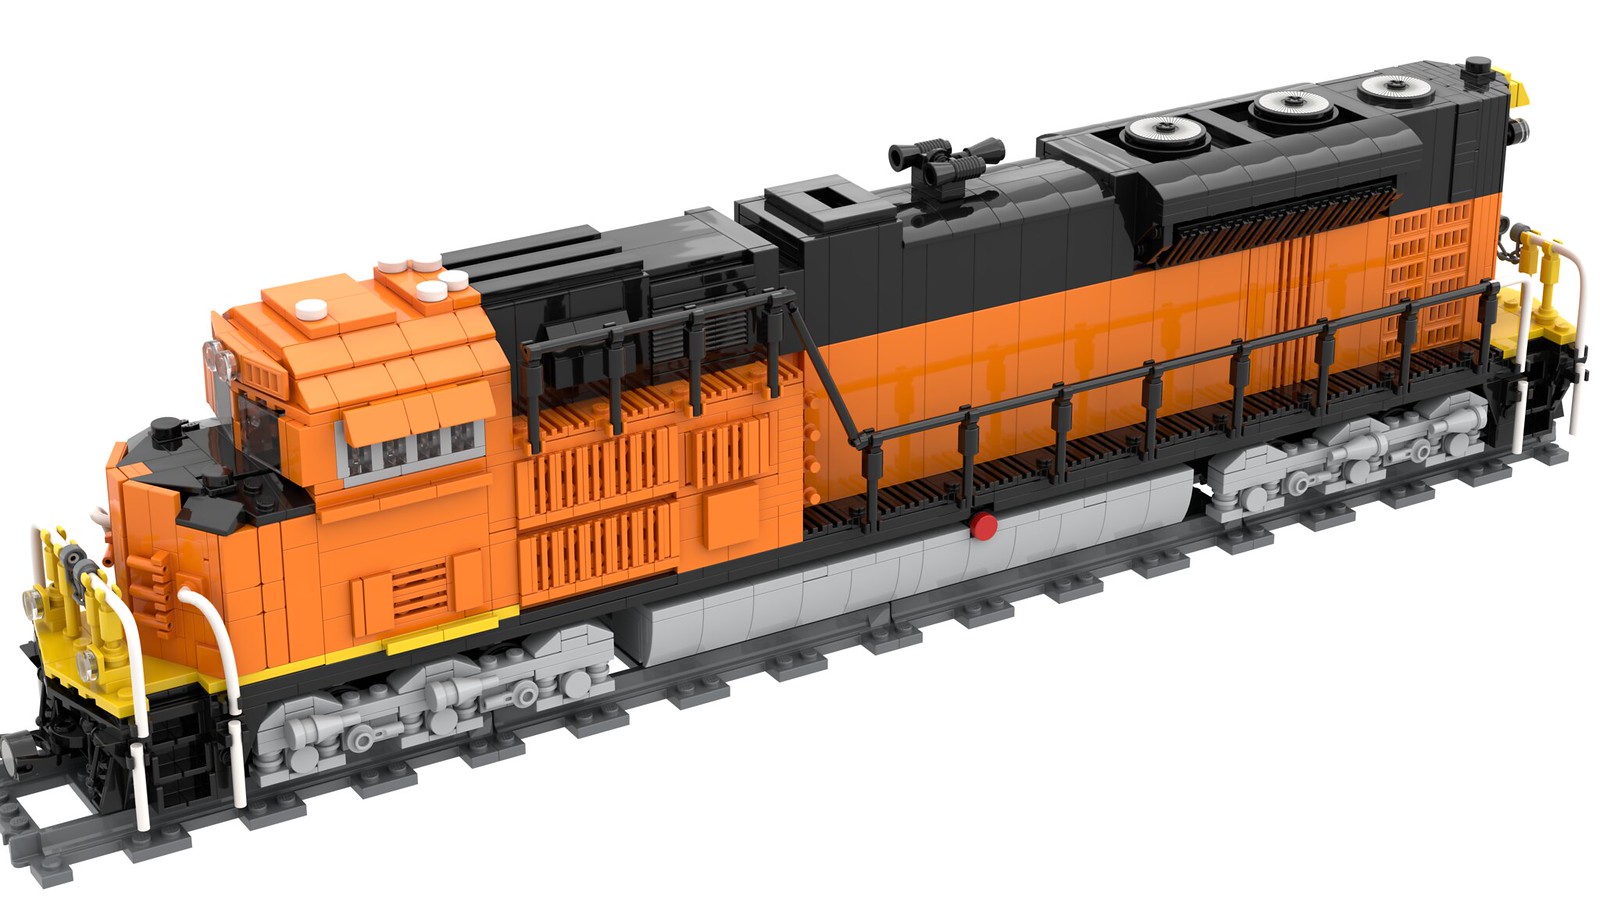 SD70Ace BNSF by Barduck12, on Flickr
Conrail (I know they didn't have SD70Aces in their line up but what's not to like)
 SD70Ace Conrail by Barduck12, on Flickr
Canadian Pacific
 SD70Ace CP by Barduck12, on Flickr
Canadian Pacific #7021 Desert Sand (which is actually an SD70ACU)
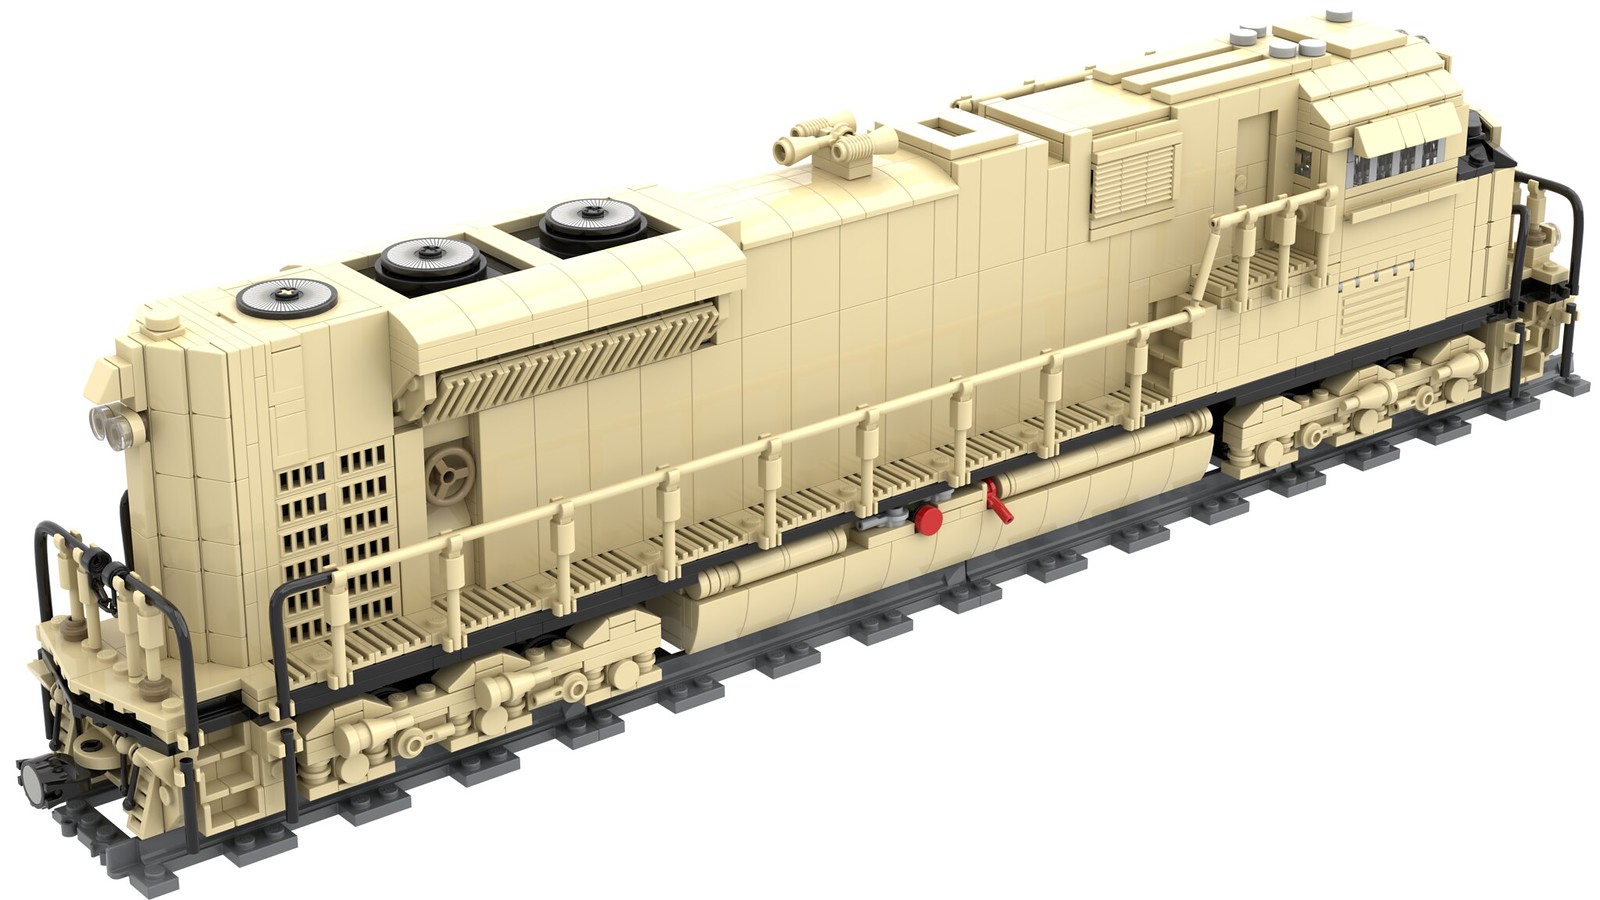 SD70Ace CP 7021 by Barduck12, on Flickr
CSX
 SD70Ace CSX by Barduck12, on Flickr
Norfolk Southern
 SD70Ace NS by Barduck12, on Flickr
Union Pacific
 SD70Ace UP by Barduck12, on Flickr
Virginian (NS heritage) (will need decals on the 2x6 tiles that hide the Buwizz 2.0)
 SD70Ace Virginian by Barduck12, on Flickr
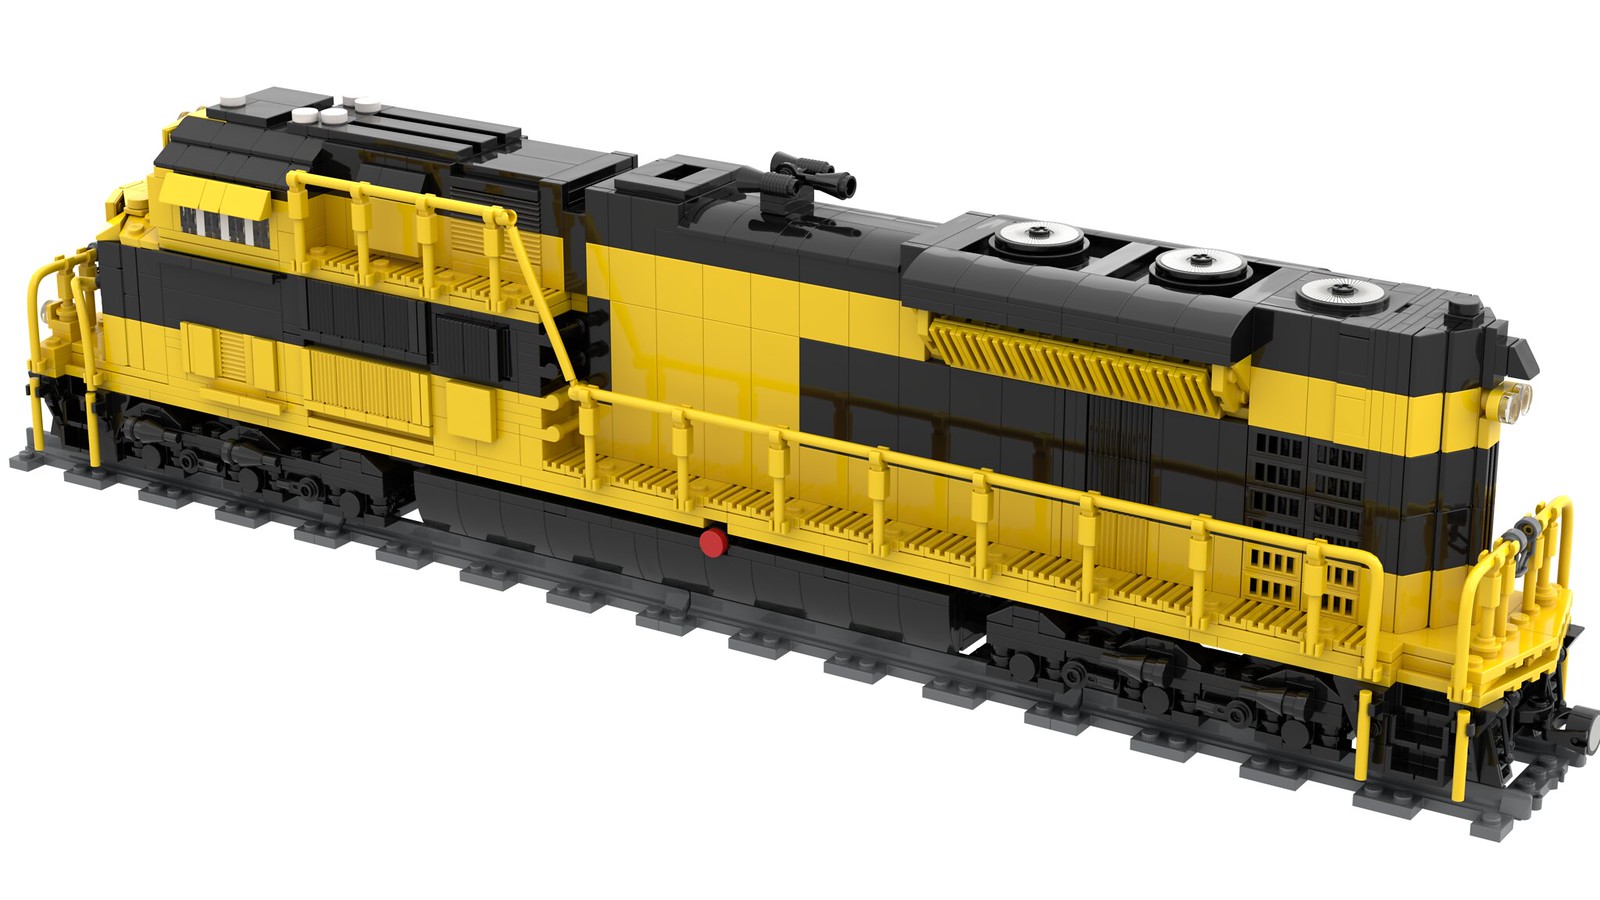
WABASH (will also need larger decals to hide some stuff)
 SD70Ace WABASH by Barduck12, on Flickr
Depending on livery the models have 2200 to 2300 parts in them, are 66 studs long and 37 plates high (from top of rail to top of cabin). Scale used is 1/42 but I had to make 2 compromises as she's actually 1 or 2 studs to short and 1 plate to high. I tried to incorporate as many detail as possible and where possible not go for easy solutions, I wanted her to look complex and I think I did a decent job at that, but what do you guys think?
-
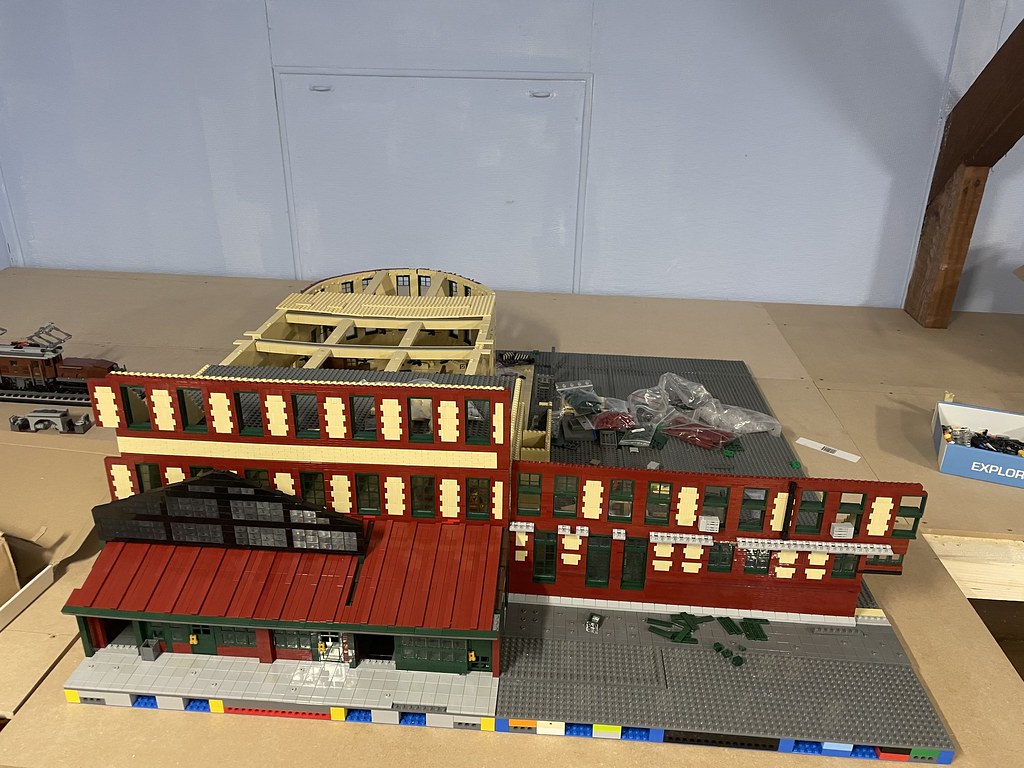
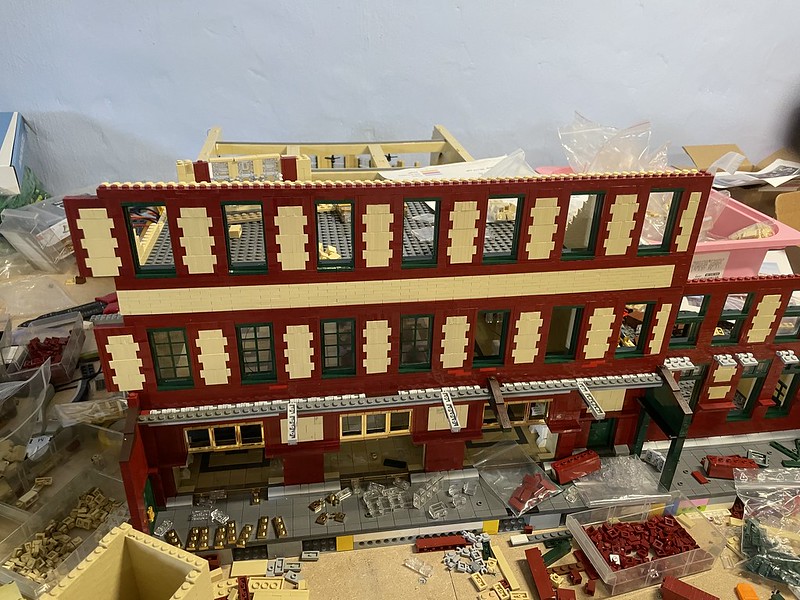
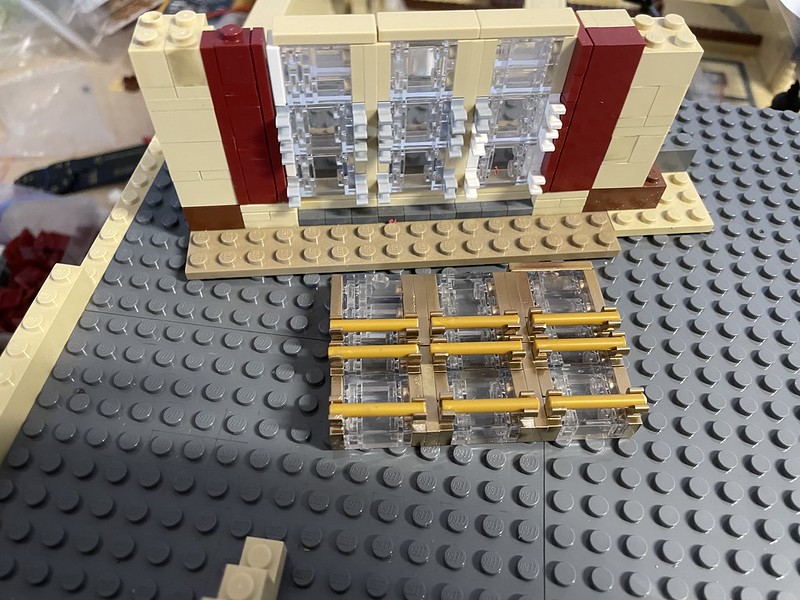
Time to update this. Since last post I've been very busy on this, but I'm still lacking the interior pictures to add all the details needed. So I'm building with that in mind, I can always take parts of it apart to add the details whenever I get pictures. In the following pictures are all the parts I've build so far, it's a constant challenge to get parts needed as I'm going thru bricks in a high tempo (1000 1x2 tan bricks last me like half an hour when I start building). I've connected the lights for the sign that are inside the main hall, those will just need their decals to finish them. I've also redone the outside curved wall of the main hall, noticed that there was to much stress on the bricks and that I made a few mistakes as well. Some parts I have to make compromises as it's impossible to get it just right.


To add these features I had to cheat big time, drilling holes in to the plates to be able to put the minifig hands in.

The slopes were added to get an impression on how this would look, height was ok but I'm going to use 33° slopes instead of these 45° ones as the roof would end up being way to high.

-
Since latest reply in this topic I've added 2 more coaches to her but can't yet take good pictures off those as one is missing a decal (spelling mistake). Took this little consist to our LUG's end of the year event at Antwerp, Belgium where she stood with a small corner I threw together in a hurry:
Once pictures are taken of the latest 2 coaches I will post those. Also gathering parts for the next 2. Once those are finished I still need to build 4 more, all 70 studs long.
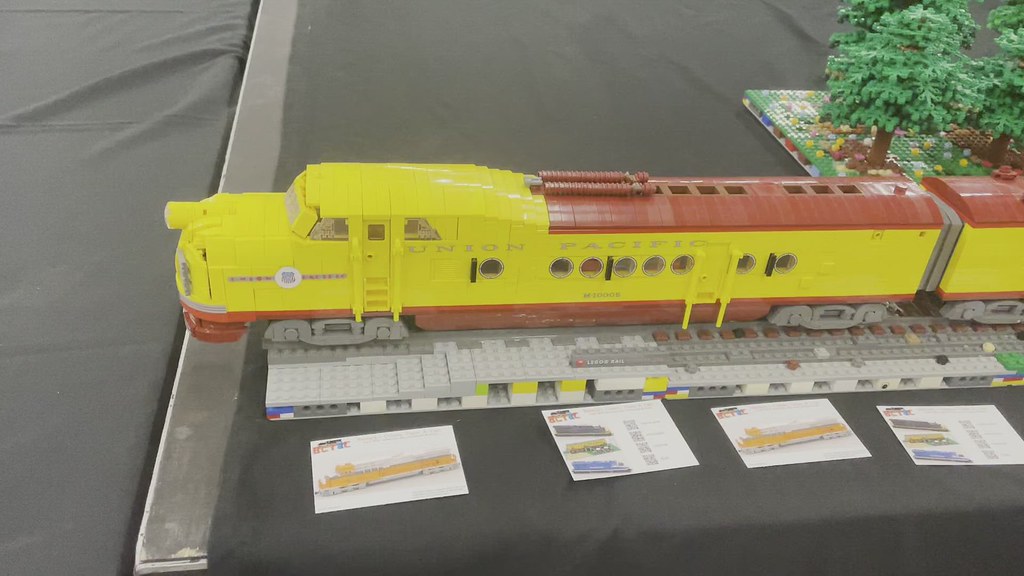
I've licensed her to Letbricks to make sets and made a video of it compared to to my version in LEGO: (admin: please remove if not allowed)
-
My trains are 8 wide, coaches 7. Why? Simply because of weight, 7 wides are slightly lighter than 8's which is beneficial in the end, less weight means longer lasting batteries in the end
-
On 8/12/2022 at 9:20 PM, Barduck said:not that I can think of
actually, entered a digital too, diner coach for the COD consist UP 10303. The others are uploaded, the M10005 "City of Denver" and one of it's coaches "Ogallala". For next year I think I should manage to get the full consist build, already have the decals for it thanks to OKBrickWorks
-
10 hours ago, keeganp1234 said:Hey there,
So I rarely ever go on euro bricks and I completely forgot about the site. I haven't played with legos in a long time. It's probably been damn near 10 years since I've been on this website. I was lurking on here one day and saw this post, and got into my old account. I happen to be living in Portland. If you need specific pictures of something, I might be able to find some time and go down there and just take them for you, considering I'm like 10-15 minutes away.
Anyways, really love the build and was pleasantly surprised to see you settled on the Union Station in my town, living all the way in Belgium! That's awesome.
hey. There's some people that have promised me pictures but so far I haven't received any. Will be contacting everyone next week to see if they managed to get those pictures. School vacation is almost over for the smallest kids so I'll be starting to get more time soon to continue the build (to much of a hassle when they're at home). That doesn't mean I haven't been building in the past month, just very slowly.

Although to be honest, September will have more building time on a corner module with 2 tracks which needs to be ready for Brick Mania Antwerp in November.
-
1 minute ago, BricksMcgee said:Excellent! Anything else?
not that I can think of
-
defo entering my CoD and coaches from it
-
IDK, the LUG I'm in seams more concerned with applying stupid rules (like only using LEGO parts and not 3th party like BT or Trixbrix tracks) than with helping LUGmembers with their projects
-
10 hours ago, Vilhelm22 said:Looking amazing as it continues. Even if not completely realistic, I can’t wait to see your City of Denver compared - are any side by side shots possible right now?
Also, if I’m ever looking for tan 1x2 bricks or dark red 1x2 plates, clearly I know now who to blame….
for the tan 1x2 maybe, the 1x2 dark red plates I've already had over 2 years, got them in a LUGbulk back then.
As for side by side shots with the CoD, not possible at the moment, the table where the station will eventually be standing isn't big enough yet to hold station and tracks together, needs about 60 cm
-
small bit of progress, waiting on parts is slowing the building pace.
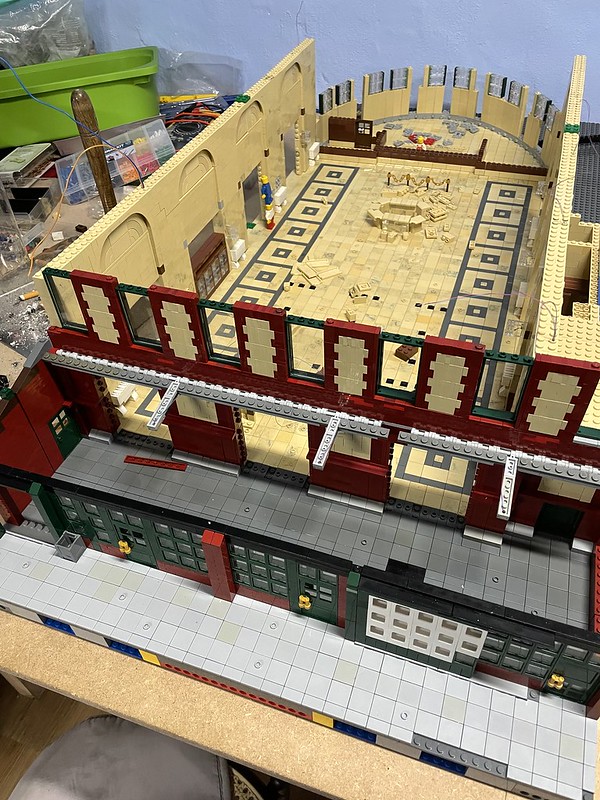
Added the wall (track side) to the second floor of the main hall (this is the third floor overall, main hall is just 2 floor high):
Also did a draft for the doors at going from trackside to main hall, here together with how they'll look with the gold chromed pieces:
Won't be doing much in the vacation months as it's difficult to keep the smallest kid from tampering with everything so won't be added extra updates in July and August. Will use those months to replenish my stockpile of tan bricks and some of the dark red pieces I still need a lot more off. As for dark red 1x2 plates, I'm settled:

Roughly 9 or 10k pieces left, should hold out for the rest of the building (I hope)
-
it's getting crazy

Going through mountains of tan 1x2 bricks in no time, last order had 800 and I'm already out. Still looking good on 1x2 Dark Red plates, got like 8k left, those should last me to near the end of the build (I hope)
-
11 hours ago, Ropefish said:oh my getting close now! I am in all honestly not great with buildings but i do love the simple structure with inverted plates to give texture. though the center of the top frame seems to droop under its weight, i assume its structurally sound aside from visually not looking so?
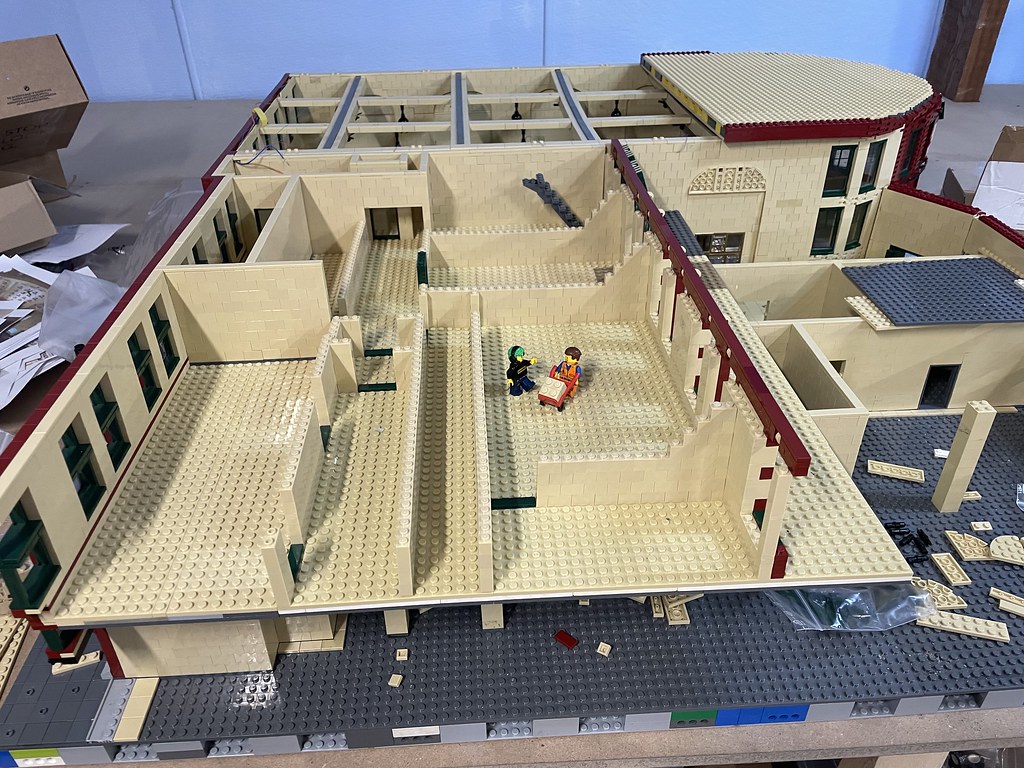
The beams are reinforced but they do drop a bit under their weight. Luckily they are not going to serve as supports for the roof so it should be ok. Building sideways to obtain the pattern in the wall was simple, and why do it difficult if it works just as well the easy way. But not getting close actually, while the main hall may be going in it's detailing phase, there is still more than enough to build. After all this is only 1/5 of the total length of the station.
-
Bit more progress but I'm starting to get to the point where I'm unable to continue without the much needed pictures.
Added the clock at the main hall's trackside exit:
Also, 3 of the 4 benches have been added so the minifig have now a place to rest a bit while the station is being build:
This is where I'm at for the moment, it's taking shape quite nicely. Still need to do the rounded parts of the main hall and then start on the roof plate that will go on this. That roof will also not be easy, specially the round part, don't have a clue at the moment on how to tackle it.
As always, comments, tips, .... all welcome
-
Well, finally I've got a response to one of my mails inquiring for pictures. Someone at Portland's Architectural Heritage Center contacted me. They do not have any pictures themselves but he's is going to pass my mail to some people he knows that are local railroad and Union Station experts in the hope that one of them might be able to assist me. So a bit of good news at last, now to hope that I'll be getting the much needed pictures
-
3 hours ago, zephyr1934 said:Thinking about it more, you have quite the engineering challenge with this build. I have only attempted one or two large buildings (all smaller than this) and I had problems with the opposite walls trying to pull apart, so any sort of beams will probably need to also be structural to keep the walls together, no? Meanwhile, for this build it looked like the inner beams were only held on by a few studs, to which I assumed they were non structural. I'm sure it is all doable, but I bet it needs a little extra thought to find the right solution before building past it. I wonder if simply a sandwich of studs up 2xN plates would be a good solution.
They are not going to be used as support, its more to give the proper look when watching inside. And the roof will come of anyway to show the inside when viewers ask for it.
3 hours ago, zephyr1934 said:Picking the era is important. Probably 1920's-1950's would be similar enough that it would be hard to tell the difference between years from the architecture alone (the number and dress of the people would be the main give away of the specific year, e.g., a lot of service men would suggest WWII. All of the non-public areas of the station would be occupied with railroad related freight rooms, offices, supporting services, etc. There might even be an integrated tower for managing all of the approaches to the station, and/or a power house for generating steam to heat the building. Then late 50's to early 70's would be a run down shadow of the earlier years (you probably don't want to do that)
The modern era, the waiting room might look similar, but where there once were dozens of ticket windows now there is probably a painted wall that might pay homage to the ticketing but the old ticket office is now probably retail or restaurant. Other public areas are probably converted to a food court. While all of the formerly non-public space is probably either retail or offices.
Doing the modern era is potentially a lot easier, you just need to find someone to take pictures of the current. But doing the historic era would be a lot more interesting.
When push comes to shove, I think it is like building a lego train interior, you can't get all of the detail in there at minifig scale, but you can get a really good caricature. In that sense you don't have to be perfect, you just need to get the key elements in roughly the right places. I bet a detailed minifig scale ticket window might be 4 studs wide and you could cheat it to 3 studs if you had to. But there were probably way more ticket windows in the real station than you can fit in the model. So if you put 8 ticket windows where there once were 30, it would still work. Similar ideas with the support spaces. Maybe there were 40-50 offices in the building, but get 5-8 at minifig scale and it works. There would have been baggage and mail handling areas. One or more large departure boards, a station master's office...
Anyway, I hope I'm not being a bother, the station looks fantastic and the interior is already excellently detailed.
You're bringing very valid points. From the few pictures I have recieved I can deduct that the ticketstation is basicly the same as it used to be, but with the Amtrak symbol added. For the rest I'm still facing the same problems. It's already hard to find pictures from others room than the main hall, boarding and waiting rooms in present time, it might be close to impossible to get pictures from other eras. And, you're not being a bother, this interaction is really helpful to go forward and get a sight on where I want to go with this building
-
The height error has been corrected, still need to build the rest until I can put the roof beams back in place.
The 2 minifigs stacked on each other are to get a better view on the height of the door openings, to better compare to pictures I have so I'm sure it is as correct as possible. It does seem to be so.

specially when compared to this picture:
 Portland Union Station by Stones 55, on Flickr
As always, comments, suggestion, and most definitively pictures, all welcome
-
7 minutes ago, zephyr1934 said:You got this far this quickly and it is still a 2 year project? Regardless, it looks amazing (even if the walls are not high enough). Just one observation, in the above photo the cross beams seem to be sagging. I THINK you could strengthen them by changing up the snot. Do studs up in the middle (as you already have) but using brackets on either side, e.g., 1x2 x2x2 up/down. Then on the sides use 2x16 plates with a layer of tiles on top.
What era are you aiming to recreate? I don't know much about this particular station, but I do know that most surviving large stations are now typically mostly shopping malls or similar (there is a former 20+ track station in Cincinnati that is now a museum complex but still has a single platform for Amtrak service, another in Indianapolis that I think still serves Amtrak on a single platform but is mostly a hotel). Whereas, back in the day, the station would have had large sections devoted to waiting rooms, baggage handling, mail handling, railroad administration, etc. etc..
If you are going for present day, according to wikipedia, "The station is owned by the city of Portland and operated by Prosper Portland, the city's urban renewal agency. The city earns $200,000 a year from nearly 30 tenants. Amtrak, the main tenant, has a continuing lease in 2021."
Here's the website of Prosper Portland.
If you are looking for historic station, you might want to contact the fellow behind streamliner memories at trainlover@streamlinermemories.info He is very big on historic Pacific Northwest railroading
Well, I did have the main hall figured out for quite some time, so on this I can work faster. This part is 2 XL MILS that are both 64x64 studs then the entrance for it (track side) is added which is another 16x64 studs. Looking at the photo from what've build, similar XL MILS are added on the left side and two times that on the right side. Those I still need to figure out and it's of those parts I don't have pictures.
Reinforcing the cross beams a bit more might be needed as you've pointed out, I'll have to look in to that. Though using brackets may create to much of an offset for the inner beams (you can see those on the second photo).
Prosper Portland was the first I reached out to but have not have the pleasure of getting a reply to my email.
As for era, I haven't given that much thought really, I'll already be happy if I manage to build this thing. I do have to admit that doing a late 1930's era would be nice as my M10005 would fit with it rather nicely then (although it would have been it's sister train, the "City of Portland", that served the station in it's time). So reaching out to the person you've suggested could help.
-
Got a bit more done:

Still no word on more pictures, not even from PortLUG, Hope someone from that LUG follows this forum and reaches out. Once the main hall is finished I'll be stuck because there's no pictures of the rooms next to it.
Today I did some extra work, added the windows and top wall at the trackside:

It was while doing that that I noticed I made a mistake in the height need of the main hall and that walls and thus also the roof beams that I've already added actually need to go higher. Also the inner parts of the arches need to be higher. So next few days I'll be taking a lot of bricks of those walls to do just that. Might take a whole week to be at the point I need to be.
And yes, you'll notice I've cut the tile, it's the only way to hide the wires for the LEDs
And please, comments, input, ideas, ... all welcome. Still need to figure out how I can do the circular part of the main hall's roof, any ideas on that are most welcome (it is still my first building I'm doing so I'm a rooky on this)


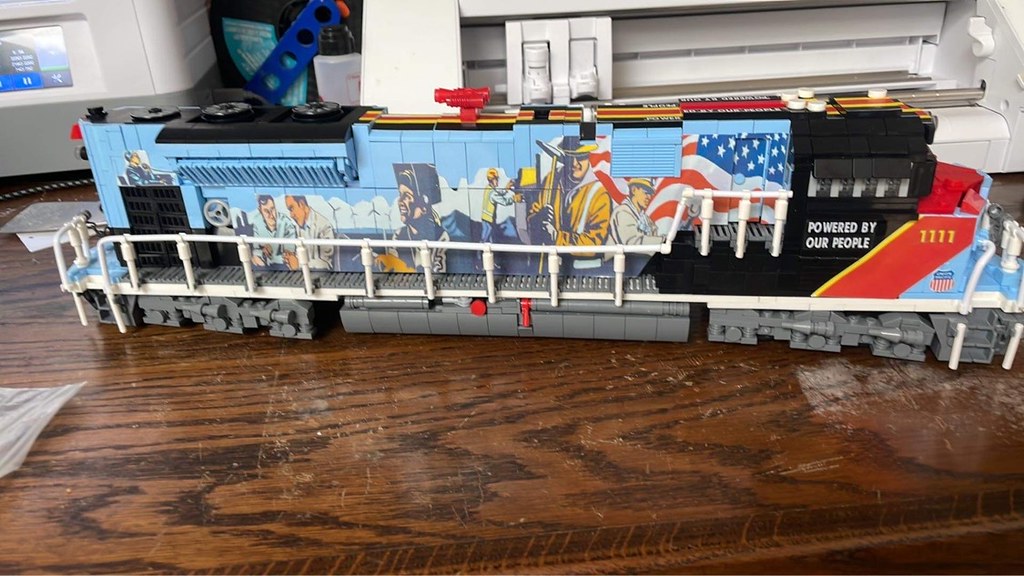
MOC EMD SD70Ace UP 1111 "Powered By Our People"
in LEGO Train Tech
Posted · Edited by Barduck
Introducing the LEGO model inspired by the Union Pacific 1111 "Powered by our People" locomotive, which pays tribute to the employees of Union Pacific in their different roles they assume in the company.
This is actually the model I started designing first when doing my latest SD70Ace line
There are some parts that are not genuine LEGO but from GoBricks, as LEGO doesn't produce those parts in Bright Light Blue (yet). Because of that this model will not be available on Rebrickable but will be produced as a set by GoBricks exclusively.
I've done the decals myself, it was near to impossible to find decent pictures of the graphics that were usable so I ended up ordering a decal set for a G-scale model and shrunk and adapted them to fit the model.
As is noticeable in the pictures, the dynamic brake intake is completely see-through, achieved with the Slope 18 2 x 1 x 2/3 with Grille.
Even the cabin door and access door to the inside of the train was added.
Battery cover can be taken off to provide easy access to the Buwizz hub which is used to powered the two train motors.