

afol1969
-
Content Count
397 -
Joined
-
Last visited
Posts posted by afol1969
-
-
Just following up on Mobruu's question....is there a parts list for Afol's extended boom. I'm having a hard time finding and ensuring i've accurately got all the correct part numbers from the AFOL's boom instructions based solely on the pictures. Any help would be *greatly* appreciated.
Steph
As making instructions take a lot of work/time, I do not spend extra work on creating a .bsx file. The part list in the instructions should be accurate, and I think it must be easy enough to find out from the pictures which parts you have/you don't have. I never had problems to find out what additional parts I have to buy.
Greetings
Alex
-
You could try to replace the part with 10247, that's a newer mold.
As a bonus, the image of it makes it easier to distinguish between the single and the double bearing plate (or between single- and a plate with no bearing holes at all...)
That 10247 is shown in the same angle, so no chance. I modified the angle to 180° from the 2444, saved to 2444b.dat and now it's shown with the hole on upper side

I'll include it in the instructions update.
Greetings
Alex
-
What am I doing wrong here?
These gears collide:
Does it collide with the 1x3 cross block? If so, I had the same problem. But there isn't any solution, I've already tried to eliminate the problem. But with moving/pressing axles and gears you can at least solve it, that the gear only collide very little that has no influence by driving. Or you go there and cut some material from the cross block.
@stephpar: to be sure, make a print screen and show me which piece it is. But myself I noticed that the 2x2 plate with hole (2444) is shown like a simple 2x2 plate... and I haven't found how to show it visible like the right part
See here:
Greetings
Alex
-
This one?
http://www.bricklink...tem.asp?P=44809
One question to your part list in your pdf. Till now i didn't find an answer.Is this the whole part list?
Yes, it's the complete partlist.
Greetings
Alex
-
Thanks again, superb work. Does this mean that it is ready to be published on rebrickable or will that have to wait for the definitive version?
It is the definitive build Version, so it can be uploaded on Rebrickable, all part lists should be correct. Notice that I had to make separate part lists because of the amount of parts. I know most of you better like it to have a complete list in .bsx format. To do this requires additional work, and after a monster project like this I had no more nerve to do it.
The final version of instructions will just have additional notes and photos. I'll publish it at the end of the month.
Greetings
Alex
-
Hi,
I've now finally finished the LPUB instructions, all pictures are in 300dpi, and I've created a pdf file: http://www.bricksafe...GMK6400_1.2.pdf
Update:
The instructions are in two parts: carrier and superstructure.
The instructions for a 4-channel RC-Unit you can download here: http://www.bricksafe...ons/RC_Unit.pdf
Greetings
Alex
-
Hello Madoca,
I am extremely impressed with your creation.
Are you able to provide instruction just you suggested? Is it ready??
Hi tedson99,
Some time ago I made the instructions for the Wing Truck. See here:
http://www.bricksafe.com/files/afol1969/Instructions/Wing%20Body%20Truck.pdf
Another instructions for several creations you find in this thread:
http://www.eurobricks.com/forum/index.php?showtopic=92669
Greetings
Alex
-
it was possible to change the internal gearing to make the actuator slower and more powerful. They sent him a set of gears to make this conversion (which worked great) and also indicated that they'd be happy to make the swap at the factory for anyone who asked for it. You can read a bit about it here. I would guess that you will want the lower gearing for this application since this boom is even heavier than the one on the AC-50.
Ok, as the order is already on the shipping way, so I'll first test the actuator. If needed, I'll order the gear set later.
Greetings
Alex
-
I hope you remembered to ask them to put the lower speed gearing in it. If not, you can still make the change yourself.
A lower gearing? No, I haven't asked them, I didn't know there's a lower gearing necessary. And if it can be made by d.i.y. is there any description how to do?
However the big change will be that the Firgelli has an integral motor. This means that the L motor used for luffing the boom right now can be taken out, along with all its gearing. The problem with this is that the motor is used as part of the superstructure structure so it cannot be easily removed. This is one of the reasons I am leaning towards Efferman's actuator. Besides looking more scale, I'm hoping I can rig it to use the existing motor.The fact is, that by luffing the heavy boom makes some gear creaking, and with the Firgelli has the advantage that there are no gears needed. What I'll do with the motor, I don't know. If it's needed for the superstructure stability, I'll don't take it out. Or if so, I must redesign the superstructure. And in this case it needs new superstructure instructions. The LDRAW File for the actuator from Philippe Hurbain I've already downloaded.
Greetings
Alex
-
One more noob question , how many Firgelli actuator does we need ? 1 or 2 ?
I think one will do the job.
-
Good share good share , I'm still waiting the rest of the 40% remaining parts to arrived at my doorstep . Do you mind sharing which model of the Firgelli you have order and the links to the store ? Thanks
See here: http://store.firgell...l12-ev3-100.htm
and the NXT to PF Cable: http://store.firgell...able_nxt_pf.htm
Greetings
Alex
-
Finally I decided to order a Firgelli actuator. If I've got it, I'll build it in the crane and test it. Later I can add an extra modification instruction to the instructions.
Greetings
Alex
-
Hi Lucio, keep up your work

Making the PF wires with LSynth is a challenge, and until know I haven't the patience to do it. So I just make text notes, which connector does belong to where.

Greetings
Alex
-
I made your Pick-Up Truck by using mlcad^^ It's really great^^ Thanks.
Send it to blakbird that he can make some renders.
Greetings
Alex
-
The instruction PDF file is available now:
http://www.bricksafe.com/files/afol1969/Instructions/Offroad%20Pick-Up.pdf
Greetings
Alex
-
Hi all,
indeed the problem with too short actuators turns around in my head. I've already thought to buy an Firgelli actuator (the long one). The actuators from efferman seem to be suitable too. But I know that there are some Lego purists here who only want to have 100% Lego. IMHO, why not use parts if they are Lego compatible? As I know, the Firgelli is used in Jennifer Clarks' Demag-AC50, and I must say, it looks very good.
At first I concentrate to finish the instructions that I can publish them. If anybody has found a good solution concerning the boom lifting, with Lego or non-Lego parts, whatever, I can make an instruction update.
Greetings
Alex
-
Hi all,
I've now finished to build the crane, and I can now document the build process.
There were moderate modifications to do, because there were some discrepancies where I wasn't happy with it.
At first it needs lot more counterweight, to have an adequate balance while the boom fully extended. I used a second battery box, but filled with batteries it doesn't give enough weight.
So I used steel balls:

it didn't need too much modification to the box, I only had to cut out a bit of plastic, it's still possible to put batteries in.
I've given some design to the counterweight:

Now the boom. I wasn't happy with the fact that the second section hangs over if fully extended as shown in the picture:

I've seen it needed more reinforcement, I used a second worm gear an an 8tooth gear. It wasn't easy to make the construction that it had enough stability without design loss. It needed some more tries, but finally I had it.
See here:

And here the boom fully extended. You see that the boom is more straight now.

My 9-year old son is amazed about the size of the crane

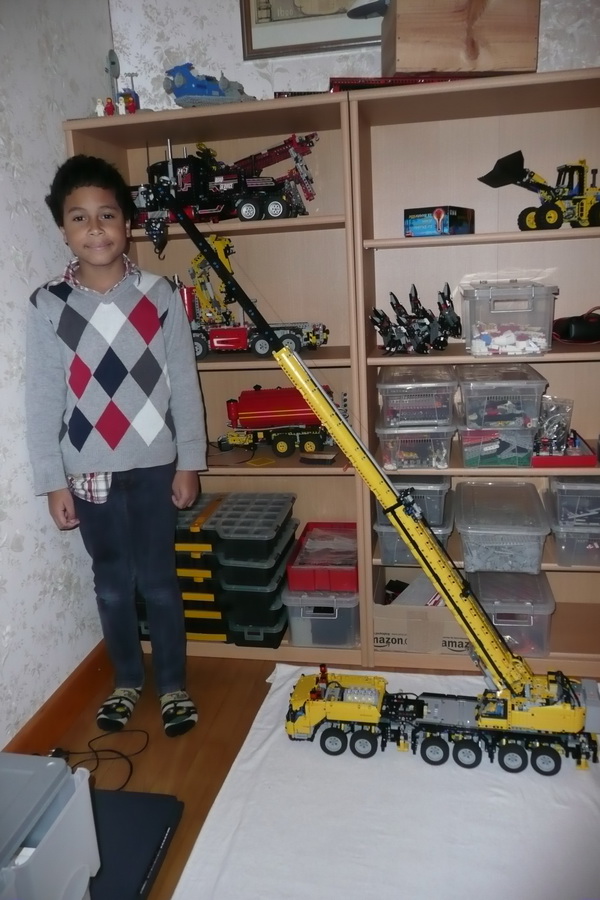
And the crane with boom retracted:

Notice that the counterweight is rather heavy, you can see it give some pressure on the rear axles resp the suspensions. But with less weight, the superstructure hangs too much over. I think I've found a good compromise.
But I think that the two actuators (or motors) are too weak to lift up the heavy boom, sometimes the gears are crunching. Indeed a Firgelli actuator should be a better solution.
The boom and counterweight modification I'll add to the instructions.
Greetings
Alex
-
Madoca, you should work for LEGO!
You're so talented, you have my full respect
All your creations are really well-designed and amazing in perfection
I'll download soon the photo instructions and upload a complete PDF file, hoping that blakbird will make some beautiful renders which I can add.
No need to make real instructions, your photo sequences are well enough to build your MOC's
Greetings
Alex
-
I suppose you meant better instructions? I am very sorry, but I think that I should concentrate on designing new MOCs.
Thanks sheo, that's I only want to know, and as you're a talented MOC'er, of course you should designing them - and present them us. We're looking forward to your next creations.
So I'll ask blakbird for the CAD file.
Greetings
Alex
-
Hi, Sheo,
Any news about instructions/CAD file for the superstructure and boom?
Greetings
Alex
-
Hi, Great job so far
Is the part list already available???Blakbird has a complete part list in his last draft4 instructions. But I think we never can have a definitive part list for the crane. Because myself, after building it, changed some few parts, so the part list may be minimal different.
At the moment I've more or less finished the superstructure too, I've to mount it and see how much more counterweight it needs. Instructions are on work, an I think that I can publish the complete instructions next month.
Greetings
Alex
-
The parts list is incorrect, as he stated earlier

I've got a more or less part list, by adding LPUB PART IGN commands for parts/submodels, But there was still a difference from two parts where I don't know how the error is produced. So I made a copy from the CAD file where I simply deleted all the Ghosts and Buffer Exchange commands, and I finally got an exact part list. Now I can make the carrier instruction, I'll publish them in next days
Greetings
Alex
-
From what I have heard, the part length reporting function of LPub is hard coded so you can't modify it.
I agree that 300 dpi is well worth the extra file size. It looks so much better. Anything more than that is diminishing returns though.
OK, I've now finished the instructions for the carrier, I've exported the pictures with 300 dpi.
But there's a new problem: While creating the BOM, it shows a complete wrong part count, a lot of parts are shown double or more. I think it has to do with ghosts/submodels, but I'm not common enough with LDRAW to where I've made errors. In the assemblies the part lists are shown correctly. So I do not know whats the issue. Clearing LPUB cache didn't help.
Bricksafe seems to be down, and my dropbox makes problems, so I cannot upload the CAD file now. If someone wants to have a look, please send PM.
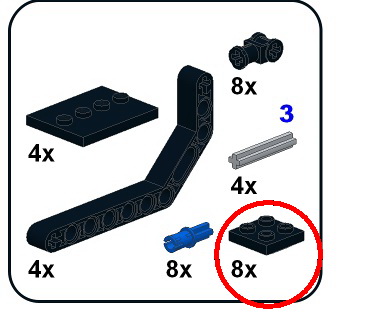
Here is the BOM picture:

Greetings
Alex
-
Hi again.
I finally completed this also in LDD, and made some improvements along the way. The functions and overall design remained the same, though.
Here's the LXF file. I designed it so that you only need to build the main module and recycle/build from official instructions the cab, boom, outriggers, and side panels. (Although you need to flip one 3x5 beam in each of the side panels.) I used the 42008 LXF file I found in the EB LDD forum for those.
Unfortunately I couldn't reproduce the tubing or wiring in LDD, but it shouldn't be too difficult to figure out. Also, all pneumatic cylinders and pumps are replaced with yellow beams. :-)
Very cool job, well done!
I think it isn't too difficult to reproduce the model with LDRAW. A tracing of the wires with a picture program or more photos will be helpful

We had so many MOC's with PF, so it's fine too see something with full pneumatic functions.
Greetings
Alex
[HELP] From LXF to Stepped Instructions
in Digital LEGO: Tools, Techniques, and Projects
Posted
Short answer: I know, why I prefer LDRAW files to step a model....and create instructions
I made the extended 42009 boom from an LFX file - it was a challenge to find the right steps and creating submodels.
Greetings
Alex