

dmarkng
-
Content Count
123 -
Joined
-
Last visited
Posts posted by dmarkng
-
-
Decided to change the exterior a bit and got my parts on hold on bl as its just a few pieces.
But do have it rendered:


Pretty happy with how it turned out, on to the next project =)
-
Ahh okay.
The 1st picture, it can't be seen.
I'll have to build a stand so it can be more easily seen from the front.
I do have space at the bridge and 2 fuselage for a stand to fit in but I just haven't built it yet. A tad short on technic bricks at the moment too.
-
3 minutes ago, gotoAndLego said:You're missing the bombing chute and targeting sensors.
If you look at the 2nd picture its there, though perhaps not so clear.
1 hour ago, kingodacheez said:This looks great!
Being exactly accurate to canon (down to the tiniest greeble) isn't that important, unless the model is supposed to be a UCS representation.
As long as the builder is satisfied with the efforts and result: that is what its all about.
I like to think that the Empire is really vast. Mission-specific modifications to vehicles and equipment are necessary to adapt for changing requirements in most armies.
Really good work, dmarkng!
Thank you =)
-
Okay, been awhile.
Redid the Pylons and Wing connection.
Sticking to my initial option for the cockpit/windscreen although it doesn't completely cover the whole fuselage, I think I'll accept this as it looks better to me at least =p
Took a couple of pictures before I removed the wings again so I could rework the stand and touch up the 2nd fuselage.
There's an interior which I forgot to take pictures of =s, enough space for a seat and console.
But I've been so busy I think I'll rework some of it after Christmas.


-
Really like it.
It's a bigger playable version.
Looks like its about double TLG's walker piece count?
-
Looks great so far.
How are the levels holding up under the weight? Any warping?
-
Yup... they don't really bother.
You can easily find pirated goods too and they aren't really bothered by it.
Even Amazon has stuff like that =/
-
Reported the seller.
He's sold quite a few of the nebulon b instructions too.
-
Hey mate, don't want to offend you, but perhaps you should reconsider quoting people from a post over a year old.
Just my 2 cents, not intending to offend you.
Cheers =)
-
I had a very initial design using a 10x10 trans-clear dish, and a 6 x 6 behind it as seen below.
The 8x8 tie-printed dish isn't a cheap piece to come by, I had to trade some other parts with a friend for it from the UCS Tie Fighter.

For the Pylons, I did like 3 variations, still subject to change, ran out of some of the wedge plates. One is something like this (incomplete):

-
1 hour ago, Fuppylodders said:I think what you appear to be missing with regards to the cockpit/screen area, is that its actually not the same as a typical TIE. The screen is almost the same diameter as the round fuselage behind it, itself. The majority of pictures show this, but a few certain perspectives make it appear like the screen is quite smaller. That is just due to the perspective, as the fuselage that the cockpit glass is connected to is quite bulbous and protruding from the connecting block (or whatever it is called, that connects the 2 fuselages together). That's where my issue arises with regards to it.
Totally understand where you're coming from.
Perhaps I'll use a 10x10 trans-clear dish.
Other than that, the only way would be to make the entire build smaller to fit the 8x8 dish with tie prints.
-
Both the hulls and the rear. Was building up just the internal structure to see how it would hold.
Feels very stable now, so I'll probably do details after I find a way to get a stand supporting both hulls and the bridge.


-
8 hours ago, ProvenceTristram said:I actually really like the cockpit itself.
This was the alternate for the cockpit.
They don't make the part #87559 - Brick, Round Corner 6 x 6 x 2 in LBG, but it was a preferred piece even in the silver.
 4 hours ago, strider117 said:
Most impressive. Might this be to scale with the UCS TIE?
Yea, it is.
-
Thanks for the replies.
yea I have not done any detailing yet to be honest. Just put pieces over to see if it will hold up before any detailing.
had some issues with connecting the hulls adequately. But before I proceed with the build, I wanted to get some thoughts on a stand and if there is anyway to have a stand for a rounded base.
for the cockpit I had a different look done previously but am keen on seeing how I can use this particular brick for it. Still a lot of work to be done.
-
My 2nd Star Wars MOC after doing Rey's Speeder.
Just having some issues now thinking how to create a stand.
I did intend to have a stand placed below the bridge connecting the 2 hulls. But it seems now that it would be way too heavy and am afraid it will eventually give way when I do complete this.
Aside from having a flat bed supporting the rear of the 2 hulls, wondering if any one has better suggestions.
1st picture is the underside of 1 hull, 2nd is a view from the front. Have yet to complete it tho =s


-
Does any one have a good source for the sticker info?
Not sure if the info I used is as accurate or detailed as it could be.
-
Sweet =)
-
Cheers.
Changed the base plate.


Top :

Underside which I grabbed the set and held with my hand:

-
Is there a limit on the pictures I post till I hit a certain number of post count?
-
Hey,
Sorry for the slow response.
Had a busy weekend, and I decided to change the base plate and strengthen it so the build doesnt topple over.
I'll put up some pics of the underside, back, top view.
I grabbed the set and flipped it to have the top view, also to show it is strong enough to be moved around and shook and still be held in 1 piece.
Cheers
-
I took it down from my shelf for awhile to change the sticker plague onto plates instead of bricks and my dog hit the table it was on.. so now I have to fix it back =s.... and its midnight where I am.
I'll try and get more pictures up tomorrow on a better camera.
-
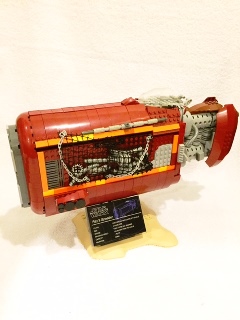
1st time posting here =)
1st attempt at a MOC vehicle too, different feel for me vs. buildings.
Added: Updated pics =)
3 years after the 1st iteration, its gone through multiple changes. This is my 12th or 13th change to the model. Its almost a whole new MOC.
I've redone the entire frame to support an interior 'engine work'.
Now sits at ~1500+ bricks
As with all my stuff, I do my best to exclude any rare bricks. No modded bricks or painted bricks, all parts currently exist =)
I've put in more than 4 weeks of time to make a manual, and am ALMOST there =p will update here.More on my IG
[WIP][MOC] Tie Bomber
in LEGO Star Wars
Posted · Edited by dmarkng
Thank you!
I'm redoing the top of the cockpit (just a bit), hoping to finish it soon when I have more time and then I'll post the pictures.