

nuno2500
-
Content Count
27 -
Joined
-
Last visited
Posts posted by nuno2500
-
-
Eureka :) Eureka :) Thanks for all the help. I found a very easy way to do it. Just have so set up "trigger cooldown" on Hub Editor, higher than the time that take to get na unwanted sensor event.
Here is my code (trigger cooldown=20000):
if(Hub[0].GetSpeed("A")>0)
{Hub[0].Stop("A");
Wait(15000);
Hub[0].SetMotorSpeed("A",-75);}
else if(Hub[0].GetSpeed("A")<0)
{Hub[0].Stop("A");
Wait(15000);
Hub[0].SetMotorSpeed("A",75);}
-
On 12/3/2019 at 10:48 AM, Lok24 said:Hi,
invert a second motor regarding the first?
Hub[0]. setmotorspeed("B", Hub[0]. getspeed("A")*-1)
"invert" relative to - what?
Hello Lok24. Thanks again for your patience :) I need to do this: stop (or wait) a train motor and reverse the motor. There is the "INVERT" option but does not stops before invert the motion (motor). It is a straight and single railroad so i need to go and go back but i want the train to stop at the trainstations on both ends. I have only one motor.
-
12 minutes ago, Nivst said:Take a loot at the help menu, there's at least a partial list there.
Yes, i have been reading those topics but i can´t find an invert motor command :(
-
6 hours ago, Lok24 said:Hi @nuno2500,
sorry, my fault....
use:
Hub[0].SetLEDColor(Port.Colors.BLUE);
Hub[1].SetLEDColor(Port.Colors.LBLUE);
And here are the colors:
Thank you so much. That is great. Is there any list of all the BAP commands. I call command to something like: "Hub[0].Stop("A);". I need to Invert motors using "Edit Code". Thanks once again.
-
On 12/1/2019 at 8:59 AM, Lok24 said:Change LED
char-write-cmd 0x0e 0800813200510004
The last two digits (04) are the desired color
Soory, i dont know where to put that. I was looking for something like: Hub[0].setLED (2); but thanks anyway.
-
Hello everyone. Does anyone knows a comand to change LED color in the HUB? Not "configure" but a comand. Thanks.
-
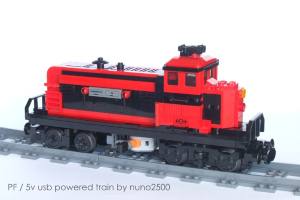
Jim, i used the 8869 - Power Functions Control Switch only. I don´t know ir the IR works with only 5V. After almost 2 hours i turn the power off...i have been testing it for a week and without recharge. 6x AAA battery= 800 mAh. This powerbank= 2200 mAh. The design is not from a real train...just a bit of this and that from memory ;)
I am working on an auto-stop mechanism placed on the track that counts laps and stops the train like in the 4,5V days.
Best Regards,
Nuno
-
A MOC powerer by an USB power bank (2200 mAh). Running at 5v it goes half speed with a DIY usb to PF adapter. Can be charged with a mobile phone charger. A good solution for events ;)

-
Yes, it an idea. The door still goes out but not with the mechanism:

-
Proposal to motorize the 79111. The target was the minimum design change. The space is narrow but after the LDD, fits. Can't wait to take the test in real bricks.
For pics and LDD file, please check my LUG:
http://comunidade093...ic,12805.0.html

-
Here is a test video for the inclination angle:
https://docs.google.com/open?id=0B7C892t9hJAnU0NHZVdWRngwVFU
-
Hello! I have made an update to my 8081 MOD. Now is so much stronger and gears can deal with XL motor power.
You can see it here: CLICK
-
Yes if you want but the true is that the brick modifid 1x1 with stud on one side was not available in the software.I noticed in the first post the picture showed a 1x1 brick with 2 studs on sides. When mounted, it leaves a stud on "front" of the lamp. Maybe some decorative element?
The heat is so low that you normally do not need to think about it. It is just the brightest and largest LED that are giving of some significant amount of heat.
No, there is no problem, even with high bright leds (3 mm)
-
Here i share my mod of 8081. It is very easy to do and change almost nothing in the original model:
http://www.youtube.com/watch?v=iiHWOqSo8jg
More details on my LUG here: CLICK
-
Here is my humble contribution: a field of poppies:

LDD file: http://www.brickshelf.com/gallery/nuno2500/Mocs/poppies/poppies.lxf
-
-
Here is my tutorial to repair a PF M motor that no loger works.
Check it here, on my lug forum:
http://comunidade0937.com/forum/index.php/topic,10389.0.html
I think you have to copy/paste the link

I cant make it work
----------------------------------------
Here is the link, now it works:
-
Wonder if ME Models or Big Ben Bricks (or anyone else) will be able to produce some kind of wheel system that will enable live power pick-up from metal tracks without having to break into a 9v motor? I've no criticism of anyone going that route if it suits them, but it does lack the flexibility of a more bespoke approach.
Hi! You can make this mod with the 9V motor inside too. A power pick up boogie it´s "easy" to do. Maybe ME is listening

-
Very small, great work! Thanks a lot for sharing your solution!
Ditto, this is pretty much as essential feature if you ask me

Thanks
-
Nice one! But, you should include a resistor.
The voltage of a Yellow LED : 2.10 < ΔV < 2.18
Ohms law says you then need a resistor of 47 ohms when applying 3 volt (2x 1,5V) to it.
It depends on the LED. Those work near 3 v (2.8). Sometimes i used 2 AA rechargeable batteries supplying 2.8 v.
Any way, my leds have been working 10-12 hours under 3V with no problems.
-
All of the lighting designs and implementations are very impressive; and I hope you don't mind me appropriating a few of the ideas.
I've been ogling the eLite sets as base units. However I did wire up my GE sign with 3 yellow SMDs.
Thanks.
I´m here to share ;)
Thanks to everyone.
I´m here to share ;)
That is pretty friggin' awesome.
How much would that cost to do for maybe ten lamps?
Hi. 0.8 € each. Brighter leds are more expensive and last less time.
This is very helpful - I have been thinking about this topic. Is there an on/off switch here though? Or do you pull the batteries to turn them off? Is there a way to string together multiple lights to one power supply (battery box)?
Thanks!
Hi. There are some small switches on electronics stores that fit right into the 2x1 Technic brick hole or into a 1x1 headlight brick.
In my photo, all light are conected to only one power supply on corner building, like this:
In each modular thera are 2 wires that receive power and 2 wires that send power to the next modular. They are not welded too. Conected by hand only.
Sorry for my poor english :(
Nice modification. This requires no soldering and no modification of any bricks. Well done!
But I'm recomending using a Warm White color, it looks much more realistic.
I have also used LED's in my buildings. Look at this thread about it: http://www.eurobricks.com/forum/index.php?showtopic=47675
And as you see I started of by modify my street lamp posts.
Now I have even tried using a strip of SMD LED inside the buildings. That gives a realy nice effect of interior lightning:

Sorry, I have no images of how I mounted the LED strip inside the building yet, but it is self adhesive and easy to stick to any wall or ceiling. You will find more information about it here.
Thanks for your tips.
Great work on this simple light mod. This tutorial makes it look so easy. I may give it a go. I assume the components are from a hobby store?
Thanks.
Yes, they are very easy to find at an electronics store.
-
The Lamp:

How to:
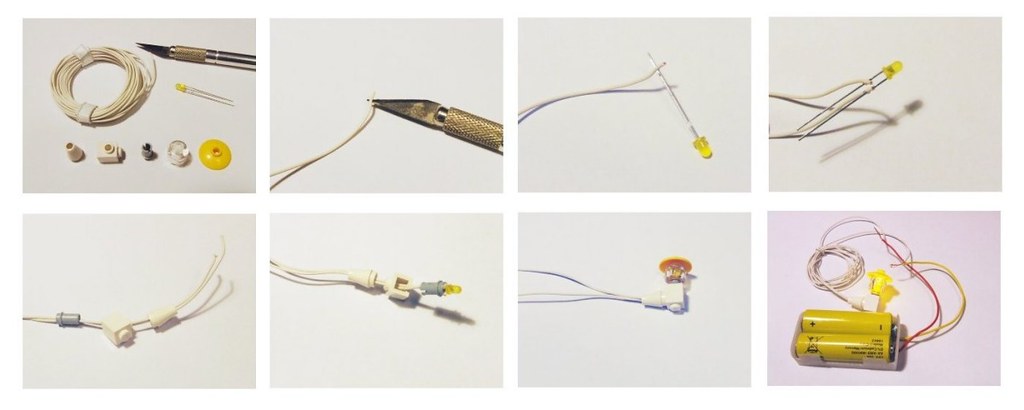
1 - Material: stranded wire / led 3mm yellow / utility knife / Parts LEGO
2 - With a utility knife, a sharp one, stick the wire in half as possible leaving a space between the hole and the tip of the wire.
3 - Insert a terminal of the LED into the hole so it does not come off lose.
4 - Insert the other end the same way. Check polarity.
5 - Pass the other ends of the wires up through the pieces of the lamp.
6 - Carefully put the LED inside the PIN TECHNIC.
7 - Assemble all of the candle.
8 - Use a holder for two AA 1.5 V and connect the wires to the led to the polarity. With this supply voltage (3V) you can check polarity by trial and error. Connecting the two wires, if it fails is because the polarity is reversed and just switch one wire to each other.
My street:
The power flows in parallel from building to building.

-
I was there 2 as a member of 0937 LUG. It was a great weekend with lots of positive feedback from audience and our partner.
-
[MOD] 42124 Off-Road Buggy goes faster
in LEGO Technic, Mindstorms, Model Team and Scale Modeling
Posted · Edited by nuno2500
Faster LEGO 42124 Off-Road Buggy.
MOD: Get 47% more speed by changing gear ratio from 1,128 to 1,66.
VIDEO LINK: