

DarthTwoShedsJackson
-
Content Count
336 -
Joined
-
Last visited
Posts posted by DarthTwoShedsJackson
-
-
This is brilliant - now you need to do the other two movies in the trilogy, too!
-
How do you enter this escape pod from inside the ship?
-
17 hours ago, rocky100370 said:Greetings all. Just started my falcon build. Question for you all.......Is it better to build whole falcon and then go back and build the mods or do mods while building?
Thanks all for your help!!
Depends on what kind of MODs you intent to do. I for one knew right from the start that I'd basically MOC huge elements like the plating, most details like on the side trenches, the mandibles and so on, so I implemented my MODs during the building process, which therefore took significantly longer. If you only want to implement small an local improvements, then you could built it as per instructions first and then go back.
-
9 hours ago, TheCreatorr said:Finally, all parts arrived and I stand ready to start building my Tantive IV Diorama ;D

Looking forward to!
-
Mature would be to NOT delete what he said before, but concede that he might have been wrong here and there and changed his mind in the light of better arguments. That'd be commendable.
-
I really dig this - I'd love to see this built with some appropriate Star Wars Minifigs in it PLUS a Minifig filming crew on the outside!
-
Amazing models - the MC80 takes the cake in my opinion, and I also like the CR90s and the Pelta-Class!
-
Thanx a lot, guys! I plan to make more photos in the upcoming days.
19 hours ago, ptrg said:I’d love to see instructions or a few breakdowns how you did this.. looks incredible, the circular shape is perfection.
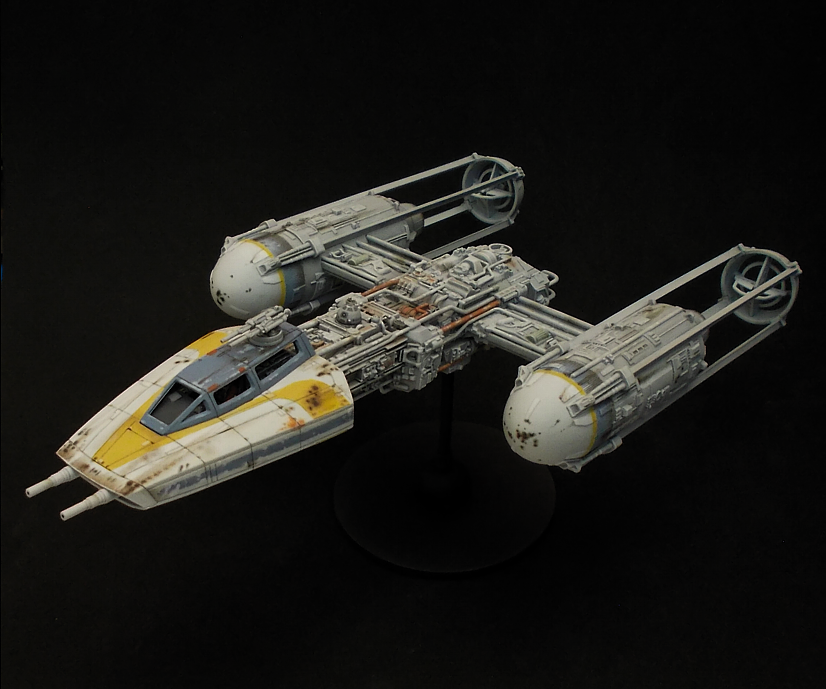
Creating instructions is both time-consuming and something I have no experience with. I have other time-consuming hobbies, like actually building, modifying and painting Star Wars model kits to look as close to the original studio models as possible, like Red 2 and Gold Leader which I built and painted last year:
Spoiler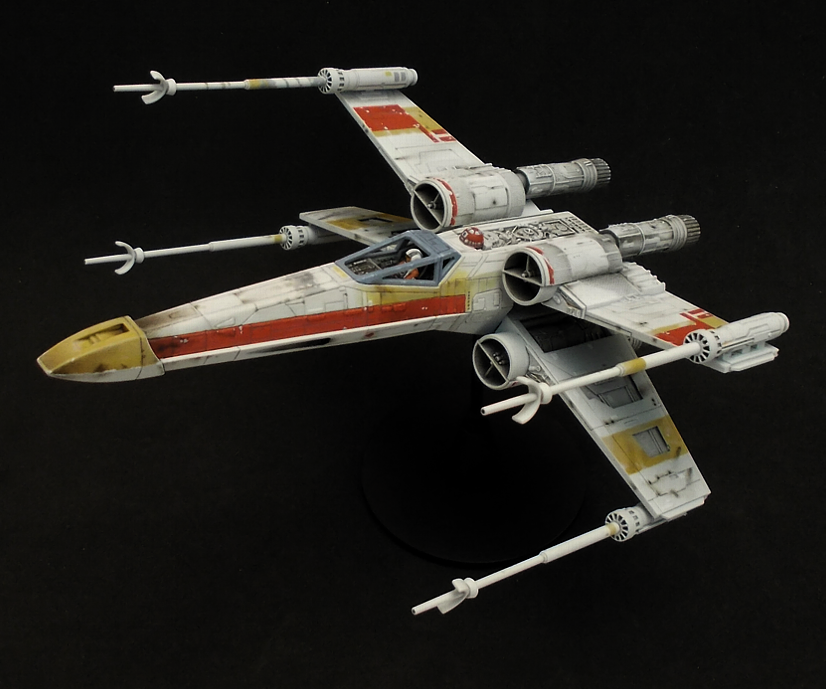
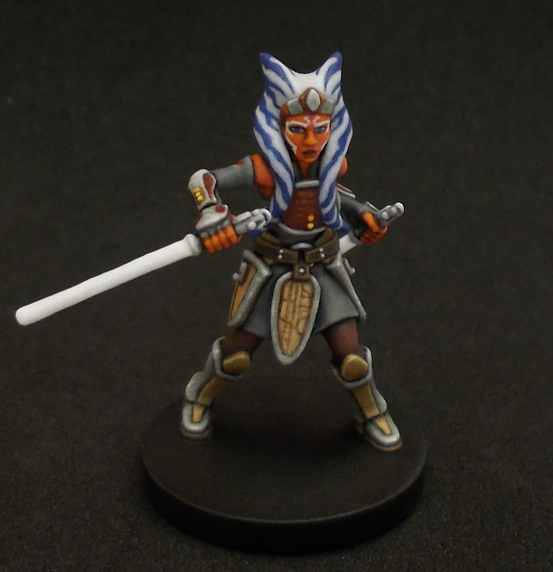
Or painting Star Wars Miniatures for tabletop gaming:
Spoiler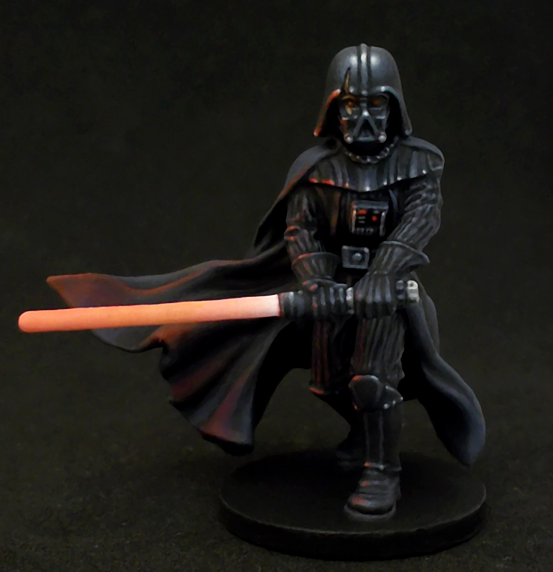
So that you get an idea why I don't want to make instructions.
That being said, I can post photos breaking down the various elements to give you an idea how I arrived at the shapes so far.
I will definitely make more photos of my Falcon and post them here. I will also continue tinkering with it.
1 hour ago, ScottishDave said:This looks great. So much better than the stock version. My favourite bit is the front half of the saucer - I think you did an excellent job there. The blast damage near the dish looks great!
Thanx, ScottishDave - I'm familiar with your exhaustive work on the original UCS Falcon, and your praise means quite a lot to me.
23 minutes ago, stifos said:I‘d love to see how you connected the new hull to the structure.
great workJust watch this space - I will grant a look under the skirt.
-
Hello there!
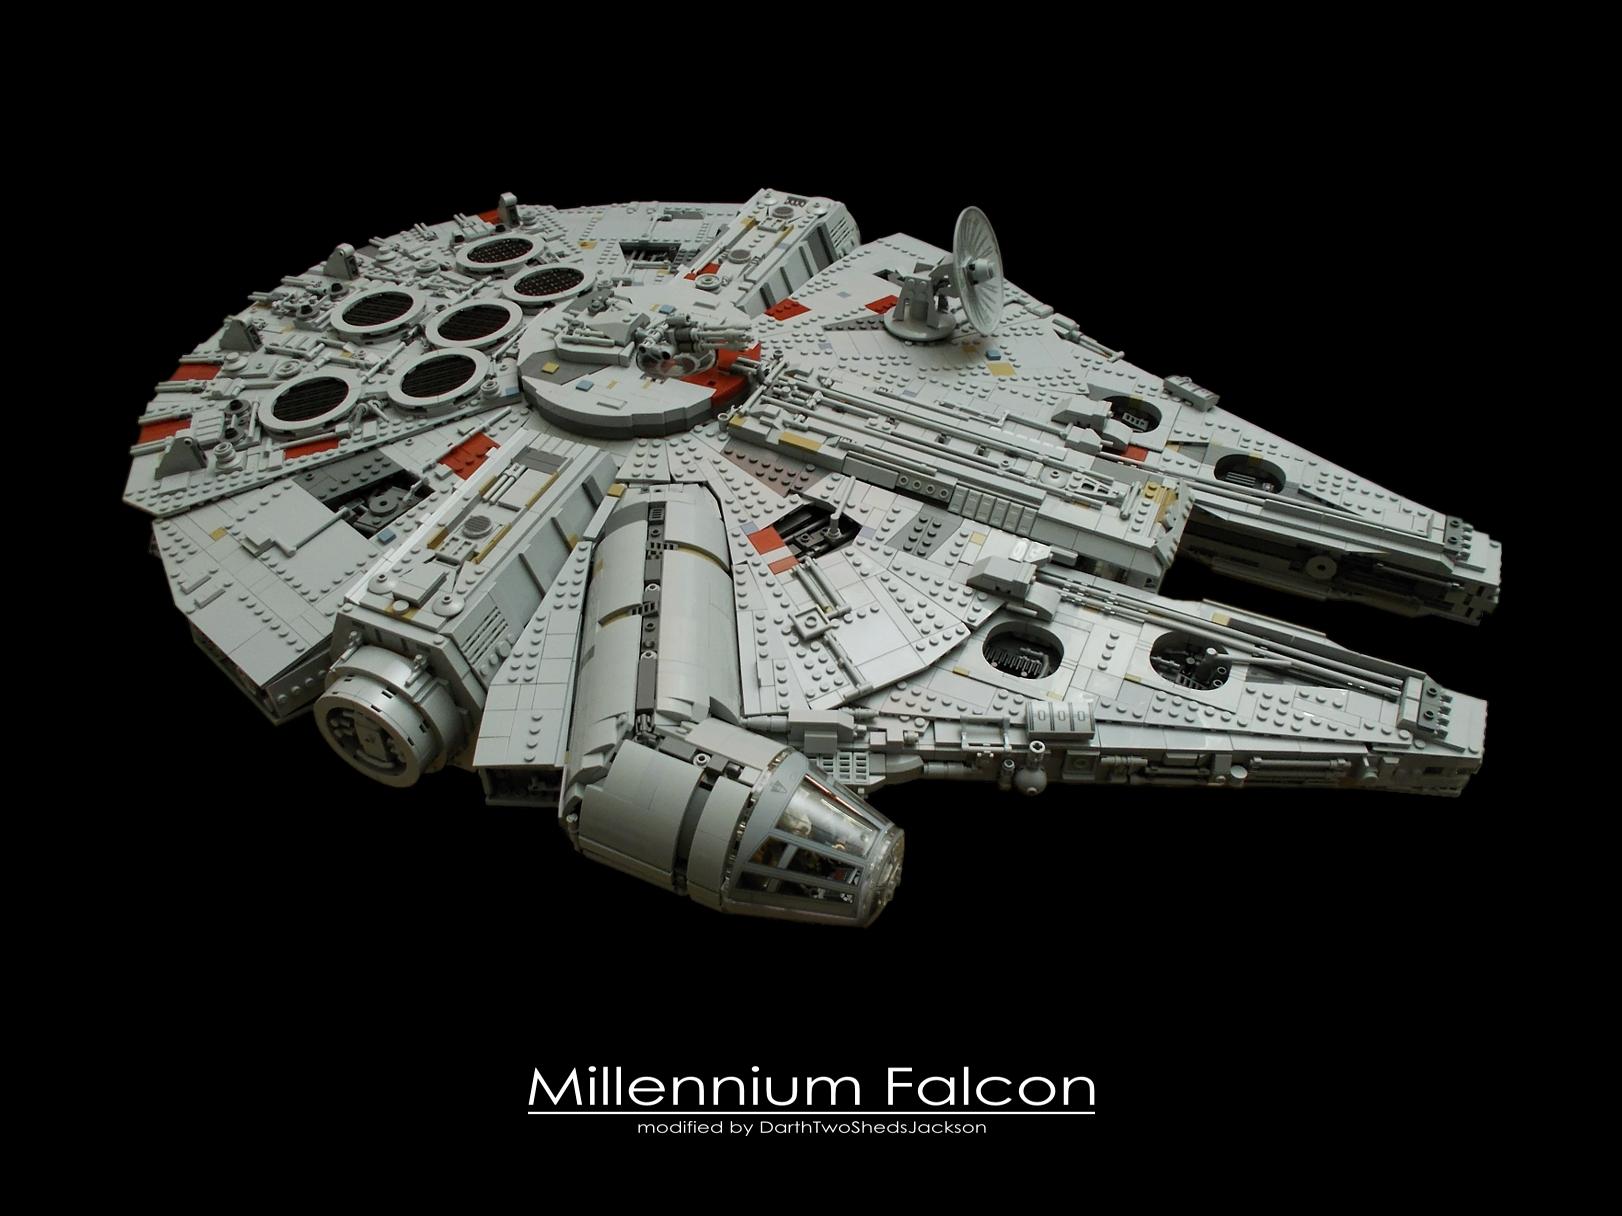
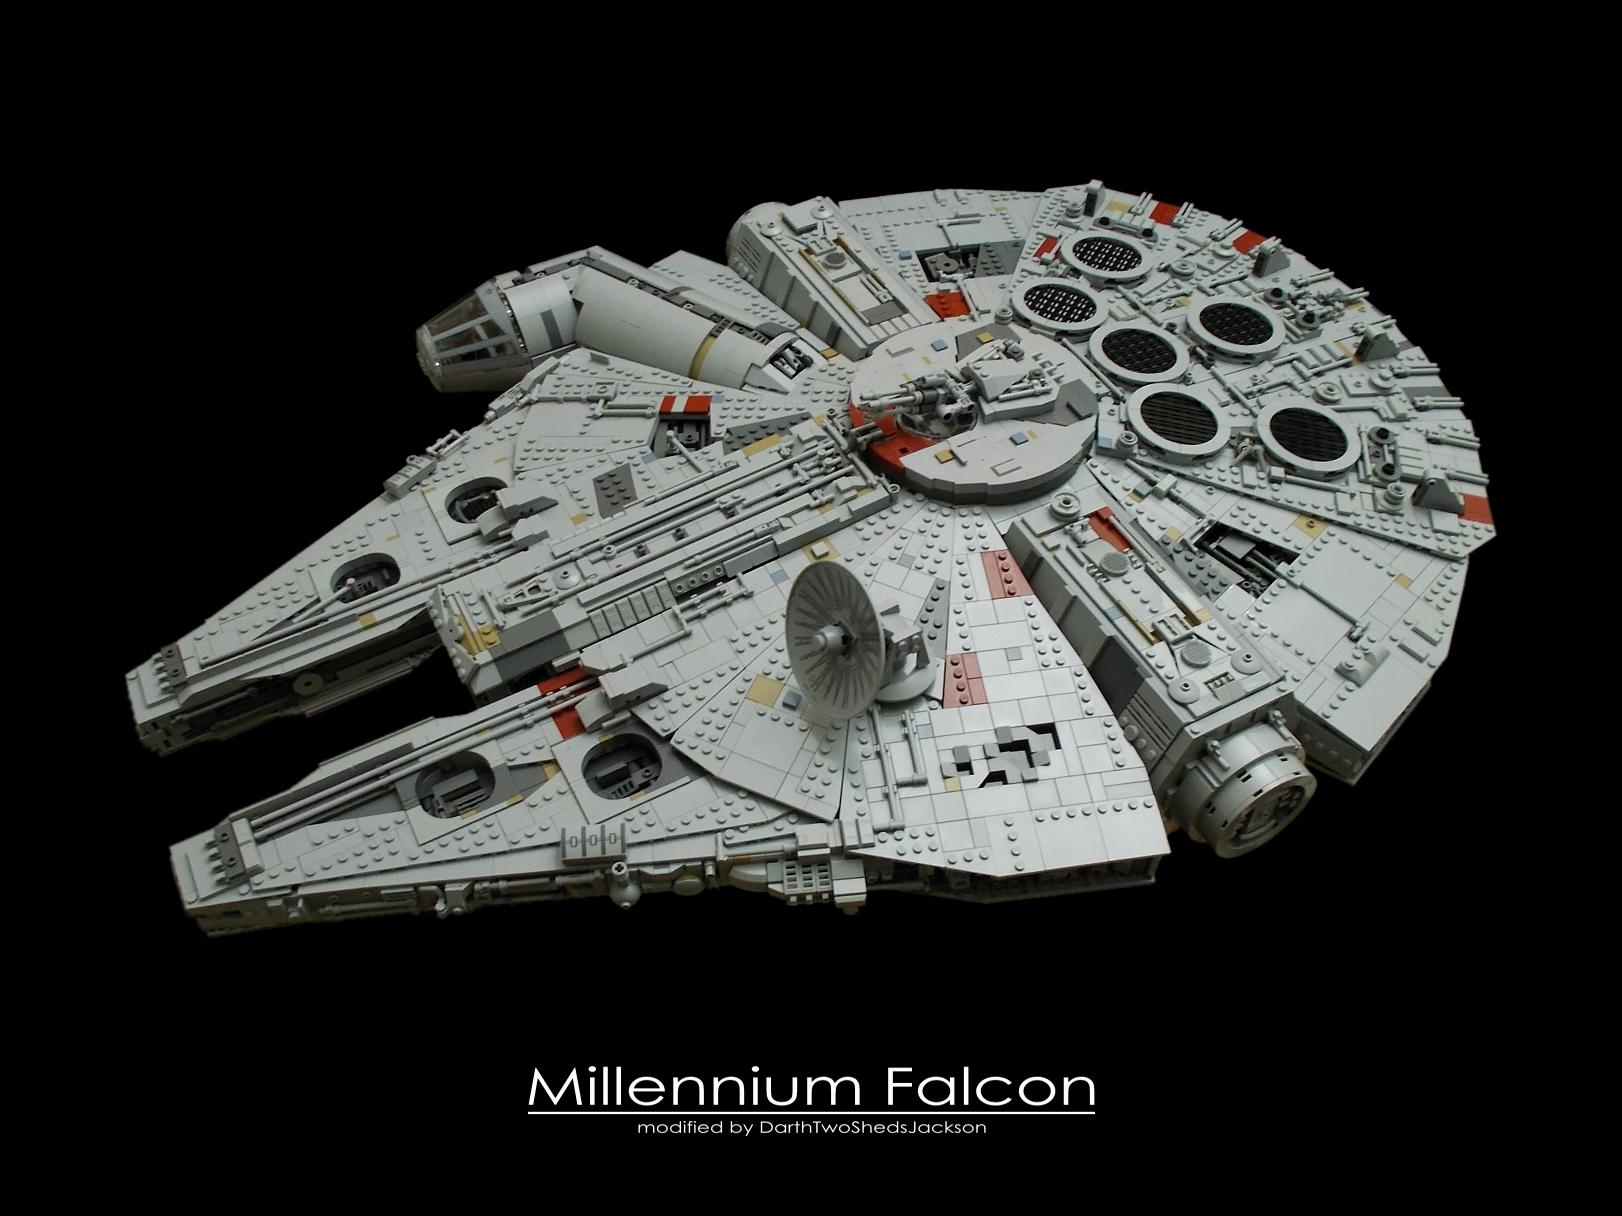
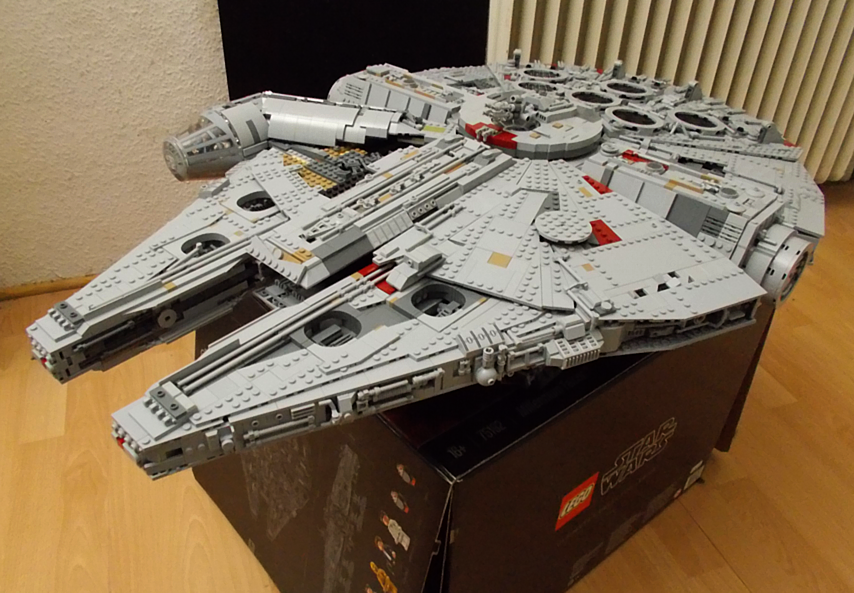
Some might remember me as the one who always was confident that we would eventually get a new UCS Millennium Falcon back in the days when there was speculation galore. I always wanted one, but I was not willing to pay 800 Euros for a set, even one as cool as the MF. Before christmas last year, however, I managed to get one for slightly over 600 Euros and finally pulled the trigger.
Even before I received the enormous box I decided to not build the model according to the instructions from start to finish, but to built the majority of the outer shell and the details myself. First of all, I wanted to get cleaner lines and surfaces, especially on the circular hull plating and the mandibles, as well as creating movie-accurate detail. As for the detail, I aimed to build the clips to which the piping is attached into the plane of plates, so that all the pipes are resting flush on the hull plating. I also didn't want to bend soft or rigid hoses to create piping detail.
As a general guideline, I always opt to achieve a 'clean', pleasing-looking finish, and I'm willing to approximate details in order to achieve that rather than trying to build them as closely to the reference material as possible, often ending up with something that looks super-accurate but clunky in Lego form. That's simply a matter of building style, not of 'right' or 'wrong'. Also, I avoid results that look cool but are wobbly.
I start this thread because the model is finished for now, with all major problems on the outer shell solved and all outer details built and attached. As for the circular plating, I went with a 'pizza-slices'-approach, since that gave me clean edges and the right directions of the studs to achieve the piping like I described above and also get the right shapes and alignments for various coloured parts of the hull. I also moved the maintenance acces ports in the mandibles two studs to the front to create space for the circular plating and more accurate proportions in that whole area.
In the coming months, I will most propably improve some things here and there, as is usually the case with such a huge model, and maybe tackle incorporating a full interior. We'll se about that. As for now, here are the first two photos of the heavily modified build, and I'll post more in the coming days. I hope you like it - in any case, tell me what you think!
-
35 minutes ago, 2mpaired said:I really wish I found those photos back when I was do the greebling. I defaulted to Fractal's renders for detailing because I was finding it difficult to find high res photos of the finer detailing of the studio model. Thanks for linking this. Will be useful if I make another destroyer down the line... (way down the line)

You're welcome - I'm looking forward to a new version.
-
18 minutes ago, Rubblemaker said:Every days a school day. I thought because Kershner directed ESB and not Lucas that he hadn’t been around very much during production. So I guess my pic IS relevant to the ESB Star Destroyers after all.
It totally is. And Lucas specifically hired Kershner for the main shoot, so that he can focus on supervising the effects shoot himself - as seen in the photo you posted - since he realized that the effects shoot would be much more involving and complex than in A New Hope, and since the stress of supervising everything in A New Hope negatively impacted his health.
-
6 hours ago, Rubblemaker said:Also I wonder if they thickened them up a bit for ESB?
They actually changed A LOT when they built a new studio model for ESB. From the texture to all small details to the shape of the guns and even the proportions. The model also was twice as big as the STD from the first movie. Apart from the basic shape and layout, the STDs from A New Hope and Rogue One are very different to those from ESB and RotJ.
Also:The photo you posted with Lucas on the left side is not from the filming of A New Hope but from The Empire Strikes Back.
-
54 minutes ago, 2mpaired said:and used the wonderful renders by FractalSponge for the greebling details
These digital models are not as accurate as they seem when it comes to details. If you want to study the details of the original studio model used in ESB and RotJ, then reference good pictures of the original studio model. This is not to say that your model is flawed - it's amazing, actually.
The original studio model:
-
Where I come from, people who make a profit off someone elses work and effort without compensating or even acknowledging the original creator are called something describing a particular rear end of the human body with a hole in it through which waste is disposed of.
-
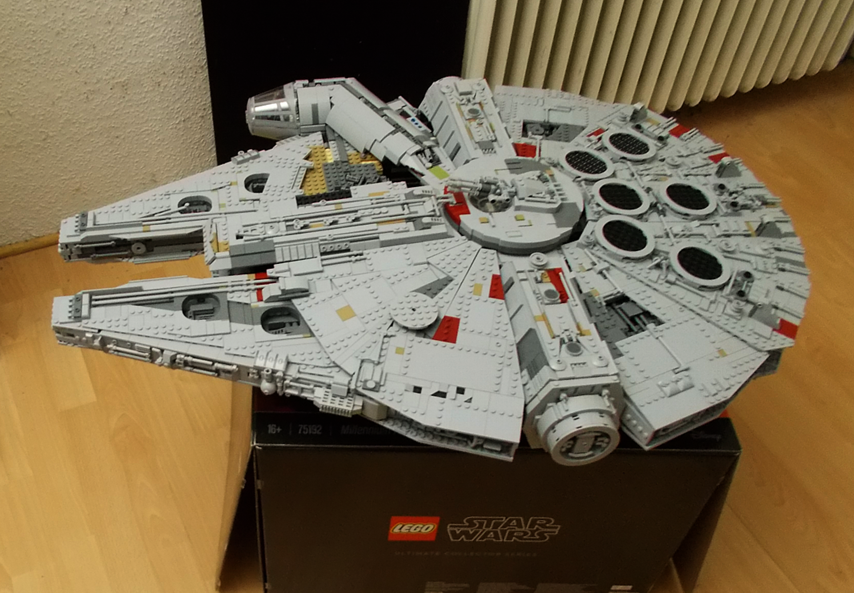
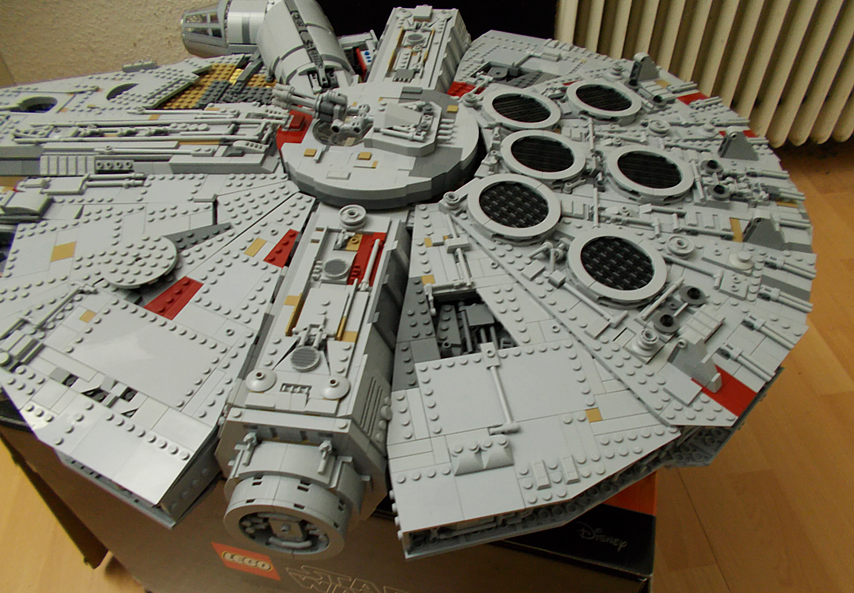
Long time no see...
I finally pulled the trigger on this one when I saw it for slightly over 600 EUR, and I slowly but gradually MOC most major elements to give it cleaner lines, smoother plating and accurate detail. Here are a couple WIP-impressions:
-
I vote for Ahsoka!
...Oh, wait. No...
Admiral Yularen it is!
-
8 hours ago, VaderFan2187 said:LADIES AND GENTLEMEN, THE BEST LEGO STAR WARS MINIFIGURE OF 2016!!
First of all, I'm happy Ahsoka won - both the character and the minifigure have earned that. Second - nice screencap from Jangbrick's review!
3 hours ago, PickleManDan said:I very much like the minifigure eliminations, so perhaps you could do best minifigure of 2015, 2014, etc.
I second that. Alternatively, instead of looking for the best minifigure of a particular year, you could make eliminations based on themes: Best Jedi Order minifig, best Sith minifig, best clone trooper minifig, best bounty hunter minifig, best rebel minifig; or make eliminations based on variants of single characters. There's a lot of potential here.

-
On 17.5.2017 at 4:57 PM, Forresto said:Meanwhile we are never getting another adult Ashoka again.
Don't count on it. Ahsoka's story did not end on Malachor, and she will play a very important role further down the line.

-
-
How long will this final voting round go to determine the winner?
-
Another beautiful rendition of my favorite rebel starfighter. I like how you have mirrored the wedge slopes on the front of the model. I also like how the fuselage directly behind the cockpit canopy is built and shaped - I will take a cue from this and re-visit my latest A-wing version to improve this part of the model accordingly. I only wonder if the engines in your version are abit too long. Making them a bit longer is a good call, since the engines of the official versions are all too short in comparison to the rest of the vehicle, but I think you maybe went a bit too far.
Nonetheless - great model!
-
Great to finally see some builds come together here.
As for a faithful reproduction of the Tantive IV studio model, I've found one thing that could be changed. What I'm speaking of is the starboard (right) side of the Tantive IV - the section between the escape pod section and the docking rings. As for the port (left) side of that section, you find two narrow sloped and slanted fins or ridges going from the top and underside of the docking ring to the centre top and bottom end of the escape pod sections - represented on mortesv's great model by the angled flag pieces. On the starboard side, however, the lower fin (or ridge) does not go all the way to the centre bottom end of the escape pod section, but stops 2/3 of the way and meets a vertical fin or ridge. Interstingly enough, this leftover from the early design stages of the ship as the original Millenium Falcon was there to leave space for a large access hatch and was kept even after the studio decided to make the Blockade Runner Leia's larger ship, and has also been recreated faithfully on the digital Rogue One Tantive IV. The Clone Wars-model of the Tantive IV has 'corrected' this feature and left out that gap, and the covettes in the REBELS show do not have that gap, either. I wonder if the Roque One-versions of the corvettes from the REBELS show have that gap or not - but maybe this goes a bit too far with the detail.

Just to play devil's advocate...
 It goes without saying that you do not absolutely need to incorporate this quirk into your model, I just want to point it out for those who do and missed that part until now as I did.
You can also see it on my screenshot from Rogue One on the page before in this thread.
-
1 hour ago, mortesv said:So you are sticking with the Rebels design ;)
For my Corvette, yes, because its story is firmly rooted within the show.
Just out of curiosity, I studied the Tantive IV as it is shown in Rogue One. At the end of the movie, there's a short scene where it directly passes the camera. Clicking through the quick sequence frame by frame, I was able to grab a screenshot where the starboard docking ring points directly at the camera. I know quite a bit about 3d models, perspectives etc. and how easy it is to get a wrong impression because of a slightly off-centre perspective, so I chose a structure to visually indicate when I had the correct frame - the docking apparatus on the lower end of the passenger lift section (in the red box). If you'd look at the frame directly before or after the chosen frame, the edges of the front and rear little cylinder of this apparatus are round because the camera is not pointed directly at its centre. In the frame I've chosen, they are straight - strongly suggesting that the vertical camera-axis is parallel to a vertical axis going through the apparatus' centre. Also, the round docking ring is perfectly at the centre of the cylinder in which it is housed.

I don't need to be right, I just find it interesting. At the end of the day, this is a nitpick either way.
-
3 minutes ago, mortesv said:Hehe, I don't think the difference is not to warrant a studs difference.
No, it doesnt. I offset mine by the thickness of one plate...


Siege of Mandalore wave MOC: UPDATE: System Scale Headhunter Starfighter
in LEGO Star Wars
Posted · Edited by DarthTwoShedsJackson
They did this because this was the first storyarc ever in an animated Star Wars show that actually entered movie territory with respect to when the events depicted happen. Hence the original Star Wars-theme at the start of the first episode of the four. What I was particularly fond of was the score playing during the final moments: It was specifically made to sound like the surreal synth-tapestries of Blade Runner, especially the 'Tears in the Rain' piece, and the allusion is genius, since the clones and the replicants in Blade Runner were so much alike: Created to serve in highly dangerous situations, doing work no one else wanted to do, being discarded once their service was no longer required, having artificially shortened life-spans and being considered less than human by many whilst actually being much more human than those who ordered and conducted their creation.