Search the Community
Showing results for tags 't2'.
Found 3 results
-
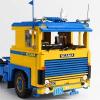
 Lego released a new Creator veichle and as a tradition I have motorized it with remote control. A bit easier to hide all electric parts this time as the car is really big. But it is also heavy and slow with only one L motor for drive. There are some small changes to the interior, but all details are still there. I have created instructions to build it with Powered Up parts, but if there are any interest I might add instructions for other power systems later. Rebrickable Instructions Youtube Video
 -
 Hello mates, today I show you probably the last VW transporter of my series, at least for a while... It's a sandblasted T2 bodywork ready to be painted. Below, the bodywork in the workshop... Side by side with my VW T2 pick-up The back... ItLUG (Italian LEGO Users Group) has recently published the complete story of my VWs and of my VW garage. Here you can read the complete story: Volks…heaven: tutti i Bulli di Norton74 Complete gallery: Norton @ flickr All the best!
 -
hey all, I've been working on some more minifig scale volkswagens, thought i'd share. I have posted a Westfalia camper before here... http://www.eurobrick...showtopic=94600 but these are a bit different, especially the Jagdwagen. The first one is modeled after my own van, a 1987 syncro passenger van with a Country Homes Camper pop top on it. here's a picture of my real van for reference... http://imgur.com/qcAJX6T I won't show a bunch of pictures of this one, since it's not a lot different from the red westy I posted before, but here's the exterior... and the interior.... Now the Jagdwagen is a bit different. Jagdwagen's were custom ordered models from the factory which were outfitted for hunting. Jagdwagen roughly translate to 'hunting car', and one major option that really makes them stand out is the full exterior cage. These were simply brush guards, not full on roll cages, but still, they look pretty awesome. For reference, here's a real VW Jagdwagen... Here's my Lego Jagdwagen.... I went a bit outside the rules on the front bars that attach to the fence/bull bar. They are made from a 6 long bar that i bent and cut to fit in that space. A 4 long bar sort of worked just resting on the top of the bull bar but this solution was a bit more solid. Working with green can get expensive! the lamp holder plates were like $2 each!!! but I had to have them. I wanted to use some other parts to make the side and tail gate hinges, but only one side of the notched hinges were available in green, so i had to go with some other options, and even with those I had to compromise since my second choice was also a hard to find part that was going for $4/each (i needed 6, so no thanks) One upside with the limited selection of green happened because even though there is a 1 x 4 with 4 Studs on 1 Side brick in green, they were only in like one or two weird sets. So they were very hard to find and when i looked no one had more than 1 and most were in Europe. This forced me to consider other options. Then i remembered good old Technic bricks, even though they have holes on both side the ability to use the stud inserts on both sides allowed me to have my trim on the outside and some faux door panels on the inside which adds a nice touch to the interior... anyway, enjoy and feel free to give any feedback or criticism. cheers droo
