

Legoist
-
Posts
561 -
Joined
-
Last visited
Content Type
Profiles
Forums
Gallery
Everything posted by Legoist
-
Is it tiling the inner spaces of the track that makes it particularly difficult? I'm sure that leaving some spaces is unavoidable. Do you think using an older type of track (4.5V or 12V era) with less sleepers would allow you to lower the area of those spaces?
-
I'll have to think about the meaning of that question... Any theme (at least potentially, but right now I have ideas only in Trains/City, Castle and Space) and any size, as long as there is some tricky challenge either mechanical or aesthetical. Because it's not easy (for me at least) and it forces me to think, hence giving me a good time
-
I don't know, that letter is clearly the worst currently, I'll have to think of a better solution than mine. I'm afraid that being a locomotive, it will be subject to a lot of bumps and movements so they better be fixed. Yes technic pins are what I plan to use to fill those holes. The other half of the pin goes into the loco's hollow body, where the engine would be, so this should cause no harm at all.
-
You should search in the General Discussions forum, every now and then a thread about cleaning bricks springs up. I was reading this old thread a couple of days ago, and while it doesn't mention minifigs specifically, it mentions great results with H2O2 with optionally OxyClean added, and some pictures seem to show that it didn't damage printings. However I would be very carefully with minifigs, especially if they have gold/silver prints... it's probably worth trying first with one minifig only, possibly the least valuable minifig you have.
-
Good point, but then it adds 1/6 to the horizontal length, messing up the other direction, doesn't it? Anyway, below is the sign I'm trying to design. The idea is to integrate this on the sides of a locomotive, so there is some room to add stuff in the back of the wall. I just tried some quick check with actual bricks, and the tile would fit perfectly vertically if the vertical stack of each letter was (from top to bottom) = 2 plates + 2 bricks + 2 plates, and the side-studded brick was the one below. Unfortunately it currently is (from top to bottom) = 2 plates + 1 brick + 2 plates + 1 brick, and I was in fact counting on the upper grey bricks to be substituted with side-studded bricks. BTW... didn't 1x4 tiles used to have a completely hollow bottom side a long time ago? That would allow to "slide" them vertically rather freely.

-
Damn... I started this project in MLCAD and because of that I forgot that when you attach a plate/tile to one of those 1x1 bricks with side stud, they don't align with the bottom of the bricks They are higher, just like when you attach them to a headlight brick. This means the whole project needs to be reconsidered...
-
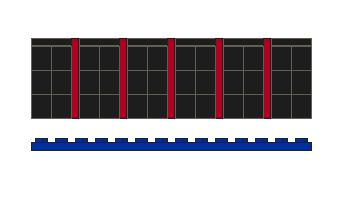
I quickly made a small picture in MLCAD to show the pattern of sizes: each letter is 2 bricks wide (black), the separator tiles (red) will be attached by a brick with 1 sideway stud from either side, the plate at the bottom (blue) is just for reference showing that the total length should end up being 14. So you can see here the problem I mean: letters #2-#5 are misaligned to anything below or above the whole word.
-
Yes, I am already using the 1x1 + side stud for this. But then the tile attaches only to one side so it won't help with the loose letters. This is a good idea, thanks! I can use 1x1 tiles with an attached ring, directed towards the back of the wall. If I manage to put these at the same level, the loose letters can be kept somehow fixed by the rod attached to the stable letters. These look great although it's not very visible how they are done. If anybody is interested, I can post a picture of my "fonts" used for this small project.
-
You'll see the result when I post it, if I manage to solve this puzzle. But I can give you a good hint, the key piece for a few more letters (note that they are lowercase letters):
-
Hello, I'm trying to integrate a certain written sign into a wall of bricks. The letters themselves are all 2 bricks wide, but to fit the whole sign into the wall I had to minimize the space between letters, hence I used SNOT and put a single (90deg-rotated) tile between them. There is a total of 5 tiles, which correspond to a length of 2 bricks, so the total horizontal length is an integer number of studs (14)... fine! Now the problem left is that the letters in between (i.e. all letters except the first and the last) cannot be attached to the 14 bricks below or above the whole sign because their studs positions are not aligned with any of those 14 bricks. Jumper plates could achieve a shift of 1/2 brick width, but neither this is aligned with those inner letters which have a relative shift of 2/5, 4/5, 6/5 (=1/5), and 8/5 (=3/5). Is there a way to solve this problem? I can try to provide some pictures if my explanation is not understandable
-
It's really hard to answer... maybe just maybe it was this one, because it was the first I've had of this size: D'oh! That was my wife's favourite as a child
-
It's bad enough for me if you have to avoid/hide it when taking pictures. You're right that it could be worse however, with other types of headgears.
-
This looks surprisingly good... nice idea!
-
Thanks for the review! I have no interest picking up any of these sets since I don't have any use for neither the sets nor many of the bricks, but I have to say that at least the overall concept and design of this one is neat. This picture explains very well why I hate double-faced minifig heads It's a pity considering that otherwise the journalist is very well designed.
-
Very nice shop interiors, and also a pretty original colour choice!
-
That would be fantastic. Your example would have plenty of very useful parts for MOCing, and if perhaps dark blue or another rare colour was used in place of regular blue, then it would be perfect: rare parts in common colours + common parts in rare colours are in my opinion a perfect combination. The only problem I see with such a set is that the designers would load it too much with tiny details and minifigs and it would quickly "degenerate" into the usual overpriced exclusive like the "winter sets" instead of remaining feasible for the retail shops, but that is just my personal preference.
-
This sounds like a great idea... I've never thought about that, probably because I largely ignore boat/ship sets and themes. Perhaps it would be nice to create a diorama inspired by PC games such as the Transport Tycoon / Locomotion series, displaying for example a cargo-switching centre where trains, trucks and ship exchange their loads, or a mail-switching centre (trains, vans and airplanes), or passenger of course.
-
Well I was basing my comment on my own experience of course. Where I live, most supermarkets (not minimarkets) have them, and then there is toy shops and you can also find the CM in houseware retail stores/emporiums. I can think of at least 18 shops on the top of my head in my town where I've seen them Considering that I go shopping for food about every 3 days, if I had picked up on average just 1 minifig everytime*, by the time a Series is discontinued I could easily have an army of about 100. Once you buy one minifig, if you just cut out the barcode/bumpcode area and take it with you for comparison, it takes 2 minutes to go through a box. It's not that unreasonable, and at 1.90-2.00 euro/minifigs it is probably cheaper than most other options (at least if you want them MINT). But of course the actual lack of suitable models in the CM series is the big deal! *rotating from one shop to another maybe you also make sure you don't deplete the boxes of your wanted fig
-
I'm checking the availability of buffer beams (the new ones in complete assembly) on BrickLink, and noticed that there are 2 different types (not counting the version for locos with the plow): TYPE 1: http://www.bricklink.com/catalogItem.asp?P=64424c01 used in... 7897 Passenger Train 2006 7898 Cargo Train Deluxe 2006 10194 Emerald Night 2009 7597 Western Train Chase 2010 TYPE 2: http://www.bricklink.com/catalogItem.asp?P=91968c01 used in... 7938 Passenger Train 2010 7939 Cargo Train 2010 4841 Hogwarts Express 2010 10219 Maersk Container Train 2011 I have only copies of TYPE 1, can someone explain to me how exactly is TYPE 2 different? Thanks!
-
Eurobricks Collectable LEGO Minifigures Series 4 Building Contest
Legoist replied to WhiteFang's topic in Special LEGO Themes
Yes, all that makes sense. It's just that category B is already so difficult, that I wish it actually had a lower entry barrier I wonder if we even get more entries than prizes in Cat B... at least there is plenty of time. -
More Lego to win in the raffle & one more week to go!
Legoist replied to dels_tesis's topic in Community
Thank you for the raffle, and good luck with your thesis! -
Thank you so much for your work! Now the sun is back to Finland, I can try to replicate your process to my few old discoloured bricks as well. It seems unbelievably simple!
-
How open are you about your Lego passion?
Legoist replied to Fugazi's topic in General LEGO Discussion
Maybe we should start organizing some "Lego pride" parades around the world... -
Eurobricks Collectable LEGO Minifigures Series 4 Building Contest
Legoist replied to WhiteFang's topic in Special LEGO Themes
If the point of this rule is to guarantee high-quality pictures, why aren't you just judging the results? I mean, if someone has a >5Mpixel camera phone and he is able to take good enough pictures with it, why disqualifying him? Can you by the way always tell what device was used to take the picture? -
I'm so jealous of them, that I keep'em with me all the time...