MinusZwei
-
Posts
30 -
Joined
-
Last visited

-
 MinusZwei changed their profile photo
 -
Gosh! The 17x instead of 18 makes the trick indeed, and then you don't have a risk of the chain to fall down since it is "clipped" on the 4x4 disk. What a great design :)
-
Hi, First of all, I have to say, this is a fantastic MOC... I am currently studying your pictures to get some new building techniques :) Speaking of that, I am curious about the design of your rims: I have tried to replicate them using stud.io, but to me, it looks like you are not using any gear to maintain the chain links into place. Am I correct? I have uploaded my stud.io file on BrickSafe. https://bricksafe.com/files/MinusZwei/truck-rims/truck rim.io Would be great if you could take a quick look and let me know what I missed :)
-
[MOC] Dump Truck 8x8
MinusZwei replied to Lucio Switch's topic in LEGO Technic, Mindstorms, Model Team and Scale Modeling
Hi all, Since I bought the instructions and I am starting to build it, I think here is the best topic to discuss about it. In the book #5, at page 6, you will need 2x 2745 in white, and this part is not produced since a long time, therefore, hard to find. I have found a easy way to get rid of this issue, by using a more modern 41531 and 18651 combination... In such a case, you will need the following additional parts: 2x "Cylinder 4 x 4 x 1 2/3 with Pin Holes and Center Bar" (41531) in White 2x "Technic, Axle Pin 3L with Friction Ridges Lengthwise and 2L Axle" (18651) in Black But you will also be able to remove the following parts: 2x "Cylinder 4 x 4 x 1 2/3 with Axle Holes" (2745) in White 2x "Technic, Axle 4" (3705) in Black 2x "Technic, Axle and Pin Connector Angled #2 - 180 degrees" (32034) in Black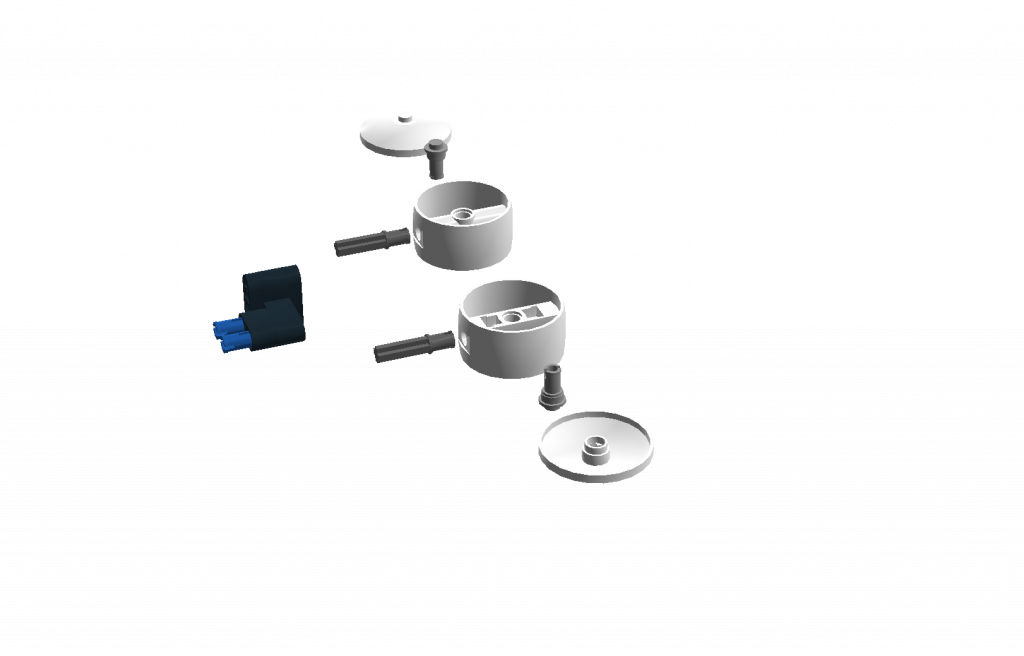
-
Ok. Got the idea. So basically: - I should make a kingpin and not a straight vertical pivot - I must reduce as much as possible the distance between the pivot and the center of the wheel. Hummm, thanks for the offer but first I don't want to waste your time with this... ...and I would prefer redesigning by myself, and getting your approval afterwards
-
So what you are saying is that I should remove the brakes from inside the rims and place them somewhere else, to reduce the distance between the pivot and the wheel, right ?
-
I have tested with some weight on top (~1.5 kg), and I did not see any big bending on the axles. Of course, the wheel would be better attached with the 3 pin Unimog portal piece, but in such a case, I would loose the space to place the brake system.
-
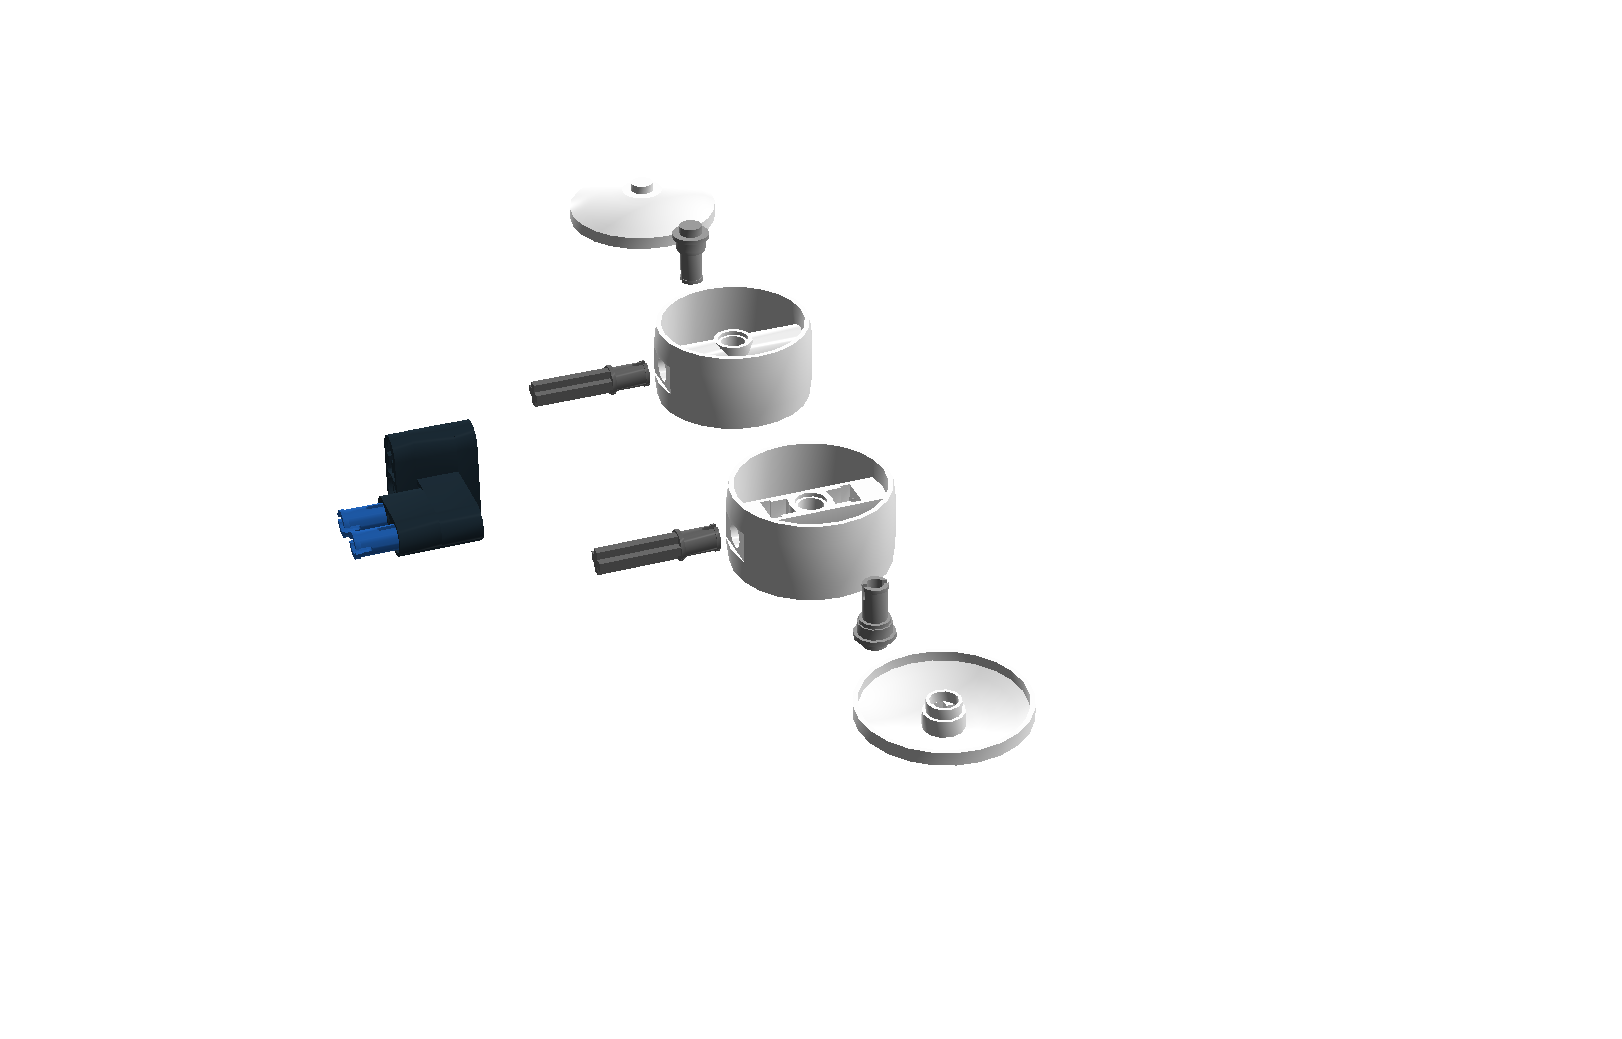
I have started designing a steered axle for my heavy truck project with the following features: - Blocking differential (will be controlled by a PF M motor) - Pneumatic breaks (following Sheepo’s Peterbuilt system) - Portal Axle with 1:3 reduction - Triple wishbone independent suspension - Ackermann steering (still WIP) Please note that it is still work in progress, and the design is not yet final… The steering is not yet fully designed, and the “casings” might also change here and there. As this is more or less the beginning of my first real big MOC, comments are always welcome. I think there is still lots of improvements possible, and I would love to get expert technic builders advice :) I have attached the LDD file (might not be 100% up to date) so that you can have a closer look to my mechanics, but I will anyway describe them in more details here. 1. The Wheel Let’s start with the simplest element: The wheel itself. I am thinking big; therefore, I take the Unimog wheel for my truck (44772/92912). Regarding the cosmetic aspect, I put a black dish to give it a 41999-ish look to the rim that also fit nice with a military truck. The inside is far more interesting. Following Sheepo’s Peterbuilt drum breaks, I put another rim (60208), maintained in place with 3 axles. At first, I used 3L blue pins instead, but using 3L axles you spare ½ stud, and the drum is “sticks” to the rim as much as possible. 2. The portal axle + break pads As I needed to put the pads mechanism on the portal axle, the use of the “standard” Technic portal axles (92908) was not really an option. I started to design my own ones, taking some inspiration from Atr’s Volvo FL12 8x8 Trial Truck. I used the new 8-tooth gear and the “good old” 24 tooth one to make a 1:3 reduction (If you plan heavy trial trucking I think replacing with bevel gears would be a smart choice, but you would have 1:2 in this case). Please note that the steering is not fully finished yet. I still have to calculate the correct angles and gear reductions to make a nice Ackermann steering. I am also planning to use the 13L gear rack (64781) for some axles, to maximize the steering angle. 3. Suspension system The original truck that I try to reproduce in my MOC features independent suspensions with 2 wishbones. For my MOC, I have decided to add a 3rd one to keep the driving axle a bit more solid. Apart from that, nothing really special here. As my truck will have lots of “Model Team” stuff, I also use the Unimog extra hard shock absorber (95292c01). Currently I only put one per wheel: I don’t want to have too hard suspensions, and adding a second one may block the portal axle when steering at extreme angles. Using the standard 6L shock absorber is not really an option here: Its amplitude is 1 stud less than the 9.5L shock absorbers. This would reduce the wishbone course too much. 4.Blocking differential For the differential, I followed one of Sariel ideas. I needed to modify it a little, to let the driving axle continue to the other axle: I just “lifted” the locking mechanism using 16-tooth gears. Using this trick, I can also put all the driving gear on the same side and therefore motorize it far more easily. Please also note the thin 1x5 lift arm: It is used to limit the course of the changeover catch so that it doesn’t get out of the driving ring when unlocking the diff. Steered Axle 2.0.lxf
-
#41999 back in the stock!
MinusZwei replied to peter_m's topic in LEGO Technic, Mindstorms, Model Team and Scale Modeling
Still sold out on the french and german LEGO shop. I think this is only valid for people who already ordered their 4x4 crawler while it wasn't marked as 'sold out'. -
Supercar Lamborghini SV
MinusZwei replied to spiderbrick's topic in LEGO Technic, Mindstorms, Model Team and Scale Modeling
For your disc brakes, are you using some pneumatic system to extend/retract the pad... or is the yellow piston seen nearby for some other functionality ? -
Regarding the USB wifi adapter, I finally managed to dig around with the EV3 source code (from https://github.com/m...ards/ev3sources). I looked over to the Linux kernel source code and its default configuration (assuming that this has been to one used by LEGO for building the official firmware...), and I could not see where the support for the WNA1100 USB dongle is selected. The WNA1100 is based on an Atheros AR9271 chip: The Linux kernel supports it over the 'ath9k_htc' module. However, the default Linux kernel config file enables the common code for Atheros devices (CONFIG_ATH_COMMON is set), but there is no support for AR9271 based devices (CONFIG_ATH9K_HTC is not set). -> So I am wondering if I should enable it manually, or if the support is done in another way... The WNA1000M is based on the Realtek RTL8188CUS which is handled by the 'rtl8192cu' module. However, the kernel used by LEGO is a 2.6.33-rc4, and the 'rtl8192cu' module has only been added in 2.6.39+
-
I tried that and got the answer that they cannot be sold, as they are licensed parts. Even if they are mentioned on the service.lego.com website, you won't be able to buy them.
-
Since you are saying that you can program the EDU brick with retail software, I just ordered myself a core kit from Netherlands :)
-
For the additional sensors, you have to download the blocks from LEGO.com directly: - http://www.lego.com/de-de/mindstorms/downloads/ev3-blocks/ultrasonic/ - http://www.lego.com/de-de/mindstorms/downloads/ev3-blocks/gyro/
-
Ted, could you check if the intelligent brick that comes with an Education kit can be controlled using the retail software ?
-
Wooohoooo!!!!