
Nelson
-
Posts
72 -
Joined
-
Last visited
About Nelson

-
 Ha! Love the stilts. I have been spending every waking moment getting all my inventory organized and entered into my BrickLink store. I'm almost ready to throw the switch, so I decided to take a day off and get my model off the shelf. I showed some videos of it walking to a few folks at a local meetup over the weekend. It was discouraging to hear them say, "It's trying! It's almost walking." I'm thinking, "If you people only knew the engineering hurdles of this project, you'd be carrying me around on your shoulders for getting this far." That said, I am considering ripping it down and trying to figure a way to get even more lift out of the legs. I also need to figure out how to trigger the faux knee bend. I think that will really help sell it to the masses. Of course, there's still the nagging issue of weight and getting a mechanical system that doesn't bend and flex itself into oblivion once the body cladding is on. I suppose there's no turning back at this point. It's tough to get so close so many times, only to decide you need to step back and revisit the drawing board.
 -
Glad to see you're back at it. I'm trying to get a Bricklink store off the ground, so I've been slacking on my model. I was scanning the web for a part to fit a specific need and ran across this: https://www.bricklink.com/v2/catalog/catalogitem.page?P=4368#T=P&C=86 I don't have an immediate use for it, but I'll keep it in mind when a cam is required. I don't think there's anything else that's round with an off-center axle hole like this.
-
@BrickBear I'm going to try and replicate your image to see what you've got going on. While it may not be a design conducive to my concept, I've found inspiration from your ideas in the past. It looks like you may have had some bushings on the ends of the orange pieces in the first photo, but they're just tipped with raw pins in the second photo. Any reason? Or am I not seeing it right?
-
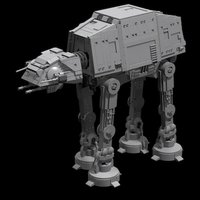
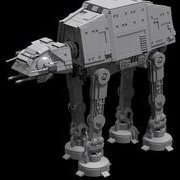
Okay. It may be time for a break. (Yeah, right.) Another update on the Abridged-Terrain-Awkward-Transport. It's getting heavy on the awkward ("heavy" also being an operative word.) I'm struggling to get this MOC to the finish line. Much of this project has involved overcoming the limits of the materials, and this phase is no different. To get the aesthetics I desire, the weight just keeps piling on, and the plastic bends, flexes, and occasionally gives up the ghost. The "pinning" technique I worked out for the legs did a LOT to sturdy those up, but it's not enough to wrangle so much weight. I'll try to get an ounce or two off the body panels and chassis, but I feel like something needs to happen with the legs themselves to get things working better. It may mean giving up on the faux leg bend and adding another solid liftarm inside the leg structure. That would suck, but it may be the best option considering I'm also struggling to figure out a way to articulate those upper leg portions. On the plus side, I'm really happy with the way it's looking. I just received a parts order and altered the upper legs to get the width proportions more accurate. It's tricky to pull off widths like 5 studs when dealing with curving areas. Many of the panels are not yet completed in this video. Anything sitting on top of the head and body is literally sitting due to gravity alone. I may take a little breather and do some diffuse thinking rather than focused thinking on it. Unless I have an epiphany of course! Update: I made some adjustments to the ankles to limit their rotation a bit more and that helped somewhat. I think the rods that drive the mechanics need to be bulked up or doubled or something. They flex too much when struggling to move so much weight. I'm sure pondering a solution will invade my sleep for days to come., Before I put the MOC on the shelf, I did a quick comparison to some online photos of a film model to see how my proportions and details were stacking up. If you ignore the missing head and rear sections, I think it's pretty close for a motorized model of this scale. (The head is a bit droopy because it's barely held together at the moment.) There are definitely a few tweaks that could be made.
-
It took several attempts, but I finally figured out a way to run a gear for the head articulation off the main drivetrain. There is so little space to work with up there, it is a miracle I found a way to rig it up. This will provide complete control over the timing of the head movement, which is awesome. I'm working on ways to make the mechanism smoother. There is also the question of aesthetics. The place where the neck joins the body might be a bit uglier than I'd like, but of course, I'll keep refining it. The motion in the video is a bit wonky as I haven't balanced things out weight-wise yet.
-
@BrickBear Steal away! Now you've got me thinking of ways to connect to the drivetrain. That really would provide ultimate control over the timing. Another fine evening of ripping the whole thing apart!
-
@BrickBear Yes. I built that kit with my girlfriend's son back when it came out. I don't have a way to feed off the drivetrain to make that kind of mechanism work. At least I haven't found a way yet.
-
This head articulation is a tough nut to crack. I've tried about a half dozen ideas this weekend. This is the most promising, but still needs a lot of refinement. Or perhaps some other epiphany will hit me.
-
@BrickBear I may indeed do something along those lines. I have a few ideas. We'll see which one actually works and can fit in that tight space. Even if I reach Echo Base, I won't have room for any troops in there!
-
A quick update. I tried several different "wheelbases", (the length between the front and rear legs), along with subtle leg angle changes, (pitching them slightly more forward or back), but nothing improved upon what I had in the most recent videos. Those changes invariably made the balance and movement worse. It's all just so touchy. I'm going to try figuring out a way to get the head moving. I hinged it up in testing and manually moved it to counter the shifting weight and it seemed promising. It would be great if the head movement was in phase with the movement of the liftarms, so I could link them, but alas, they are not. There's no way to access the big gear that drives the crank either. Time to put the old thinking cap on. I'd like to use some kind of linkage rather than things like string or rubber bands, but those may be the best solution.
-
If I could create more organically-shaped cams, that type of balance shifting might be possible. Unfortunately, I've yet to find a way to pull that off. I'm going to try stretching the length of the chassis out a bit to see if getting the legs closer to the front and rear will help. I'm also going to experiment with reducing the camber on the feet, making them more perpendicular to the legs rather than pitched slightly. I may let it all sit for a week while I catch up on some other projects. I have to portion out my obsession in metered doses!
-
I completed my goals for the weekend: test the model on various substrates and see how it deals with weight. Mixed results in both departments. I really love how the side panels look, but man... they need to lose some weight. The chassis and legs alone are 1.25kg. The side panels bring it up to 1.38kg. That's over 3 pounds. I can't imagine how heavy this thing's going to be once I add the top and end panels along with the head! I just hacked together a method for attaching the sides, so you see them gracefully falling apart in the video. Aside from the idea I mention about angling the legs out a bit toward the front and rear, I wonder if reducing the camber on the ankles/feet might help it not pitch around so much. Here lies the next challenge! Honestly, it performed better than I expected. I didn't think the feet would even get off the ground.
-
@BrickBear Crank Ankle. "Crankle"
-
Some tests on various substrates. I didn't notice the upper leg on the right rear had separated while I was setting up. It may have altered the motion slightly, but is probably not responsible for the mechanical failure at 1:00, even though it's on that leg. The loose terry cloth really bound things up. I think if it had been pulled tight, it wouldn't have been a problem. Still. This baby won't be tackling any loose dirt or gravel any time soon. Watch the rod on the right rear flex like crazy before finally breaking the crank ankle.
-
I will study this image a bit. As for reaching goals, I try not to think of this as a competition (although that can be motivating). My idea of success is different than yours. A model with true bending legs is integral to your vision, while I'm bypassing that feature. I would not be where I'm at in this process without your contributions in this forum. The current concept #2 design is a direct offshoot of this conversation. I only hope my contributions are helping you reach your goal. I had a sizable head start on this project, two years at least if not three.