
Tobi Wankenobi
-
Posts
25 -
Joined
-
Last visited
Content Type
Profiles
Forums
Gallery
Everything posted by Tobi Wankenobi
-
 Wow. That is purely mechanical, correct? No Electronic/Software Control!? I find shooting mechanisms very challenging. Especially if they have a "automatic" function. I built one for my Fire & Rescue Tank, and making the shooting mechanism working reliably was about the same challenge as building the rest of the vehicle. I think the challenge comes from the fact that there are high speeds, high forces in combination with very limited space. Several sub-mechanisms need to be combined in very small space (accelerating the round, feeding the next one, preventing others from doing the same, preventing the loaded one from rolling away)
 -
What is the most challenging mechanism you have ever built (or even failed to buid)? What mechanism do you think is impossible to build with Lego Technic? I like to start this thread as a collection of challengig mechanisms. You may get inspired to try to realize something which is precieved as "impossible". Or people might post solutions to "impossible" mechansims in this thread.
-
Thank you!
-
Congratulations to everyone! I reached exactly the rank I was expecting to reach. Thanks again for organizing this excellent contest!
-
In my opinion, the voting for the own entry should not be restricted in any way. If you really think your entry is the best, give it 15 points. When you think it is 4th place acording to the rating criterias, place it on rank 4. I like the sportsmanship approach. I kinda felt sad to place mine on the last rank, because I would not have placed it there if it was from a different person. (which is of course arguable, if it really belongs there )
-
Very nice! I once made a manual-activated transformer, but I can hardly imagine, how this is possible with a motor activated transforming mechanism... And yes, spreading the legs was also challenging in this build.
-
As we have no insights into the voting process (which I think is a good thing), we could start some guesswork, which entries will make it for the first three places. I have a strong feeling, that the Arctic Explorer Truck and the Arctic Walker will make it for rank 1 and 2 (though not sure, which will be on 1). For the Arctic Explorer Truck features many functions and the innovative gear-box through the crane arm and is built with many details. The Arctic Walker on the other hand has an exceptional walking mechanism and is built very clean. It also has the originality, as something like a walker does not exist in reality (at least to my knowledge). For the third place, it gets difficult to guess, but my guess would be for the Icebreaker. Featuring many function and the cycloidal propulsion system will score it a high ranking. I guess my Arctic Monowheel will not make it to rank 1-3, as the quality, originality and functionality of many entries outplay the monowheels electronic stability control and its originaliy. So this is my guess. Who wants to go next? Anyway, I am curious to see the final results in two weeks.
-
Thank you! The key element of the self-balancing is the programming code at 5.) The angle of the hub is multiplied with the Proportional Factor (in this case 1.5). As soon as the hub gets out of the horizontal positon, the difference is multiplied with 1.5 and the value is feeded into the motor drive block as power parameter. The more it gets off, the more power the motor gets to steer against and make it go back to horizontal position. The additional coding is used to allow the steering, as well as to have a seperate path with not electronic stability control.
-
@Jim and @Milan: Thank you for organizing this contest! It is my first time participaing in an Eurobricks Building Contest and I like the whole setup and organization of it. It is exciting to watch how ideas and models develop and to be part of it. Very well done!
-
A model like the Arctic Monowheel is not only done by assembling bricks and pieces, but also assembling programming-blocks. I like to share the programming of the Arctic Monowheel (explanation below): 1. Mode selector for "Electronic Stability Control" (Enabled/Disabled). The position of the hub in the controls is read out (The hub is connected to the mode select lever, and tilts, when the lever is moved) 2. Path for Operation of the Monowheel with Electronic Stabilty Control Disabled. 3. Block to enable smooth and proportional steering of the two drive motors with one joystick. Joystick Y-Position is used to make one motor turn slower (or even backwards), in relation to the other. I used this part for a tank before, and I could take it over 1:1. 4. Path for Operation of the Monowheel with Electronic Stabilty Control Enabled. 5. Proportional Controller for the stability of the cabin of the Monowheel. 1.5 is the proportional factor which I determined experimentally. Making it too big, makes the Monowheel become unstable, making it too small will not give enough stabilitzation effect 6. Steering block of this path (basically copy and paste from above) 7. Stoplights activation block. (Whenever the joystick speed controll is reduced for more than 3 units, the stoplight is turned on for a certain time) For completeness, the programming showing the most right blocks:
-
Arctic Monowheel Imagine the huge flat arctic snow-fields. Not every way is difficult to manage and needs a tracked vehicle. Some missions just require a transport to go fast. The Arctic Monowheel is the vehicle of choice, when tracked vehicles are too slow and weather conditions do not allow to fly. Functions The Arctic Monowheel features: Remote control with proportional steering and speed control Working Stoplights Electronic Stabiliy Control. The Arctic Monowheel is driven by two XL motors, one for the left wheel, one for the right wheel. Both motors as well as the stoplights are controlled by a PU Technic hub. As monowheels only have one axis, an electronic stability control system was programmed. It basically features a P-controller (Proportional Controller), who is programmed to get the passenger cabin of the monowheel horizontally. Therefore, the motors actively worke agains wiggling of the monowheel. This is possible, because the technic hub has a build-in gyro sensor, which can easily be read out and serves as input for the controller. When accelerating the monowheel, there is no direct speed command sent to the motors, but instead, the P-controller is given a different input value. (e.g. to controll the cabin to -10° tillted position) This then makes to monowheel to move forward. Because of this additional stability control, it was not possible to use a Buwizz, as they dont offer programming capabilities. Last picture: Monowheel with equipped snow-spikes...
-
Finished building, porgramming, video shooting. The Arctic Monowheel features remote control with proportional steering and speed control, working stoplights as well as an electronic stabiliy control. The electronic stability control is especially important, as monowheels tend to seesaw as easily can be seen in the video. The Arctic Monowheel is driven by two XL motors, one for the left wheel, one for the right wheel. Both motors as well as the stoplights are controlled by a PU Technic hub. As monowheels only have one axis, an electronic stability control system was programmed. It basically features a P-controller (Proportional Controller), who is programmed to get the passenger cabin of the monowheel horizontally. Therefore, the motors actively worke agains wiggling of the monowheel. This is possible, because the technic hub has a build-in gyro sensor, which can easily be read out and serves as input for the controller. When accelerating the monowheel, there is no direct speed command sent to the motors, but instead, the P-controller is given a different input value. (e.g. to controll the cabin to -10° tillted position) This then makes to monowheel to move forward. Because of this additional stability control, it was not possible to use a Buwizz, as they dont offer programming capabilities. To control the Arctic Monowheel, I used my Universal Vehicle Controls, becuase I like to have haptic feedback, and it just feels better. See how it moves:
-
Deadline approches, so its time to finish up things... Video will follow soon. Arctic Monowheel: The fastest Arctic Transport if you cannot fly. :-)
-
I had to change the small 12-tooth gears to larger ones, because the motor was not able to provide enough speed to compensate the wobbling movements... (I could have geared-up before, but I want the motor-wheel connection as short as possible and with as little play as possible.) I also implemented a P-Controller with the PoweredUp App. Works fine, but I can imagine, that even smoother movement can be achieved. Has everyone implemented a PID-controller with PoweredUp App?
-
Imagine the huge flat arctic snow-fields. Not every way is difficult to manage and needs a tracked vehicle. Some missions just require a transport to go fast. The Arctic Monowheel is the vehicle of choice, when tracked vehicles are too slow and weather conditions do not allow to fly. „Riding a Monowheel is a very unique feeling. You get the impression, that you’re half flying, and half sailing. But with an incredibly speed and always in control of the direction.“ Robert, Monowheel Pilot The idea to build a mono wheel, started growing at that moment where my son saw one in a „future-book“ and told me, that this is not possible… :-) AND YES, it is not actually a monowheel, as there are two wheels. But looking at it from the side it looks pretty much like it. The vehicle faces the same challenges for balancing in driving direction, as a real monowheel, but is of course more stable in the other direction. The challenges for building the final versions are: - Implement a decent controlling algorithm to keep the mono wheel stable while driving. - Build it with even weight distribution - Make it look nice and clean (my biggest challenge :-) First Prototype. Two XL Motors driving the Monowheel (one for each side).
-
I created a video, how you can build and program a remote control yourself. Of course, the technique is not limited to joystick-remote control, but could also be applied for steering wheels or even foot-pedals. Using hubs as remote controls might even get more interessting with this Pybricks function of "Hub to Hub communication". Has anybody already tried it?
-
I guess, I still can work on my driving skills... But you really feel, how you get better and better with every time you run the machine... A question to those people controlling their vehicles with a mobile phone / touch-screen: Do you also feel the improvements in operating skills after some practicing? Or is the "tactile" feedback from the handlers essential to get better and better?
-
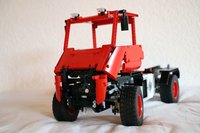
I always wanted to see how remote controlled pneumatics can be applied in a model. A telehandler is suitable, as there are auxiliary functions, where pneumatics are ideal for. (And I like telehandlers anyway :-). In addition,I wanted this model to be realy playable. Therefore speed of the different axis was one of the main development criterias. If things are moving too slow, it is only half the fun... All the movements in the video are original timed. Technical insights: The model is build with 2 Powered Up Hubs, 7 Powered Up Motors and controlled with my Universal Vehicle Controls. 2 XL-Motors: One motor for driving: 4 wheel drive One motor for lifting/lowering the boom. An extra rubberband is mounted to the boom to serve as „counterweight“. This allows to move the boom quicker as more of the power of the motor can be used for movement instead of fighting gravity. 5 L-Motors: One motor inside the boom to change the angle of the tool. The motor is located in the lower part of the boom, to create the least possible load, and is moving with the front part of the boom, when extended. One motor for steering: 4 wheel steering One motor driving the compressor, which consists of 4 small pumps. To run it as smoot as possible, the working angle of all pumps is 90 degrees shifted. One motor to shift the gearbox to select the correctt valve to activate. Its a 4 way gearbox. One motor to actually activate the valves The 4 pneumatic functions are: Extend the boom: the extension is not as far as I wish to, as the stroke of the piston is limited, but is working smooth. Coupling/Decoupling the trailer. Fixing the tool after a tool change: The piston is mounted floating, means not fix mounted on either end. Tools chan be changed completely remote controlled. Additional pneumatic function for special tools. These tools (like a gripper) cannot be changed remote-controlled as the pneumatic tubes need to be connected as well. But once mounted they offer an additional remote controlled function. The gripper tool is especially handy, as a lot os special items can be moved, which cannot with other tools. (And yes, I tried to make a tool change, which allows the pneumatic tubes to be connectes automatically as well. I almost succeeded, but it was not working reliably, and it almost killed the whole project) The gearbox which is driving the 4 pneumatic valves: Tool Adapter in both, open and closed state: Open (Tool can be changed): Closed (Tool is mounted and work can be performed):
-
Powered Up Code As requested I add some examples of the Powered Up code. I am also working on a how-to video, but that will take some more time. Code Example for a simple car Standard Code for a simple car/vehicle with one driving motor and one motor for steering. The controller-hub is hub "01", where the hub in the car is hub "02" (with driving motor on port C and steering motor on port A). Steering motor is automatically centered by Powered Up, when the program is started, and just needs a solid end-stop on either side. The key block ist the orange gyro-sensor-read-out block, which delivers information about the current position of the hub on X or Y axis. This is then used to control the power (or the position) of the motor of the vehicle. Code Example for a telehandler In addition to the steering and driving motor, there is also a one motor to lift the boom and one to close the gripper tool. There are two hubs ("02"&"03") used to controll the machine. Video of the Telehandler controlled with this code:
-
Generic Contest Discussion
Tobi Wankenobi replied to Jim's topic in LEGO Technic, Mindstorms, Model Team and Scale Modeling
Where will the official rules and conditions of the contest be published? I don't want to miss that! -
Yes thats correct. I was also thinking about the possiblities of adding two hubs and then use both tilt sensors, but that is really going to be too bulky. The cool thing on using the Powered Up Hubs, is, that you can easily add more functions to it, which are not directly related to the remote control. For the Telehandler, I made a air compressor, that turns off, as soon as a certain pressure is reached (pneumatic piston working against a spring, change detected by a color sensor). Also, because you have encoders in the PU motors, something like shifting a gear by 90° for the next function is possible to implement.
-
Some more technical insights: Yes, the tilt/gyro sensors of the technic hubs are used to read out the position of the joystick. As the value range is different to the motor-power range, some mathematical operations need to be performed to make it work. For the triggers, I used the distance/color sensors. (see pictures below) The 3x5 liftarm will trigger the sensor to see "red", when the trigger is pressed. (otherwise, it detects no or black color). This signal is then used to trigger different actions, depending on the vehicle. For the LEGO Liebherr 9800, I made it switch between track-control and excavator control. On my telehandler, I used the trigger to activate the pneumatics and/or switch the gears to select the pneumatic function. ForceFeedback is a cool idea! I need to think a little more about that. Maybe, if rubberbands are used to decouple to motors and the joysticks, it could work in a way... Concerning powered up code: I am planing to create something, explaining how to make it work, but it will take some more time until it is finished. I have the hope, that LEGO will realize, that a propper remote-control is a cool feature and addtion to all their Powered Up set. Ideally, you could configure the remote control with an App, and then use it without a mobile phone... In order to make LEGO aware of the demand from the community for a proper remote control, I created this LEGO Ideas project: https://ideas.lego.com/projects/7a877a58-dc8d-432e-84de-9db5556be044. Feel free to vote and share, if you support the idea of a real LEGO remote control. Joystick from the outside: Joystick open, trigger not pressed Joystick open, trigger pressed. Colorsensor detects "red".
-
I used the LEGO Powered Up APP, which allows to do some "Block-programming". It can interact with up to 4 hubs, which I made use of. On that basis I developed small programs, with which a MOC or LEGO set can be controlled. I hope, that LEGO will pick up this idea and release a remote control in the future, which makes use of the full capability of the Powered Up components. (and maybe does not need a mobile phone to run in parallel.)
-
Lego Powered Up is fantastic, but controlling models with a mobile phone does not feel great. Either you focus on the App, but then missing the movements of the machine, or you watch the machine, but your finger sooner or later miss the controls on the phone. LEGO did not fill the gap of a real „physical“ remote control (as known from earlier Power Functions), even though this is a huge demand of the community. This is the reason, why I developed the „Universal Vehicle Controls“. It is a real remote control for any LEGO Control+ set, and any MOC build with the „Powered Up“ hub. Compared to the former PF remote controls, the „Universal Vehicle Controls“ does not only allow you to control motors on-off-reverse, but you can proportionally control the motors power or speed. See how it looks in reality: Some technical insights: Each joystick has 4 degrees of freedom (front/back + left/right + turning CW/CCW + trigger). Each of the axis can be assigned to a function of the vehicle. For example, moving the joystick to the front will make the vehicle drive forward. The movements are proportional, this means, that the more I move the joystick forward, the more power is used to accelerate the motor. The additional trigger is used for special functions like switching operation mode or start a certain action. In the example with the Liebherr 9800, the triggers are used to switch between driving (track- and swing control), and the excavator control, as found in any standard excavator on construction sites all around the world. The All-Purpose Controls have an indicator, which shows speed or operation mode, depending on the selected model. This gives an additional feeling of being right inside the machine.
-
Nice build.