

Munchkin255
-
Posts
41 -
Joined
-
Last visited
Content Type
Profiles
Forums
Gallery
Everything posted by Munchkin255
-
Advanced Lego robotics
Munchkin255 replied to pekka111's topic in LEGO Technic, Mindstorms, Model Team and Scale Modeling
You could also use an actual Pi instead of a LEGO hub. The Raspberry Pi Build HAT allows you to connect four PowerdUp / Technic / Spike motors to a Raspberry Pi. https://www.raspberrypi.com/products/build-hat/ -
Advanced Lego robotics
Munchkin255 replied to pekka111's topic in LEGO Technic, Mindstorms, Model Team and Scale Modeling
I recommend that you check out Antons Mindstorms. He is doing a lot with Spike and 3rd party parts. https://www.antonsmindstorms.com/ -
Here is a suggestion from MicroSoft CoPilot: It sounds like you’re ready for a challenging and rewarding project! Here’s an idea that could spark your creativity: Project: Transforming Robot with Multiple Modes Imagine building a robot that can transform between different modes, such as a vehicle mode, a humanoid robot mode, and a third unique mode of your choice (like an animal or aircraft). This project would incorporate complex mechanisms, motors for movement, and pneumatics for actions like lifting or grabbing. Key Features to Include: Articulated Joints: Use Technic gears and levers to create smooth and controllable movements. Motorized Functions: Integrate motors to drive the robot’s transformation and mobility. Pneumatic Systems: Add pneumatics for realistic mechanical actions. Remote Control: Implement a control system to operate the robot remotely. Design Considerations: Stability: Ensure the structure is stable in all forms. Weight Distribution: Balance the weight to prevent tipping during transformation. Aesthetics: Design the exterior to be visually appealing in all modes. Building Tips: Start by sketching out your ideas and planning the transformation sequence. Create a sturdy core frame that can support the various moving parts. Experiment with different gear ratios for optimal speed and torque. Use color-coding to enhance the visual appeal and differentiate between modes. This project will not only put your Lego Technic collection to good use but also challenge your engineering and design skills. Have fun building, and I’d love to hear about your progress on this exciting endeavor! 🚀 I might add. How about building a pneumatic octopus 🐙
-
I really like, that the winner is using a good old RCX
-
LEGO i overpriced for what it is. :-) I think you should be very aware about his age and what you are asking of him. Spike Prime is recommended for age ten and up. So is this something that he will get the full benefit from? Maybe Boost is a better way to introduce him to programmable Lego?
-
the Spike app comes with many different built and coding projects. I recommend that you download the Spike app and check out what it offers. Then you can decide if that is the way to go. Personally I think it is brilliant and understand why it might not be for everyone. About the price of the set maybe check Bricklink for a cheaper price than getting it directly from Lego Shop at home.
-
Maybe check out 4993 LEGO Creator Cool Convertible. It has a nice and simple mechanism.
-
Hi I am not really an expert on the Mindstorms App. To me it looks like that one issue is that every time you move a new slider you will start a new sub-part of the program and subsequently a new infinite loop (widerhole fortlaufend). This means that if you move all four slides then the program will execute four loops all giving different commands to motor E. A possible solution might me to exchange the loop widerhole fortlaufend (run forever) with a run until block. And setup each of these loops to run until slider is 0. How does that work? Cheers Carsten
-
Raspberry Pi LEGO HAT
Munchkin255 replied to Ankoku's topic in LEGO Technic, Mindstorms, Model Team and Scale Modeling
That is a great concept, that brings much needed computing power to Spike robots. I wonder if it is possible to attach multiple HATs to allow connection of more than 4 sensor / motors. -
Technic makes poor floating boats and even worse flying aircraft. Thank you Jim for a constructive review that brings some positive wibes to this set.
-
Snake Game
Munchkin255 replied to ord's topic in LEGO Technic, Mindstorms, Model Team and Scale Modeling
I love it. Next step must be to build a bot that plays the game for you. -
Hi Gimmick I am using Spike Prime with the LEGO Education Spike software. I guess my code will not really help you. The program I have is for the driving wheels of a robot. For this I am actually not using the absolute angle measurement from the servos. Instead I use the degrees turned measurements. Furthermore my motors aren't really synchronized instead I use the gyro input to keep the robot moving in a straight line. An option - if you want the arms to move with the skies could be to do something like: motorpair.start() While not a desired angle: Do nothing or maybe use the yield command to do other stuff When at desired angle: motorpair.stop()
-
I met the same limitation with a First Lego League Spike Prime robot I am working on. My solution was to program my own program to control the robot. Instead of synchronising the motors based on angles I choose to use the built in gyro instead. I also made code to ramp up the speed of the motors in the beginning and slow them down again near the target angle. The code is currently embedded into a large library, that is very much a work-in-process. I will try to isolate the motor control method for you and will upload it here on EB - this however might take some days. A small hint of caution beforehand is, that my program probability still needs some tweaking if it is to be matched against the awesome solutions of pybricks.
-
It was actually intentionally that I wrote 0 as the first parameter when calling the function hub.display.pixel(). This does off course only result in a single column of LED showing the battery level. (In this case to the left on the LED Matrix.) Which is different from your program, that uses all 25 LEDs. I have been using the same code to show the distance measured by three distance sensors. There it makes sense to only use one column for each distance measured. Did the code run without fault on the Robotic Inventor Hub? Cheers Carsten
-
EV3 Technic Pin Sorter
Munchkin255 replied to Mr Jos's topic in LEGO Technic, Mindstorms, Model Team and Scale Modeling
Thank you for the reply. What I really like about your machine is how you have both worked out great solutions for hardware construction and for the use of sensors, servos and programming. The drum feeder is a perfect example of where the psychical construction have solved the problem. This is coupled with color sensors and servos for the sorting. I thought that reason for two color sensors was just to measure length of the pins, but I can see how using two different backgrounds colors can aid in telling the difference between two very similar colors. Once again congratulations on a fine build. Cheers Carsten -
That is a small and funny application. I have been working on a program that uses the LED to show the distance measured by the distance sensor. Just like in your program I initially though to write a program around a logic: What is done when measured value is X? I came to a solution that approached the problem from another angle. My logic is to look at the individual LEDs in the LED Matrix and for each LED determine if it should be on, dimmed or off. This allowed me to use for loop and define the criteria in a list. Please see program example below. Oh and I put the code inside a function. Please note, that because I am using Spike Prime I haven't been able to test the code - it should work though... Cheers Carsten from mindstorms import MSHub from mindstorms.control import wait_for_seconds, wait_until, Timer import hub # Create your objects here. hub = MSHub() battery = hub.battery.capacity_left() print(battery) def show_bat_level(): led_on_crit_full = [20, 40, 60, 80, 100] # List that defines when each led should turn on. led_on_crit_dimmed = [10, 30, 50, 70, 90] # List that defines when each led should turn on dimmed. for led_y in range (5): #Loop Through the five individual LED in the selected coloumn to check if it should be on, or off. if battery >= led_on_crit_full[led_y]: hub.display.pixel(0,led_y,9) elif battery >= led_on_crit_dimmed[led_y]: hub.display.pixel(0,led_y,5) else: hub.display.pixel(0,led_y,0) wait_for_seconds(3) hub.display.clear() show_bat_level()
-
EV3 Technic Pin Sorter
Munchkin255 replied to Mr Jos's topic in LEGO Technic, Mindstorms, Model Team and Scale Modeling
Cool build I really like how you have made the different parts of the machine to work independently from each other. Did you face any problems during programming? Cheers Carsten -
I finally figured out how to use Yield to run parallel threads in Micro Python (Spike Prime). I know this is a quite old thread, I do feel however that the topic is important enough and still relevant to justify its revival. Please see my sample Spike Prime program below which shows a simple way to run parallel activities using Yield. I am not a programmer so there might be a more "correct" way to do this - it does however work for me. Best regards Carsten from spike import PrimeHub, LightMatrix, Button, StatusLight, ForceSensor, MotionSensor, Speaker, ColorSensor, App, DistanceSensor, Motor, MotorPair from spike.control import wait_for_seconds, wait_until, Timer from math import * import sys hub = PrimeHub() hub.light_matrix.show_image('HAPPY') class Yield_func: def __init__ (self): self.result = 0 self.goon = 1 def add(self): """ As long as the go on variable is 1 this method will add 1 to the result. Then the check method determines that the goal has been reached it will change go on to 0 causing this method to stop counting. For a driving robot this method could be a routine to drive the robot until reaching a target. """ while self.goon == 1: self.result = self.result + 1 yield yield def draw(self): """ This method demonstrates a routine that is running together with the other methods. It will turn on LED in the Light Matrix to match the counted value. For a driving robot thus method for example control a grapper arm which moves while the robot is moving """ hub.light_matrix.off() while self.goon == 1 and self.result <= 25: #turns on LED to match self.result count x = int(self.result / 5) y = self.result - (x*5) hub.light_matrix.set_pixel(x, y) yield yield def check(self, target): """ This method checks if the desired target has been reached. When target is reached the go on variable is changed to 0 For a driving robot the method could use input from distance or light sensors to determine if the robot should stop. """ while self.result < abs(target): yield self.goon = 0 yield mat = Yield_func() check = mat.check(25) pluss = mat.add() led = mat.draw() while mat.goon == 1: next(led) next(pluss) next(check) wait_for_seconds(0.1) #print ("mat.result: ", mat.result) print ("done") sys.exit()
-
Hi Jos Have you tried to run the loop without printing output? I am a little surprised by how much it slows down program execution - especially if the output is sent via Bluetooth. Cheers Carsten
-
In my previously post I hadn't included all the "standard" includes that Spike Prime adds to any new program. The "normal" hub features are accessed via the spike module. Importing the hub modul is done only to access the raw acceleration data. Here is the complete program for viewing acceleration data. from spike import PrimeHub, LightMatrix, Button, StatusLight, ForceSensor, MotionSensor, Speaker, ColorSensor, App, DistanceSensor, Motor, MotorPair from spike.control import wait_for_seconds, wait_until, Timer from math import * import sys import hub primt_hub = PrimeHub() hub_status = hub.status() acc = hub_status.get('accelerometer') acc_x = acc[0] acc_y = acc[1] acc_z = acc[2] print (acc) sys.exit() cheers Carsten
-
the code example below first imports the "hub" module then acceleration data is retrieved by using the hub_status.get command. import hub hub_status = hub.status() acc = hub_status.get('accelerometer') acc_x = acc[0] acc_y = acc[1] acc_z = acc[2] Cheers Carsten
-
Yes, the Charging LED changes to green when the battery is fully charged. You can view the battery level from the app, If you are using PC, I recommend to connect with the USB cable, this way the battery is charged while you are creating your program. / Carsten
-
EV3 Classroom - a bug?
Munchkin255 replied to biasedlogic's topic in LEGO Technic, Mindstorms, Model Team and Scale Modeling
I made this program in Scratch for Spike Prime, and it works as intended. The motor is stopped when there is no reflected light and moves at full speed, when the light sensor is measuring against a white piece of paper. The value of reflected light is meassured in percent, with a range from 0 til 100. In order to do some math and to provoke a non-integer value for the power setting I use a muliply by 1.2 math block. There isn't any start motor at power block, instead power is set before staring the motor. Cheers Carsten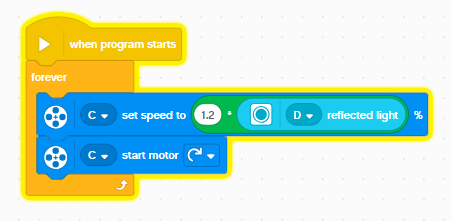
-
EV3 Classroom - a bug?
Munchkin255 replied to biasedlogic's topic in LEGO Technic, Mindstorms, Model Team and Scale Modeling
Could there be an issue with what type of variable you are trying to use as motor power? In Python the variable you use as motor power has to be of the variable type INT otherwise you get an error message. Maybe the Classroom app is changing the variable type to FLOAT, when doing math operations and then changing it back to INT when saving the result in a variable? Isn't there a console window with error messages? Cheers Carsten -
I switched from EV3 to Spike Prime this June and hasn't regretted it at all. Through my experiments with Spike Prime I have learned to program in Python. What I especially like about using Python is, that I am not limited to the tools provided to me by the Spike App. I can do anything that Micropython is capable of - even if it isn't documented in the app. This works because the Spike app is merely an editor with the code compilation being carried out in the Spike Prime Hub. I have for example been able to access the raw acceleration data by using Google and a lot of trial and error: import hub hub_status = hub.status() acc = hub_status.get('accelerometer') acc_x = acc[0] acc_y = acc[1] acc_z = acc[2] Yes, I know there is a Scratch code block for that, but there isn't a function in Python yet.