
Wurger49
-
Posts
396 -
Joined
-
Last visited
2 Followers

About Wurger49

- Birthday May 10
Recent Profile Visitors
19,185 profile views


-
 the night back drop really helped! 100%!! Thank you for the support! thank you!
 -
Thank you! That was actually one of the reasons I chose the night setting. It helps disguise the missing mountainside while giving the whole scene a more atmospheric feel. Glad you liked the trees too!
-
The LEGO Icons 10367 Minas Tirith is a magnificent model and the largest set in the Lord of the Rings collection. I loved how it combined minifigure scale with microscale to create this towering city, but unfortunately it was simply too large for my humble home. While studying the New York Skyline set, the white curved slopes surrounding the backdrop caught my eye and inspired me to create a true microscale version of the White City. The first challenge was redesigning the base into an elongated hexagonal footprint before mounting the curved slopes on brackets to form the city's imposing outer walls, with the Great Gate as the centrepiece. A mixture of non-white elements forms the dramatic central rock spur that projects through the heart of the city. The tall 1 x 1 x 5 bricks, originally used as skyscrapers, proved perfect for constructing the towering inner core of Minas Tirith. With the rocky core complete, the city was built outwards on staggered platforms to recreate its iconic terraced appearance. I incorporated a variety of architectural details throughout the walls, including towers with different roof designs, decorative columns, domed buildings, and fortified gateways to capture the intricate character of Gondor's capital. At the summit sits the Citadel and the Court of the Fountain, where trans-clear quarter round tiles recreate the fountain. The grille elements from the Empire State Building are cleverly repurposed as the façades of both the Hall of Kings and the Tower of Ecthelion, making excellent use of the donor set's architecture. The distinctive black backdrop from the original skyline has been transformed into a dramatic night sky, complete with a crescent moon and the Seven Stars of Gondor. The backdrop is crowned by a semicircular crest, framing the White City and creating a striking contrast against its bright stone walls. Dark bluish grey elements represent the sparse trees and foliage surrounding the city. One of my favourite details is using ice cream scoops to depict the White Tree of Gondor. One final story made me smile. My young son has never seen Peter Jackson's Lord of the Rings trilogy, yet when he saw the model he immediately pointed to the Court of the Fountain and declared, "That's the perfect place for throwing bad people off the cliff to be zapped by the twin Tesla coils!" I had to laugh... perhaps he was imagining a very different version of Minas Tirith! Instructions are on Rebrickable and OpenStuds: https://reb.li/m/265114
-
Thank you! Alt builds are fun and challenging. Thank you! Very insightful!
-
Haha, I do admit it's out there!
-
After designing my Horse Lord Castle from two sets of 31168 Medieval Horse Knight Castle, I received many requests to combine the Creator 3-in-1 31168 with the retired 31120 Medieval Castle, as not everyone can easily obtain multiple copies of the same LEGO set. At the time, I was working on the Book Nook series as a refresher on 31120’s building style before moving on to this next castle. I decided to call this model the “Alliance Castle”, as it’s a stronghold jointly defended by the Black Falcon Knights and the Horse Knights. I explored several design options, but given the constraints of the two sets, I focused on blending the best architectural elements from both castles to create a unified design. After some feedback on the open-back “dollhouse” layout of my previous castle, I made this one fully enclosed. Naturally, the enclosed design ended up smaller due to piece limitations. Inside, I incorporated two key features from 31168 — the tan wattle-and-daub house and the stone manor house. The tan house is hidden from exterior view so it doesn’t clash with the other yellow timber structures. I also raised all battlement crenels by one brick and flipped the slopes on the merlons outward, as they should be tall enough to shield soldiers from incoming projectiles. The Alliance Castle is divided into three main sections: The Gatehouse – featuring dragon gargoyles, a portcullis, and outward-sloped battlements for better deflection. I also added a kitchen to serve the banquet hall. The Riverside Wall Section – positioned along a river bend, where the watermill and dark azure plates form the waterline. Yellow wattle-and-daub structures overlook the water, while the mill powers a blacksmith’s workshop. The Manor house sits the banquet hall, with the throne room on the top floor. The colorful watchtower with its pointed spire stands guard over the landscape. The Land Wall Section – this area faces the main approach, so I doubled the wall height for defense. The great stone tower was built using corner panels from 31168. Inside, a stone staircase leads up to the tan wattle-and-daub house, which sits above a well and market stalls for fresh produce. With leftover parts, I also created a jousting barrier and arms stand, perfect for staging knightly duels — though my son always insists on being the good guy, leaving me stuck as the black knight! And yes, the green dragon can still be built. Overall, The Alliance Castle combines the best elements of LEGO’s two Creator 3-in-1 castles, offering both a display-worthy exterior and detailed, playable interior. Instructions are on Rebrickable: https://reb.li/m/237810
-
I had a blast designing and playing around with the Medieval Town Book Nook, and I’ve enjoyed it so much that it’s earned a permanent spot on my work desk. I wanted to expand on the idea and managed to get two copies of 31120 Medieval Castle from some mates who had them spare in their collections. From a design point of view, 31120 offers more wattle-and-daub buildings compared to 31168, making it perfect for creating a full streetscape along one side of the book nook. On top of that, my son and I both loved the set’s watermill, so I knew it had to be worked into the design. That led me to create a river town scene. Structural Design · Gate and Walls – Built completely solid for strength and easy handling. · Three-Storey Tower – Brick built on 3 sides for both play and stability. · Base – A sturdy foundation patterned in dark and light gray for visual texture. Scene Details · Left Side – Entering through the gate you’ll find a food stall, well, and blacksmith tucked beneath two wattle-and-daub houses, with a treasure and throne room hidden within. · Center – The three-storey tower with its watermill sits proudly on an island, the waterways powering its wheel. A barred door at the base is partly concealed by foliage. · Right Side – A wooden staircase leads down to ground level where chickens scratch and a mouse scurries about, while a small chapel is nestled just behind the main gate. The Atmosphere This build captures a slice-of-life medieval scene: a river town bustling with homes, a market, a watermill, and townsfolk, all contained within fortified walls and gates. It’s meant to feel like just one part of a larger medieval town or castle complex, packed with little details to discover. And of course, the green dragon fits right in with this setting—almost like Smaug swooping down on Lake-town from The Hobbit. Whether displayed on its own or slotted neatly between your books, I hope you enjoy building and displaying this medieval book nook as much as I do! Instructions are on Rebrickable: https://reb.li/m/235387
-
thank you! the closed mode is pretty cool with nooks
-
It’s been fascinating to see other LEGO designers creating book nooks — clever builds that can open on a hinge to reveal a diorama, and when closed, slip neatly into a bookshelf. Following the successful launch of my Horse Lord Castle, I wanted to follow in the footsteps of other Rebrickable designers and create a book nook of my own. My goal was to design something that works both as a display piece and as a bookshelf insert. Structural Design The front of the model (the gatehouse and adjoining building) is built completely solid for strength. At the back, where the three-storey manor house sits, I used 2-stud-wide columns for support. A solid base, patterned in dark and light gray visual texture. The tall flagpoles are connected via bar clips, making them adjustable so they won’t fall off while sliding in and out of books. Scene Details On the left, entering through the archway, you’ll find a blacksmith tucked into a stone arch with a red-and-white awning. A small tree conceals a secret doorway, while above rises a spired tower with a semi-circular battlement. In the center, the large three-storey manor house stands with narrow black lattice windows and a reinforced wooden door. On the right, a traditional wattle-and-daub house sits beside another archway. Its upper floor serves as a bedroom, while the ground floor houses a bustling market stall filled with vegetables and meats. The Atmosphere The build captures a slice-of-life medieval scene: a fortified gate flanked by homes, a market, and townsfolk, all watched over by guards beneath colorful crests and flags. It’s designed to feel like part of a larger medieval town or castle complex, packed with small details to explore. The Process Designing this book nook was especially fun (and occasionally frustrating) around the hinge joint. More than once, changes I made meant the model wouldn’t close properly — whether it was the size of the tree or the reinforcement of the manor house. A few head shakes later, the design came together. All minifigures and their horses remain fully compatible with this build. Whether displayed on its own or slotted between your books, I hope you enjoy building and displaying this medieval book nook! Instructions are on Rebrickable: https://reb.li/m/234442
-
cheers mate, Disney styles too. That's one awesome tall ship.
-
Can’t believe it’s already been four years since I built my Grand Castle using 2x 31120 Medieval Castle. This time, I pushed myself further and designed a 2,200-piece Studio model. Big kudos to the designers who regularly create large MOCs, going 5x my usual 200–500 piece builds in Studio really drained me. The 31168 Medieval Horse Knight Castle comes with some of the best modern castle minifigures. While the brick-built horses were controversial, I came to appreciate them after building. Compared to 31120’s rectangular layout, 31168’s irregular, adjustable footprint makes it far more dynamic. I built both sets simultaneously, bag by bag, over four nights (versus just one for a Star Wars set). This method helps me learn techniques while sorting parts directly into the castle as I go. Design Goals My main goal was to elevate the castle’s vertical presence. LEGO’s octagonal tower design is brilliant, but the gatehouse towers felt underwhelming. Using two sets, I rebuilt the gatehouse with octagonal towers and doubled the height of the ramparts. This not only improved the proportions but also created stronger connections, as each wall now locks in with two clips instead of one. Arrow loops were shifted higher up the walls, and the drawbridge was extended by a third while still retaining its winding play feature. I chose not to rebuild the trees, as keeping the castle walls tall and imposing felt more important. Open vs Enclosed Castle At first, I considered enclosing the castle, but inspiration struck: my Disney Castle is always displayed front-on, its open back showcasing multiple stories. Then my 6-year-old chose to defend the castle from the open back during play. Finally, keeping it open allowed me to go bigger overall. Decision made. The design keeps four main sections: gatehouse, two L-shaped walls, and the main building. Expanded Features The back section was lengthened to retain the banquet hall, blacksmith, and stable. The guard tower was replaced with a wattle-and-daub trade house for the craftspeople. Another level was added to the banquet hall, turning it into a multi-storey masonry keep with a throne room above. Towers & Silhouette The focal point is the pair of towers: a smaller guard tower with two lookout rooms, and the main tower crowned by a tall dark-blue spire built with palisade bricks and convex slopes. Finishing the main tower used up every last corner panel I had. Together, the towers create the pyramid silhouette I love for castles, a shape that reflects feudal hierarchy and inspired the name Horse Lord Castle, the next level up from Knight Castle. Extra Builds With leftover parts, I made a jousting barrier, perfect for smashing the two knights on horses. My son insists on being the good guy, which leaves me stuck as the black knight! This build is both a display centerpiece and a playset. If you try it yourself, you won’t regret it. Instructions are on Rebrickable: https://reb.li/m/233156
-
The official model is 5.9 cm wide, 10.6 cm long, 15.4 cm tall. Or 2.3 inches wide, 4.2 inches long, 6.1 inches tall. My model is 5.1 cm wide, 9.1 cm long, 12.8 cm tall. Or 2.0 inches wide, 3.6 inches long, 5.1 inches tall. Another overpriced set from LEGO — even though it includes two great builds, the newly designed Spider Droid and the updated AT-RT. The yellow AT-RT has been downsized from the massive 501st version of 2020, which in my view is actually a positive change compared to other downsized Star Wars vehicles. Just like when I rebuilt the 501st AT-RT, I wanted to make this walker more screen-accurate and closer to minifigure scale. The Spider Droid was not modified in this listing. It was important to me that the AT-RT remain as posable as the original. The large feet from the set play a key role in stability, so I kept most of their design intact including 6 dishes for leg joints, with only minor adjustments. From the hips upward, however, I redesigned nearly everything — saddle, seat, and front shield — to significantly reduce the overall size and make it truer to scale. For play and posing, I recommend holding the model at the hips, since sudden pressure on the joints can shift the connection there. I also modified the flat silver tooth plate by removing the bracket beneath it, giving it more articulation and adding stability when posed in a walking stance. With the spare pieces, I put together a small command post, complete with blasters and a communications unit. I hope everyone who picks up this set (hopefully on sale!) enjoys the build and finds this AT-RT mod a more accurate and satisfying version. Instructions are on Rebrickable: https://reb.li/m/231903
-
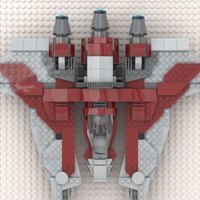
When the 2025 V-19 Torrent was announced, I thought it would be perfect for rebuilding into a Republic Gunship — it’s practically tradition for me to convert starfighters into gunships. But when I finally built the V-19, I was so impressed with its design that I decided to start with a modification first, using leftover pieces from my Z-95 alternate build from set 75402. After the modification’s successful launch, I took apart the V-19 and began work on the gunship. The first problem I encountered was the lack of bracket to use around the cockpit due to the wide fuselage design of the V-19, which means I had to design around a 6-studs wide base vs the 4-studs wide base I normally use. Fortunately, there were just enough SNOT bricks and Technic pins on Technic bricks to support four 3×2 curved slopes — my dream pieces for recreating the gunship’s trapezoid front profile, where the cockpit canopy is narrower than the hull base. White 1×8 and 1×2 curved bricks let me seat the trans-yellow windscreen at an angle without big gaps, and I built a hinged slope to close the gap while still allowing easy opening. The cockpit comfortably fits a single clone trooper pilot — perfect for darting around on recon missions. The yellow and light gray bricks are used on the side hulls like the actual gunship. Once the cockpit was sorted, the rest of the build followed my usual modular approach. Two 1×12 Technic bricks form the spine, with more Technic bricks making up the back wall of the cargo bay. The rear ramp connects on angled pin plates, while rear side panels mounted on brackets close the hull gaps. Two projectile launchers sit under the cockpit on either side of the nose. The cargo bay is 6 studs wide and 7 studs long — enough for six clone troopers facing forward, though I display mine with four troopers standing sideways. The tail gun connects via a hub on pin plates. For the missile launchers, I kept the ball-socket connector system from the V-19, testing several 3×3 round arrangements before settling on the sturdiest design. The wings connect as a single integrated unit to the spine, locked in with just one pin and one brick — surprisingly secure with very little flex even when swooshing around. This is one of my most structurally sound builds yet; you can grab it anywhere on the main hull and swoosh it around by the fuselage sides without worry. This gunship continues the evolution of my alternate-build gunship series — a sturdy, playable, and display-worthy addition to any LEGO Star Wars collection. Instructions are on Rebrickable: https://reb.li/m/231603
-
cheers, I find alternate builds a lot more accessible to the general public.
-
After building the 2025 official V-19 Torrent, I was quite satisfied with the design — but I saw room for improvement. I wanted to enhance the proportions by extending the wings and raising the back fin, and I built this modification using leftover parts from my Z-95, which remains my most popular alternate build for 75402 (ARC-170). This upgrade lengthens the V-19’s wings by 4 studs each and the height of the back fin by 2 studs, giving the starfighter a sleeker and more balanced silhouette. These instructions let you build both the enhanced V-19 and the Z-95 Headhunter using only the parts from 75432 and 75402 — no extra bricks required. Instructions are on Rebrickable: https://reb.li/m/230949