
Gumbinger
-
Posts
28 -
Joined
-
Last visited
Content Type
Profiles
Forums
Gallery
Everything posted by Gumbinger
-

NEW Delta-7 Jedi Starfighter - Minifig Scale MOC
Gumbinger replied to Gumbinger's topic in LEGO Star Wars
Instructions & parts list are FREE on Rebrickable -- https://rebrickable.com/mocs/MOC-97631/Gumbinger/delta-7-starfighter-moc/#details I've also updated the design recently, and the STUD.io file will be available via Rebrickable once it's approved. Enjoy! -
NEW Delta-7 Jedi Starfighter - Minifig Scale MOC
Gumbinger replied to Gumbinger's topic in LEGO Star Wars
Hey Hey -- Since my last post, I made a bunch of adjustments, with a complete overhaul of almost everything. I was able to add more detail to the front, the bridge/cockpit area, tail, wings, and undercarriage. I'm really happy with how it turned out, and am excited to say that over the Christmas break I had some free time to crank out the STUD.io model AND instructions. My main reference was this 3-D model that I found -- https://sketchfab.com/3d-models/star-wars-delta-7-jedi-starfighter-053a14f9353a4f4aa6300fa0a398ffab -- but I've also found the image below useful. If you compare my model to the image below, you will see that the overall length is spot on, but the wing width is off by a hair. The only way to make the wings wider with the 3x6 wedge plates is to make it longer, with will make the model too long. I'm tempted to work with the 4x6 wedge plates, but not sure if that will work? I also decided to use the 3x3 cylinders for the engines, as that matches the 3-D model much better. The reference image below has the engines a little smaller, but I think the 3x3 engines look best. Instructions are available on Rebrickable -- https://rebrickable.com/mocs/MOC-97631/Gumbinger/delta-7-starfighter-moc/#details More pics on Flickr -- https://www.flickr.com/photos/147199612@N04/albums I'm going to take pics of the physical model & do some renders of some of the details soon. Delta-7 Jedi Starfighter MOC by GUMBINGER, on Flickr Delta-7 Jedi Starfighter MOC by GUMBINGER, on Flickr Delta-7 Jedi Starfighter MOC by GUMBINGER, on Flickr Delta-7 Jedi Starfighter MOC by GUMBINGER, on Flickr Delta-7 Jedi Starfighter MOC by GUMBINGER, on Flickr SWPM-JediFighter by GUMBINGER, on Flickr Delta-7 Jedi Starfighter MOC by GUMBINGER, on Flickr -
NEW Delta-7 Jedi Starfighter - Minifig Scale MOC
Gumbinger replied to Gumbinger's topic in LEGO Star Wars
Hi there -- I don't have a plan to make instructions for this model. However, I recently bought the new 3x3 curved slope corner pieces to redo the back of the tail area, which lead to me doing a complete overhaul of the model. The wings and undercarriage stayed relatively untouched, but I revamped the cockpit and tail areas. I was going to do a new post about it, but haven't gotten around to it yet. Here are a few pics -- I'm still tinkering with a couple things inside the cockpit, but I'm getting close to being done. I can't promise instructions anytime soon, but once I finish the instructions on my ETA-2 model I will start on this one. Updated Delta-7 Jedi Starfighter by GUMBINGER, on Flickr Updated Delta-7 Jedi Starfighter by GUMBINGER, on Flickr Updated Delta-7 Jedi Starfighter by GUMBINGER, on Flickr Updated Delta-7 Jedi Starfighter by GUMBINGER, on Flickr Updated Delta-7 Jedi Starfighter by GUMBINGER, on Flickr Updated Delta-7 Jedi Starfighter by GUMBINGER, on Flickr -
NEW Delta-7 Jedi Starfighter - Minifig Scale MOC
Gumbinger replied to Gumbinger's topic in LEGO Star Wars
Thank you all for the positive feedback! Maybe -- I would consider it if I got enough requests. -
Hello there! Here is my second iteration of one of my favorite ships of Star Wars -- the Delta-7 Aethersprite Delta-7 Jedi Starfighter. @khatmorg & @atlas_er are big influences on this design -- especially the cockpit area of @khatmorg's, and the wings by @atlas_er. Biggest difference in mine is the overall length; it's shorter by two studs (which I think is more accurate). Making it a little smaller in comparison, but still has a lot of detail. Overall I'm really happy with how it came out. I tried my best to eliminate all gaps, and make it smooth as possible. I've very proud of the green accent on the back wings, and how I was able to keep the front wing/hood area smooth. The only thing I'm bummed about is that I couldn't squeeze in rear landing gear, but I love how the smooth underside came out. And the little bit of stickering on the back section to better convey the curve of the green. It's quite sturdy, but it does have some weakish points in the design. Thanks for checking it out! Delta-7 Jedi Interceptor MOC by GUMBINGER, on Flickr Delta-7 Jedi Interceptor MOC by GUMBINGER, on Flickr Delta-7 Jedi Interceptor MOC by GUMBINGER, on Flickr Delta-7 Jedi Interceptor MOC by GUMBINGER, on Flickr Delta-7 Jedi Interceptor MOC by GUMBINGER, on Flickr Delta-7 Jedi Interceptor MOC by GUMBINGER, on Flickr Delta-7 Jedi Interceptor MOC by GUMBINGER, on Flickr Delta-7 Jedi Interceptor MOC by GUMBINGER, on Flickr Delta-7 Jedi Interceptor MOC by GUMBINGER, on Flickr
-
Hi there, I've updated the MOC (with another small update coming soon - more on that in a bit), and I just wanted to share a few of the updates. The instructions for BOTH models are on REBRICKABLE. ***UPDATED DESIGN & INSTRUCTIONS*** 1) I've updated the design slightly to add more stability to the rear section & engines. The rear section was 1/2 stud higher than the rest of the ship, and now it is level with the rest. Now there is a smooth transition all the way through the model. OLD version RZ-2 A-WING by GUMBINGER, on Flickr NEW RZ-2 A-WING by GUMBINGER, on Flickr 2) I've updated the wings on the engines to closer resemble the model, by adding a 1x1 quarter round tile, which adds a nice round-over for the leading edge. OLD RZ-2 A-WING by GUMBINGER, on Flickr NEW RZ-2 A-WING by GUMBINGER, on Flickr RZ-2 A-WING by GUMBINGER, on Flickr 3) I ditched the design for the "call sign" or red lines on the side -- no longer brick built and instead chose stickers. I used red electrical tape which worked really well. Its more stable and just a better solution over all. OLD RZ-2 A-WING by GUMBINGER, on Flickr NEW RZ-2 A-WING by GUMBINGER, on Flickr4) I've also added instructions for the red ship. Very similar, but a few differences in the inside to set it apart from the blue model. RZ-2 A-WING by GUMBINGER, on Flickr RZ-2 A-WING by GUMBINGER, on Flickr RZ-2 A-WING by GUMBINGER, on Flickr RZ-2 A-WING by GUMBINGER, on Flickr5) The cockpit now raises/lowers via a hinge. BUT, an idea popped into my head the other day, and I've been working on a new version, where I will be able to keep the flat hood (no dip via a 2x4 curved slope) while still allowing the cockpit to hinge up. RZ-2 A-WING by GUMBINGER, on Flickr RZ-2 A-WING by GUMBINGER, on Flickr WIP The hinge brick attached to a ball joint (which is attached to the main model) acts as sort of a scissor-lift & allows the cockpit to lift straight up without interfering with the tile or bricks in front of it. I'm going to play with it a little bit more to make sure its strong enough to hold up, then I will update my instructions on both models. Cockpit hinge WIP by GUMBINGER, on Flickr Cockpit hinge WIP by GUMBINGER, on Flickr Cockpit hinge WIP by GUMBINGER, on Flickr Cockpit hinge WIP by GUMBINGER, on Flickr
-
@mcphatty nice work & excellent MOD! I like the how you did the curved slopes and 10x3 wedges on the blue model -- it keeps it in line with official set, but shows the difference in the two variants.
-
Man those look great! I think I prefer the clear canopy - I might update mine. Glad you liked the build!
-
I've been slacking lately and need to finish the red instructions - I need to test out the "hood" in physical bricks first. But I'm close to adding those to the rebrickable site. All who have purchased will get the updated PDFs once they are completed. Can't wait to see your version! Awesome! Can't wait to see how it turns out. Sweet! Its a sticker, not sure which set it came from. It looks like its from a trench run? Maybe from one of my older x-wing sets? I'll try to confirm on bricklink.
-
Hi there! Thanks for the kind words. I would love to see your updated rendition of this ship -- you can never have enough takes on this ship. Maybe I'll takle my Delta-7A model next... It's due for an update in a couple of areas
-
One purchase for all three
-
I wasn't planning on it, but I definitely will! Once I'm finished with the red & green variants' instructions, I will post the mods. Thanks! The lips of the 1x1 round plates with holes fit snug in the gaps in the plates on either side, and don't move. It's definitely not an approved Lego method, but it works. And it keeps the thrusters perfectly centered in the engines.
-
Good morning! I just wanted to stop by to let you know that the instructions are up on REBRICKABLE. I am almost finished with the instructions for the Red version, and will add those sometime this week. - M
-
Thank you! I appreciate the complements. Your model is great too, and I think LEGO should update their design to more resemble yours. They never address the split the in the front end, and I don't think they addressed the updated shape (i.e. its a tad longer then the RZ-1). I am currently working on instructions, and they should be done in the next week. I did reach out to Brick Vault, but unfortunately they were not interested in using my design for their shop because they are already working with another designer. Oh well! I will more than likely sell them on rebrickable. ALSO - that's a great looking minifig! Looks legit LEGO
-
**UPDATE** I finished the Stud.io model this weekend and tinkered with some color-swaps. I didn't check to see if LEGO makes all the pieces in the colors needed, so I'm sure I will need to edit them when I make instructions. For example, I know they don't make the ice cream cone piece in red or green, but I can swap those out for regular cones. I didn't spend much time on the red or green models, I only swapped colors. RZ-2 A-Wing BLUE by GUMBINGER, on Flickr RZ-2 A-Wing RED by GUMBINGER, on Flickr RZ-2 A-Wing GREEN by GUMBINGER, on Flickr
-
Glad you are enjoying it! P.S. - I'm working on instructions
-
I, uh, cheated... sorry to all that I offend! Connecting the round 4x4 plates behind the cockpit was a fun challenge. I went through about 4-5 different connection points, but settled on this one. It had to be offset every so slightly to line up with the cockpit. RZ-2 A-Wing by GUMBINGER, on Flickr RZ-2 A-Wing by GUMBINGER, on Flickr RZ-2 A-Wing by GUMBINGER, on Flickr RZ-2 A-Wing by GUMBINGER, on Flickr And here's the part where I cheated.... I originally uses a regular bracket and used 1x4 curved slopes similar to Jerac. It looked fine, but then I saw these pieces and thought what a shame it was that they were 2x2. So I cut the piece down to size. I thought I could make it work without cutting the plate by having it sit in the open space of the dark blue round 4x4, but I couldn't get it to work. RZ-2 A-Wing by GUMBINGER, on Flickr
-
That makes two people! I'll see what I can do - maybe some instructions "Inthert style" So little screen time! Hopefully more in The Rise of Skywalker 2x2 curved slopes won't work b/c the engines need to be smaller than the RZ-1 - 3 studs wide instead of 4 studs wide on the RZ-1. I wish they made 1x1 curved slopes that I could use instead of the 1x1 and 1x2 regular slopes that I used on the sides of the engines. I initially started with the 3x6x3 engine blocks, but couldn't quite get them to work for me. Thanks for the suggestions!
-
A few comparison pics with Jerac's RZ-1 RZ-2 A-WING by GUMBINGER, on Flickr RZ-2 A-WING by GUMBINGER, on Flickr RZ-2 A-WING by GUMBINGER, on Flickr RZ-2 A-WING by GUMBINGER, on Flickr RZ-2 A-WING by GUMBINGER, on Flickr
-
Thank you - very much appreciated! Thanks! Glad you like it! Thank you! Here are a couple more shots of the cockpit detail RZ-2 A-WING by GUMBINGER, on Flickr RZ-2 A-WING by GUMBINGER, on Flickr The frame is kinda sorta similar - the way the hood and underside slope towards the front is done in a similar fashion, the engine connections are similar, and the cockpit borrows a couple ideas. I originally sat down with his directions in front of me, but quickly realized there isn't enough room for all the stuff he did in his RZ-1, and just started putting bricks together. Maybe? Depends on if there is enough interest.. Thank you! The fins are attached in a similar fashion as Jerac's RZ-1 - see pic below. Fairly simple, yet effect connection. RZ-2 A-WING by GUMBINGER, on Flickr I believe the ball joint is no longer in production in light gray - they still make it in yellow though. RZ-2 A-WING by GUMBINGER, on Flickr
-
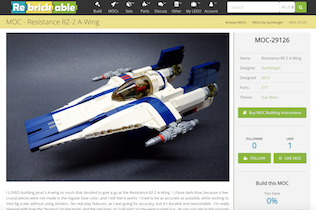
I LOVED building Jerac's A-wing so much that decided to give a go at the Resistance RZ-2 A-Wing. I chose dark blue, because a few crucial pieces were not made in the regular blue color, and I still feel it works. I tried to be as accurate as possible, while sticking to mini-fig scale, without using stickers. No real play features, as I was going for accuracy, but it's durable and swooshable. I'm really pleased with how the "humps" on the hood, and the red lines, or "call-sign" on the wing turned out. As you can see in the pictures you can change the number of red lines to your liking - and they fit snuggly and wont fall out. Let me know what you think! RZ-2 A-WING by M G, on Flickr RZ-2 A-WING by M G, on Flickr RZ-2 A-WING by M G, on Flickr RZ-2 A-WING by M G, on Flickr RZ-2 A-WING by M G, on Flickr RZ-2 A-WING by M G, on Flickr RZ-2 A-WING by M G, on Flickr RZ-2 A-WING by M G, on Flickr RZ-2 A-WING by M G, on Flickr RZ-2 A-WING by M G, on Flickr
-
First off, excellent model designed by Jerac. Thanks for the instructions, as it was a really fun (and sturdy!) build. I've always enjoyed tinkering with lego models, adding my own take on proven designs - this one has been my favorite by far. I wanted to color match a model that I found (LINK), which I think I did a pretty good job. I think I was able to make the nose of the ship a bit more accurate, as with the rear wings. I redesigned the guns and the back of the ship, but nothing major. DSCF5678 by M G, on Flickr DSCF5674 by M G, on Flickr DSCF5672 by M G, on Flickr DSCF5671 by M G, on Flickr DSCF5670 by M G, on Flickr DSCF5669 by M G, on Flickr DSCF5667 by M G, on Flickr DSCF5660 by M G, on Flickr DSCF5686 by M G, on Flickr DSCF5684 by M G, on Flickr DSCF5683 by M G, on Flickr
-
Aw man, I didn't realize I had a few replies! Not on here very often. Thanks! I love your version and I referred to yours and Khatmorg's (and some photos) quite a bit! Mine is very sturdy - even the engines, and the only spot that is slightly weak is the underside, back of the wings. The only thing that is 'illegal' is a connection on the inside - The cockpit is a half brick higher than the rest of the ship, if that makes sense.
-
Thats exactly how I did it. They hold on very well.
-
Thanks! The ship is quite swoosh-able and sturdy. The engines are attached via the stud at the tip with a bar going through it for added support. There are definitely more stable designs out there, but I wanted to go with the round look like the actual ship. I'm sure it can be modified for the booster ring! I am not very good with LDD, so I wasn't planning on making instructions. But I could take some parts off to show the inside. Thanks! I played around with that idea, and was on the fence about it. I liked it, but the cheese slopes stuck out just a bit about the wing, and its a slightly different angle than the nose/wing, so I decided to leave them off. I chose not to use red 2x3 wedge plates right after the 3x6 bley wedge plates because in the model there is a little gap there close to where the gun fires (I hope that makes sense). Thanks for the suggestion though!