
atomic80
-
Posts
53 -
Joined
-
Last visited
Content Type
Profiles
Forums
Gallery
Everything posted by atomic80
-
You mean step 361 not page 361? I see that a two 1x2 plates and 1 1x6 plate is used. Both brown..did you mean to switch those out to two 1x3 plates and a 2x6 plate and then put 1x1 brick on the side? Do you mind taking a close up picture to show us how it looks? I'm having a hard time envisioning how you did that. Thanks!
-
Can you post a link to the two different LED strips that you got. The ones I found so far are in fact weather proof.
-
Can you share details on what lights you got and how you set it up? Would love to do the same to mine as well.
-
Here you go LEGO Magic Carpet by Jason Tang, on Flickr LEGO Magic Carpet by Jason Tang, on Flickr LEGO Magic Carpet by Jason Tang, on Flickr
-
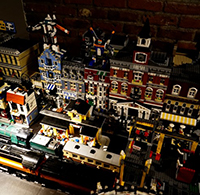
Disney castle really looks good next to the haunted house, grand carousel and ferris wheel! LEGOTOWN begins by Jason Tang, on Flickr
-
I finally was able to get my Disney Castle finished and put the Eiffel Tower next to it for size comparison. As a bonus I threw in the Haunted House too. LEGO size comparisons by Jason Tang, on Flickr
-
Do you mind sharing the LDD files for the other cars you've built? I also built this engine, a coach and sleeper car but would love to build the other things you've designed too especially the baggage and observation cars!!! I also noticed that you have the X4449 sticker near the smoke stack on yours! I would love to get the same for mine...do you have details on how/where you got that? Mini-me by Storms26, on Flickr
-
Bellevue, WA. that was only a quick guess. It's probably really more than 25 or so. They had piles of them behind the cash register even after 10 had already purchased them ahead of me. On another note...now I have two sets of these. Has anyone figured out how to combine the front and back yet?
-
When I went to the LEGO store this morning to get the newest architecture sets they had PLENTY of these Disney castles in stock. I estimate that they must have sold at least 40 when I was there.
-
I just ordered the Tower of Orthanc...I hope to build all of these sets and put them next to the Eiffel Tower. That would be cool to see! All the tallest sets offered by LEGO!
-
And LEGO Eiffel Tower (10181) is still the tallest set at 42"
-
^^^Wow...the disney castle really is MASSIVE!
-
That's my goal...I just got one. Will get another one at some point.
-
I bet someone will make the attempt. Not me though!
-
I have a great idea...buy TWO of these and make it into a complete castle on both sides that opens up to reveal the interior. That's a thought I had.
-
The manager at my local LEGO store seems to think that this will be released starting on August 17th to VIPs. Also, the new technic excavator is coming out on August 1st so perhaps that London bus set was intended for those folks. :(
-

Do people actually use bicklink mocshop?
atomic80 replied to Wardancer's topic in Buy, Sell, Trade and Finds
1. I bought 3 sets from there...and now a 4th. 2 arrived in a timely manner but 2 of them took a while because they had to collect the parts. It'd have been nice if they actually kept parts on hand to sell but I guess they wait until an order actually comes before collecting parts. 2. Yes, I would.. 3. N/A -
Amazing project you undertook. I'm wondering if you could get a picture of all of them together in one spot. That would be amazing for us all to see!
-
I honestly don't think the passenger cars need to be any longer. They're perfect the way they are. Have you thought about creating a baggage car also? That would be cool to have too. I look forward to seeing what the observation car looks like.
-
I'm finally finished after months of getting parts, testing, experimenting, building cars, etc.. The end result was well worth the effort. My next step would be to ensure that everything looks good and then apply the decals. Detail shots of the train as requested LEGO Daylight Express 4-8-4 by Jason Tang, on Flickr LEGO Daylight Express 4-8-4 by Jason Tang, on Flickr LEGO Daylight Express 4-8-4 by Jason Tang, on Flickr LEGO Daylight Express 4-8-4 by Jason Tang, on Flickr From top to bottom, sleeper car and two passenger cars. I hope to build an "end" car one of these days. LEGO Daylight Express 4-8-4 by Jason Tang, on Flickr The decals from zephyr with the custom rods that he also created. LEGO Daylight Express 4-8-4 by Jason Tang, on Flickr Top view of the cars LEGO Daylight Express 4-8-4 by Jason Tang, on FlickrLEGO Daylight Express 4-8-4 by Jason Tang, on Flickr Detail shots of the front of the locomotive and tender. You can see the IR receiver sticking through the top of the tender here. You can also see the modifications I made to the top front "smoke stack" section to include the plates for the engine numbers. Tony's original instructions did not have this plate. LEGO Daylight Express 4-8-4 by Jason Tang, on Flickr LEGO Daylight Express 4-8-4 by Jason Tang, on Flickr The setup on the temporary track layout. LEGO Daylight Express 4-8-4 by Jason Tang, on Flickr And a video too. Click on the image below to go to the video. LEGO Daylight Express 4-8-4 by Jason Tang, on Flickr Tony, do you plan to create an "end" car? And zephyr, will you be making extra decals for the "cars" as well? I suppose I could use the engine decals on the cars if the dimensions are correct.
-
Do you mind showing me a picture of what part you're referring to?
-
Thanks Tony, but I checked on the grey pin...it won't work with the wheels because the connecting points on the XL wheels are like this, + whereas the other end is round. I'd have to use the blue connecting pins instead but those would stand out...I'll try them and see if that makes it any smoother. I tried running the train without ANY connecting rods and it doesn't work too well either. I'll try the quartering technique to see if that improves things. On the upside, having two motors really works well in pushing the locomotive around but the bigger XL wheels don't move too well. So glad that I was able to inspire you! You'll love the end results after it's all done!
-
Quartered? You mean the counterweights being one rotational stop away from each one starting from the front? And yes, the technic pins are all black. Thank you also for the suggestion on stacking the motor connections! I didn't know that you could do that! And I used the switch as you suggestion to reverse the polarity on the second one so they're now moving in the same direction. One step closer!!! Thank you everyone for your help! Jason
-
Just curious, what are you using for your table setup?
-
I finally got the parts needed to rebuild the locomotive properly but now I'm struggling with two things. The XL wheels with the custom rods that zephyr created seems to be moving with a bit of a friction. It doesn't move smoothly most times. I tried moving the wheels out a bit and adjusting the rods but there seems to still be some friction. This in turn makes it very hard for the powered tender to push the locomotive around the track. Tony's instructions calls for using two PF motors but I can't get both to work with the same channel using one RC. It's only possible to put them on two separate channels meaning that I'd have to turn the dial on both at the same time to get the train moving. I thought about adding another IR receiver but there's no room for two IR receivers and two battery boxes. Any suggestions?