
woody64
-
Posts
871 -
Joined
-
Last visited
Content Type
Profiles
Forums
Gallery
Everything posted by woody64
-
MinifigCustomsIn3d - Material & Post processing Tips
woody64 replied to woody64's topic in Minifig Customisation Workshop
http://www.shapeways.com/model/148071/forage_cap__test_.html -
MinifigCustomsIn3d - Material & Post processing Tips
woody64 replied to woody64's topic in Minifig Customisation Workshop
Indeed the undress/forage cap is an item which is missing. I already had a look on it and some prework done.ackpack http://www.shapeways...__test_v2_.html You mean picture 24) here: http://i710.photobuc...01/img305-2.jpg You mean nearly the same backpack without the roll/greycoat on top? I think, both could be done. Woody64 P.S.: I've added building tip2. @Michael: Any new projects on your plan. I was already asked when we can expect a new Napoleonic topic from you. -
During the last months I've seen some more people working with 3d printing. Additionally I got a couple of questions about materials and colours. Therefore I've collected my first series of printing and post processing tips. Building Tip 1: White & Flexible - Glossy Surface This picture shows a White and Flexible French Hat, sprayed black. Afterwards I've applied a coat of gloss varnish.The bigger part of the picture shows the achievable result of the surface, whereas the smaller part gives an impression how that would look like in real Minifig size. French Shako White & Flexible: http://www.shapeways...o_1809__s_.html Tamiya spray black Eberhard Faber gloss varnish White & Flexible is the standard material I order my items the first time. It's very flexible and durable. Although it looks a little bit fuzzy. Especially if you take a larger photo from nearby. Therefore I've searched for a solution to give the items the correct colour and more gloss. The best results achieved so far were reached with Tamiya colour sprays and a coat of gloss varnish. On the bigger pictures you still see the porosity of the material. But if you take a look on the screen in a size comparable to the size of a Minifig the result is rather good. Building Tip 2: Black & Flexible - glossy surface In this photo you see on the left side a Bavarian Helmet ordered in Black & Flexible. I've only added a coat of varnish gloss. Bavarian Helmet in Black & Flexible: http://www.shapeways...ian_helmet.html Eberhard Farber glossy varnish: http://www.tamico.de...oss/TA85006.jpg Whereas White and Flexible is the standard material there' s also the option of coloring this material. Black seems to be a very demanded color therefor Shapeways didn't change it so far. If you take a look on the results you get the impression of a smoother surface compared to the original white. That's true for all colors and seems to be a result of the penetrating colour process. As I have seen so far they use the same process (RIT colours) as also described in Brickjournal02 from fineclonier. The colour itself is matt and not as intensive as the spray used in tip 1. You can compare that with the 2nd Minifig on the right side of the picture. At the end I've also added some gloss varnish. For all people who won't do coloring themselves it's a great option for all black parts. Since coloring also results in an additional fee per piece I've started to provide packs cosisting of 10 pieces for a lot of my items. That reduces the price a lot. I wish that shapeways would offer more colours ... References: Brickjournal 2/2/2008/p.61ff: http://www.finecloni...ements_-_Paints,_Dyes,_&_More.pdf Building Tip 3: Brodie in Transparent detailed - glossy Surface In this picture you see a Bonnie helmet in transparent Detailed, sprayed in gray and coated with glossy varnish. Brodie helmet in transarent detailed: http://www.shapeways.../brodie_wd.html Tamiya spray grey Eberhard Faber glossy varnish Since many user demanded a material with smoother surface I started tu try the detailed material. For that I had to change several designs since the detailed material has a minimal wall size of 1mm. The transparent material already results in a much smoother surface. This can be seen on my flickr page. In the next step I sprayed it grey and added a varnish gloss. References: Flickr: Brodies in transparent: http://farm5.static...._246ae60373.jpg Flickr: Brodies sprayed grey: http://farm5.static...._47bd0252eb.jpg ---------------------- I will publish some further hints on my facebook account and add some more pictures about the steps here. Woody64
-
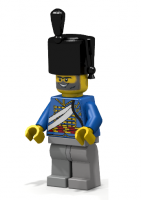
After having destroyed the scene today I made a final picture of the main minifig with neutral background. Since my camera setting is now much better, enjoy: Woody64
-
With the last order I also received a lot of Brodies in Transparent detail which should cover the wish of many users for a smoother material: Woody64
-
Some more detailed pictures: Woody64
-
Yesterday the resut of the 21th mold arrived bringing 3 new pirate items: - Baker cavallery rifle - Spontoon - Pistol Flickr Woody64
-
Since I'm very often asked about the materials I've documented that with a small video. It shows the Bavarian and the Austrian Helmet in the material "transparent detail" sprayed in Tamyia black. Since the result is the first time really very nearby the Loego hats I will try to make the most popular items available in this material. You will find the scenes for the helmets at 1:15. http://www.shapeways.com/model/23686/bavarian_helmet.html If you want to see which parts are already available follow this link: http://www.shapeways.com/shops/MinifigCustomsIn3d?section=White%20and%20Detail Unfortunately most of them are not tested in that material. So if anybody did a test and provide me the photos I will document it on the item page with credits ;-) Woody64 Woody64
-
Therefore I tried to color them with Tamyia spray. That's the best result I have achieved so far. Woody64
-
I've added some spray paints to some of the pirate customs and it worked very well: - Midshipmen in black - Grenadier in black - Hussar in black - Ferguson Helmet in black based on this results I would recommend White&Flexible colored with Tamiya spray. I will test that later on also on Detailed, which is cheaper for a single piece. Woody64
-
Tamiya spray paint results So far the Tamiya spray cans achieved the best results for coloring. Easy to use. Results very nearby the dye results of Shapeways itself. The color cans are available in a lot of variations which come very nearby the Lego colors. I will deliver some photos of helmets in green very soon ..,. Take a look at the first photo to see the difference between White&Flexible and Transparent Detailed. The 2nd one is much more shiny. Here's a standalone picture of Transparent Detailed sprayed in black: that leads to the proposal that this combination seems to be the best fit with the current available 3d printing materials to come nearby real Lego pieces. Woody64
-
Browsing trough brickshelf I've found this battle scene: The other fotos ca be found here: http://www.brickshelf.com/cgi-bin/gallery.cgi?f=435221 Also some nice custom cannons: http://www.brickshelf.com/cgi-bin/gallery.cgi?f=412220 Woody64
-
I've started to test some sprays with my customs. here are the first results: First of all here's a picture of the new material option "Detailed" which is much more ABS like. http://www.brickshelf.com/gallery/woody64/New/Napoleonic/19thMold/dscn0107.jpg and here's the spray result http://www.brickshelf.com/gallery/woody64/New/Napoleonic/19thMold/dscn0276.jpg more should be visible on brickshelf (when public): http://www.brickshelf.com/cgi-bin/gallery.cgi?f=433379 I've used a normal spray (unfortunately there was no Vynil spray available at my shop) - spraying is much easier then painting - the picture shows 3 coats of spray - the surface becomes much smoother then - I've used White and Flexible and Detailed Helmets (guess which of the minifig does wear a detailed helmet) - the spray results in a very shiny surface (too shiny for my point of view) Try to get some vinyl spray the next time and do a next pass. Also chrome sprays would be interesting. Woody64 P.S.: Can an admin answer the question how to duplicate that in the pirate forum. I always have the problem that some threads would be interesting in both. And for sure will be missed by sime of the members only dealing with one of the forums.
-
The items in detailed material have arrived today: Woody64
-
Today I received the set of items printed in "Detailed" material. I've tested all the available options: - transparent - black - white for more concerning material specifications take a looke here: http://www.shapeways.com/materials/white_detail The surface is much smoother and the material more ABS like. Woody64 I will give more detailed photos after reloading camera's battery.
-
Therfore I introduced the 10x packs, here's a comparision of prices between the single and the 10x version Hussar: $4.59, $2.88 Baker Rifle (20x) : $3.03 , $1.14 British: $3.53 , $1.93 Bayonette Swordform: $2.30 , $0.82 French: $3.59 , $1.42 If there are still singles which are interesting in a 10x form please mail me or leave a PM here. Woody64 P.S.: Currently I'm searching for a redistributor (Bricklink or another store) which also allows the ordering of cheaper singles by having some packs on stock. Additionally I have a request for 2 LEGO colors for some of my pieces open at the producer. Let's wait for the results.
-
Just wait till the (Test) has been removed from the title. Woody64
-
I've started the 20th mold iteration with 3 new elements: - Spontoon (for british sergeants) - Cavalry Rifle (based on the Baker) - Pistol 1806 Maybe there are some interesting wishes fitting in this line ... Woody64 http://www.shapeways.com/shops/MinifigCustomsIn3d?sg11290[sortAscending]=0#sg11290
-
It took me a year to have a design for the Baker which satifies me to 80%. That are the results so far: Therefore I have decided also to provide the shorted cavalry form: http://www.shapeways.com/detail?model=128144 Woody64
-
20 x Baker is now updated. Woody64
-
In the 6x pack it's a little bit less expensive: ($5.2) http://www.shapeways.com/model/91096/6_x_guns.html Yes it's possible to make the guns in all sizes. For example the napoleonic can be resized to any size. Unfortunately the price is dependent from the used material. Would be interesting which design you would propose for the different guns. Woody64
-
Part of the 19th Mold Some of the updates items arrived today: From left to right: - Baker with a little extra stuff to allow the attachment of the bayonette - Austrian Infantry Helmet - French Cuirassier Helmet - Hussar Shako V2 - Patrol Cap - Oncemore British Shako with Baker attach with sword bayonette Woody64
-
Some of the updates items arrived today: From left to right: - Baker with a little extra stuff to allow the attachment of the bayonette - Austrian Infantry Helmet - French Cuirassier Helmet - Hussar Shako V2 - Patrol Cap - Oncemore British Shako with Baker attach with sword bayonette Woody64
-
I'm using a prototyping method for production therefore it's more expensive per piece and very quick. The others are using real molding which is more costly in production but allows mass pieces in high quality. Therefore they need a careful planing and a period of months to generate new items. Woody64
-
I have started with the 19th mold. Due to an user request there will be a rifle available: http://www.shapeways.com/model/124645/kar98k__test_.html I've started to adapt some of the designs to use the White Detailed Material which is much more nearby ABS. You can see all the adapted designs here. http://www.shapeways.com/shops/MinifigCust...%20and%20Detail I'm looking forward for the results. If you think some of the designs will be interesting to be added to the White Detailed list then please give me a hint. Woody64