

Cooper
-
Content Count
86 -
Joined
-
Last visited
Posts posted by Cooper
-
-
Personally, I'm a huge fan of 7 wide. They look more realistic and still go through the standard LEGO curves without looking totally ungainly.
Mind you if you build articulated steam engines in LEGO, then I think people are just amazed that they can make the corner at all, and anything else that follows looks normal by comparison even if it does overhang the curve a bit.

-
Thanks for the inventory pic! If you have the time, could you please post a closeup of the printed shield? It looks great!
Here you go. Both shields have the same design.

-
4200 parts is a lot of parts.


I'm only now starting to work myself toward the end of the 1st of 3 booklets. It feels like I'm barely making a dent in the parts. From a parts perspective $239 is a very good value for what you get.
-
Could you please take a highres photo of the set inventory on the box side ?
The following photo is clickable to get to the high res version

-
LEGO store at Mall of America in Minnesota has the Tower Bridge set in stock and on shelves for sale. Saw it with my own eyes!
My girlfriend got it for me today at a LEGO store here in California.

-
Hmm..that rocket on the launchpad has an odd shaped nose.
FWIW, pictured below is the Atlas V rocket operated by ULA. The odd shaped nose you refer to is the larger diameter payload fairing. Obviously not the exact rocket LEGO built, but the larger diameter fairing is realistic.

-
I really like the look you've achieved here.
The IR sensor is pretty tucked away and only visible through a 1x2 slot. Have you noticed any impact on the response?
I presume there is an XL motor tucked away in the cab is that correct?
Nice work packing all the PF gear in.
-
I really appreciate you're avoiding the classic bright Lego colours, and instead use tan, dark red, dark green etc which adds so much more realism to my point of view.
Thanks. I have intentionally been trying to stick with color schemes that convey something a little more mature.
I really love how you managed to have those different carriages, some with totally different design, some with the same with just subtle changes to them.
It's been a bit of a challenge at times and some of these have been rebuilt a few times in order to preserve some kind of overall fit color wise. My intent throughout has been to build coaches that could still look good together if they were mixed and matched to form a complete train.
I just wonder (as always when seeing those long coaches) how they manage points and turns ?
I can't wait to see them behind your excellent cab forward! I've always loved seeing that old SP at the train museum.
Here a few videos.
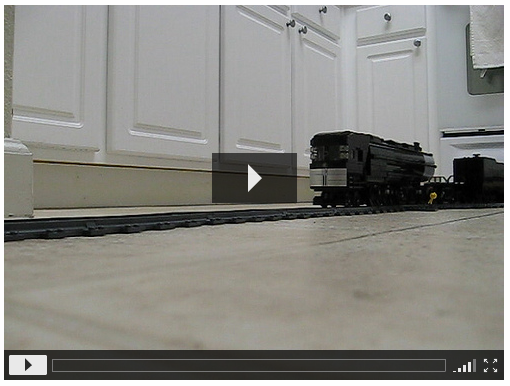
My earlier cab forward with two EN style coaches, the 3rd coach (right in front of the boxcar) is one of the 7 by 46 long coaches shown above.
VIDEO #2 (curves and switches) - same setup, the 3rd coach is 7x46.
VIDEO #3 - more of the coaches shown above, but no real curves.
I really need to get some new video with the updated cab forward and all the coaches in tow.

-
Are some of these UK Mk1s without the middle doors (for selective compression)?
The line of thought wasn't quite that clear, although elements of that were involved.
- The color scheme of the MK1s was certainly an inspiration
- I intentionally constrained the design to only 46 studs long so that the coaches did not look too ungainly navigating curves and switches.
- That said, similar coaches from South Africa were also an influence. Ref 1 | Ref 2 | Ref 3
- Since these coaches run with my Southern Pacific Cab Forward, the coaches were Americanized by not utilizing buffers.
That was the original jumping off point anyway.

- The color scheme of the MK1s was certainly an inspiration
-

As much as I love the Emerald Night, like many others I was left wanting more passenger cars.
Initially I just wanted more coaches, but that soon evolved into a desire to have the coachs be wider and longer. In the end, that lead to settling in on a 7 wide by 46 long platform on which to build the basis for a fleet of passenger cars to tow behind my Cab Forward (and another large steam engine that is still a WIP).
The image below is the current state of my passenger car fleet
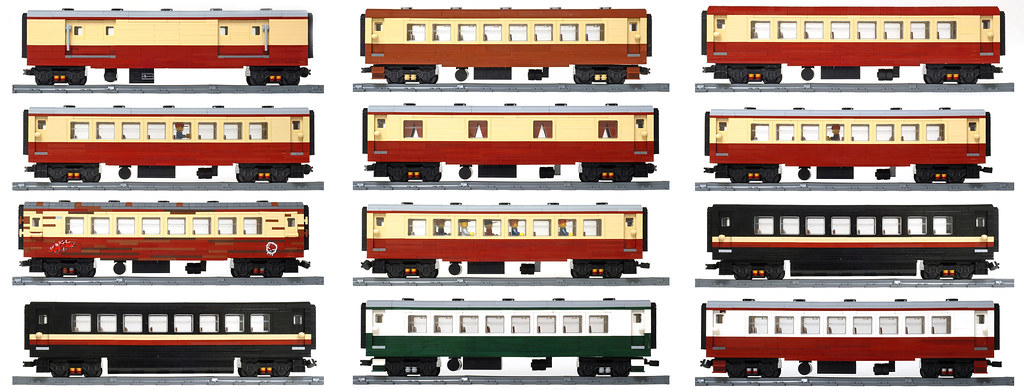
If you click on the image, or follow this link to my flickr there are links to each of the passenger car variations with higher res images.
-
-
I hope the trains come out soon7938 Passenger Train is now available on the U.S. site ($129.99)
no cargo train yet
-
MOC V1.0 - I had the same reaction as a lot of the others in terms of the overall fairing height relative to the top of the trailer.
MOC V2.0 - A nice improvement. It certainly addresses the height differential in V1.0. However, I personally liked the way you left the back side of the fairing open in V1.0 because (as your photo shows) the back side of the fairing usually is open (at least on the trucks I see around here - California). Now, if it were me, I would also explore how much of the roof of the cab under the fairing you could tile, so you didn't have the studs exposed from the back side of the fairing. Just thought.
-
Little note to all - instructions for ALL new train sets are on Lego.com customer service pages ! -
looks like brickshelf being down killed your photos. Are you on flickr by chance?
EDIT: looks like brickshelf is back up.
Overall, I really like what you have going here.
-
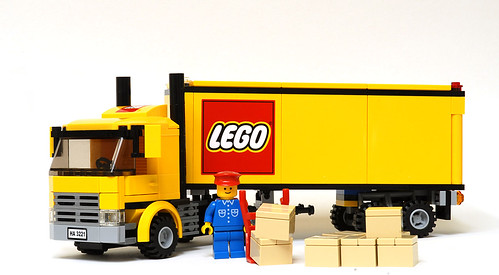
Nice rendition of the delivery truck.
The scale and proportion of this truck has certainly met the classic town spirit.

Thanks. I loved that classic yellow truck as a kid (still do). It has been on my list to build 6-wide ever since the photos of the new Semi showed up.
IMHO much better design than the new LEGO truck set that was released this year. The new official set is like squashed tomato and very disproportionate. Yours is quite accurate.I'm actually a bit surprised LEGO didn't do try to pull on it's heritage a little more with the new truck.
I agree, a great model and photo. What are your photo secrets? My photos need improving.My set-up is extremely simple. A white background, a tripod, and shooting without flash. I'm shooting indoors, without any special lighting. The real key for me is to watch for weird reflections. Then use photoshop to do a couple quick clean-up touches (remove any seams in the white background for instance). Also, FWIW I'm using a D-SLR and usually shoot LEGO with aperture priority between F/8 and F/22.
-
I'm really a fan of this built. Not sure what is my favorite part, but the tail, landing gear, cockpit, and folding wings all are very well done.
-
When the new 3221 City Truck was released, I couldn't help but wanting to update the classic 6692 to 6 wide.
-
Thanks for the photo. :)
I'm working on an expansion project now. The technique for the soft curves with straight track is from Holger Matthes in Railbricks #1.
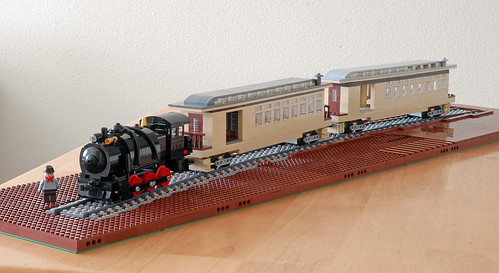
Higher res images on my flickr http://www.flickr.com/photos/-cooper-/4568944338/
-
This is really nice. I love seeing big diesels, and it does remind me I need to build one.
-
just curious, now that you've seen the real thing, do you think you will adjust anything in you MOC?
Recently I had the opportunity to see the real deal, and it resulted in a near total rebuild.
Yours seems very faithful to the original (at least until Ben starts making Dark Red train wheels). That said, before seeing the real thing, I would have guessed your MOC was more recent.
-
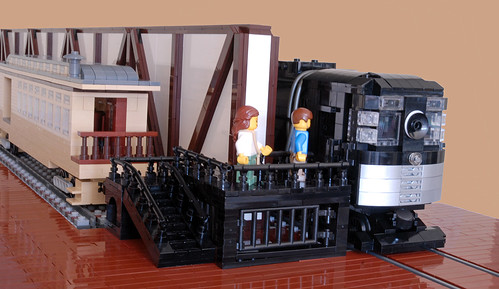
I've never seen such a cab forward locomotive. Did they also exist in Europe or just in America?Your creation is wonderful! Great idea to build this museum. The loco also looks great! But I'd have preferred seeing the whole museum... just kidding! I'd cost you an unbelievably high number of bricks to build something as big as a whole museum!
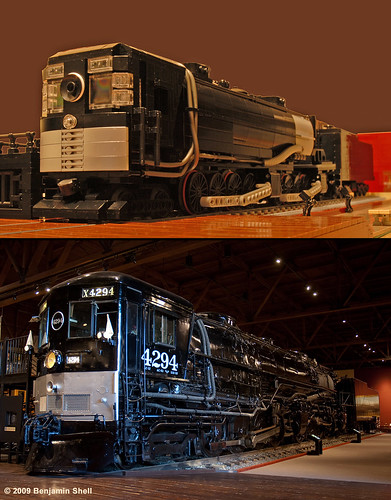
To my knowledge the Cab Forwards were only used in America, and at that mainly by the Southern Pacific for their routes in California and Nevada. The main advantage of the Cab Forward design was that it was much more pleasant for the crews going through the snow sheds and tunnels on these routes. Of the course of their use by Southern Pacific, over 250 Cab Forwards were built. All but one have been cut up for scrap. The only remaining example is on display in Sacramento.
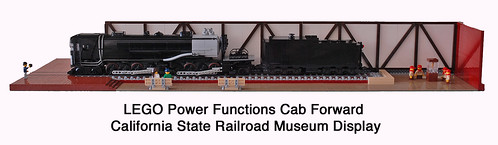
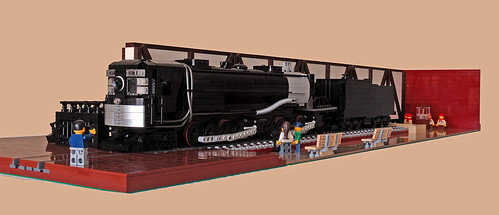
As much as I would like to build more of the museum, if it does happen, I will likely be building the floor space adjacent to this display. Building out the building with rafters and the 2nd floor would be a massive undertaking. Not just from the buildings, but all the locomotives too. So, I could see this current display expanding out by one or two baseplates in width in the future.
-
Nice work, Cooper! I've only been to the museum once, and that was years ago, but as far as I can remember, you're pretty darn accurate! It's a very clean display with some wonderful touches like the Boy Scouts and the staircase detailing. Overall, very excellent work.Thanks. In addition to visiting the museum and taking my own photographs, I also used some other photos as guides.
Here's a composite showing a comparison with the real thing.
 Do you plan on doing more parts of the museum?
The short answer is yes. In addition to the Cab Forward, I also have built the Monterey & Salinas Combo which is on the other side of the wall. I hope to build some other aspects of the museum in the future. I'm not sure if I'll hold 100% true to the current display though. I may mix in some other Western locomotives (I have a couple Southern Pacific steamers in mind).
-
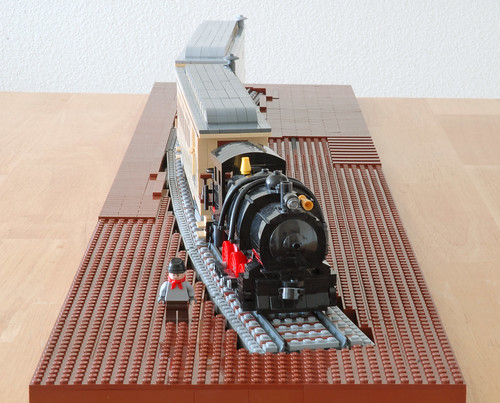
This build has been in work for some time.
The Cab Forward was a near total rebuild (previous build for the curious). I realized after visiting the Cab Forward in the California State Railroad Museum that the proportions of my earlier build were off. While I was at it I corrected some other issues and added more detail including the tubing.
Then I built a replica of the display which the Cab Forward sits in at the CSRM. The display includes the "Lost" Spike which was one of the two Golden Spikes made for the meet-up of the Transcontinental Railroad.


Star Wars Miniland to come in LEGOLand California
in LEGO Star Wars
Posted
The L.A. Times has a photo gallery up of the new Star Wars Miniland