Search the Community
Showing results for tags '3d printer'.
Found 3 results
-
 Dear readers, For a new project that started a while back (about a year ago), I was investigating a certain track configuration for a tracked vehicle. It pointed out that I needed a lot of ground clearance from the track wheel, but the track wheel could not be two studs wide: the tracked vehicle is only 15 studs wide and a lots of gears, motors and linkages need to be in between. As you can see, the standard wheel above is two studs wide due to a ring of 1/2 a stud that supports the track. This ring is not always necessary. In fact, the tracks barely even touch this ring under normal driving. A lot of you will recognize the difficulty with this wheel: it protrudes half a stud to both sides. In many designs, the number of horizontal studs is uneven: an M motor, XL motor, frames, differential, everything has an uneven width when measured in studs. This enables a symmetrical design as Lego Technic has no beams with even lengths (only 3, 5, 7, 9 ..). That's why many Technic designs of this day are an uneven number of studs wide. This is in contrary to the olden days, where all Technic components and widths were even. Check for example the old style liftarms, differential, frames, motors and even battery boxes. With this theory lesson over, it is easy to see why this track sprocket introduces a problem: when the wheel is mounted in the uneven Technic system (to get a nice symmetrical design with uneven Technic beams), the wheel size is even! So the wheel can not be connected to a liftarm at the place where the axle connects to the wheel. There needs to be a distance of 1 stud to any supporting liftarm. This is mostly done with a bush or a 3L thick liftarm. This also means that to mount this sprocket very strongly, the minimum width of the structure (when fit in an uneven system) is 5 studs. Then I started thinking: how nice would it be if there would be NO distance to any supporting liftarm? In that case, the sprocket has to be only 1 stud thick and the supporting structure is only 3 studs wide. Also, the support ring has to go. This is an enormous space saver when the maximum width of your vehicle is 15 studs.. I decided to draw the part in Solidworks and print it with my own 3D printer. Out of curiosity, I checked GrabCad to check whether someone got the same idea too. To my amazement, somebody had already tried this part, with the internals to be the 40 teeth gear. This is done with a reason. A standard 3D printer is generally very bad at printing axle holes. If you draw the outline of a standard Lego Technic part (that has a nice axle hole) into your 3D printed part, the part will be connected firmly inside the model(nice) while the axle is inserted into a Technic part, so no troubles with cracking plastic will occur. In short, I printed that part. It didn't work. (See image below). It turned out that every 3D printer is a little different. A tiny offset can cause a diameter difference, which then will cause friction, because the track doesn't fit around. The wheel needs to be perfect to make the solution work. That's why I decided to design my own custom sprocket wheel from scratch. This was my first 'from scratch' attempt. As you can see, the pin and axle holes do not have great quality. A revised 3D design is in the image below. As you can see, there is a large hole in the middle. This hole fits two 4185 pulley wheels (shown right) very tight. This means the vehicle is connected to a nice and round axle hole, while the 3D printed part is also fit very well to the vehicle. The sprocket diameter is not arbitrary as the number of 'lobes' is fixed: there are no half lobes, otherwise the wheel won't work.. That means that for the same tracks, a limited number of wheel diameters exist. As you can see, there is a slight ring in the 1 stud wide sprocket wheel, not all track support is gone. The 3D printed results: I was really happy with the quality of this wheel, the drawbacks from 3D printing don't show up and the wheel is very strong and straight. In the image below, is is visible that the tracks fit very smoothly around without additional friction. It is also visible that the wheel is just as wide as two pulley wheels, so one stud. I was so amazed when the 42095 set was launched. There was my not-published-about part, exactly the same size, in a real Technic model! And now there will be 4 DBG ones in the 42100 Liebherr, which will drop the price. There is one 'slight' drawback though. My 3D printed wheel is only one stud wide, needing only a frame of 3 studs wide to support it. The new 42100 sprocket wheel has the 1/2 stud ring protruding out of it on both sides, taking the drawback of the old wheel onto the new wheel. That's a pity. It could have been so nice. Then comes the question: why would you 3D print parts? That's cheating. And I agree. It is cheating. I never do this in my models. You are allowed to check my YouTube. I even built of a 3D printed way of getting three axles through a Lego Technic turntable but never used the solution as I do like pure models. Then, why am I doing it now? Because currently, I'm using Lego Technic as a strong platform for a scale model that requires 100% of the quality of Lego Technic, but cannot do without adding custom parts. Even the most skilled builder cannot work his way round sprocket wheels that don't exist. That's why I see it as an engineering project, and from that prospect, creating your own parts (when all else fails or doesn't exist!!) does not show lack of skill but broadness of view.. Surprisingly, some other minds thought alike and brought a Lego Technic wheel of the same size on the market. Too bad.. Let's start building and stay thinking!
 -
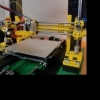 Update september 2015: I have build a new extruder for this printer. It's now capable of printing chocolate. ------------------------------ Although it's not a 100% lego build. I think it's worth mentioning in this forum. This fully-functional 3D printer is capable of printing 3D objects, including Lego bricks. The printed PLA bricks look like the first lego bricks from the early '70s. Switching to ABS will be a next step. The LEGO printer is based on the Prusa I3 rework printer. LEGO and Nema 17 stepper motors are a perfect match. A default LEGO brick of 4 by 2 studs is 32 x 16 x 9.6 mm. Nema stepper motors have m3 holes at a distance of 31 mm. Attaching the Nema 17 stepper with LEGO technic, using a felt damper/isolator and m3 x 15 bolts, gives a solid base. It's not a 100% LEGO printer. I don't have any LEGO Mindstorms products. Another reason is that LEGO motors are servo motors and 3d printers use stepper motors. Last reason is the software used to control the printer. I'm using Marlin for the Atmega 2560 and Pronterface on my laptop to control the printer. The base of the printer is 34 x 64 studs (19.2 x 51.2 cm) and is about 44 blocks high (42 cm). Y carrier belt: Attaching linear bearings. Z-azis motor and smooth rod: It took some time to calibrate the printer. But everything is working like it should. A picture of my latest print: The advantage of using LEGO is the possibility to alter the printer after building. More pictures, a video of this printer in action and building instructions are on: http://www.instructa...EGO-3d-Printer/.
 -
Only two axles through a Lego turntable (the 48452cx1) has always irritated the more experienced Technic builders, stimulating them to work out many different solutions. Actually, some really clever solutions have been found, but most of them cause too much friction or require too much space. I have succesfully tried to do an attempt too, thanks to 3D printing and a good friend, he designed the CAD model of my solution. I can say that my solution has low friction and consumes much less space in comparison to the existing solutions. More of the story and some more pictures can be found at http://mocpages.com/moc.php/419288 I have made an elaborate video about the problem and the process, but I think it will be 6 well-spent minutes. At the end of the video, there is another big surprise... Something that never was possible, is possible with the new parts! http://youtu.be/1OsSGkDsgXs To get a better idea of the part, you can find some photos here: All photo's can be found on: http://mocpages.com/moc.php/419288 in a higher resolution. The CAD drawing assembly: This design is extenable to bigger versions, I think that up to 5 or 6 axles would fit through the turntable. The only problem is connecting all gears in a robust way: to 'get to the gears', the outer gears have to get a bigger diameter and the problem of space-consumivity is back. I found that the three axle design really was a good optimization between robustness, way of accessing the gears and maximum transported torque through them. It is my hope that the Lego group takes over this idea and starts producing it, because especially the three-axle option ore the two-axles through the small turntable could be very useful in an upcoming Lego flagship. So, if you happen know someone at the Lego Technic department, please give him/her a good impression of the idea!