
lego9vtrainfan
-
Posts
61 -
Joined
-
Last visited
Content Type
Profiles
Forums
Gallery
Everything posted by lego9vtrainfan
-
How to make long smooth curves from straight track
lego9vtrainfan replied to lego9vtrainfan's topic in LEGO Train Tech
Good question -- after assembling and disassembling dozens of long curve layouts, I have never experienced any problems or seen any damage to my straight track or the clips. They are quite strong, and there is not much stress on them in the setup anyway. Good luck with your layout! LEGO9Vtrainfan -
Hi everyone, With the recent release of Railbricks #7, you may be wondering how to make the long smooth curves seen in the article by Steve Barile about his experiences making such a layout with Holger Matthes. Holger originally described this method in Railbricks #1, and as a long-time user of his idea in my own layouts, I thought I would make a short "how-to" video to share with everyone else: Although you need a lot of space (hence my layouts are only temporary), long curves really bring high speed trains to life, as I originally noted in my thread about my TGV, Eurostar, and ICE 3 MOCs. There you will also find videos of these high speed trains in action (including a few crashes ) , or you can check out my YouTube channel. Hope this helps, and let me know if you have any questions! Give it a shot on your next layout / at your next show! Cheers, LEGO9Vtrainfan
-
Great new photos! Interesting that they chose to run the trains on 9V rails... or is that my imagination?
-
Thanks for starting this topic and for posting these links. I had read different things before, but it's nice to have several resources compiled in one thread. I hope this leads to good discussion. I admire the work of Ondrew Hartigan, who has an excellent Brickshelf gallery showing different geometry possibilities and his creations. In his folder he also has a PowerPoint presentation from Brickworld 2008 discussing track modifications. I will be very interested to see the results of your curve modification from 22.5 degrees to 11.25 degrees. This is something I have been looking to accomplish for some time. Apart from making very wide curves (radius ~1.9 m) from unmodified straight track (see Railbricks issue #1 for more information or my videos to see this technique in action), I am not aware of any other satisfactory way of increasing the curve radius without going to modified O-gauge track, etc. If the LEGO 9V radius is too short and the long curves from straights too large, it would be nice to have an intermediate radius -- do share some photos of your progress soon! Cheers, LEGO9Vtrainfan
-
If you're looking for something along the lines of the TTX doublestack set, James Mathis has plans for a great three-unit doublestack container car set in his Brickshelf folder. I gather doublestack car sets normally exist in sets of 3 or 5 units with shared bogies in between, so this rendition is more realistic than the TTX set in this sense. Most of the parts are quite common, and those that aren't are easily replaced by more common ones if desired (e.g., regular 1x4 yellow bricks instead of the grooved variety). I liked it so much, I built two sets worth -- sorry I don't have a better picture handy, but you get the idea. Hope this helps with some ideas! Cheers, LEGO9Vtrainfan
-
MOC: Airbus A380
lego9vtrainfan replied to reload's topic in LEGO Technic, Mindstorms, Model Team and Scale Modeling
Simply stunning! Great work! :thumbup: -
MOC: High Speed European Passenger Trains
lego9vtrainfan replied to lego9vtrainfan's topic in LEGO Train Tech
Thanks for your comments, and I'm glad you enjoyed the videos too. The crash I staged was entirely fictional, so please do not be alarmed... -
MOC: High Speed European Passenger Trains
lego9vtrainfan replied to lego9vtrainfan's topic in LEGO Train Tech
Thanks again for the great comments! Of course I am happy to share! The answer, however, is rather low tech -- I use the video mode on two point-and-shoot digital cameras, a Canon SD600 from several years ago and a Canon SD880 IS that I got last year. The video quality is by no means spectacular (VGA 640x480), but it's decent enough and they make up for it with their small size and relatively light weight. This enables me to fix the camera to the top of the train, for example, with a gob of poster sticky tac that is easily removed later. I normally use one camera at a time, but I have put both on a train at once to have the forward and backwards perspective at the same time, whereas normally this would require two different shots. Of course I have plenty of out-takes where one or the other camera has fallen off the train, but so far nothing has been broken. The remainder of the shots were done either from a small tripod (stationary shot) or with a mostly steady hand (tracking shot) while holding the camera. The "chase camera" involved sticking the camera to a flat car that was then pulled by a train in front while the camera was looking back at the train of interest... here the hardest part by far was making the trains advance at the same speed, as they both ran from the same controller. Other cars were therefore added between the camera car and the locomotive such that the right "weight" was achieved. Most of the work comes after shooting the video itself, and that is the editing, which I do in iMovie on Mac OS X. I basically had some ideas for the videos one day and made use of the camera and software I had... it's all quite low tech, but it works. In the hands of a professional with different equipment I'm sure many more things would be possible! Anyway, I have had a few requests on YouTube to make a "making of" video tutorial on my methods, so I hope to do this soon if there is further interest here. More to the point, you most likely have a relatively compact digital camera at home, so I would encourage you to try the video mode with some of your trains and (optionally) a gob of sticky tac -- perhaps you have some ideas for shots that I haven't considered? I would certainly be interested in the results! Anyway, hopefully that discussion was not too far off-topic... I have been humbled by the great feedback so far, and I would welcome any further questions or ideas about my trains and/or videos and I will try to respond. I certainly look forward to contributing more to this community in future! Cheers, LEGO9vtrainfan -
This is a good topic! I have had good success printing on Clear Gloss Inkjet labels from onlinelabels.com. I used these labels on my Eurostar and ICE 3 models, and the quality is excellent. Laser labels are also available. The nice thing with onlinelabels.com is that you can buy any number of sheets, say 10 or 20, and the cost is not all that unreasonable. I could not find such a product in my local office supply store, so their solution worked well. The sheets can also be ordered in a whole bunch of different label patterns, but I found the full page label to be convenient. I agree that the colours are slightly translucent -- both of my applications were on white bricks, which worked great, but for darker colours you might have to experiment with more colour saturation. And yes, the lack of white ink is the biggest challenge, since in many cases one would like to put a translucent sticker with white lettering (for example) on dark bricks. I had discussions with this seller one time (I don't know where he went either!), and I seem to recall he used an Everest thermal printer to print white on clear. They have now become part of Rimage, which only seems to make printers for CDs and DVDs. Of course one could use clear CD labels (if they make such a thing) and then cut them out, but this is getting to be a pretty specialist (and expensive) product... perhaps there are other printer manufacturers too? The website ministickers.nl looks very interesting -- thanks for the link! Cheers, LEGO9vtrainfan
-
MOC: High Speed European Passenger Trains
lego9vtrainfan replied to lego9vtrainfan's topic in LEGO Train Tech
Thank you for the warm welcome and the kind comments! Perhaps I will have to post an introductory note in the Train Tech registry too. I will try to address some of the questions raised: Each train has two motors, one at each end. These are standard 9V train motors and haven't been modified in any way. The main loop in the first video (TGV) was about ~35-40m -- I never measured it exactly, but I know I used ~350 pieces of straight track including sidings. The second layout (crash video) was shorter, about 125 straights for each loop, giving ~250 straights for the double loop. I realized a while ago that to truly enjoy these trains, I would need a lot of track, so I gradually built up this amount over many years. I have plans for a larger double loop layout using ~500 straights, but now I need find the time to go and try it out. Due to the increased electrical resistance provided by the small area of contact between each piece of straight track when they put together in long curves, I have found many electrical connections to the track to be very important. In the first layout, for example, I used a contact every 4 m (~30 straights) in the curved areas. One can get away with a lot fewer contacts on the straightaway sections since there is more contact between track pieces. For the TGV video, which I made a little while ago, I used three stock 9V speed regulators in series, each powering a different section of the layout. This was OK, but I knew the resistance from the layout was still holding the trains back a bit. Now I have some customized speed regulators where the current has been increased from 1 amp to 3 amps at 9V. This was used in the second video (train crash), with one modified speed regulator for each loop, which is much nicer. The result is particularly apparent with the ICE 3, as it also has 5 lights, which, combined with the two motors and the loss in the track, meant it could not get enough current from a standard 1 amp speed regulator to go at full speed. This shortcoming is solved with the 3 amp speed regulator, which I obtained from the seller ELECTRO-BRICK on Bricklink. He is a great guy and I highly recommend his work -- he can also modify your speed regulators if you don't need a new one. This isn't something I've tried (unfortunately I don't have any such parts), so I would be interested to hear from anyone who has tried making fast trains with the new Power Functions elements. Each straight is connected together with a hinge plate on one side and a 1/2 stud offset on the other side, which is achieved with a jumper plate. Eventually this gives a curve with radius ~1.9 m. HoMa wrote an article in Railbricks issue #1 describing this method, and I would encourage you to give it a try! Eventually I might try to make some custom track if I ever have a permanent location for a layout, but for now this method works great as it allows for long curves that can still be easily disassembled. Haha yes, I thought about this afterwards, since I might have broken the lights on the ICE 3 in the crash. Fortunately they were OK. In any event, the beauty of LEGO trains is that you can just put them back together again! Parts can be replaced, decals can be reprinted, so have some fun and stage a terrible crash! Yes, this is why the layouts are only temporary... it is difficult to find a large enough open area sometimes! The others in my house just stepped around carefully for a few days... very kind of them. Thank you once again for your comments, and I look forward to participating in this community more in future! -
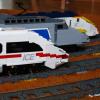
Hi everyone, I've been lurking on Eurobricks for years, but I decided it was high time to create an account. I would like to share with you my collection of high speed European passenger trains (Eurostar, TGV, and ICE 3): I had the pleasure of working in Germany for a summer in 2007, during which I did some traveling as well. I greatly enjoyed the high speed trains, and these trips were the inspiration for these models, which were built over the last few years. Full credit goes to James Mathis for the original designs, which I used as the basis for my designs and modifications. He has an excellent Brickshelf folder featuring many models -- thanks James! I would not have attempted these models without a way to run them at high speed (as they should be run!). Fortunately, I read about making long curves from straight track in issue #1 of Railbricks magazine, which I found presented an ideal solution to the sharp corners of 9V curve pieces (slowing down is out of the question, of course ) Thanks are due to Holger Matthes for this article (he also has a nice model of the ICE 3 -- check it out!) Videos and media I have a side interest in video making, so I have filmed my models running on various long curve layouts that were made temporarily over the years (a lot of space is needed, so I have no permanent layout, alas). Here I have included lots of interesting camera angles, particularly those with the camera on the train and the "chase camera" positioned on a train in front that is also going around the layout. All of the videos are stored in my YouTube channel, but I will link a few here. For example: TGV ICE 3 Photo gallery: Brickshelf Eurostar (double track layout with ICE 3)High speed train crash Of course I like to have some fun too, and my most recent addition is a terrible train crash between the ICE 3, Eurostar, and the innocent Christmas train. Needless to say, the engineer responsible has since been fired. I would welcome any comments or ideas you may have, and thanks for reading/watching! Cheers, LEGO9vtrainfan