
Ralph_S
-
Posts
1,418 -
Joined
-
Last visited
Content Type
Profiles
Forums
Gallery
Posts posted by Ralph_S
-
-
I didn't recognise that the idea how to mount the fenders on version 1 came from Mr Zumbi's Beetle. I do remember browsing brickshelf briefly, but consciously decided not to take a closer look at minifig scale Beetles when building mine for the little VW Beetle build challenge we had a few weeks ago as I wanted my model to be original.
However, I saw no problem with version 1 of Dennimator's Beetle being based on a combination of bits he liked from various other people's Beetles. I often use things that I know I've seen somewhere, but I can't put my finger on where they they came from. I'm picking up ideas all the time. However, if I do know where an idea came from, I generally will credit the builder of the original.
With the pictures posted by Gambort it is clear that version 2 is very similar to Mr. Zumbi's and giving some credit would be in order. There's no shame in admitting that you looked at somebody else for ideas.
Cheers,
Ralph
-
Thanks to all of you.
BEYOND AWESOME !!!!
From the railway to the old chip shop to the trad. London bus - you have out done yourself 'Ralph_S' !

Simply very beautiful and like I said beyond awesome - one the best I've seen in a real, real long time !
I'm a conformist! 'Ralph_S' I'm a conformist! !
One of the things I didn't like too much about one of the collaborative displays I contributed to was that there was nothing but tables behind the row of buildings lined up alongside the road. Because a lot of trains going into London run over the top of viaducts/ Victorian arches, building one of those seemed like a nice idea, and if you've got a railway track, you've got to have a train, right?
This is exactly the king of layout I would love to have. With a train, cars, lots of figs, and a number of buildings all in a small easy to display space. How large is this in terms of baseplates?Reaper052
That's exactly what I was looking for too. I had a lot of fun working on collaborative displays, but I've seen other people build compact town displays somewhat like this one. The length of it is the equivalent of 6 32x32 baseplates. It's a bit more than 2 32-stud baseplates wide: 16 studs for the base of the viaduct, 32 for the modular buildings and roughly 20 studs for the road. Because the road was largely built with brick on its side it isn't attached to a baseplate.
I couldn't tell, but for super accuracy you should add some CCTV cameras. :DThere actually is one in the Corner Store, but indeed, there are a few typical London things I can add without necessarily adding seediness.
Looks fantastic, Ralph. Perfect blend of different buildings for a British street. Then all your great vehicles and that train just top it off.Laurie
Thanks. When I built my first cafe corner compatible building, I also built two cars to go with it pretty much straight away. One of them (the black cab) is on the current layout. After that I went a bit overboard with the car building. We had so many of them for the collaborative display at STEAM (I built just about all the cars for it) that I ended up lending some to other Brickish members who had a large train display with a vacant parking lot. For this display I selected the ones that I felt seemed the most British.
Really nice MOC, and nice details. The little park with the statue is a very nice touch.Thanks. I wanted a bit of green in there. For one of the collaborative displays a few years ago I had a park that was twice as large with a pond and a few trees, but for this city scene I wanted something a bit smaller (also because having a large park would mean building more roads.)
That is spectacular! Very very realistic - I've seen each of these buildings individually, it's great to see them together in a layout. The train is also very realistic, the bridge section in red is very similar to one just down the road from my house! The only thing I could suggest that would make it maybe even more lifelike, is that where we have pedestrian crossings at junctions like that, we tend to have a pelican crossing with traffic lights, rather than a zebra crossing.Overall, a fantastic setup


Thank you. I looked at pictures of quite a few railway bridges before settling on red. It seemed like a nice bright colour to liven things up a bit. I will fiddle around with the traffic situation a bit more in the future. I'd love to have traffic islands with some trees in there too, but I completely ran out of old dark grey parts. I appreciate the comment.
Cheers,
Ralph
-
Thanks guys. Apart from the roads and the viaduct I already had all the MOCs. I had the intention of putting them all together, but I didn't have the parts for the viaduct until recently. When I put all of this stuff on the floor this morning, I hadn't seen it all together myself.
I built the train a few months ago, with this project in mind, and did post it on eurobricks too with a few pictures. However, it was in the train tech forum, which may explain why die-hard city heads may have missed it
For good measure, here's one:
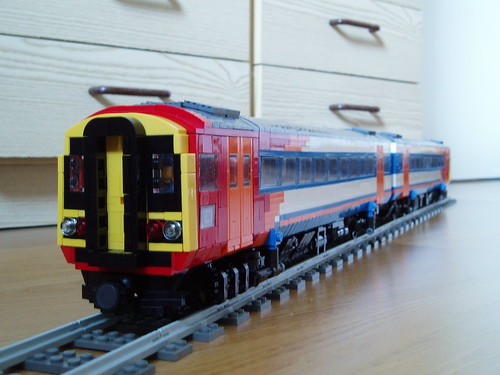
It's a British Class 158 DMU in Southwest Trains livery.
There are obviously a few things missing that you would see in London: garbage in the street, pot-holes, police cameras and drunks and hoodies. I decided to go for a slightly cleaner version

Cheers,
Ralph
-
 Layout
In the last few months I've seen a few very nice collections of Cafe-Corner-Compatible buildings.
Now it's my turn

Since more than two years I've been steadily expanding my collection of British buildings. It all started with 'A Taste Of India', built for a competition organised by the Brickish Association and I kept adding more. You'll have seen a few here on Eurobricks in the past. I displayed several of these buildings at the Great Western LEGO show in Swindon in 2008 as part as a larger collaborative layout. Obviously, with my return to the Netherlands in mid-last year, collaborative British/Brickish displays have become much more difficult. This is why I decided to build everything I need for my own little layout, which I decided to call Brickston Borough (after the London neighbourhood of Brixton).
To complete the layout I had to build roads and the viaduct. The buildings are, from left to right: The Chipshop, The Lion Pub, The Corner Store, A Taste Of India and the Georgian Houses.
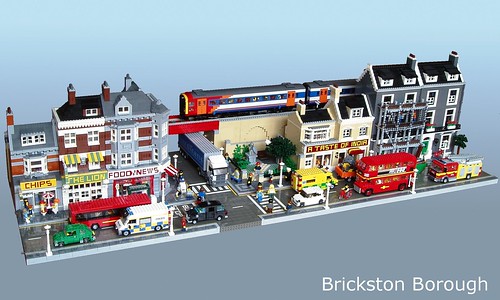
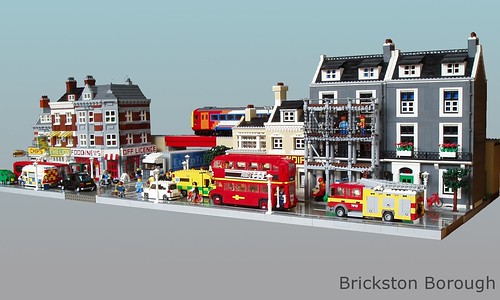

Not only the buildings are modular. They rest on modular bases (16x16 stud segments). The roads are modular too, as is the railway viaduct. The whole layout can be packed into a few not too large boxes, which should make it fairly easy to take to events. The modularity also means that it will be relatively easy to build additional bits. I already have a lot of ideas for that, if not the parts
Anyway, I hope you like it so far!
Cheers,
Ralph
-
Yeah I just realised, that if minifigs are six feet tall, it is not 1:40 scale... (minifigs would be 5' 5") The scale would accually be 1:44.307692307 if they were six feet... but that has no impact on the rest of the calculations...
I've changed that, but I do feel a 1:40 scale would in fact be better if you were more into detailing, of course, like you said, its personal preference.

Sure, a bigger scale makes building certain things a lot easier. I build aircraft models out of LEGO (as you may know) and years ago I settled on a scale of 1/36 for those. I don't use minifigs with them, though, because they look too small next to them. Recently I have built minifig scale models of aircraft as well and build them to a scale of roughly 1/43. The difference might seem insignificant, but it is enough to make things harder.
I tend to be fairly precise about scale, but one thing I think you ought to be aware of is that there is a limit to how accurate you can make things anyway, especially when building a small object. In realistic terms, you can't make steps that are much smaller than a 1x1 plate. If I use a scale of 1/45 I might find that a particular car ought to be 5.2 studs wide, but I have to round that down to 5 because 5.2 simply isn't practical. If you can get the dimensions of what you build to within a stud of the dimensions it ought to have according to the scale you've chosen you've already done really well IMO.
Cheers,
Ralph
-
Seconded.
I´ve seen you bring that 1/45 scale discussion up in at least 10 topics..
However, as I said before I agree completely.
Well, this topic keeps coming up! Pretty soon I'll start boring myself
-
I was doing some measurements, for a ship recreation I was to do, And had to make some conversions of stud to brick, in order to make things minifig scale. So I worked out that if minifig scale is 1:40 (supposively minifigs are 6ft. tall) And they are exactly 5 studs tall, that means the ratio is 6:5, or for every five studs in lego, it is six feet in real life.
If you divide that, you get 1.2 feet per stud, or 0.8333... studs per foot.
So, say you have an 85 foot long ship. Simply multiply by 0.833 and you have a 71 (70.83) stud, in length, ship.
For those of you that don't use feet, in measurement, but one foot = 0.3048 meters, so minifigs would be 1.8288 meters tall, meaning the ratio would be 1.8288:5 or for every five studs in lego, it is about 1.8 meters in real life.
If you divide that, you get 0.36576 meters per stud, or 2.7340332458442694663167104111986 studs per meter (just to be exact)
So, say you have a 45 meter long ship. Simply multiply by 2.734 and you have a 123 (123.03) stud, in length, ship.
Also here is a "stud converter site" That would probably help a lot too...
(BTW calculations from this site are not exactly the same as mine, FYI)Figures are the equivalent of five studs tall. One stud corresponds to roughly 0.8cm, so 5 studs equals 4 cm. Consequently, if I take a figure to be approximately 1.8 m tall, I find a scale of 1/(180/4) is 1/45.
Conversion from metric to Imperial units is a pain in the behind, but a close equivalent would be:
One stud corresponds to roughly 1/3 inch, so five studs is 5/3 inch. If i take a figure to be 6ft tall (=6x12inch) the scale becomes 1/(6x12x3/5) is approximately 1/43.
Obviously with more precise conversions you;d find the same scale in both systems, but quite how you reach 1/40 is a mystery to me.
I've never heard that it was commonly accepted that minifigs are 6 ft. tall before. I suppose it depends on whether you view minifigs as being exceedingly short or morbidly obese. I think there has been a lot of discussion on what height is appropriate for a minifig, but I don't think there is a definite answer. This is similar to the 6 vs. 8-wide train debate. The proportions of minifigs simply don't allow for an ideal scale. I prefer to treat minifigs as being on the short side, but that's simply a personal preference.I agree. It is mainly a personal preference that IMO very much depends on what you want to do with your figures. I chose my scale such that the height of figures looks reasonable next to my vehicles, which leads me to use approximately 1/45. Consequently I cannot have figures sitting side-by-side in most of my vehicles. If you want figures side-by-side you'll have to chose a larger scale.
The 6 vs 8 wide train debate indeed is similar. If you want a realistic scale you end up with 8 studs wide. If you want it to actually fit on LEGO curves you'll have to go smaller. It all depends on what you want.
Cheers,
Ralph
-
I proudly present my third model built in 1:17 scale. It weights over 4kg's and it's my biggest MOC so far.
It's a rotator tow truck, with front based on Kenworth W900 truck:
General view:
The whole pneumatic instalation consist:
- compressor with two small pumps, powered by one RC motor, turned on/off by pressure switch (it looks almost like this switch
- 4 red pneumatic cylinders used for raising the crane boom.
- 2 pneumatic cylinders used for raising the wheel lift arm
- 1 pneumatic cylinder used for tilting the wheel lift
- 1 pneumatic cylinder used for raising the second axle
- 4 pneumatic cylinders used to stabilize the truck (two in front outriggers, 2 on the rear)
- 1 Manometer, which shows air pressure in the whole installation
- 1 air tank
Almost all function switches are hidden above the rear axles:
I'm very impressed that you managed to cram all this functionality in there and yet, looking at it it isn't at all obvious. It's all very well hidden. I love American wrecker trucks anyway, so this ticks a lot of boxes.
This MOC is even better today!Just noticed the license plate, hah! :D
One beef though, how many tow trucks have a crane like that? I made a Google image search for heavy tow truck: http://images.google.se/images?q=heavy+tow+truck
The only ones with a tall crane are built out of LEGO. :D
Not that it makes your MOC any less impressive in any regard, mostly curios if you had a "real world" inspiration?
The majority of heavy duty wrecker trucks don't have a crane that rotates, but there are plenty that do. I built a wrecker truck a few years ago (albeit on a much smaller scale and with far less functionality) and it too has a rotating crane. I based that on pictures of a real truck from a book. Search images for "heavy duty wrecker" and you'll find plenty.
Cheers,
Ralph
-
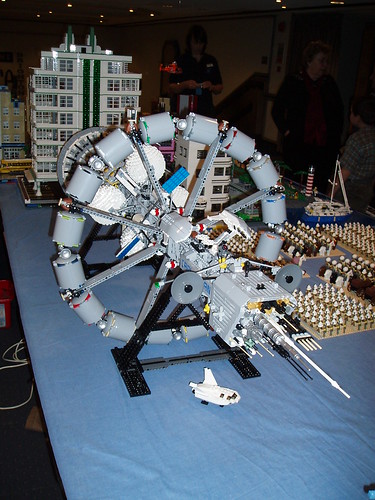
We had the Modelworld exibition in Brighton,UK last weekend so thought i'd post some pics.The show is mainly for train and boat fans but it does have a small Lego display.Our local Lego shop had a stall aswell selling most of the latest kits and build your own minifig table.
Whilst this display had many other themes,i was only really interested in the space section.Strange that it only has classic space models and nothing from the later lines,it was very impressive however and brought back many memories of my early sets!
Enjoy the pics

Shane.
I'm glad you liked it. The display was built by members of The Brickish association. I was there as well, but was mainly involved in the city layout you can see in the background in some of the pictures.
I can shine a light on why it's mainly classic and neo-classic space. Peter Reid, who contributed some of his models to this display (even though he wasn't there in person) is one of the people behind neo-classic space. Most of the space-builders in the Brickish Association are in their thirties and they've had collaborative classic space displays at a lot of events in the past. Stuart Crawshaw, who built the other space models, also has a large Blacktron collection, space was only a part of the various things on display. We could have done with a bit more room. You seem to have missed a spacy MOC on the display though: the Carl Sagan, a near-future star ship built by Ed Diment and myself.

Cheers,
Ralph
-
Thanks guys. I'm back home after being away for about a week and really appreciate your comments. I too like this sort of vehicle. I remember that a cousin of mine had a toy truck that was similar to this when we were children and that I used to love it. I've built similar vehicles to a larger scale in the past, but this was my first attempt (as far as I remember) on minifig scale.
One advantage of having built many vehicles on this scale is that when building a new vehicle you can combine various bits of vehicles you've already done. Much of the cab design of this one is directly based on my older airport shuttle van, for instance. It's the sort of thing you can build in a few hours; not particularly challenging but a lot of fun. The colour scheme was mainly driven by the parts that I had that weren't yet earmarked for other projects. I didn't want to build it in red overall because that would make it look too much like a fire engine in my mind.
The challenge was building the excavator and I am glad that most of you seem to like it so much. This is probably about as small as I could make it and still fit a minifig in the cab. The upper part is nine studs wide and that gave me just enough space for a three-wide cab.
In the last few years I've kept the majority of my models in one piece. I have been dismantling a few older ones in the last few months, because I need the pieces, don't like them any more and because I'm running out of space. I also build some of my models specifically with public displays in mind and those tend to go after a few months.
Cheers,
Ralph
-
You know, I never got back to you on that. I have another question.
So I motorized the alternate model for the Ralley Truck, using the mechanism you showed me, but I have no room for the motor box, and the M-motor really does overheat.
It works well, but it has a few kinks here and there. I have trouble gearing it, as with the spring box, the gear attatched to the steering must be lined up with the axle, but so should the axle attatched to the motor and spring box. I don't really have enough room to go through the gears to do that. I also do note that it overheats a lot.
How can I fix that?
I haven't noticed any problems with the motor overheating. I remember driving the space vehicle around for about half an hour at an event about a year ago without any problems.
For the self centering steering you indeed need to line up everything nicely, otherwise the central position won't be a straight line, but if you've done it once is should stay in place. The motor and spring box is a far more compact set-up than one involving gears, but whether or not you can apply it obviously depends on the overall geometry. I've only applied power functions to fairly large vehicles and in both I had space to connect the motor and the spring box directly to the steering, without any gearing.
The gearing on the first version took up a lot of space, which meant that there was a massive box inside the truck's cab to cover it all.

One the new one, I was able to lower the steering set-up, as you can see in this picture by comparing how high the chassis is behind the wheels in comparison to the battery box (which stayed in the same place in the rebuild).

This allowed me to fit a flat floor in the aft of the cab.
Thanks for all the replies, guys (girls?).I had seen some stuff on return-to-center steering using rubber bands, (on Technicbricks maybe). Ralph, thanks for the link to that previous thread, I'm off to bricklink for some hockey spring units.
I though about trying to achieve return-to-center through playing with caster angle and trail, but even if that worked I'd still have the question about if the motor would get hot at full steering lock.
Thanks again for the answers, at this point I just need to build and see where it takes me.
You're welcome. Ultimately you'll have to experiment yourself. What works for my vehicle may not work for yours.
If it is a fast moving vechicle I would use self centering because your not going to be having it on full lock for long unless your doing donuts. If its a slow moving vechicle then use a actuator/ worm gear or some other system that does not use the motor to keep it at a certain angle.Only my view :)
I suppose that for something slow a worm gear works fine. I don't like slow though
. Cheers,
Ralph
-
What is your approach to keeping bricks in stock. When you are finished with your model do you order the replacement bricks so you can keep building without depleting your stock?
Great models BTW; do you have a Flickr or Brickshelf gallery(ies)?
Sorry I didn't reply sooner. I was away from home for a few days.
Rather than replacing bricks I've used I tend to buy parts/ sets in advance with future projects in mind. The pictures I posted link to my flickr account (and it's in my signature). I also have an account on brickshelf. but I haven't updated it in months.
http://www.brickshelf.com/cgi-bin/gallery.cgi?m=RalphS
Cheers,
Ralph
-
I built so many minifig scale vehicles last year that I basically swore it would be a very long time before I'd build another. However, in the last few days I got stuck working on a MOC and decided to build something small instead. Ultimately it did turn into a faily complicated little thing, but it was far more fun than what I had been building.
It's very much my own MOC, but I did derive some inspiration from various flatbed trucks I've seen here in the last months and Piotr's excellent Caterpillar 320D excavator. Mine is considerably smaller and a lot simpler, though (and a 320C).
The truck itself is 7 studs wide and the trailer 8. Unlike the excavator the truck isn't based on a particular brand or model. It was inspired by relatively modern US trucks such as the Kenworth T2000 and Mack Vision.
Anyway, pictures:


More pictures, as usual are on flickr.
(I'm about to head to the airport to go on a trip so I may not be able to read responses for a few days, but wanted to share this model nonetheless.)
Cheers,
Ralph
-
I disagree. IMO what you need for a properly controllable vehicle is a self-centring steering mechanism. When I first built my FDNY fire engine, it had a combination of a worm gear and a clutch. It worked, but it was a complete bastard to drive. I fiddled with it for quite a while, but was never happy because it is very hard to find a compromise between the vehicle being able to change direction fairly quickly and it being able to drive in a straight line properly. I have since updated it with self centring steering, as explained in my previous post, and it's made a massive difference. The thing turns left if I push the controller to one side and right if I push it to the other. If I let go of the controller, the vehicle moves in a straight line.
I realise that Darth Legolass mentions that in this sort of set-up the motor does get warm. I haven't noticed this issue myself, probably also because the motors are hidden deep inside the structure and because I don't drive the things around for very long. I suppose that in theory there's nothing stopping you from combining a clutch gear and a spring. I tried that when building the space tractor and ran into the problem that the torque exerted by the spring was enough to make the clutch gear slip.
Cheers,
Ralph
-
Thanks guys. It's much appreciated.
Cheers,
Ralph
-
The only difficulty with a set-up as described here (incl a clutch gear) is that it'll lead to a vehicle that is pretty hard to control. It'll be fine in corners, but getting it to go in a straight line or any fast manoeuvres will be difficult.
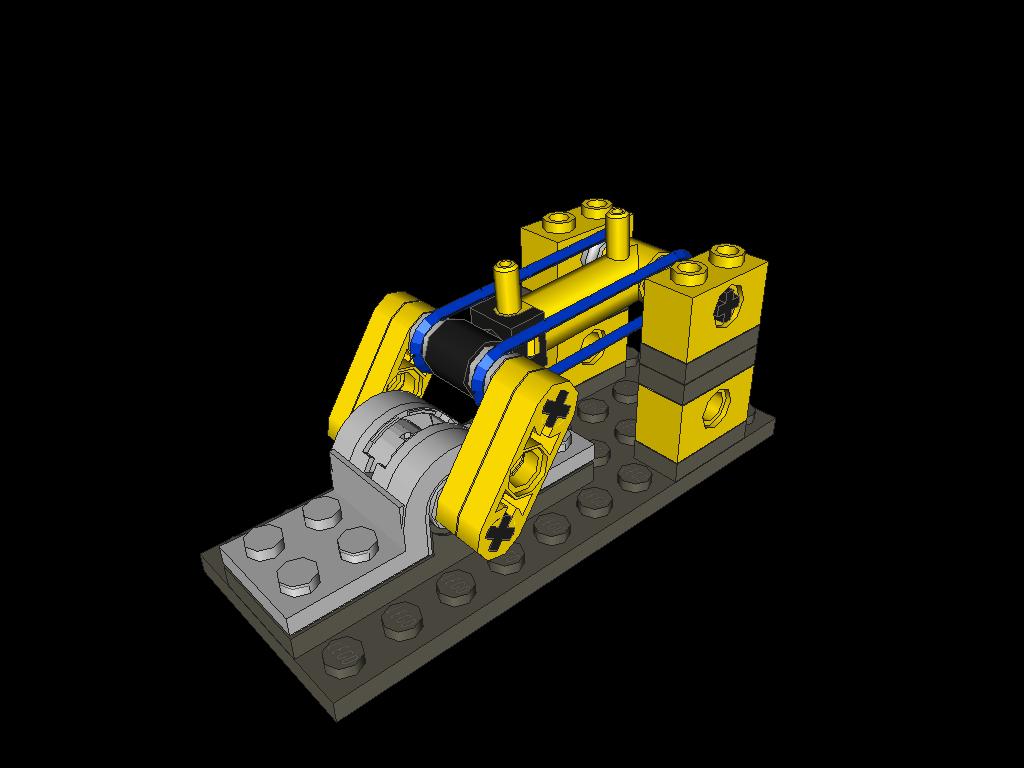
I described an alternative system in another thread a while ago
http://www.eurobricks.com/forum/index.php?...c=36045&hl=
It uses a spring to self-center the steering. The mechanism that wasn't my idea, but I have applied it successfully to two models (a six-wheeled space vehicle and a model team fire engine). The motor simply stops when it can't go further, but since it is only in that condition for a very small amount of time I haven't experienced any problems so far.
Cheers,
Ralph
-
Another great creation Ralph. I love your building style which along with the brick-built windscreen give it a real nostalgic classic Lego feel. I don't mean to say it's old-fashioned! Great creative use of parts too.
Do you keep your models built? That'd make quite an impressive display.
Thank you. In my book, a 'classic LEGO feel' is a good thing, so I appreciate your comment. I do keep most of my models together. I have been taking apart a few things in the last (mostly things I built years ago and that look a bit pedestrian compared to my newer stuff), but I've got about 40 aircraft and helicopter models.
I don't have the space I'd need to put them all on display at home. In may 2008 I gather all the aircraft and helicopter models that I had at the time.
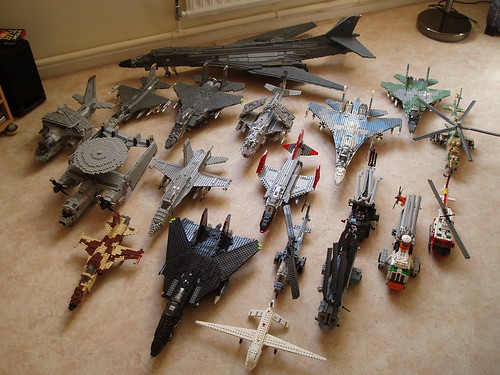
The collection has grown a lot since then. I've also taken stuff to public displays. Here's a picture of part of my display at the Great Western LEGO show in Swindon (UK) in October 2008:
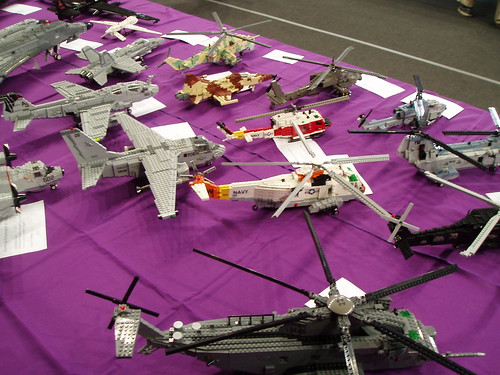
(showing a few models that I didn't yet have in the first picture)
It is great to see them all together. I've recently found a new job and will be moving in the next few months. One priority in house-hunting will be havinga decent-sized room where I can put up some more shelves, so that I don't have to keep my models stored away in boxes.
Cheers,
Ralph
-
Today there is a greater colour and part choice. I would probably change the yellow truck to a not so bright colour and I would add front mudguards to the trucks.
Below are some images of another 1930's vehicle I built way back then. It is on a truck chassis I suppose
I didn't include it earlier as it was not a truck. But due to the unexpected praise from my old sets here it is. It can fit 6 firemen.
Also I am very suprised to make the front page with these old designs. Thanks

I fire engine is a truck in my book and it fits very well with the other three. It's got a nice classic look to it, both in the design of the vehicle and in how you recreated it in LEGO. These are far better than a lot of the more modern creations I see all over the internet.
Cheers,
Ralph
-
Very nice model Ralph, congratulations for your new moc!
Amazing the folding rotor and tail detais!
the scale biulding is perfect!
The cockpit is very well assembly
I also like a lot the stickers! I can´t biuld without them:
http://legobrazilmilitary.blogspot.com/
thanks for chering with us your perfect model of this amazing e classic chopper
regards
Rodrigo
Thank you. Not everybody likes stickers, but then again, not everybody builds military aircraft or helicopters.
Ralph, you've amazed me again! Every detail is just perfect! The only thing that "bothers" me a bit are the pilots...They look so simple next to the Lynx, and aren't the orange unifors the old ones?I'm glad you like the helicopter. I'm not too keen on the figures either, which is why I didn't post a picture of them here, but don't know what to do about it. They seemed to go down well on flickr, but I'm open to suggestions on how to build better figures on this scale. I have seen pictures of Lynx pilots wearing olive green overalls (no way to do that in LEGO), but as far as I know when they're flying over (cold) water, they still wear a survival suit in international orange, also known as a 'penenpak' in Dutch.
Cheers,
Ralph
-
These are very nice. If you'd have told me they were built last week rather than ten years ago, I probably would have believed you.
I miss the front fenders on both conventional trucks a little, although on this scale adding them would probably lead to something bulky. Just out of curiosity, if you were to build similar trucks today, is there anything you'd do differently?
With things such as google images it's almost hard to imagine that, say 15 years ago, if you did want some info about something you'd have to go to the library or go buy a book or magazine, but it's what I used to do too. Actually, I still like to have printed pictures as a reference when building with LEGO.
Cheers,
Ralph
-
While the colors won't match spectaculary well, it would still work.
I still seem to read it as 10 studs wide, when I look at the bottom of the helicopter.
http://www.peeron.com/scans/5542-1/27/
I'll customize the trailer a bit, hopefully it'll fit well enough visually.
You're right. That does look as though the skids are 10 wide. Still, I have my doubts it will look good, but perhaps you'll provide me with a positive surprise
Cheers,
Ralph
-
I have both the highway rig and the helicopter transport, although I took both of them apart about 20 years ago... They were among my favourite sets, however, and I too built a trailer for the highway rig. I remember that it was a white box trailer with a red and blue stripe to match the stripes on the front.
I also remember hooking the trailer of 5590 to the highway rig and that it didn't look right to me. The trailer seemed a little small. I don't have the 'Black Thunder' helicopter, but looking at the box art the fuselage is 8 studs wide. Including the landing gear struts it is 12 wide. The trailer on 5590 is 12 studs wide, but it has an edge around it. That means that Black Thunder won't fit without some modifications to the trailer. Even if it were to fit, it would look awkward IMO. The colour schemes don't match (black trailer, black and yellow helicopter, red, white and blue truck). Yuck!
Cheers,
Ralph
-
Says enough i think
Indeed it does. Thanks.
Wow, this is just ncedible! I love all the little details you paid attention to to make this a beautiful aircraft! amazing workThank you. Building aircraft and helicopters offers fun on several levels. I enjoy building the shape, but I also enjoy fiddling around with details. Naval helicopters in particular tend to have all kinds of stuff mounted on the outside.
Very well done. The little highlights of color are what make this MOC really well done, they break up the gray and make the MOC more exciting, as well as adding some realism becuase they seem to serve a purpose. The little details are also well placed and make the MOC even more realistic. My favorite little touch, however, would probably be teh side doors. The shapes for the open spots when just very very well done. Over-all you have created a nice MOC, that looks damn close to being real. Good work. My only suggestion for the next time would be to not use that glass, and just leave the place where glass should be blank. I realize that LEGO doesn't give you a betterchoice for the glass, but the wierd thicker looking parts betwee nthe bricks is disorienting, if only a little. Other than that (tiny) nitpicck, it's fantastic!Thank you. I appreciate your honesty. What I really wanted to use was a train window frame with a regular clear piece of 'glass', but sadly the frames don't exist in dark bley. Obviously what I did now is a compromise, but I felt it looked better with some transparent bricks than without. If I could have, i would have added glass to the front doors as well.
Another great job Ralph.You keep amazing me.
If I may offer a new challenge; try the Air Force AB-412 "Tweety" SAR helicopter from Leeuwarden. That should fit quit nicely in the entire line of your models.
Thanks. An excellent suggestion
I agree that it would fit with my collection nicely and actually have already been collecting some pictures and digging out old issues of 'Onze Luchtmacht' to gather info. I used to have a model of a Bell 214 several years ago also built to this scale, so I know it can be done. The cockpit windows will be a bit tricky though. They're more curved than the ones on the Lynx, but it's definitely on my wish list  I've also been eyeballing a Cougar.
 Cheers,
Ralph
-
Then they'd ask for a 18 years old, wouldn't they?
I don't know. Doesn't that depend on your bank? Is it legally not possible to get a credit card if you're younger than 18 no matter where you are?
Cheers,
Ralph
MOC: Brickston Burough
in LEGO Town
Posted
Thanks. I am glad you like the look of them all together. Regular LEGO road plates don't really lend themselves very well to being used with modular buildings, because they already have sidewalks. Putting the buildings on top of the road plates can work, but is still a bit awkward. In Brickish we tended to use road with brick on its side instead and I liked the look of it. It also means you get to add custom features, such as the markings for the bus stop. I enjoyed building the train because I am normally not a train builder. It was fun to do something a little different and I was pretty determined that it would look good. The HGV seems like a permanent fixture in British cities, although this one may be a little lost. There's certainly no way he make a turn! (Note the driver sitting on the left in the cab, he's probably Dutch!).
Thanks.
I too think that right now things look a bit too prim and proper in some respects and I considered adding graffiti to the viaduct. Like in real life, however, I felt that graffiti ruins things. There's an added issue in that all the LEGO-built graffiti that I've seen and that I feel looks decent tends to be very big. Here's a sampling of LEGO-built graffiti on flickr:
http://www.flickr.com/groups/1093064@N23/d...57622641298734/
That means adding it to the buildings isn't an option as there's simply no space for it. The same applies to the train, with the added note that I don't recall ever seeing graffiti on a train operated by Southwest Trains. It's very well possible, however, that with further extensions in the future, I will add bits of viaduct with some graffiti.
Thank you. This was all built spread out over a long time, with me building new parts for it now and then. I am no good at building something really large in one go. I prefer to break things up in smaller modules instead interspersed with building different unrelated things. That keeps a project like this interesting and I can spend the effort to make all the bits look decent by themselves.
I am fairly certain that I will keep adding bits to this in the future. Feedback I've been given here and on flickr has already given me a lot of new ideas.
Cheers,
Ralph