stevendejong
-
Posts
34 -
Joined
-
Last visited
Content Type
Profiles
Forums
Gallery
Everything posted by stevendejong
-
 True, but I can achieve a lower height with the original (entirely non-stressed) mechanism and 41678 (as suggested above). Double axis to the left, single axis to the right: I really like the double axis design, because it does not have spurious pin holes / ball socket, like mine does. Also, the parallellogram deforms around its center and not an edge. But we need to find a way to make it less high. :)
 -
So, you think the stress on the axles isn't that much of a problem? Then maybe we found a solution... One challenge left, which is that the connector to the steering axle on top requires another stud of additional height. I'm thinking about this and will come back here.
-
OK, went back to the drawing board with the 5W idea and achieved this with (almost) the same material: Advantages: The construction is sturdier. The wheels don't rotate exactly around their own axis, but it's quite close. We can get 20 degrees of rotation within a four stud gap. Disadvantage: the mechanism requires five studs, so for a six-stud vehicle, we need to use thin rims and tires.
-
Wow, thanks for doing this. Definitely an interesting idea and not falling apart! What I find problematic is that the axles are under considerable stress. We're basically bending LEGO.
-
Hi everyone! My 6yo boy is obsessed with public transport and I am similarly obsessed with LEGO, so obviously I had to start designing some vehicles! I decided to design them all in City scale, for two reasons. First, so they fit with the out-of-the-box trains and bus (from set 60335). Second, for affordability. I obviously do want to make vehicles that look cool and may remind you of real ones, but first and foremost, they're toys, so they're sturdy, playable and not ridiculously expensive. Bricks for the models below range from $/€ 25 to about $/€ 150, and that's my upper limit to keep it all fun. Also, my kid wants to push his toys around, so they're generally not motorized. My Rebrickable has other models too, but I did not want to spam you with too much. Instructions for the bigger (and well-designed) ones are available for a small price, there are also free ones. It all started with this tram, which looks good and is played with a lot, but made me understand why rail vehicles need bogies with two axles. :) This doesn't actually drive on tracks. It does have pretty nice articulation and sliding doors. This metro is inspired by the real metros of Rotterdam, but LEGO-fied. It has Jacobs bogies, articulation, removable roofs and sliding doors. It can drive on tracks. This yellow one has bellows between the carriages and an interior with a stroller, because my boy just had a baby sister. This is currently his favourite one to play with, for some reason. This little bus is quite popular (for my standards) on Rebrickable. It's a $/€ 25 model that just works. It's really sturdy, the door works well, the roof can be taken off. It might be my favourite OC so far. Instructions are free. This sleek one wasn't built yet, I want to treat myself to a Circuit Cubes starter kit and see whether I can make a motorized metro. Not that my little guy wants something motorized though! :D
-
A potential solution for a stronger build would be to make the parallellogram 5 studs instead of 4 and to attach thinner wheels. This has some disadvantages though. Reduced steering angle, approximately 15 degrees instead of 20. See red lines. Wheels are not turning around their own z-axis. They don't touch the chassis or mudguards, but steering looks less aesthetically pleasing. See green intersection. Those thin wheels and tires are less cool. :)
-
Thanks for the feedback and suggestion. I don't think I understand how to attach the steering axle if I use two sliding axles. Also, the parallellogram needs to rotate with respect to the sliding axle. Would you be able to provide a screenshot / render?
-
Thanks for the incredibly knowledgeable feedback. Unfortunately I haven't been able to try the mechanism yet. Yes, those connectors are a potential issue. My problem with Technic is often that I know what I want to do, but the pieces are simply not available. :) That also explains why I am using the yellow ball connector; it's the only piece with two perpendicular axis holes. The suggestion to use 41678 is useful, but we end up with two pin holes for our rotation point instead of one. If anyone has a solution, please don't hold back! And yes, the steering direction is reversed wrt the steering axle. There are arrows under the lever to indicate the direction the vehicle will travel if you move the lever towards the arrow.
-
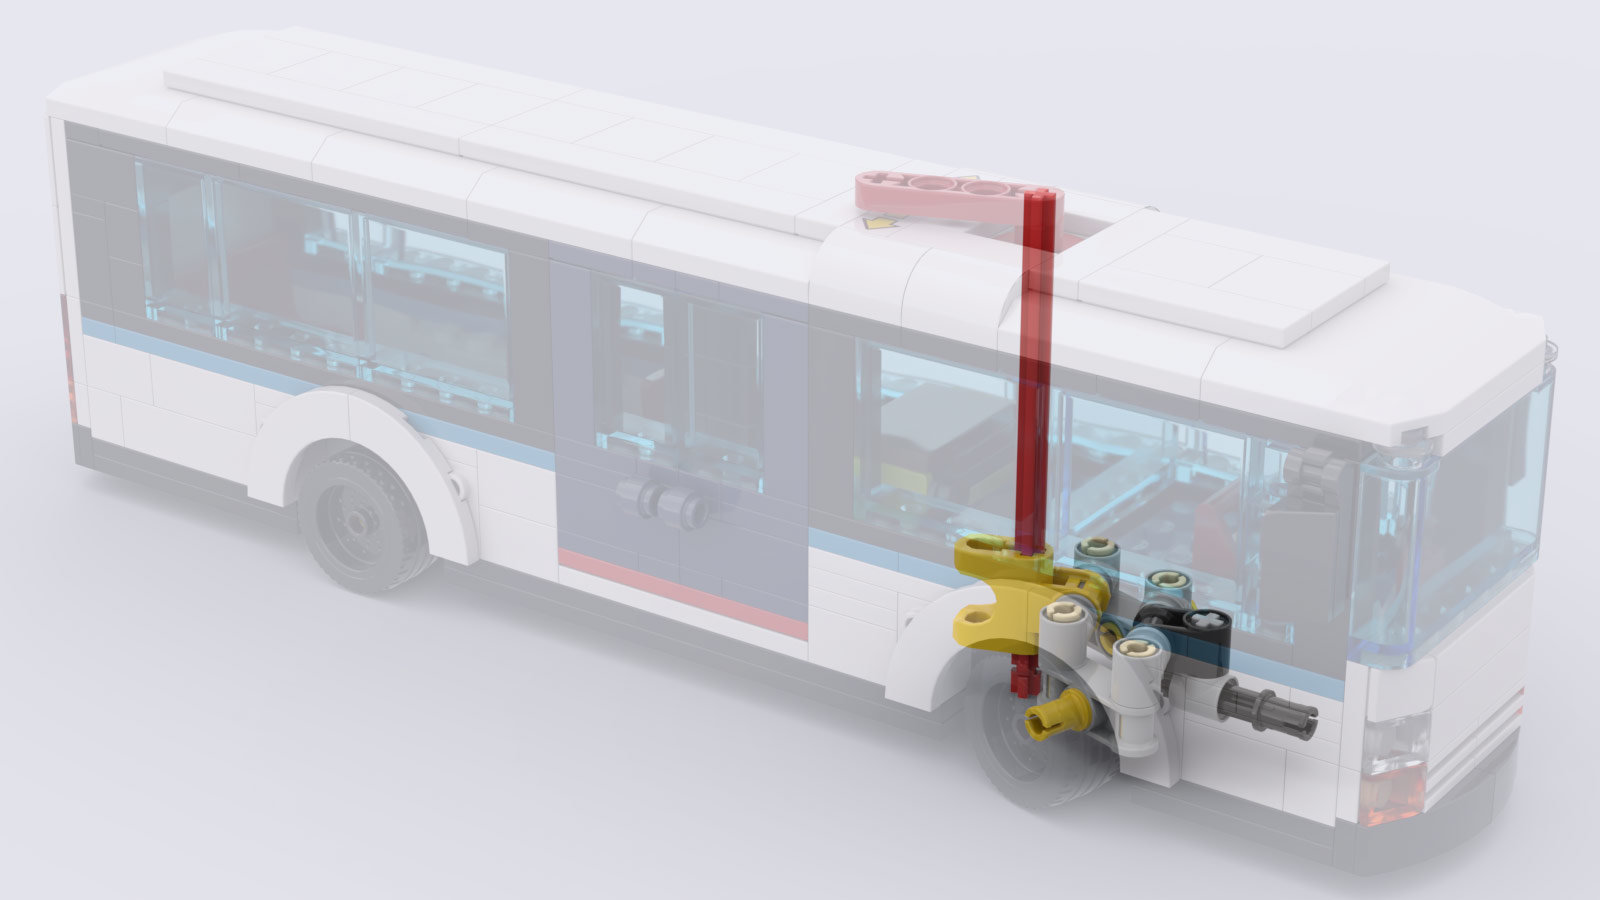
Hi everyone, I'm reviving an old topic because I think I might have something to add. :) I've designed an operable virtual pivot steering mechanism for 6-stud cars. I'm attaching an image of the mechanism inside a bus. Notable (I think) is: The mechanism does not rely on tolerances in Technic. The parallellogram slides along an axle. The wheels are not rotating exactly around their own z-axis, but the rotation point is close enough. In theory, they could rotate within the gap of a Lego mudguard such as 35789. Unfortunately, pretty Lego mudguards have a wall on the inside, preventing the wheel from rotating inward and blocking the possibility to add a mechanism there. This is why the bus has brick-built mudguards. Full gallery and annotated close-ups: https://bricksafe.com/pages/stevendejong/virtual-pivot-steering-for-6-stud-vehicles My Rebrickable page: https://rebrickable.com/users/stevendejong/mocs/