
Sylyphics
-
Posts
32 -
Joined
-
Last visited
Content Type
Profiles
Forums
Gallery
Everything posted by Sylyphics
-
[M4-24 - The Phantom Menace] Droideka Introduction
Sylyphics replied to Sylyphics's topic in Watto's Junkyard
Thanks! At 8x8, the dome is really the perfect size for minifigs to have a shield cover them and still touch the ground in a realistic way, very glad that part exists and in light blue! -
Links to my three entries:
-
[M4-24 - Duel of the Fates] Force Fighter by Sylyphics, on Flickr Coming soon to an arcade near you, it's the freshly released Force Fighter! Battle with an original cast of characters as you duel your opponent in a 4v4 tag team showdown! Early reviewers have praised the fluid swapping mechanic and the depth of combos it opens up, as well as unique per character animations, but have criticized the lack of balance especially in regards to a certain joke character. [M4-24 - Duel of the Fates] Force Fighter by Sylyphics, on Flickr [M4-24 - Duel of the Fates] Force Fighter by Sylyphics, on Flickr I wanted to play around with both how it's a duel, typically 1v1, and yet a cast of characters are involved in an endless struggle. Happy I managed to squeeze in a Harrower to help set this stage's time period (not the characters' as it's a fighting game, so the two are unrelated), though it did take up 28 of my 100 budget. Came in at a total of 98/100.
-
[M4-24 - The Phantom Menace] Droideka Introduction by Sylyphics, on Flickr [M4-24 - The Phantom Menace] Droideka Introduction by Sylyphics, on Flickr [M4-24 - The Phantom Menace] Droideka Introduction by Sylyphics, on Flickr [M4-24 - The Phantom Menace] Droideka Introduction by Sylyphics, on Flickr One of the most memorable to me scenes from the Phantom Menace was the introduction of the droidekas. The droideka with its rolling, non-anthropomorphic looks (unusual for Star Wars droids), and shields really captured my imagination as a kid. The scene depicts the moment right after Obi-Wan and Qui-Gon used Force Dash (its only appearance in the films).
-
[M4-24 - Sabines Paint] Under New Management by Sylyphics, on Flickr CIS took the colorful (for Star Wars) fighters of the Trade Federation and decided that it was high time they got back to the grayscale conformity Star Wars ships must have! At least they added some nice deep blues in some places. Since this was a theme of coloring ships, I wanted to do a scene where recoloring is central to the story, even though it's actually about how the rare-colored ship defying the traditional greyscale palette was made grey. Both ships' parts are identical, but different colors, so the new blue variant is just there for the story. [M4-24 - Sabines Paint] Under New Management by Sylyphics, on Flickr [M4-24 - Sabines Paint] Under New Management by Sylyphics, on Flickr The vulture ended up with some really interesting "connections" where it's actually a 63586 rangefinder accessory and a 15392 launcher trigger keeping the 1x1 trans-red tiles in place, and which was needed since, to my surprise, there were no 1x3 trans-red tiles and a traditional connection wouldn't fit. The missile attachments also work very well despite not being a traditional connection, and there's some more part trapping in the wings. Overall, there's nothing that is illegal to my knowledge. The vulture is very swooshable and can transform into walk or flight modes. I'll make a free set of instructions for it when I get some spare time.
-
[MOC] UCS Jedi Defender Class Light Corvette
Sylyphics replied to Bob De Quatre's topic in LEGO Star Wars
Fantastic moc of my favorite era of Star Wars. Really wish we had more good looking ships from then, but you took one of the best looking ones and did it justice. -
Updated my minifig-scale droideka for the premiere of Episode I 25 years ago, May 16th, in Los Angeles and for Eurobrick's May the 4th contest. Updated Droideka Minifig I redesigned the head, which was the weakest element of the previous design; its eye-sensors are more accurate now. I also found the new version can be rebuilt into a ball, which while not a perfect sphere, will roll on a carpet just fine. It's a tad taller, but same height as the B2 so still perfectly minifig-scale and it also fits in the shield I designed for them. I'll be including them in a scene for the contest entry, but felt like just the updated version itself may be of interest to some. Free instructions on my Rebrickable
-
Better detailed now than smooth IMO, though it changes the look. Part of the effect that it looks more detailed is that it now has a lot more of a negative-space type look, as if what we are seeing is the inner part of the mandible with the top section removed, the epidermal layer of hull if you will. Looking at some photos of the film prop it seems the mandibles are almost the same thickness as the edge of the hull "dish", so you can likely get away with bulking them up a bit more visually.
-
I actually preferred the first mandible iteration, as the second version lost the texture of the plate built, and now integrates less well with the busier texture-wise main hull. Perhaps consider using bricks with studs on sides and brackets to add detailing back in? That said, brick-built would likely still miss the sidewall greebling that the wedge plates gave the outer edges of the mandibles, which was a nice continuation of the sidewalls from the main hull.
-
[MOC] Tie Defender (Minifig-scale, UCS-style)
Sylyphics replied to Sylyphics's topic in LEGO Star Wars
Thanks, quite happy with it's look, too! Thank you! Yeah, I wondered about calling it UCS as it's quite nebulous, and Lego uses it for a variety of scales and detail levels, and in my mind serves a similar role of display for the collector who wants the best they can get at the scale. Can be used as an indicator of the part count and price-tag (part count wise it's pretty close to the recent UCS A-wing, 1573 vs 1672), though my Defender is cheaper than any UCS set they'd put out these days (about $150 estimated new on Bricklink for where I am right now before shipping, and regular Lego Starwars sets are more expensive than that). I guess packed-with-as-many-relevant-details-as-the-scale-allows style, accuracy/fidelity focused, and minifig-scale, is more accurate, but figured UCS could be used to denote that more succinctly. I tested experimentally during design and it's stable enough without alternation between the 65578 parts, but the alteration adds a little bit of extra stability, yes. The model is delicate and for display only, though mine has stood without issue since I built it and survived being moved around for it's photoshoots. It doesn't use anything I know of to be "illegal", like connections that stress pieces due to not fitting, bending pieces, things half studded in/not fully connected, etc, essentially things that to me feel like they are "cheating" the system, as the fun of designing it for me is to get it to work within the confines of the "rules". I'm actually fair pedantic about trying to avoid these "illegal" connections and that's one of the reasons I greatly prefer to design with physical bricks, as stud.io is very tolerant of some connections that don't work in real bricks. An example of me avoiding said connections in this design from the Ad x7 thread linked in the first post: This kind of work around requires physical bricks as stud.io doesn't complain so doesn't even show as a problem digitally. I will say my personal definition of "illegal" connections doesn't extend to things that are difficult for children or open to interpretation in the instructions (i.e. how deep to insert a bar into a hole), though I think that's usually only a concern for Lego themselves and not MOCs. -
Thanks everyone, this was the first Lego contest I participated in and it was great watching it unfold and all the directions people took the prompts. Lots of wonderful MOCs!
-
Thanks, and neat it is the same technique for the triangle! I toyed with using instead part 1941 the ninjago weapon holder, as it has the same triangle shape needed to fill part of the gap between the 6x6 dishes and related shapes, but it was too noisy a look and departed from the smoothness. The biggest challenge were the wedge slopes need to continue the shaping past the triangles, and due to limited space they are actually attached using 3 completely different techniques in different parts of the build. The brick built wings also were tricky, as I wanted them to be accurate and robust but also like the rest of the build not use any illegal techniques which would stress pieces. The rear of the wing actually needed a slight trick with that, as the tiny irregularity of the 1x1 inverted bracket piece makes it push up pieces almost unnoticeably but it does. Not sure why Lego made that (I think 0.5 LDU) offset. In any case, by making the rear grey trim out of 1x2 tiles, which have no underside stud supports, allows the parts to push together the 0.25 LDU part tolerances in between them and solve the 0.5 LDU extra issue cleanly. Thank you, and not being a ship guy makes the compliment better!
-
[M4-23 - Minifigure Habitat] - ILM model makers
Sylyphics replied to thomas_jenkins_bricks's topic in Watto's Junkyard
Nicely out of the box and yet still on theme; the AT-AT is the highlight and I personally really dig like how the lamp came out, as it conveys the time period and workshop aura wonderfully. -
[MOC] Tie Defender (Minifig-scale, UCS-style)
Sylyphics replied to Sylyphics's topic in LEGO Star Wars
Thanks everyone, I really appreciate all the comments! In terms of sturdiness, it's not a play model but when on rest on display it's fine. I moved it around and shook it plenty during filming and it held up fine. It sits and doesn't tip as the center of gravity is back far enough, but the large brick built wings and the thin pylons mean that if you tip it forward too much, the pylons can come apart. The most delicate part is the joint/pylon area with the wings, so as long as you have a solid grip on the bottom two wings/joints/pylons and don't tip it you can move it without much issue. If you drag in around by one wing it will loosen but it's a few second fix to press the joints/pylons back together. I swooshed it around with two hands for a bit for fun and nothing broke, but I don't consider it to be a play/swooshable model. -
Thanks! Thanks and yep, novel cockpit; the desire to design a new cockpit technique was one of my main motivations for tackling a TIE variant. Chose the AD x7 for having the most ball cockpit as I realty wanted to capture the spherical nature of the TIE series.
-
Tie Defender by Sy Lyphics, on Flickr Instructions: Rebrickable The TIE/D Defender is an advanced experimental TIE starfighter from Sienar Fleet Systems, armed to the teeth with four laser cannons, two ion cannons, two warhead launchers, and a hyperdrive. It's know for it's agility and ferocity both in looks and performance. This UCS-style Tie Defender is minifig scale and is based on the most common depictions of the defender in various sources. The model features a cockpit with controls that can seat a tie pilot. The bottom hatch opens for the restocking of missiles, maintenance, and refueling the hyperdrive. The top hatch also opens as does the front (pilot is put in through the front). The focus on accuracy and aesthetics means this is a delicate display model not for play. To the best of my knowledge, doesn't use any illegal techniques which would stress pieces. 2 months ago when the May 4th contest was announced, I wanted to see if I could make a novel UCS-style Tie fighter from scratch in 2 months time, and I picked the Tie Defender/AD x7 as there were some elements I thought would be really attractive if done justice and that it had the most quintessential "Tie ball" of any of the popular Tie variants. Brick built wings seemed to me the most appealing route at this scale and especially in this variant, and you see the underside as frequently as the top. The AD x7 is same as the Defender, but missing the top ion cannons, cockpit missiles, and the hyperdrive. As the completed version, a more show room background seems to me to be more appropriate for this than the AD x7. It's also way easier to get good photos of that with the story scene so I ended up with more shots I like. My AD x7 contest entry and story are here:
-
This was a very fun challenge!
-
TIE/Ad x7 under development by Sy Lyphics, on Flickr The TIE/AD x7, aka the TIE advanced x7, was a prototype TIE Series starfighter by Sienar Fleet Systems that would later become the TIE Defender. It was developed at the Sienar Advanced Research Division on Corulag, notable for its bamboo forests and loyalty to the Empire. "Sir, the holo quality was awful, are you sure he said brown not down?" "... Just paint." Barely made the deadline, designing the TIE advanced x7/TIE Defender from scratch took the whole 2 months. It's minifig scale, and based on an amalgamation of its most common features from various depictions, as each source depicts the ship differently. There's also a second AD x7 here on the workbench likewise being painted, though much smaller, so technically this entry is the same ship twice a differing scales. With the way digital technology is in Star Wars, I think it's likely that they also create smaller scale mock ups physically during the design process. The AD x7 is same as the Defender, but missing the top ion cannons, cockpit missiles, and the hyperdrive. I also took photos of the AD x7 with a different background from my Defender, as the mood and story I wanted to convey with the scene seemed to be lighter in tone. My Defender variant, without the story with instructions in the main form here, as I didn't want to mix the two ships and story:
-
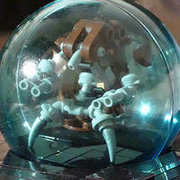
Embedding sadly needs the ground to be raised, yes, but for something like a diorama it'd still work with same or similar technique to what I did with the stand. The stand is actual designed so that the dome is removable and put in last for easy access, and secured in place by moving a few technic axles to lock it in. Removing the droideka and shield only takes a few seconds, and putting it back in is a bit slower but still a fairly quick procedure once you get the hang of it; no studs need to be taken apart. Thanks! In person the dome is pretty transparent, so the details are actually pretty easy to see, though the glare makes it hard to photograph.
-
24121 is too big, would make a 22 x 22 circle; minifig-scale would be more in the ballpark of 10 x 10 for that part to be accurately scaled.
-
This link here has a comparison image and goes into depth about where 29.6 comes from:
-
Thanks! To get everything aligned back to the stud "grid" like a baseplate, 4 studs tall. If you are fine with keeping things off-stud, so no plans to attach anything on bottom, then you can shave a few more plates off. The side panels aren't actually attached to the ring or inner ring as they don't align, they attached to the bottom base which was extended down 2 studs for a firmer connection to said side panels and to make the side panels 6 tall to accommodate the designs and logo in back.
-
Thanks! Thanks, that was what I was going for: I originally had plans for a Theed diorama featuring shielded droidekas, but while waiting on the PAB order of the uncommon dark tan parts which will take a long time, thought in the mean time it make look appealing as a small, solo display piece as well.
-
Shielded Droideka by Sy Lyphics, on Flickr Shielded Droideka by Sy Lyphics, on Flickr Shielded Droideka by Sy Lyphics, on Flickr Wasn't sure if I should start a new topic or put this in the same thread as the previous droideka, but since the part count is more than 10x the last one, figured it's better to do it's own topic. Let me know if I should condense them. The back of the stand features a Confederacy of Independent Systems logo, but that can be easily swapped for a panel same as the other 3 sides if you wanted a non-CIS affiliated droideka. Scaling down the droideka to accurate minifig-scale opened up the possibility of using the 8x8 Windscreen Domes, which are the largest windscreen domes, as the iconic force-fields of the droideka. With the droideka standing at 6 studs, 8x8 is the perfect size sphere to envelope the droid correctly. Embedding it into the ground proved to be quite the tricky challenge actually, as I wanted the ground internally to match the external ground level, and also have a tight fit around the shield, which much to my surprise is 1 plate not spherical as the domes aren't actually perfect semi-spheres. This lead to a ring and inner ring that doesn't have a top or bottom, as the studs on it face up in 4 different directions like the blades of a windmill, and an interesting and fun internal build to match up all the turns and offsets. Happy with the end result as gaps are almost exclusively the thickness of the shield itself and it works well from any angle. Instructions: Rebrickable I optimized the build to be as cheap as possible and use common parts, and any color parts, where possible, and is less than 10c a piece on rebrickable. It is a challenging build at times; in the instructions I used 3 extra colors to make it easier to assemble, and a more professional and fun experience.
-
Actually, now that it's been updated to 29.6 meters long, which is shorter than the falcon, I plan on making a minifig-scale version of this. I have a few other MOCs I'm working on in parallel, but this next up.