

UltraViolet
-
Posts
121 -
Joined
-
Last visited
Content Type
Profiles
Forums
Gallery
Everything posted by UltraViolet
-
I will try to make an actual image of the fabrication when I get a chance. I didn't have enough time last night when I wrote the procedure in text form. You are certainly correct that the cable can be oriented one way or another on the stud connectors in order to get the polarity for the PF output correct, and I described those forward and reverse polarity orientations in my explanation. I have tried to keep the explanation as simple as possible (and at lowest risk) for those of us that "aren't such good electricians", and because it was not easy weeding out wrong information from the internet. The 9V stud system doesn't have a fixed polarity, but it does in a sense have a 'preferential' forward polarity. The trouble, particularly for the inexperienced or those without the benefit of owning a multimeter to check, is that you have to be aware at all times what polarity any 9V studded connection is actually creating, as it's not marked on any of the components, and is potentially subject to reversal at any connection point. (There are multiple ways to easily create a dead short solely within the 9V studded environment.) The PF/9V combo connector will not automatically solve this for you. Unless you want to have to make all your 9V studded connections by trial an error, or marking labels on everything, it is better to understand the existing polarity of all the components involved and get it right the first time. The PF system expects only ever one polarity on the battery wires - once you start injecting power from C1/C2 and crossing it back over to the battery lines, you have to get this correct every time. I don't know if all the PF components have integrated reverse polarity protection on the battery lines (which should not have been necessary given their implementation), and I don't intent to find out by frying something at random, or worse, by having someone else fry something at random because I encouraged them to try. (The 9V studded battery boxes have overcurrent protection in case of a dead short, but don't tempt fate by engaging it.) The PF system enforced a safe connection every time by making it impossible to connect the PF battery wires to the 9V studded legacy contacts, only to the C1/C2 contacts. Once you go circumventing this restriction, the onus is on you to keep track of the polarity. C1/C2 you can reverse all day long and it doesn't matter, but under normal circumstances you shouldn't need to reverse the expected polarity of the PF battery lines, and giving that ability is confusing without clear polarity markings/colors on your modified connectors. I appreciate everyone's creativity with alternative connectors in their cable mods, and it's certainly something I know how to do. My explanation above simply allowed use of all standard LEGO components/connectors, while only having to modify one part (the wire), and not having to add anything else. It is the simplest way and safest way. P.S. Had LEGO gone with a reversable PF connector with five contacts instead of four, this all could have been avoided because it would have allowed them to preserve battery polarity in either orientation. The center pin would be ground and the one pin to either side of center would both be 9V positive fixed. The outer two would be C1 and C2 which would then be reversable. As they did not go that route, we have to pay attention to polarity ourselves.
-
Wow - both this and the other picture you linked really made my day! I'm struggling to figure realistically how much additional adhesion they were going to achieve with this scheme, given how small the extra driver was, taking into account the relative inefficiency of the earlier locomotives with a single large driver arrangement, and considering the difficulty of avoiding wheel slip with multiple independent and unsynchronized cylinder/drive gear groupings. The sound of these things in action must have been quite bizarre!
-
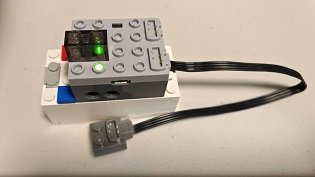
If directly feeding a PF motor or lights, it will work. If you want to supply battery power input to the PF IR Receiver, if won't work without a modified cable. I've been digging deep into LEGO wiring theory recently, with particular attention paid to standard polarity on various devices and wires, so I can speak to this issue fairly competently. I will attempt to illustrate how you can go about making this work: The 4760/73955 9V battery box has a simple on/off switch, which simplifies keeping track of the correct polarity. While under most circumstances polarity would not be particularly important to observe, in the PF system the fixed 9V battery supply lines to the IR Receiver or the Servo Motor must maintain proper polarity, while the separate control lines can reverse without issue. The PF connectors are polarized by their physical keying, but some caution still must be observed if using the 9V stud system headers so as to avoid back-feeding power from a second source into the IR Receiver or PF Battery Box output, or attaching multiple stud-connector headers in reverse relative polarity on the conductive plates. First we must note the polarity on this 9V battery box: With the switch end facing you, the left row of studs is positive. When attaching the PF extension cable to this box using the 9V/PF connector end of the cable, the wire lead can face straight away from you and the switch, or towards the right side. (Left or towards you makes the polarity backwards.) I keep track on my 9V battery boxes simply by attaching a 1x1 red tile somewhere on the correct side of the box. With that established, we can now move on to modifying the cable: To observe correct polarity, the outer two conductors on each side can be stripped and soldered together somewhere along their length. (Offset your stripped points slightly so you don't have to insulate the two soldered pairs from each other.) GND and C1 will be one joined pair, while C2 and 9V will form the other. (This layout was clearly created so that the outer pairs of wires don't cause damage if they somehow short together.) Alternatively you could solder bridges on top or bottom of the PF end connector, or on the PF top part of the 9V/PF end connector. Please note - I have seen an image posted joining C1 to 9V and GND to C2 - don't do this unless you absolutely remember to reverse the orientation of the 9V connector on top of the 9V battery box! It is best to stick with the proper polarity I described in order to avoid potential damage and to not get confused later. I also strongly recommend not using either of the two later types of 9V studded battery boxes with direction switches/buttons, as this significantly adds to the confusion and risk if you don't properly keep track of what you are doing. If you do so, be certain to label the positive studs in relation to the directional control. If you want to be even more safe, or are simply paranoid, you could splice a protection diode of sufficient amperage handling in-line with the cable at the point where you pair the neighboring wires on the positive side pair. As long as the polarity is correct, you can use the modified cable to power the IR Receiver or any PF motor/servo directly, with the rotation being in the expected direction (forward polarity equals clockwise rotation when the motor is viewed from the axle face). You can then reverse a motor/servo using a PF polarity switch if not using an IR Receiver. The PF polarity switch would have no effect on an IR Receiver if it were connected ahead of one, so it is not harmful. If feeding a PF servo directly from the modified cable only, obviously this will result in full travel to one side or the other only because the control lines are fed full voltage without any PWM. One other method, as a bonus, is available to you if you own a PFx Brick. (This may apply similarly to other third-party controllers, but I don't have any others yet to prove it.) The PFx Brick has a cut-away in the bottom that will fit a PF connector flush. The bottom connector is for 9V power input to run the Brick. The designer smartly set up the input pins in such a way that power can come from the 9V/GND battery box contacts OR the C1/C2 control line contacts. (C1/C2 must still maintain the standard forward polarity as detailed above.) The advantage of this is that the ordinary 9V-to-PF cable can power the PFx Brick from a studded 9V battery box without any cable modifications! An even neater trick I learned from this is that you can actually use just the 9V end of the cable sandwiched between the PFx Brick and the top of the 4760/73955 battery box. The free end of the cable could quite simply be cut off. That loose end of the cable can still be very useful, however, as a constant 9V supply for always-on lighting, or even to power a second PFx Brick! See below a photo taken just now at my desk showing the stacked configuration and the green power LED lit on the PFx Brick: You can also see where I put the red tile on top of the battery box to indicate the always-positive side, and a blue one on the always-negative side for good measure! (You can never be too sure. ) One thing that occurred to me about this stacked assembly is that you could use the pin holes in the side of the PFx Brick to support everything, meaning the battery box could be freely suspended. The importance of this is that the battery cover will not be fouled on the bottom of a build like a train, so you can open the cover and swap out the 9V battery without dismantling anything else. The studded clutch between the PFx Brick and the top of the battery box is extremely and sufficiently firm to maintain the suspension. Use of lighter weight batteries, as is the case with most rechargables like the li-ion version under direct discussion in this thread, would only make this more assured. Happy modding!
-
I noticed that the original version of the Znter 9V had the micro USB connector at the bottom, while the current crop for sale seams to all have them at the top. Someone commented on one of the teardown articles, that the new version no longer has a screw together casing - just force together or clips maybe. Can anyone confirm this? I also see that Znter makes AA and AAA type, as well as C and D format.
-
That is precisely what I had in mind! (Modifying the cable or using other types of pre-fab conversion cables gives additional possibilities for destination also.) Thanks, dr_spock, for finding that video. It was amazing! The Znter batteries are indeed, as said by the presenter, very "logical" in construction. I really appreciate anything that can disassemble/reassemble with screws and no permanent damage. The in-depth description of the circuit and the components was quite refreshing to see, and gives me a lot more confidence in the battery brand. One of the more intriguing details mentioned is that the internal circuit will slowly but eventually drain the lithium packs when not in use. It might be possible to modify these by adding a cell disconnect switch as an improvement to the design. The space is tight, but maybe enough. I think I have little to lose by ordering a few of the Znter batteries to play around with.
-
I see everyone is getting 'on board' with the PU to PF mods! I tend to build smaller creations, so the 2-port hub would be a benefit there. But on the other hand, I greatly appreciate that I was able to install the official SPIKE app natively on Windows 10 and have immediate access to block-based coding and USB or bluetooth connection options to a SPIKE Hub. (The same applies to the combination of Mindstorms Robot Inventor software and hub.) This would make acclimatizing to the PU universe of hardware and programming a lot easier, certainly when just roughing out builds on the workbench. I would hope that the block coding scheme used in the SPIKE and Mindstorms Robot Inventor apps is common to that in the Powered Up mobile app. One other thing - is there any major downside to the SPIKE hub not supporting Bluetooth Low Energy? Is this the same for the other 6-port hub?
-

Bows and curved slopes with matching curvature
UltraViolet replied to UltraViolet's topic in General LEGO Discussion
The following family has a curvature of two studs horizontally and two bricks vertically. It is important to note that there are two slightly different variants of the curvature, which I will refer to as "New" and "Old": New Curvature 92903 - Brick, Arch 1 x 3 x 2 Curved Top *33243 - Slope, Curved 3 x 1 x 2 with Stud. Bricklink notes multiple curvatures for this part but does not list multiple mold numbers. I have 33243 in my collection. 88293 - Brick, Round Corner 3 x 3 x 2 Dome Top 87559 - Brick, Round Corner 6 x 6 x 2 Old Curvature 6005 - Brick, Arch 1 x 3 x 2 Curved Top *ID unknown - Slope, Curved 3 x 1 x 2 with Stud. Bricklink notes multiple curvatures for this part but does not list multiple mold numbers. *6183 - Brick, Arch 1 x 6 x 2 Curved Top. Bricklink lists alternate mold number 24434 but does not say if it differs. I have 6183 in my collection. Please let me know if any of you have in hand, and can confirm, the curvature of the alternate/missing mold numbers. -
There are a number of brands offering similar batteries, and if I buy them I will probably be going through eBay. (I even saw one type that can use an OTG adapter to reverse-charge another device out the USB, acting like a typical USB Power Bank.) The most important feature to me would be the constant 9.x volt output level, followed by USB charging input - Do you think the Znter is the best overall when considering these together with capacity? Is there anyone else out there who has tested more brands of these batteries and found better alternatives? Please comment also on similar AA-format batteries if you have experiences to share, as I am also interested in those. My primary reason for looking into Li-ion compatible cells is to avoid the problem with leaking Alkalines. I've had a TON of these AA's/AAA's leak randomly over the years, some within a few weeks of installation. It's so random, messy and potentially damaging, I've had to resort to keeping all battery boxes and remotes empty between uses. (The same goes for my wireless computer mice.) I want the same voltage as alkaline while also having proper recharge capability, but with out the damned leaking!
-
If I were to consider buying a PU hub just so I have at least one in my collection, and taking into consideration that software and firmware capabilities are still evolving, which one hub right now offers the widest app and accessory compatibility? Do any of you have a particular personal preference for one over another based on any other attributes, such as physical size, power source/battery type options, or port count? Then there is the consideration of third-party options - The freshly released BuWizz 3.0 Pro is looking mighty-attractive right about now.
-
I see 4DBrix has done this and is still offering them after the move to partner shops: They are available from the partner sub-site Lowa's Brix, only listed in black, and have rubber rings. I would still appreciate having an alternate source for these, and with a more thorough selection from a single source, as you offer. And it would be great if the intermediate size fit the existing standard rubber band, as I mentioned above. Accurate/smooth rotation is my biggest concern, especially considering how fast these would have to be rotating to get anywhere quick.
-
Too many columns for my BBS... wide-ways or long-ways... and yes, I counted...
-
Oh, man, now you're really taking me back, as well of stretching the limits of my childhood memory. If I recall correctly, this was our first family computer in 1984: https://en.wikipedia.org/wiki/Thomson_MO5 I still remember the moment we picked it up from the Post Office (the building is now a Federal Halfway House - gritty-enough for ya?) It was just the bare computer - we couldn't afford the accessories. After 'miles' of typing numeric codes to program it, the end result was a blocky, barely discernable black on white archer who could move up and down and fire an arrow across the screen. That was it. Shortly after that we returned it. (Childhood faith was restored a few years later upon the arrival of an IBM PC Turbo XT. ) Could I have controlled a train with it? Maybe. Did any of us feel like typing an entire encyclopedia worth of codes to accomplish that, and have no way to store it after power down? NO WAY! As to other "nitty gritty details", I plan on posting about my experiences with the inter-system power adapters in a dedicated thread. It seems very few people are aware yet that they can buy a pre-made solution, without having to hack their own, or even have the option at all. PV Productions certainly deserves the credit and exposure, although the GBC crowd is probably well aware of them already.
-
Thirded! I definitely want some intermediate sizes with drivable axle hole between the standard train wheel and the tiny one. Is there such a size which would fit one of the standard existing rubber bands though? The x151 on BrickLink would probably do the job, and it's cheap enough. That would be most practical.
-
Efferman's Custom Parts
UltraViolet replied to efferman's topic in LEGO Technic, Mindstorms, Model Team and Scale Modeling
I really like those so called "cracker" or perhaps 'waffle' grids. They kind of remind me of high-strength molecular structures, such as in carbon fibre. -
I absolutely adore how this train-themed thread was almost completely derailed by excruciatingly detailed accounts of 80's computing! Just a slight bit further into the future, I have a Control Lab Interface B which I intend to get working on a Mac Classic entirely just because. Maybe I'll program it to run a simple back and forth trolley car or something, just to bring this closer to thread topic. Perhaps it's because I'm old school, but I'm still not sold on the Powered Up system. There are so many little annoyances with inconsistent device support across all versions of the software, firmware and hardware - it's hard to even make a compatibility matrix to keep track. (Just imagine the kinds of support email/phone calls they must be getting!) Until LEGO gets around to fully unifying the system (the WeDo Hub is already a permanent bust on accessory compatibility), I'm not likely going to be buying any PU hubs. That said, it didn't stop me from buying some of the PU motors after I got a bunch of the custom-made adapters available from PV Productions. It is far more fun figuring out how best to build something when I can take just about anything 9V, PF or PU and connect any number of mixed system components together at any time. This includes various power sources which don't depend on batteries, like the 9V train speed regulator and the PV Productions USB-to-9V/PF step-up supply (or the aforementioned Control Lab). I also got a PFx Brick so I have IR, bluetooth and USB-based control in a single package, and it can respond to multiple IR remotes with completely customizable actions. I enjoy designing compact train motor bogies, among other random things, and the ability to swap any motor in and out of the assembly as I work to find the best combination of connection points and output speed/power makes the exercise far less frustrating. I can even drive multiple PU motors from one source by using the PF-to-PU adapters and stacking the PF source ends together. When I ever get around to owning a PU hub, I'll be able to split outputs to multiple PF/9V motors using the PU-to-PF/9V adapter and then stacking the PF/9V connectors. Or I can get really crazy and go PU hub, PU-PF/9V adapter, then stack multiple PF-PU adapters so I can drive multiple PU motors from a single PU port, seeing as nobody is making a direct PU splitter yet. Got your head spinning yet?
-
Efferman's Custom Parts
UltraViolet replied to efferman's topic in LEGO Technic, Mindstorms, Model Team and Scale Modeling
The was something else that came to mind today which is actually technic related. I recall having more than one tight space were this would have been helpful. It would be like a 18677 "Plate, Modified 1 x 2 with Pin Hole on Bottom" except with the hole centered like on a 2444/10247. The 2444/10247 doesn't allow an axle to pass all the way through under the rest of the 2x2 plate. You could also think of it as a short-height variant of 32529. My only concern would be clutch power if suspended below another part. 18677 2444/10247 32529 11458 Also useful would be 1x2's plates with the hole facing out the narrow side. This could be done above or below the plate. I'm not actually requesting these, just musing out loud. The 1x2 with centered hole on bottom is the thing I could most likely use in the near term. -
Bows and curved slopes with matching curvature
UltraViolet posted a topic in General LEGO Discussion
I am attempting to put together a reference list for bricks which share a matching vertical curvature as a family. These parts are scattered over multiple categories on BrickLink, hence why a centralized list would be useful. To make the list, the parts must be able to touch matching a curve anywhere on the end faces. The ones I am looking at first have a curvature of one stud horizontally and three plates vertically: 6091 - Slope, Curved 2 x 1 x 1 1/3 with Recessed Stud (One plate height before curve.) 37352 - Slope, Curved 1 x 2 x 1 6191/10314 - Slope, Curved 1 x 4 x 1 1/3 (One plate height before curve. 10314 has raised reinforcement so a stud fits under the center stud holder.) 6081 - Slope, Curved 2 x 4 x 1 1/3 with Four Recessed Studs (One plate height before curve.) 6215 - Slope, Curved 3 x 2 x 1 with Four Studs 4744 - Slope, Curved 4 x 2 x 2 Double with Four Studs (One brick height before curve.) 30165 - Slope, Curved 2 x 2 x 1 Double with Two Studs 6192 - Slope, Curved 2 x 4 Double 6216 - Slope, Curved 4 x 2 x 2 Triple 30075 - Slope, Curved 6 x 2 x 3 Triple with Eight Studs 6214 - Slope, Curved 8 x 2 x 4 Triple with Eight Studs 67810 - Brick, Modified 2 x 2 x 1 1/3 with Curved Top (One plate height before curve. Outside curvature on corner is actually only one stud like 1x1 round corner tile.) 65617 - Brick, Round Corner 3 x 3 x 1 without Studs 24599 - Brick, Round Corner 5 x 5 x 1 without Studs Let me know if I've missed anything, or if there's a non-matching curve profile on any of these I didn't have on hand to compare physically. Please don't quote my entire post in a response, or this thread is gonna get messy quick! Cite specific examples. If this works out well, I will continue with other curvature families. On a related note, efferman just fulfilled my dream of a 4x4 variant of the 65617 3x3x1 corner, which I've just ordered from ShapeWays: https://www.shapeways.com/product/3WFLSFSSP/slope-curved-maccaroni-4x4x1-stud?key=18b09252707f3ff8394b285cd03c6f73 In future, I really wish LEGO would produce variants of the 6091 and 67810 without the plate sticking out the side, and preferably one brick high instead of 1-1/3 like they did with the 37352 and 65617. (I had to cut the side plate off 12 of the 6091's before the 37352 was released and solved my problem, but there's still no solution for odd-numbered stud lengths.) I also don't understand why the 24599 5x5 corner was made with the 4x4 curve filled in - now the 27507 4x4 macaroni tile, 48092 4x4 macaroni brick, and numerous other items also matching this radius can't fit inside. And speaking of macaroni, 3x3 tile and brick would be great to match the radius of the various 6x6 round pieces, and also the 3x3 quarter dome. (I'm starting to drift off-topic though, and I don't have any immediate applications for such things anyway.) Kris -
Efferman's Custom Parts
UltraViolet replied to efferman's topic in LEGO Technic, Mindstorms, Model Team and Scale Modeling
This should do quite nicely, thanks so much!!! I may use this shape for mudguards on another project, but in my current build they will be laying flat, so clutch should not be an issue. I am prepared to fine-tune or glue them if required. I just ordered 16 pieces from ShapeWays so I'll have some spares to play around with, as well as some of your 3x2 panels and panel corners because I have another idea for them. Quite amazing, thanks again! -
Suggestions for modelling accurate clerestory?
UltraViolet replied to Tube Map Central's topic in LEGO Train Tech
Here is my attempt: I was just messing around with the idea last night and got this far as an example. (Colors are not meant to be accurate with any known liveries on LU Standard Stock.) This is using cylindrical panel 30562 for the main raised part, which provides a fairly fine lip at the transition to the outer roof. For most known liveries, suitable colors it comes in would be light bluish gray, tan (for cream color), or dark red (to possibly emulate brown). Round 4x4 tile 27507 matches the panel curve on front end to cover the studs. I left the side walls straight vertical at 8-wide - as a result, the intentional small overhang of the roof side edge sticks out about one tile thickness extra on both sides. On the prototype there is a very slight inward angle starting below the windows, but this seemed unnecessarily complicated to replicate in 8-wide scale. Scale reasonably fits 9v train motor on the motor end as shown. You may prefer to cheat the overall length, as the real thing is somewhere around 50 feet long, I believe. (Unless you just want a nice display model.) I was building roughly to accurate scale length up to the point I stopped. If you are trying to accurately model the London Underground Standard Stock, the basic roof shape is only part of your battle. There are a number of other detail spots along the roof which would be difficult to insert. If you're simply looking for inspiration for similar models, or aren't worried about the finer details, then maybe my example is suitably inspirational. Someone did a 6-wide here a while back: MOC: Vintage London Underground Tube Train - LEGO Train Tech - Eurobricks Forums The roof components are all done with slopes more like the method you were suggesting. You can see in their model the problem any build would face of the end color matching the rest of the front end, as they've obviously painted the end face of the roof parts red. I can't see any other good way around this except making your own stickers. Happy building, Kris.jpg.7a54b174f9eaa380a02f58a9adbb3b5d.jpg)
.jpg.b13d0892a5156acef9105754f97bbe74.jpg)
-
Efferman's Custom Parts
UltraViolet replied to efferman's topic in LEGO Technic, Mindstorms, Model Team and Scale Modeling
65617 was released in 2020, and yes, it is 3 plates thick and curves continuously from the bottom edge. It's supposed to match with the straight piece 37352, and 24599 which are also 3 plates thick. As a family It shares vertical curvature with 6091, 6081, 6191 and 67810 (there are some others too), but those have an extra plate height at their bases before the curve begins. It would be more flexible to have a 4x4x1 than a 4x4x1-1/3. I need to make a continuous 180 degree bend between two parallel 6191s sitting on the outer studs of an 8-wide space. If this part can be created, I will need at least eight pieces, but will probably order many more in case this element is never officially released. Cost is of very little concern to me, as these will be a signature feature on a MOC. -
Efferman's Custom Parts
UltraViolet replied to efferman's topic in LEGO Technic, Mindstorms, Model Team and Scale Modeling
Hello efferman, You seem to be the go-to guy for custom part design, and I am seriously impressed with your work and creativity. I'd humbly ask if you'd consider creating a design for me. I am seeking an alternate size for part 65617: The original is 3x3x1 in size, but I need one that is 4x4x1. The layout for the underside could be sourced from the nearest similar part, 48092, because it has the same horizontal radius of curvature. If it were published to Shapeways, I would preferably like the color option Red to be available. I see that you generally focus your work on Technic parts, but hopefully you would be willing to do this 'standard' brick, as it ties directly into a number of other existing parts in the same family. Additionally, a question to the other members of the EuroBricks forum - how accurate versus standard LEGO color is the Red offered by Shapeways? Is it close enough, or would you recommend I paint the finished part myself?