

jelockwood
-
Posts
23 -
Joined
-
Last visited
Content Type
Profiles
Forums
Gallery
Everything posted by jelockwood
-
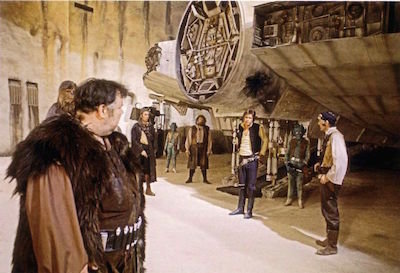
It is I believe indeed bigger than other Tantiv MOCs especially in length. Excluding the ceiling, it is 13 bricks tall. (The ceiling is a single brick thick.) This was necessary in order to fit the two arches top and bottom, the two wall containers and the SNOT solution I used which was as thin as possible being a single brick in height or three plates. The door(s) used however are the same height as other MOCs and therefore overall I feel the extra size is minimal. Also if you compare the image of my MOC with Picture 3 it is an excellent match in proportions. I might have been able to make it slightly less tall but then I would not have been able to fit the red 'lights' above the door which was the main dictating requirement for height - indeed it caused me to need to add an additional 1 brick in overall height, it also would not have had the right proportions otherwise. If you download pictures 3 and 4 and flip between them quickly you can get a better idea of how closely my MOC matches the film set image. My next project is Docking Bay 94 and a significant portion of Mos Eisley. This also is larger than other peoples MOCs and again I am finding this necessary to produce a more realistic result but again it seems to work well even for minifigures. (It will eventually have a lot of minifigures as it will include many sub-scenes from Episode IV.) My aim with this next project will be to produce photos of sections of my MOC arranged to replicate stills from the film so that again they look as similar as possible. This project apart from being much bigger is proving a lot more difficult in that even the film sets are not consistent, for example it is well known that the Docking Bay film set was not actually constructed as a complete circle due to inadequate space on the Elstree studios set. Even so called official sources like an official illustrated guide shows an artists image with one of the staircases angling in the opposite direction to what is in the film. This is the staircase going up from the base of the Docking Bay up to the surface where the entrance from the street is. As the film cuts between positions as Luke and Obi-wan walk towards the Docking bay you also do not get a picture of all of the streets and I will therefore have to fill in gaps by making invented connections. Not to mention Lego itself hugely limits things. Lego prefers 90˚ angles but one significant street junction just outside the entrance to docking bay is more like 135˚
-
As I approach a slightly early retirement, I have been buying Lego Star Wars UCS sets to later build, and started working on some MOCs/Dioramas. I have deliberately not worked on these MOCs as fast as I could for several reasons, other time commitments including work, to give time to refine the designs, to lengthen the enjoyment period, and to spread out the costs. However I have now completed my first significant project as below. The inspiration was originally a printed canvas artwork I also purchased for my Lego man cave. However other inspirations were the photo from the Star Wars Episode IV film scene, what I believe to not be another photo but an artwork with actors, smoke and debris removed, and of course various other peoples MOCs. Whilst I did review various existing Tantiv corridor MOCs my focus was on achieving maximum accuracy compared to the the film set and not 'playability'. I did make some recent changes to the pillars based on the relatively recently released official Lego 75387 Tantiv IV Corridor set. Whilst I have used a lot of SNOT the only potential 'cheat' I have used is to fold up a piece of white paper and squeeze it between the two vertical red tiles above the door to give the impression they are separated as it was not possible to do this with tiles and have the right spacing. Unlike most/all other Tantiv corridor MOCs I have used translucent/pearl Lego 1x6x5 panels part number 35286 as part of the ceiling, I have also used genuine Lego slope bricks part number 60186 to create the grills in the pillars but via SNOT I have been able to use them upside down since there is no inverted version of this brick. I have also bought genuine Lego minifigures of Darth Vader, Storm Troopers and Rebel Fleet Troopers. (Not shown.) Picture 1 = canvas artwork Picture 2 = film photo Picture 3 = cleaned up artwork rendition of picture 2 Picture 4 = my completed MOC
-
@MaximillianRebo Excellent models! I have been looking for a decent Ronto to include in a diorama. Would you be able to provide a complete parts list for each? [UPDATE - Found it on Rebrickable! see https://rebrickable.com/mocs/MOC-191049/MaximillianBricks/ronto/#details ] I had hoped that Lego would make an official Ronto minifigure like the artwork shown on the following page. (Scroll down to find it.) However this has not happened despite there being as a relevant example an official Dewback minifigure. https://www.artstation.com/artwork/xDr6B4
-
Auto stop motors?
jelockwood replied to jelockwood's topic in LEGO Technic, Mindstorms, Model Team and Scale Modeling
It would likely make a noticeable noise and of course continue to draw power. The answer below seems what I was looking for. I will therefore buy a PF polarity switch via Bricklink and explore designs for pulling the switch back to the centre off position at top/bottom. I will also try and make it harder for a 'guest' to accidently try to use up when already at the top and down when already at the bottom. -
Auto stop motors?
jelockwood replied to jelockwood's topic in LEGO Technic, Mindstorms, Model Team and Scale Modeling
I accidently posted originally in the Star Wars theme forum and as advised posted (then) in the Technics forum. It looks like someone kindly then moved the original post also to the Technics forum so we ended up with two in their. (I could not move it myself.) -
Auto stop motors?
jelockwood replied to jelockwood's topic in LEGO Technic, Mindstorms, Model Team and Scale Modeling
Thanks, I also found a video demonstrating the PF polarity switch. Its name had led me to believe it only did polarity reversal and not also on/off but the video clearly shows the mid-position is off and top/bottom are the reversed positions. -
Auto stop motors?
jelockwood replied to jelockwood's topic in LEGO Technic, Mindstorms, Model Team and Scale Modeling
It would be manually operated. How do I link the leaver to the battery box to turn it off? What parts would be involved? This sounds like what I am looking for if it triggers automatically when the lift reaches top or bottom. -
Auto stop motors?
jelockwood replied to jelockwood's topic in LEGO Technic, Mindstorms, Model Team and Scale Modeling
I am intending to use a Lego power functions motor as part of custom lego build and ideally need a way for it to auto stop. The motor will be used to power a lift and when it reaches the top or bottom I need it to stop rather than mindlessly grinding itself to death when it reaches the end. This is different to if you use a motor to rotate something which could rotate indefinitely. For the lift I was planning using either a worm gear with Lego 3743 gear rack bricks or a standard gear and Lego rack and pinion. I did think about using a clutch gear wheel but need something more effective than that as the clutch gear wheel would be not be really suited to fit in the build. -
I am intending to use a Lego power functions motor as part of custom lego build and ideally need a way for it to auto stop. The motor will be used to power a lift and when it reaches the top or bottom I need it to stop rather than mindlessly grinding itself to death when it reaches the end. This different to if you use a motor to rotate something which could rotate indefinitely. For the lift I was planning using either a worm gear with Lego 3743 gear rack bricks, a standard gear and Lego rack and pinion. I did think about using a clutch gear wheel but need something more effective than that as the clutch gear wheel would be not be really suited to fit in the build.
-
I have not watched that video but this is not I feel startup teething problems. As I mentioned overnight several days ago 75% of the bricks I had in my basket changed to out of stock. That means they were previously all in stock or I would not have been able to add them to my basket. This includes common and popular bestseller bricks and not so popular standard bricks. Again as Lego claim Standard and Bestseller bricks are processed by different warehouses with logically Bestseller bricks being the ones that they sell most of and either should be more likely to go out of stock or to be ones Lego work harder to keep in stock. The results I am seeing suggest neither and that vast numbers of bricks of all types have simultaneously gone out of stock.
-
The examples from František Hajdekr are way better than I thought was possible with consumer level 3D printing equipment but I also share the opinion that technology is not yet good enough for this. I had however thought that Lego should be looking at this themselves as a way of offering a 'print on demand' service for discontinued bricks. Lego would be able to buy industrial level 3D printing systems which should be much better and faster but even there I would still feel technology is not yet advanced enough.
-
Connect lego motor(s) to wall-socket?
jelockwood replied to h3ctic's topic in General LEGO Discussion
I am surprised no-one else has mentioned this yet. You can buy a product called a 'battery eliminator'. This is an AC to DC transformer but rather than a standard one that might have a USB or mini jack connector, this type of product terminates in a dummy battery and includes one or more additional dummy batteries so as to be inserted in to the standard battery compartment. You could therefore buy one of these for use with a Lego battery case. -
Lego (had) two website methods of buying bricks, one was focused on buying additional stock of common bricks, and one that was focused on 'replacing' missing bricks - although I like many also used this as a mechanism for buying additional stock of a wider range of bricks. These have now been merged and whilst it is likely the result on average will be a little more expensive that is not my issue. I had been building up a shopping basket for my next order as I try to buy enough at a time to make the shipping costs etc. more palatable and since the reorganisation this is more important as bricks now are listed in two categories - 'Bestseller' and 'Standard' and each has their own additional shipping charges if you don't order a certain amount. I am also used to and expect that from time to time some bricks will go out of stock. When out of stock you of course could not add them to your shopping cart but previously if you had already added them it was still possible to complete the order although this would obviously delay their shipping the order to you. This time however practically overnight about three quarters of my pending shopping basket was wiped out - that is removed from my shopping basket. This was not a random error but was due to these items going out of stock as I confirmed by searching for them. Again I expect from time to time individual bricks to go out of stock but this time a huge proportion of bricks have all gone out of stock at the same time. This suggests something more significant has happened as there is no way overnight that many different bricks would have genuinely simultaneously gone out of stock. Has their factory or warehouse burnt down? Has Lego suddenly discontinued dozens of different bricks? Is Lego phasing out the entire 'Pick a brick' feature? Note: It was the 'Standard' i.e. less common choice of brick that was most affected but not exclusively so as also many 'Bestseller' bricks are now also out of stock. Supposedly these are stored and processed at different warehouses as this is the excuse Lego use for having two categories each with their own additional shipping charges. As an example Plate 8x16 (part number 92438) is now out of stock except for a single colour meaning eighteen colours are out of stock.
-
@MaximillianRebo Thanks for the idea for the WED-9-M1 droid. That is a very good start and better than I thought might be possible. Your choice of arms and upper torso particularly look a good choice. It does also inspires me to realise that since the WED-9-M1 is made by the same droid manufacturer as the Treadwell that Luke initially buys from a Jawa in A New Hope before it blows up. Therefore one could use a base similar to the SW0550 Treadwell minifigure. Could you list the parts used for the head and neck? Also what you used for the shoulders - probably 31561 on top of a half pin.
-
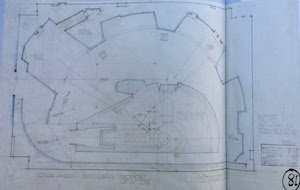
Just as an example of the difficulty in trying to get images to use to help provide guidance on the layout and appearance of Mos Eisley and Docking Bay 94. The following link is to the official site of John R. Mullaney who was an officially appointed artist who illustrated many official Star Wars books. On the page I linked to is an image of Docking Bay 94 in cut-away view. This view is going to be helpful but to me having already done a lot of research it instantly shows several errors. https://www.thetopdraw.com/artwork-galleries/sci-fi/star-wars If you look at the following image which is the official film set plan for the docking bay you can see the staircase skewed in the opposite direction to the image on the above page. Note that even though the following image is an official plan for the film set the actual built set is slightly different, the film set plan also confirms effectively only half the docking ring was actually built. This is the sort of problem I have been facing with the physical film set images, the CGI special edition images, the images from various computer games and various other sources having contradictions. In the case of John R. Mullaney's image one major error is that the staircase shown in the bottom left of his image is skewed to the left i.e. pointing away from the centre of the docking back, in the actual film it is absolutely clear it is skewed in the opposite direction, he also has some storage crates in the wrong side bay and has distorted the size of the large bays to shrink them to the same size as the other bays, as have other existing user Lego models. Going back to the staircase, having closely studied actual film images, I can see that when one goes through the docking bay 94 entrance on the street level, there is a short corridor, then a right turn that is at the top of the stairs, you go down the stairs (skewed the right way) to the below ground level base of the docking bay and enter one of the two large side bays. I have already built all this section and even skewed the staircase correctly. (By stressing alignment of bricks illegally by exactly one stud difference in length between the two sides.)
-
@Tipsy46@Kage Goomba Yes it is the UCS set @Kit Figsto Yes Bricklink is my backup plan for the goggles, however I am in the UK and only two stores currently list it and the shipping charges vs what other bricks I could get from them at the same time make it either difficult to meet their minimum order level or to make the overall cost justifiable. I am looking in to this though. The helmet and head are still current parts unlike the goggles which are discontinued. I have already bought a number of discontinued parts via Bricklink such as the red forklift arms (although I am using these to represent 'stabilizers'), an extra large door frame (1x6x10) and some wedge plates without stud notches which I am using as part of the pneumatic compressors in the docking ring. @Kit Figsto For the docking bay scene my own research has so far identified the following characters as being present :- Han Solo, Chewbacca, Jabba the Hutt, Boba Fett, Beedo (a Rodian), another Rodian, Ront Byrnloo, Boelo, Gela Yeens So I am looking for minifigures to represent Ront Byrnloo, Boelo and Gela Yeens. Neesh was another Rodian inside the cantina, Thuku was another Rodian outside the cantina. I found the following which seems to be an excellent reference for who appeared in the Mos Eisley cantina and indicates some who then appeared in the docking bay scene. https://www.starwars.com/news/meet-the-humans-from-the-mos-eisley-cantina
-
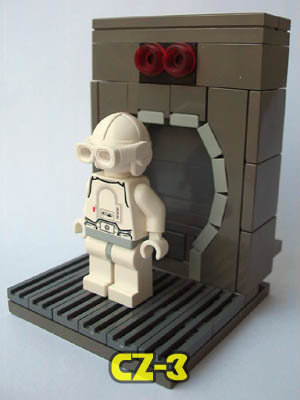
@Kit Figsto Many thanks for your reply. I will look in to those parts for the CZ-3 droid. That blog article is also a godsend although I am not sure it is totally accurate in using George Lucas material as source but it definitely is a big, big help. I have already bought Luke's Landspeeder and the Millennium Falcon, I did think about getting Obi-Wan's hut but it is located well away from Mos Eisley. I do intend to get the Cantina set. I plan to use many of the figures from that including Garindan. I have already bought Jabba and Boba Fett and a couple of extra Greedos. I was hoping to get character names for the human characters in the Jabba/Han scene and see if any of the other cantina set minifigures matched up. I am trying to get a number of Sandtroopers but these are a lot more expensive than standard Stormtroopers. I will need at least nine I reckon. (For the benefit of others, the Luke Skywalker minifig included with the Landspeeder set includes the 'poncho' that Luke puts on when walking to Docking Bay 94.) I have even bought an extra minifig hand to put on the floor of the cantina to represent the hand that Obi-wan chops off with his lightsaber. I don't intend to build the whole of Mos Eisley and I am only going to do Docking Bay 94. It would be far too big and expensive to do it all and arguably my current aim of doing the major film scene locations is already going to be a major task. At the moment I am hoping to do scenes between the journey from the cantina to the docking bay which would include the droid hiding place, the Landspeeder sale, the walk back to the docking bay including its entrance and of course all of the docking bay including the stairs from the surface and entrance. I would expect these to be at least 3 square metres, maybe four. At the moment the parts I have built are in sub-sections and not assembled together as I do not have a big enough table to join them all on currently. When I eventually do I will contribute some pictures. (Found the white helmet and blank white head, Lego show no stock of the white goggles.)
-
I am currently working on a massive Mos Eisley scene. I have made a good start and I am using images from Episode IV A New Hope as my main guide - the version shown in the remastered copy of the movie. This therefore includes the fact that Jabba is seen in Docking Bay 94. As people maybe aware the actual Docking Bay 94 in the film as built on the film set was deliberately incomplete because they a) could not afford to build the entire circular docking bay and more importantly b) could not build a big enough one on the set due to the size limitation of the sound set at Elstree Studios in England as used at the time. This means that only half the docking bay and the Millennium Falcon was actually built and depending on the scene in the film versions either it is achieved by a visual trick or in the later remastered version showing an overhead view via a CGI image and to some extent this contradicts aspects of the physical set. I am going to make a full circular version but try and combine that with the physical version layout. The CGI version implies all the 'sides' are equal in length, the physical set shows two long sides, one short segment and implies several medium length segments. The long ones feature much more prominently in the film. Whilst in the film you cannot tell I did manage to find an image of the actual film set plans and there is actually a medium length segment between the two long segments. I have also already built a replica of the infamous forklift briefly visible behind the Millennium Falcon in the docking bay. (Apparently this is technically and more accurately called a 'lifter' rather than a forklift.) None of the existing Lego forklift designs looked similar enough to this. Anyway, the purpose at this point is to ask for some advice relating to various droids visible in the Mos Eisley scenes. Some will be easy enough to represent with suitable Lego minifigures, obviously this includes R2D2 and C3PO but would also if needed include the WED Treadwell droid. It would also be possible to use a Lego R5D8 to represent the actual R4E1 droid as these are similar enough in appearance. What I am struggling with is finding a suitable equivalent for a CZ-3 and WED-9-M1 droid with it being more important to find a CZ-3 droid. I did find the above image which appears to be of a 3D printed minifigure scale model which someone else is using for a CZ-3 but it might also be a minifig made up of mixing various parts from other minifigures. Perhaps someone could suggest which parts to use if this is the case. It would also be helpful to have a list of characters that feature in the scene in the docking bay between Jabba and Han. This obviously includes Han, Jabba, Chewbacca and Boba Fett but also several others. Where there is no correct Lego minifigure suggestions for similar enough ones would be appreciated. For example whilst Greedo is shot by Han in the cantina two more Rodians feature in the docking bay scene with Han and Jabba, one is called Beedo, I am not sure of the name of the other but it would be possible to use Greedo minifigures for both of these. Another difficulty is that whilst scenes show Luke and Ben walking through Mos Eisley from the cantina to the docking bay these have cuts between them meaning you do not get a view showing the overall street layout and it is clear once more that due to filming limitations the way it is presented in the film means views may contradict other views. As an example there is a set of steps that go up between some buildings and at least partially imply they may be to climb a hill but all other views suggest Mos Eisley is quite flat. It should also be noted that some computer games based on the same film and scenes also clearly contradict aspects because of inherent image conflicts in the film and/or misunderstanding. In general I expect it will be necessary to 'guess' the further one strays from the main film viewing points. One also faces the structural limitations of Lego bricks which make doing diagonal walls/streets impractical in many cases. If anyone has a source for a more accurate Mos Eisley street plan that could be useful.

-
I think I have now managed to solve this myself. I ended up having to use a technic brick on its side with an additional two stud technic brick clipped to it to allow gears to mesh diagonally. I had originally been trying to do it using just a technic beam in a straight line. I now have the equivalent of option 4 from my list and the entire gear train is 3 studs in height and fits where I need it.
-
I am hoping someone can help with the following query. I am looking for a design to achieve a 1:12 gear ratio in lego. I can see the following ways to achieve this. A worm gear hooked up to a 12 tooth gear, 12 rotations of the worm tooth results in 1 rotations of the gear. Unfortunately as the worm gear works asymmetrically it can only do 12:1 not 1:12 as I need A gear train made of a 24 tooth gear linked to an 8 tooth gear, then the axle of the 8 tooth gear has a 24 tooth gear linked to a 12 tooth gear and then the axle of the 12 tooth gear has another 24 tooth gear linked to a 12 tooth gear. This would then overall be 1:3 x 1:2 x 1:2 totalling 1:12 The same as above could also be achieved with a gear train made of a 24 tooth gear linked to an 8 tooth gear, then the axle of the 8 tooth gear has a 16 tooth gear linked to a 8 tooth gear and then the axle of the 8 tooth gear has another 16 tooth gear linked to a 8 tooth gear. Again this results in 1:3 x 1:2 x 1:2 and a total of 1:12 Or a mixture of 2 and 3 as in a gear train made of a 24 tooth gear linked to an 8 tooth gear, then the axle of the 8 tooth gear has a 16 tooth gear linked to a 8 tooth gear and then the axle of the 8 tooth gear has another 24 tooth gear linked to a 12 tooth gear. This would then overall be 1:3 x 1:2 x 1:2 totalling 1:12 Note: For the above the order of the gears would make no difference to the total ratio. My issue is therefore not what gears are required unless someone has a more efficient choice than those above, but how to construct this in the most compact possible way and this might dictate the physical size of the gears but not the ratios. The gears would have the axles running vertically and hence the gears would be lying flat i.e. horizontally. I need the total height of the assembly to be as low as possible. Thanks for any suggestions.
-
Advice for multi layer rotation project
jelockwood replied to jelockwood's topic in General LEGO Discussion
Thanks, this sounds promising, do you have a link? Most of the turntables I have seen have a static base with one rotating layer, in my case it will be three rotating layers. Ah, looked at one, it seems for my case it would translate to a static bottom i.e. my hidden internal pillar and then three rotating layers on that which would be very similar to each other. I also see that it looks like a planetary gear approach might be simplest and thinest but will have to check further to see if the rotation speeds for each layer are possible. I am currently bidding for some parts to get started prototyping with. For @JintaiZ it is not even started let alone built so I have nothing yet I can take a picture of. -
I am completely new to Lego Technics and any associated motors. I am however considering a (to me) significant project and as a newbie coming here for advice before starting. If/when the concept looks feasible and begins progressing I will reveal more details about it but for now conceptually it could be considered to be similar to a three layer sponge cake with each layer rotating at different speeds. (It will not actually be a cake.) The stack would rotate about a vertical axis with each layer needing to be powered at different speeds from the same vertical input. The three layers would need to hang off the vertical tower containing the drive axis which will be inside the build. Potentially the upper two layers could rest on the bottom layer which would rest on buttresses from the central tower. Bearings between the layers could allow each layer to rotate freely whilst still allowing the upper layers to rest on the bottom layer. The issues are to ensure that no gearing or support between the layers prevents full 360 degree rotation and also to allow the full diameter of the upper layers to be supported sufficiently so it does not fall off or through the lower layers. If it makes any difference I would need the middle layer to rotate the fastest. Due to the anticipated diameter I am expecting that using the Lego banana gear i.e. the 11x11 circular rack would form a major part of the structure. Apart from advice on how to ensure support without each layer crashing in to part of the other layers I am also interested in advice on choice of motors and power. Lego have and/or had a vast number of options not limited to EV3, NXT, Power Up, and so on. The drive input would come from an externally mounted motor providing a horizontal axis which would then enter the build at the bottom and be translated to the vertical central axis. This will not require high speed rotation, only smooth, steady rotation and the build will likely end up being reasonably heavy. Strength will be more important than speed. The gap between layers should be kept as little as possible, since bearings between the likely three sets of banana gears will I feel be needed that would probably be the constraint for the minimum gap although possible overhangs outside of the banana gears may help disguise this. All three layers will rotate in the same direction. Looking down on to the build this would be considered to be a counter clockwise direction. Thinking further it might have been easier if the drive was possible at the circumference instead of the centre but this will prevent the intended design appearance.
-
@dmaclego You mentioned (quite a while ago) in this thread that making your AT-AT in this diorama able to walk would be 'silly'. Whilst your unbelievably excellent set is already beyond compare you could look at the official Lego 10178 AT-AT set as inspiration for making your AT-AT able to walk. I have to say that your AT-AT is far, far more realistic than any of the many different AT-AT versions released so far by Lego and this is even ignoring your models lighting and animated head. Indeed I would say your AT-AT model should be considered inspiration for a future Lego UCS AT-AT model just as your Imperial Shuttle was for the Lego 10212 set. I have no hope of building a diorama equivalent to your stupendous creation but I am considering trying to achieve something similar based on the MOC instructions being sold on eBay. As per https://www.ebay.co.uk/itm/Lego-Imperial-Shuttle-Landing-Platform-Star-Wars-Instructions-Custom-Endor/ With regards to this could you provide some tips by answering the following. What is the lego baseplate you would suggest using? How did you make the deck of the landing pad? Not the entire instructions but just how did you create the smooth surface along with the rest of the 'sandwich'. This might not be adaptable to the smaller scale of the MOC instructions being sold. What part do you use for the tree leaves? Of the (many) different AT-AT models Lego have sold which would best match the scale of the eBay MOC instructions above? Or do you have any recommendation for a MOC build AT-AT of matching scale? Also the same for an AT-ST?