

thndrmatt
-
Posts
21 -
Joined
-
Last visited
Content Type
Profiles
Forums
Gallery
Everything posted by thndrmatt
-
Figured I"d bring this thread back from the dead again since world circumstances had me finally get around to duplicating this effort for the full size BB-8 of ~11k pieces by Henrik. https://imgur.com/a/6q0OARu His work obviously, not mine. Some notes from the build: -I will say using LDD auto-generated instructions was a real pain as the build order was pretty terrible, but I couldn't seem to find an alternative program that could handle the 11k pieces and auto-generate instructions correctly. It also seemed to always leave some major technic elements just totally missing, and some pieces orphaned and floating in midair. Luckily since there's some duplication across the build you can figure out where things are supposed to be eventually. The auto zoom all the way back out thing that LDD did every 4 pieces placed was the bane of my existence, as trying to zoom back in every time and figure out where the heck it just placed that 1x1 plate was a real time sapper. Feel free to share how I could have done it easier, hindsight is always useful... -I went with LBG vs the DBG he used, as I had more of those pieces lying around. I wouldn't waste the money getting 100% new white, as there are a ton of the white pieces that end up either fully hidden or mostly hidden, and a weathered look to him looks more realistic anyway. -I reinforced the interior using the crossbars that are blue/gray in my version, his version had one included the parts list but not the other seven I ended up duplicating and adjusting to fit. Much sturdier than it would have been otherwise, I think he might have went with a similar solution when he restructured the interior. -I also added a third technic section to connect the remaining two of the 6 sides, as I felt that would help secure it as well. You can't really secure the 6th side in the same manner because you have no way to see what you're doing once you slide it on there, so I just made the 6th face the top section and plopped that one on with the added central support. -There is a lot of usage of 1x1 plates when larger plates (1x2, 1x3, etc) or even 1x1 bricks could be used basically all over the model. If someone took the time to go through the draw file and make it more efficient you'd probably save some decent coin. But that would cost a bunch of time, which you might value more... -I used a kickstand of bricks on the back and wedged it into a corner to keep it from rolling away, but definitely consider display strategy... Similarly I added some bricks to the interior of the head to give allow it to solidly attach to the body, as the instructions had it mostly just sitting on top rather than being connected solidly. -This thing isn't light, definitely a two armed hope you don't trip effort to get it anywhere even with the head removed. People see it right when they come in my front door, and it's certainly a conversation starter... Thanks Henrik!
-
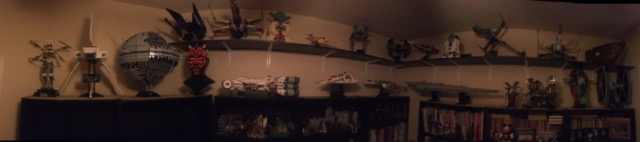
Quick update to show I added a shelf and supports between the upper edge of the 6 foot tall shelves and the ceiling, that allowed a full other row of display space. Left the far left side open for some of the taller sets but the rest fit no problem. Probably just going to bring in 10188 at this point vs buy the new one and put it in its place chronologically, also still waffling on whether new snowspeeder would be worth it. And still getting around to Hoth, hoping for a discount.
-
Where'd you get the table?
-
This post will basically show how impossible it is to try to display umpteen UCS sets. I don't intend this to be a permanent solution, but I had sets all over the place as I was building, and with both a 1.5 year old and one due in a few months, the breakable stuff all gets booted into a tiny room I call the "library" which is basically a trove of all kinds of stuff. I attempted to go semi chronological with a few exceptions. Spacing was a challenge. Visible in this shot is also the complete LOTR/Hobbit collection of sets which I have done a similar horrible job cluttering together. Having the legs of the AT-ST fit in between the Y-wing engines was convenient, even better was the natural tilt of the snowspeeder happening to fit a millimeter above the blockade runner. Oh yeah, and the DS2 is huge, news flash. I actually didn't have room for R2D2 initially, then I figured out by turning the TIE sideways I could fit him in the gap. Obi-wan's is basically hidden behind the mass of the SSD if viewed from the floor. We'll see if I end up losing sleep over the massive heavy set only having 3/4 of it's mount actually on the shelf... Hopefully I'll eventually post pics of some kind of fancy display solution. Especially since I have precisely zero room for additional sets up there. Not pictured are 10030 and 10179 which are duking it out in the family room on either side of the entertainment center, and 10188 because "it doesn't count" that's up on top of a china cabinet. It's also paired with the Tower of Orthanc, those two look pretty bizarre next to each other... especially since the third thing up there is a model of an AC-130 gunship, like the one I flew on for 9 years.
-
Got all the formulas working in the spreadsheet, so this is what I've got figured out. Honesty up front, due to the massive amount of lots (~1050), doing the ISD by itself, then the rest, then the last two, I did a total of 53 (!) Bricklink orders and at least 5 from bricks & pieces. Figuring I averaged paying $3 shipping at least, that's probably $200 just for shipping. Also note I did not purchase any boxes, any instructions, or any stickers. I did purchase the two minifigs since they were ~$4. The typical used set costs below were pulled like six months ago when I started all this so they might have changed. Feel free to call me out if something seems blasphemous and I'll correct. But while it seems like there's significant profit on several sets, obviously if they're heavy on stickers or if I was heavy on substitutions, those aren't realistic "profits". The goal was to compile the collection in a near accurate state, but obviously with some of the choices I made it is by no means a purist product. Besides which, the "profits" are only relevant if I was going to sell everything off, and that won't be happening anytime soon. Set, my bricklinked cost, typical used set cost 7181, $37, $300 7191, $243, $400 7194, $217 (bought full set used), $320 10018, $74, $450 10019, $150, $700 10026, $67, $340 10030, $700, $1200 10129, $161, $650 10134, $125, $605 10143, $336, $900 10174, $92, $250 10175, $90, $425 10186, $100 (bought full set used), $200 10215, $100 (bought full set used), $157 10225, $108, $325 The grand totals combined are: 20,304 pieces (~4k common ones pulled from my childhood collection, ~16k bricklinked) Cost: $2600 Value: $7371 I repeat, once you factor in shipping times 60+ orders, cost of reproducing all the stickers, and drastic substitutions of $20, $50, and even $100 pieces, the realistic value is not what's listed, but it makes me feel better about the project. :) I updated the substitutions list from the original post including the last two sets. Edit: This post inspired me to check the other sets values that I either purchased new (some discounted) or was gifted over the past several years: 10179, gift (probably $499), $2100 10212, $206, $485 10221, $320, $727 10227, $100, $225 10240, gift (probably $199), $251 75060, $199, $156 75095, gift (probably $199), $167 So the ultra grand totals of the entire UCS collection if counting what those who purchased the gifts paid: Cost: $4,322 Unrealistic but still fun to add up value: $11,482 If anyone has any questions about a particular set let me know. ps I know I don't have Hoth yet, can't have that amazon wishlist be totally empty, and clearly it's a much cheaper hobby if I'm not buying everything!
-
Finally the last one is complete, 10129... I'm actually not pleased with the dark gray slope on the front not matching all the other dark bluish gray pieces, so might still change that out. Obviously a couple major subs were the trans-orange windscreens on both the rear sides (instead of orange) and the front (instead of trans-black). Other subs were 1x4 orange slopes on the front instead of 2x4, and a 2x3 and 1x3 orange slope on the rear for each of the intended 3x3s. Also didn't do trans-black hinge plate on top, just left it lbg. A few of the pieces weren't available in lbg and I had to stick with lg, but they blend in pretty well or are hidden. Also noticed when I took the pic I forgot to rotate a few of the technic pins, I bought the ones with notches since they're so much cheaper, and if rotated to face downward on the cannons they appear the same (compare the left with the right to see the difference. Now that all the building is done, going to update all the substitutions lists (including the last two I hadn't added yet at that point) and finish up all the math on the spreadsheet and see which ones were the best bang for the buck. Oh, and figure out where to put them all. ;)
-
Another option is light bluish gray 50990b (solid studs) instead of 50990a (hollow studs). Certainly doesn't affect the visual much, that's what I chose for $1.40. http://www.bricklink.com/v2/catalog/catalogitem.page?P=50990b#T=P&C=86
-
Honestly with the new Bricklink site and the way you can sort stores and filter them, it would have been a lot easier. Basically make a want list that combines all of the inventories you want, and then start working your way through the places that have massive amounts of the pieces you need (but eliminating all the stores with 10 times the prices of others). It becomes obvious if looking at the old style of want list which pieces either don't exist in the color you're substituting or are extremely rare/expensive, so make decisions along the way based on that. Another thing I would do is look at the actual instructions for the set to see if the problematic piece is even visible, or how prominent it is. I did it all manually in excel, and that took some serious time, much like the sorting of all my old childhood pieces did since there were multiple full boxes. But that's why they call it a hobby right? :)
-
Next up was a dual build of 7191 and 10129, conveniently delayed on both fronts because of a few last pieces on the former, and managing to buy 1x1 bricks modified with clips instead of 1x1 bricks modified with headlights for the latter... The inventory is a bit of a mess since it was both combined. I'll go back and post the substitutions I did for these when I update the pricing. There were a few key pieces that were only in lg and not lbg, and a few others that were just way cheaper in lg. The half cylinders, the 12 length gray axles, and the robot bodies are a few of those subs. I also did white wheels for the front of the engines instead of the cost prohibitive gray ones. I didn't go cheap everywhere though, I did splurge for both the clear windscreen and the printed slope piece beneath it, as those are both very visible. Another sub was for the rear flower pot pieces, and I'm not all that happy with the result (even tried them flipped around), so may research another substitution there. This next shot shows you some of the mismatched grays up front because of the odd shaped slope pieces again only being accessible in lg. One last build to go as soon as those headlights show up... Because of all the mistakes by myself or the sellers, deciding to do 10030 alone at first, then all the others, then adding these two, I'm at 50+ bricklink orders. :/ I highly recommend making sure you know how many you want to do in advance and getting everything all at once... cost permitting of course.
-
The last of the 4x4 dishes for 10019 finally showed up (after multiple sellers sent me 2x2 dishes incorrectly and would promptly refund the tiny amount of cents I'd paid for them which didn't help the extra shipping I had to keep paying for additional shipments). This was most of the inventory before I started the build: Like I mentioned before there were some pretty severe color changes here to save money, in particular the quarter cylinders and motorcycle wheels being lbg. I added some dark red quarter circle plates to give the engines slightly more red to match the rest, and I'm hoping once I apply the stickers later on that some of the starkness on the sides will be hidden. The trans black octagon domes on top are pretty bizarre looking, I might still try to pick up some of those in white at some point, but I do kind of like how the set as a whole now looks more unique than the full white versions and actually looks more representative of some of the non Lego models out there. I am experiencing some of the engine sagging described in the other 10019 threads, so we'll see how that holds up longer term. Finally got the last of the 7191 and 10129 pieces ordered, so that will be a simultaneous build to follow. And then will be updating all the pricing info to discuss bang vs buck for all the sets.
-
Slight interruption to my Bricklinking as I'm still waiting on the last engine pieces for 10019, and still have about 25 lots to purchase for 7191 and 10029 that I'm having trouble finding in something other than 10+ sellers. In the meantime I figured I'd knock out 75059, which was actually a refreshing change. It's amazing how much faster you can build when you're just looking through one numbered bag instead of the entire table of thousands of pieces... Lots of repetitive building here, with the left/right sides being just different enough that you couldn't just "2x" them in the instructions. Lots more moving parts than I expected looking at the box, like the barrels that can slide out the sides and the cargo containers that can be placed in various positions or slid through the side holes or raised with the crane. I have a feeling this one will be a major pain to bricklink in the future, as there is obviously a truckload of unique brown/tan/orange used throughout, might end up similar to those who try to do anything using Statue of Liberty/Yoda green... I was also surprised at the number of "extra" pieces. With each bag (16 numbers, with some doubled) having one extra of every tiny piece, in some cases (1x1 round plate for example) you end up with 5 or 6 extra of the same piece. I've always stored the extra pieces with the boxes thinking it may add to the value if I ever resell, but I'm wondering now what kind of treasure trove of expensive extra pieces I might have in some of the older sets that were purchased at retail. The minifigures are pretty fun, and there are plenty of them. The completionist in me is thinking maybe after the remaining older UCS sets are complete, I may pick up Ewok Village and Hoth on future holidays/sales... Especially since I have the Death Star playset, those in a trio on display probably make more sense than putting them with all of the vehicles.
-
Apologies for the delay, I had a few issues with orders containing the wrong part, a few broken parts, and there was a vacation in there somewhere... I've actually been simultaneously building 10019 and 10134 and the former is still waiting on a few more pesky trans-orange 4x4 dishes for the engines, so in the meantime, I finished up the Y-Wing. Apparently I never took an inventory shot at the very beginning, so this is most of it: Several substitutions were made, including making everything dark and light bluish gray, which I continue to prefer over the old stuff. Four of the dbg hoses ended up lbg which doesn't make much of a difference. The engines obviously had significant color changes from mostly white to a combination of lbg, flat silver, and metallic silver. I also chose dark red instead of dark orange for the modified bricks and grill tiles, not only because they were more common but to tie it together better with the Blockade Runner and its color scheme. I am very pleased with how both of those substitutions turned out: Another one to make the purists vomit, but another one for the shelf. Or the display case. Or whatever I end up doing with all these... Will put up picks of 10019 as soon as those last pieces come in. Oh and spoiler alert, all those pieces in the background are the majority of 7191 and 10129 which I decided to do after all... I'm having too much fun. :)
-
The random orange pieces showed up so I also finished up R2D2. Not much exciting to say on this one since it's recent enough I was able to get all the pieces with no substitutions. Quite the rainbow is involved given obviously the blues and white are what shows primarily. Also interesting they use the huge black tile now instead of a bunch of smaller ones combined for the plaque. He is a bit awkward when trying to display in the third leg forward moving position, it seems like most of the weight is still on the rear two feet. I'm not sure if that's by design or a side effect of my building process. I did forget to add the bottom red hoses until after I took the pic, but they're on there now. The only two substitutions I had to do on 10174 were black patio stands instead of lbg, and lbg 4x4 open center technics instead of black (not visible). I really enjoyed the AT-ST build process, especially the fact that all the parts were freestanding as you went, thanks to great balance of pieces. The final product is bigger than I expected, and a really neat addition to the collection. Now a UCS AT-AT would really look great nearby... Last two on the list for now are the Y-Wing and Blockade Runner, the latter of which is in progress but waiting on a few last pieces. Both were heavy on the substiutions so more to follow. Also going to put pricing info for everything at that point since the inventories will be finalized. Needless to say some were better "bang for the buck" sets than others...
-
After I finally managed to grab the last of the Black Brick 4x6 which were for some reason even harder for me to get than the 4x18, I finished putting together Darth Maul. The surprise for me on this one was the sheer volume of red pieces, I for some reason had it in my mind that it would be mostly black. The large black pieces are all in the base so I had the base about half complete and all of the head done for a long time while waiting on pieces. Of course almost completely done with the head, I noticed this: A classic case of getting to the top and having two extra black 1x1 bricks and no brown ones, and realizing I incorrectly placed them wayyyy down the bust... By some miracle and using a lot of force, I managed to split it basically exactly where I needed to, was able to replace the pieces, and get it all back together and tight. That could have been a lot worse... The only substitution I did on this one was the cylinder quarters, I chose dark gray instead of black, but as you can see they merely provide support from the rear, and aren't even visible from the front. Interesting trivia is discovered as you build as the bust is "almost" all symmetrical, but with a few noted differences, like who knew that he wears an earring in his left ear...
-
Finally got some of the lbg 20L hoses that I promptly trimmed to make both 10L hoses x 8 and 14L hoses x 6, which allowed me to finish the 10175 build. Again I used a blue cockpit, and obviously even more so than the interceptor, it looks pretty flagrantly out of place here. There are some MOCs people have done of the cockpit using less expensive pieces I've been seeing on this forum that I may end up using, since there are no other blue pieces as a part of this particular set. The other noticable changes are the light gray rear which is pretty tame, and the large bow pieces which I have in black instead of gray which are more obvious with a portion of them showing on the furthest aft portion of the center section. The other main subs were the top hatch which I just went generic lbg with, and some black patio stands instead of gray, but since black is a primary color those don't stick out too badly on the side of the wings. On to the next set! After finally receiving the 30ish modified bricks that I'd accidentally ordered as modified plates, it ended up taking several days of on and off building to finish 10143. First thing of note is the 4x green 2x2 plates are actually just used to help align the central circular array, and are discarded for the final build. So no need to purchase those if bricklinking. The main visible sub was the 4x9 wedge plates which ended up lg instead of lbg. They actually don't bother me as much as I thought they would, and I think stud notches on the side of them would bother me more. If I happen to find a deal on them then I'll pick up a bunch for both 10143 and 10175 (24 total). This was a really fun build, even with the monster duplication of the under construction portion. I built both simultaneously, and it was fun to see them climb up and up and up and then attach to the main frame. Certainly the largest of the sets I'll be doing as a part of this project. One thing I would change is I made the mistake of thinking that Pearl Gray was closer to lbg than it was black, when in fact the latter is true. So for the main base 1x15 liftarms I probably would have gone with black if doing it again. Next is R2D2 since those pesky orange bricks finally came in... why did they choose orange for internal pieces...
-
Good segue, the last of those came in so I built it up: Most of the chrome pieces were about a buck from Bubul's. They actually didn't have one of them in inventory so I e-mailed them asking if they could do it, and they did it near instantly and sent it out no problem. The larger wedges were slightly more, but that beat the ~$9 and rare availability for the legit pieces. You can tell on the bottom on a few of them in tiny sections that don't show what the original color was, but as you can see above the final product appears the same. The other noticeable thing is when you feed the axles through the pieces, there is obviously verrrry slightly less clearance so it requires slightly more force than normal. The other substitution was the black wedges on top instead of the silver windscreen pattern. I should also mention I'm going to get all the stickers from all the sets via the other thread on here and print them onto sticker paper and add them on later. All the pieces in the background are the inventory of the DS2 which I got 1/3 of the way through and figured out I had accidentally bought 30 plates with handles instead of 30 bricks, and all the pieces from R2D2 which I got partway through and figured out I had somehow ignored the 4 orange 1x2 bricks in the inventory and hadn't gotten them... Wondering why on earth they chose orange for internal not visible pieces, but I hadn't had to do any substitutions on that one yet so figured might as well get them.
-
First building update, I figured I might as well start with 7181 since it was the earliest and as one of the smaller sets would be a good warm up. The main substitutions on this one were the large cockpit pieces, I left the wings vertical so you could see the difference. Obviously the rear is light gray instead of dark, and the front is the trans-dark blue. Given all the solid blue on the wings, I'm pretty happy with the result for the front, less so from the back, but it won't be on a rotating stand. :)
-
B&P has them about $1 each, which means $24 between the 10143 and 10175 :/ I'll be posting pics of what the substitutions look like since some of them are definitely "unique" which could easily be seen as good or bad.
-
Hmmm that's an idea, but I wonder given the placement in the DS2 if the stud notches will actually leave visible gaps between them visually that weren't intended...
-
I did the standard excel spreadsheet I'm sure everyone does, combining all the inventories into one for purchasing quantities but still broken out into columns so I could tell which sets were demanding which pieces. It just became really tedious given there were 800+ lots/rows. That is a TON of unique pieces. And then of course every time a big shipment would come in having to inventory it all... And trying to keep the big Bricklink wanted list updated to the spreadsheet every time I was buying partial quantities. Mistakes were made a few times and I had to rebuy partial quantities of some things. Once I've gotten everything I'm going to price it all out per set including shipping to the US so people have a window into what Bricklinking each UCS set is costing with today's prices/exchange rate/shipping costs. While it's easy to see the $5k+ in potential value from the sets I think a lot of people underestimate the shipping especially when looking to get 800+ lots/18k pieces. If I include the ISD I'm at approximately $2.5k for the 13 sets. Fun fact, the most common piece was Dark Bluish Gray Brick 1x2, with 465 of those being needed including 458 just for the DS2... Several others had 200+ quantity. I have a tall entertainment center with two pillar display cases on either side of a big screen tv, and I have the Millenium Falcon and ISD facing each other angled partly forward and tilted slightly towards the room via risers, so based on the angles visible to the room the engines aren't a focal point. I also just randomly happened to have six of the wheels in black from a set I had in the early 90s, so it was one less thing to purchase. It's actually the arctic globe bases which bug me more but again not enough to change them out. The color change that appears to be problematic thus far is the 2413 Light Gray Wedge, Plate 4 x 9 without Stud Notches that will be very visible on both the DS2 and Vader, they're $0.05 for light gray which I got the right quantity in, but $2+ in light bluish gray that would match everything else. Going to try it out and see how bothersome it is visually.
-
I've lurked a while and gained a wealth of knowledge from this forum, so I figured it was about time I posted. I've been lucky enough to acquire some UCS Star Wars sets over the years, including a Millenium Falcon when it first came out. It was discovering the value of that set that led to me collect others over the past few years (10179, 10188, 10212, 10221, 10227, 10240, 75060, 75095). The one I didn't have that I always wanted was the ISD, so I spent quite a bit of time bricklinking one with some substitutions, and realized how it looks just as cool on the shelf with a few substitutions as it would have if I'd paid loads more for an exact match. This in turn led me down the path of wondering if it would be possible to Bricklink EVERY UCS set that I didn't already have. After subtracting out the old X-Wing (I have the new one) and the Snowspeeder (planning on a new one there too right?), that turned out to be 12 sets. Three of them (7194, 10186, 10215) I actually found 99% complete and purchased them as full sets, filling in the missing few pieces. For the other nine (7181, 10018, 10019, 10026, 10134, 10143, 10174, 10175, 10225) I spent a truckload of time sorting and organizing the few huge boxes of parts that I'd kept for a few decades, and that allowed me to figure out I had about 3300 pieces that I needed, and thus figured out I would need to bricklink the rest up to a total of a little under 18,000 pieces. Those of you familiar with the UCS sets will immediately recognize some of the color substitutions I chose to do purely for expense reasons. In all cases, I substituted in light bluish gray for light gray, and dark bluish gray for dark gray, so the sets all go together as a whole in the modern colors. In the cases where the pieces were only made in the old grays, I stuck with those when not cost prohibitive. Specific additional substitutions follow: 7181 4095 Black Bar 6.6L with Stop Ring (Patio Umbrella Stand) – instead of blue 30374 Light Bluish Gray Bar 4L (Lightsaber Blade / Wand) – instead of dark gray 2618 Light Gray Cockpit 10 x 10 x 4 Octagonal with Axle Hole – instead of dark gray 30364 Dark Gray Hinge Brick 1 x 2 Locking with 1 Finger Vertical End – instead of changing to dark bluish gray 7191 32039 Light Bluish Gray Technic, Axle Connector with Axle Hole - instead of blue 30374 Light Bluish Gray Bar 4L (Lightsaber Blade/Wand) - instead of dbg 2489 Dark Bluish Gray Container, Barrel 2 x 2 x 2 - instead of lbg 2653, 6565, 6564, 30155, 4275, 6069pb03, 2625 - used dg instead of dbg 6259, 3185, 4315, 30361a, 78c06, 2744, 3708 - used lg instead of lbg 32007 Pearl Light Gray Technic Tread Hub - instead of lbg 2507 Trans-Red Windscreen 10 x 4 x 2 1/3 Canopy - instead of lbg 2645 White Cylinder 4 x 4 x 1 2/3 with Axle Holes - instead of lbg 10018 30562 Dark Bluish Gray Cylinder Quarter 4 x 4 x 6 – instead of black 10019 3961 Dark Bluish Gray Dish 8 x 8 Inverted (Radar) – instead of light gray 2440 Dark Bluish Gray Hinge Panel 6 x 3 – instead of light gray 2903 Dark Bluish Gray Wheel 61.6mm D. x 13.6mm Motorcycle – instead of dark red 2515 Dark Bluish Gray Wheel Hard Plastic Large (54mm D. x 30mm) – instead of light gray 30565 Dark Red Plate, Round Corner 4 x 4 – instead of light bluish gray 30374 Light Bluish Gray Bar 4L (Lightsaber Blade / Wand) – instead of dark gray 30562 Light Bluish Gray Cylinder Quarter 4 x 4 x 6 – instead of white 30386 Light Bluish Gray Hinge Brick 1 x 2 Locking with 1 Finger Vertical End and 2 Fingers Vertical End – instead of white 30283 Light Bluish Gray Slope, Inverted 45 6 x 4 Double with 4 x 4 Cutout – instead of white 4625 Light Gray Hinge Tile 1 x 4 – instead of tan 2362b Light Gray Panel 1 x 2 x 3 - Hollow Studs – instead of white 2418b Trans-Black Windscreen 6 x 6 Octagonal Canopy with Axle Hole – instead of white 6177 White Tile, Round 8 x 8 – instead of dark red 10026 41748pb004 Black Wedge 6 x 2 Left – instead of with Silver Windscreen Pattern 41747pb004 Black Wedge 6 x 2 Right –instead of with Silver Windscreen Pattern 3942c, 6233, 41531, 42061, 4266 – all custom chromed instead of original 3007 Light Bluish Gray Brick 2 x 8 – instead of dark gray, not visible 10129 30374 Light Bluish Gray Bar 4L (Lightsaber Blade/Wand) - instead of dbg 4735 Light Bluish Gray Bar 1 x 3 with Clip and stud receptacle - instead of dbg 4161 Light Gray Slope 33 3 x 3 - used 3x2 +3x1 in lbg 44570 Light Bluish Gray Hinge Plate 3 x 4 Locking Dual 2 Finger - instead of trans-black 30363 Orange Slope 18 4 x 2 - instead used orange 60477 4x1 6070 Trans-Neon Orange Windscreen 5 x 2 x 1 2/3 - instead of orange 4474 Trans-Neon Orange Windscreen 6 x 4 x 2 Canopy - instead of trans-black 32530, x131b, 2536d, 4266 - used lg instead of lbg 3939, 32007, 2413 - used dg instead of dbg 10030 32018 White Technic, Brick 1 x 14 with Holes – instead of black 40345 Light Bluish Gray Technic, Brick 6 x 8 Open Center – instead of black 2356 Light Bluish Gray Brick 4 x 6 – instead of blue 32016 Light Bluish Gray Technic, Axle and Pin Connector Angled #3 - 157.5 degrees – instead of blue 2625 Black Wedge, Plate 7 x 6 without Stud Notches (Boat Bow Plate) – instead of dark gray 3961 Dark Bluish Gray Dish 8 x 8 Inverted (Radar) – instead of light gray 30342 Dark Bluish Gray Rock Arctic Globe, Bottom – instead of light gray 73092, 2607, 2476, 3673, 30159 all replaced with mod that includes technic and pins instead of magnets (37x2476 Light Bluish Gray Plate, Modified 2 x 2 with Pin on Bottom; 14x32557 Black Technic, Pin Connector Perpendicular Double 3L; 14x42003 Light Bluish Gray Technic, Axle and Pin Connector Perpendicular 3L with 2 Pin Holes) 2573 Black Wheel Hard Plastic Giant (71mm D. x 47mm) – instead of light gray 6249 Dark Bluish Gray Brick, Modified 2 x 4 with Pins – instead of red 4519 Light Bluish Gray Technic, Axle 3 – instead of red 4285b Trans Light Blue Dish 6 x 6 Inverted (Radar) Webbed - Type 2 (underside attachment positions at 90 degrees) - instead of 30159 Trans-Light Blue Dish 6 x 6 Inverted (Radar) - Hollow Studs 10134 30236 Dark Red Brick, Modified 1 x 2 with Handle – instead of dark orange 2412b Dark Red Tile, Modified 1 x 2 Grille with Bottom Groove / Lip – instead of dark orange 78c02 Flat Silver Hose, Ribbed 7mm D. 2L – instead of white 75c14 Light Bluish Gray Hose, Rigid 3mm D. 14L / 11.2cm – instead of dark bluish gray 6538b Light Bluish Gray Technic, Axle Connector (Ridged with x Hole x Orientation) – instead of white 32039 Light Bluish Gray Technic, Axle Connector with Axle Hole – instead of white 30183 Light Gray Slope, Inverted 45 6 x 4 Double with Recessed Center – instead of light bluish gray 32077 Metallic Silver Wheel 70 x 28 mm Futuristic – instead of white 10143 3937 Black Hinge Brick 1 x 2 Base – instead of tan 30364 Black Hinge Brick 1 x 2 Locking with 1 Finger Vertical End – instead of tan 32555 Black Technic, Brick 5 x 5 Right Angle (1 x 4 - 1 x 4) – instead of red 50990b Light Bluish Gray Dish 10 x 10 Inverted (Radar) - Hollow Studs – instead of 50990a solid studs 32034 Light Bluish Gray Technic, Axle and Pin Connector Angled #2 - 180 degrees – instead of blue 32278 Light Bluish Gray Technic, Liftarm 1 x 15 Thick – instead of pearl dark gray 2413 Light Gray Wedge, Plate 4 x 9 without Stud Notches – instead of light bluish gray, visible 10174 4095 Black Bar 6.6L with Stop Ring (Patio Umbrella Stand) – instead of light bluish gray 32324 Light Bluish Gray Technic, Brick 4 x 4 Open Center - instead of black 10175 4095 Black Bar 6.6L with Stop Ring (Patio Umbrella Stand) – instead of light bluish gray 47405 Black Wedge, Plate 8 x 12 (Boat Bow Plate) – instead of light bluish gray 44375a Light Bluish Gray Dish 6 x 6 Inverted (Radar) - Hollow Studs – instead of Tie Advanced pattern 2618 Light Gray Cockpit 10 x 10 x 4 Octagonal with Axle Hole – instead of light bluish gray 2413 Light Gray Wedge, Plate 4 x 9 without Stud Notches – instead of light bluish gray, visible 2598 Trans-Dark Blue Windscreen 10 x 10 x 4 Canopy Octagonal – instead of Tie Advanced pattern 10225 None Alas, the "project" is not yet complete, as I am still short a few shipments. One came from the Czech Republic and the tracking says arrived 4/1 "in destination country" but I haven't received it yet. I'm also still on the hunt for 31 lots of 136 total pieces. And as luck would have it, there's at least one or two lots missing from each of the sets, so I have held back on building so far. It's likely I may tweak a few of the sets as I build them since some of the substitutions might have a more negative affect than I anticipated. But I figured given how much information I've gained from this forum, I might as well share some of the knowledge since I haven't seen this volume of UCS bricklinking taking place in one thread. More to come!