

retrotecchie
-
Posts
64 -
Joined
-
Last visited
Content Type
Profiles
Forums
Gallery
Everything posted by retrotecchie
-
I'll hack if I have to (I took a Dremmel to a couple of PF straight track sections to make a crossover...) and that is a quite tidy solution for the upper lights on the Cargo train!
-
I call it PUP as I think that is what LEGO have sold us....
-
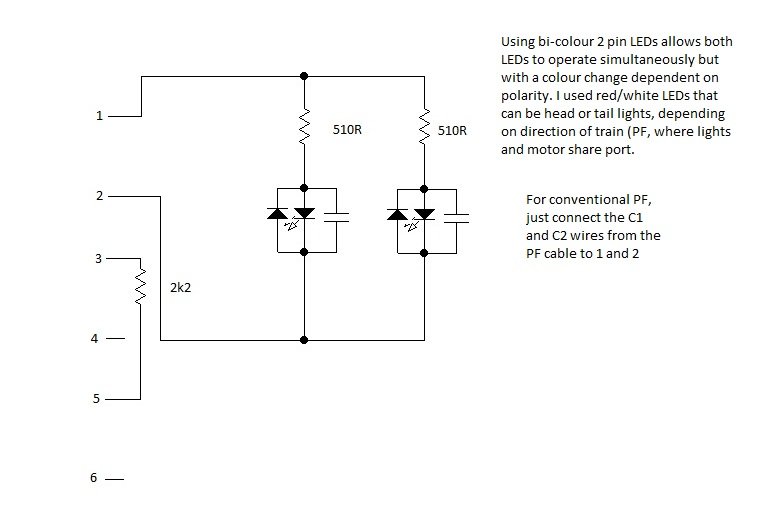
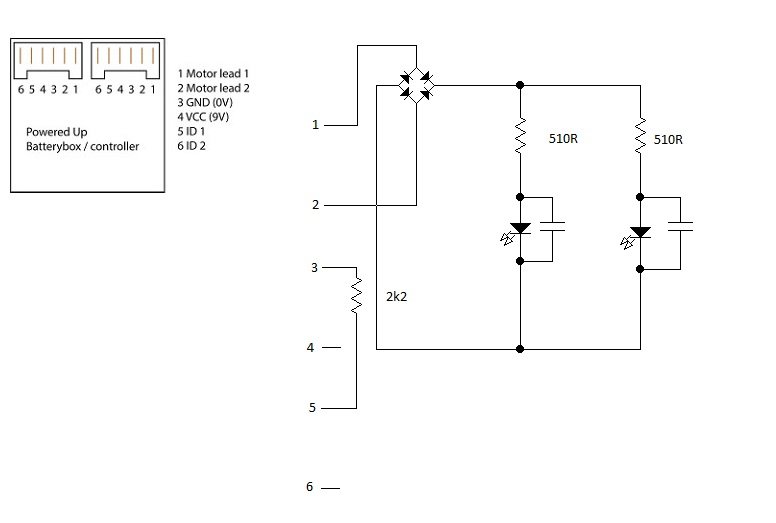
For the electronics engineers out there, please note that VCC is NOT 9v (or 7.2v if you use rechargeables) but actually 3.3v, which is the microcontroller operating voltage and not the battery voltage. You cannot use these 'power' lines to drive anything heavy as they appear to be only intended for providing a Logic 1 or Logic 0 reference for the ID pins or possibly powering low voltage, low current peripherals such as sensors. With PF, you can just pull the full battery voltage from the +V and GND pins up to the current limit (0.8A) of the battery box. I have stripped a set of PUP lights so I can use the PUP ports with a breakout cable (also a PUP>PF adapter) for my testing and experimenting. I have posted a circuit diagram of the PUP lights in 2018 Train Tech if anyone is interested. Not very different from the PF lights, except the resistor values are lower (510R instead of 4K7). This did make me think that the LEDs are driven at 3.3v by the H-Bridge drivers rather than the full motor voltage (and that output voltage is somehow dependent on ID codes), but my PWM signals on M1/M2 (C1/C2 in PF notation) appear to scope out at full battery voltage. PF lights are somewhat brighter on full tilt than the new PUP ones.
-
Aha..... Those pins on PUP. Disregard the annotations 9v and 0v. I just cribbed the SmartHub image from the Powered Up Tear-down thread. When powered on and paired, the two power pins provide only around 3.3v and 0v (GND), regardless of whether you use AAA alkalines (9v) or AAA NiMH (7.2v), so these are not pins that can be used for powering anything meaty (unlike the PF battery boxes), but are operating at (what I assume is) the microcontroller's actual operating voltage. I would also imagine that they are also current limited by the 3.3v regulator. I did try shorting them for a couple of seconds and that seemed to have no permanent adverse effect...the NiMH batteries didn't go bang, but the hub did power down! That is to say, they are only there to provide logic level signals for the ID pins, or to power other small 3.3v devices such as the colour/distance sensor or other PUP input devices. The C1/C2 lines operate at nigh on full battery voltage as they are outputs from the H-bridge driver chip. This could make a PUP hub to PF cable conversion easy enough (the ID logic is handled at the PUP end), but going the other way (PF to PUP) won't be an issue as PF devices only really need the C1/C2 wires. If you remove the 2.2k resistor from PF lights, they are no longer identifiable by WeDo, but still work perfectly with PF. I hope that clarifies things a little?!
-
Try these circuits for signals or for reversible head/tail lights. Change resistor values to 4.7k for PF versions. For head/tail lights, a 3mm bicolour 2pin LED can be used. For signals, use a conventional red and green 3mm LED, but wire them with opposite polarities so with the direction set one way, the red LED illuminates and the other way, the green LED illuminates. Multiple signals can be parallel wired up to a limit of around 20 LEDs per output. The PWM frequency is around 10kHz, so you shouldn't see any noticeable flicker even only illuminating on each half cycle, so to speak.
-
Internally, the PUP lights are virtually identical to the PF equivalent. Two resistors (series resistors for the LEDs - 510 ohm by the looks of it), two smoothing capacitiors, a bridge rectifier and a small resistor (2.2k) for ID. A little smaller than the PF components, so values are a little harder to read on the capacitors, but I can't see anything particularly special about the lights. The series resistors in PF were 4.7k rather than 510 ohm, but when measured with a light-meter and run at full tilt, the PF ones are a tad brighter, using 7.2v of fully charged NiMh cells in each case. I'm not particularly impressed, especially as they are significantly more expensive than the PF items. ID1 (pin 5) is pulled down to Gnd by the 2.2k resistor, ID2 (pin 6) is unconnected and the 9v line (pin 4) is not used. Now, I'm assuming that the ID pins in the Smarthub have high value pull-up resistors so that an externally floating pin (as ID2 above) shows as a logic 1 and a low value resistor is used as a pull down to Gnd to signal a Logic 0. Obviously in a train motor, the pins are hard-wired (ID1 to 9v and ID2 to Gnd) so the ID logic for the motors and the lights appears to be reversed (Lights=x10 and Motor=x01). Anyway, I'm possibly just going to open up a train motor to play with the ID's, or chop a PUP connector off the spare lights and hook it to my breakout board as the PCB in the lights is just way too fiddly to work with. I have found another subtle difference between PF and PUP. If you set an output on PF (lights, train motor, etc.) then the output state is maintained until another IR command is received. For instance, if you start up a train motor on (say) speed 4 and then disconnect the PF motor from the receiver, when you reconnect the motor it will operate again at the last set speed. The same with lights - they will come on at whatever power level the channel was last set to. On PUP, disconnecting any load will automatically shut off the output of the port. Re-attach the lights or motor and the default state is off. It can be assumed then that checking the state of the ID pins is a continuous process and the ID isn't simply scanned at power on time. In that respect, the SmartHub Port is more 'intelligent' than the 'set and forget' output of the PF receiver. Another part of my experimentation with my breakout board will be to try and change ID states 'on the fly' with lights or motors operating and see what effect that has on things.
-
OK, I now have PUP lights for my two trains, and it has all gone pear-shaped again. Having finally persuaded my PUP to 'play ball' and get both trains working from one controller, the lights have ballsed it all up again. On one controller, I have the Cargo Train motor on Port A and the Passenger Train motor on Port B so I can operate both trains from the same PUP controller. The only way to connect the lights in a train, as it stands, is to plug the lights into the other port on the Smart Hub. Only, with the new connectors you cannot piggy back two sets of lights...you are limited to one, so it's headlights only...no tail lights or carriage lights. But....with the controller paired to the two trains, Port A controls the motor of one train, but brings the lights on on the other train, and vice versa! The 'fix' is to unpair the controllers from the trains and have a separate controller per train, with Port A controlling the motor and Port B controlling the lights, or one controller but the two trains on different colours, necessitating button presses on the controller green button in order to swap between trains. Not at all elegant, and kind of defeating the point of having multi-channel control. I can also confirm that the lights indeed work by stepping the brightness up and down rather than a binary on or off, so it seems at first glance that the lights are simply using the same C1/C2 pins to drive them with PWM as with the existing PF lights. The 'emergency stop' (red button) will dunk the lights instantly, but to put them on, you have no choice but to ramp the brightness up in steps. Perhaps messing with the ID wiring may have a bearing on their operation? I shall endeavour to find out. Obviously, PF allows you to stack multiple devices so you can have a motor and one (or more) sets of lights running from the same output. So in that respect, PUP is (thus far) a retrograde step. Time to get the soldering iron out and get down to work! I see no reason at all why a PUP to PF cable (with the ID pins hard wired to identify the load as a 'train motor') can't drive a motor and lights in exactly the same way as PF allows stacking of devices. The Passenger Train is intended to have lights fitted, as the two front headlights are fitted to studs with holes in the nose-cone and the brick immediately behind this was clearly intended to accept the PUP LEDs. The Cargo train is a little more tricky as all the 'lights' are fitted to blind bricks, without any method of locating any LED's without changing a few bricks about, as Yodah has done. Ideally the Cargo Train locomotive would also require 8 LEDs (4 sets of lights) if you wanted to illuminate all the available lighting positions (two at the bottom front and the two over the cabs). Certainly not possible without reaching for the soldering iron!
-
I just fitted a PF connector onto a 7.2v NiMh charger and snap that onto the standard 88000 battery box, with AAA rechargeables. You can pretty much charge in situ. With my old 4.5v battery tenders, I just built a pack out of NiMh AA cells that sit inside the tender and fitted a 2.1mm power plug into them so I can just plug them in to a charger. The old 4.5v trains run ok with 3 cells (3.6v), but go like stink if you make a 4.8v pack!
-
Mine are on their way. Despite a couple of items on my order being out of stock and telling me they would ship everything together in a week's time, they have shipped the lights (arriving Monday) and the other parts will be shipped separately. One set of lights for the passenger train, one set of lights for the cargo train and one set of lights to cannibalise and dissect for 'research purposes'.
-
Looks like he is using a slightly modified SATA cable to plug into the hub in some of the videos.
-
Motor on Port A, Lights (only one set) on Port B. You will need to use both channels on the controller, one for speed and one for illumination. If, as has been mentioned, the smartphone app just turns the lights full on or full off when the train is moving, then that is a slightly different proposition. I know years ago when my cousin played with HO scale Hornby trains, he had carriage illumination that stayed on even when the train was static. He used the Zero One controllers which keep a permanent DC on the tracks and just superimpose digital (DCC) control signals onto the rails. I have ordered some PUP lights but they won't be with me for about ten days as some of the other items on my order are back-order until August 23rd and they are dispatching the whole lot once everything is in stock. One question I want to know (and maybe someone has already looked at this?) is whether the 9v DC on the 6-wire PUP cable is permanently live (as in a direct connection to the battery) or switched live (as in, live when the hub is on and paired). I have already made up a quick hand-wired PCB with six pins to attach to the PUP cable and plug (when I get my set or lights to hack) and some 9v/0v pins and C1/C2 pins. I have added some headers which will allow me to set various combinations (00,01,10 or 11) on the ID pins, plus a few LEDs to monitor the lines. Once I have the lights (I really don't want to chop a PUP motor just yet) and can hook it all up, I'll post some pictures and my findings. Watch this space! The plan is to make a 'universal breakout connector' which should work as a PUP to PF interface plus maybe allow a few other, as yet unknown, tricks to happen.
-
sed6...100 VIP points is better than a kick in the cojones. Incidentally, the train front ( Element 6226707 Design number 37493) is now available on Bricks and Pieces (GBP 3.78 here in the UK) as are most of the other parts so if you wanted to make a custom dummy 'engine' (locomotive, auxilliary control car, missing 'end' - whatever you care to call it) then it should now be possible. Motors are not available, but you would probably only need to make up a dummy one anyway. Then again, you already have a free motor...
-
Lucky I have one then! I know the S@H website (UK) limits both sets to five per customer and (judging by the number of PUP kits appearing on Ebay) it seems that a lot of the trains are being bought by folks just parting them out. In which case, a 'complete' train with original box and instructions, kept as shipped, might well be a bit of a rarity before too long, seeing as not that many people are overly impressed with the trains themselves. I wonder how many 60197 sets are just being bought for the extra carriages, the loco fitted with a dummy motor bogey and the train turned into a double-ender and the second set of PUP gear being offloaded? I also wonder how many folks have, like me, put the PUP to one side and retrofitted the trains with cheap PF gear?
-
Same as the 2x2 brick in the middle of the PF lights, I suspect. The series resistors for the LEDs themselves, a bridge rectifier (so the lights come on no matter what the polarity of the C1/C2 PWM signals), smoothing capacitors so the LEDs don't flicker plus maybe another resistor or two for the ID signals. Apparently the existing PF lights have an ID resistor incorporated so they can be recognised by We Do. I have decided to get a set of new lights just so I can hack off the 6 pin connector and make myself a custom cable, possibly terminated with a conventional 6 pin Molex header. That way, I can experiment with different motor and lights wiring and see how easy it is to come up with some other options. One idea I had was to bypass the rectifier so I have an output to the LED's that changes polarity, and to then use a bi-coloured (white/red - they are available) LED in place of the white one. The idea being, with the polarity in one direction, the LED lights up white and in the opposite direction they light up red. That way, the lights at each end of a train can change from headlights to tail lights depending on the direction of the train. Another thought was for trackside signalling. Instead of using a bi-colour LED, use discreet green and red LEDs so that for one polarity, a red signal will illuminate. Reverse the polarity and the red goes out and the green comes on. If the lights ID allows simple on-off switching, then this would work a treat. We know the train motors draw around 200mA and the PF LED lights draw around 4mA, so it should be eminently possible to wire up multiple signals from the output of one hub. I have already done the above with Power Functions, as well as hacking the wiring on a PF receiver to allow powering from an old 4.5v battery tender and driving a 4.5v LEGO motor as fitted to something like a 7720 or my even older 171. I have also hacked a PF receiver so that the C1 and C2 outputs power the centre rails on my old grey 12v track with the 7745 High Speed 12v train. The 12v motor works beautifully with the PWM control signals and I would imagine that the 9v system would work equally as well, subject to the limit of one train per circuit. Of course, the PF system will work at any voltage up to around 14v, and as low as 3.2v - I run 4.5v trains with 3x NiMH cells for 3.6v. I'm not sure how safe the PUP is to drive at higher voltages than 9v. Much to do and, although I have had a long career in both software and hardware, my main interests have always been hardware and interfacing, I plan to have a good play with the electronics to see what can be screwed with.
-
64% more expensive than the PF originals...
-
Now I have my PUP working 'properly', I have to admit I quite like the fact you can save some space inside your train by losing the PF IR receiver, but I am still not convinced it brings very much at all to the 'train party', other than the ability to have different networks operating in fairly close proximity which may be advantageous on larger layouts or where multiple layouts are in use at the same time (exhibitions, fairs, LEGO gatherings, etc.). I see a big disadvantage in the 'one device, one port' philosophy. Certainly most of my PF trains now have lights (some have more than one set) and to be able to piggy-back the lights on the same output as a motor is quite handy - the lights work with the motor rather than use a second channel. With PUP, I can see the lights needing to be on PortB of the Smarthub while the train motor is on PortA. Ok, you can then control the lights independently of the motor, but it does 'waste' a second channel. That said, it may be that the Smart Hub will identify lights and control them as a direct on-off device (bang-bang control) rather then have to dim them up or down using the PWM motor signals. The range doesn't seem to be a whole lot better than the IR. If you have obstacles or line of sight issues (tunnels, embankments, tall buildings, etc.) then using a very cheap IR blaster gets round that problem. If the BT loses connection, the train simply stops and then powers off, while a PF train will simply carry on on with it's last received setting. I have to say I do quite like these new trains...as trains. Sure, they are so similar in style and design to the old 7938 and 7939 sets that they are nothing groundbreaking, but there are one or two very nice touches that seem to have been thought out quite well. The purist in me says 'leave the older trains as they are', for the sake of originality, but the engineer in me says that tiny little tweaks that can be rolled back to earlier trains without changing their outward appearance is not a bad thing. I'm thinking specifically of the under-slung centre section of the cars that sit between the bogeys. Just a couple of changes to the design keeps it looking the same on the outside, but the two brown 2x4 bricks with the 2x2 grey tiles that fit through the square holes in the carriage base and blank them off is rather a neat touch. Maybe even change the tiles for plates if you want continuous studding on the train floor. When 7938 was released, the train roof used a new element - the red curved train roof sections. Within a few weeks of getting my 7938, those roof sections were available on PAB enabling me to build a few additional carriages...two passenger coaches and a post/goods carriage. With the train being a double-ender out of the box and being able to slave a second motor to the first (and fit lights in both ends!), this ended up as a pretty decent train. I just hope that the locomotive nose-cone for this new train ends up on PAB as I can certainly see that there would be many folks who feel a train isn't 'right' unless it's a 'push-me pull-you' design. The pricing is still a little steep (at 50% more than their predecessors) though. Perhaps still bearable for many AFOLs, but out of the reach of some. I blew two weeks wages on the two trains (I'm in the semi-retired 'JAM' demographic) and don't regret it (hell, I'm a LEGO train nut!), but for me it was a huge chunk of change and not the same 'value for money' as earlier incarnations of City train sets. If LEGO manage to 'add value' retrospectively by leveraging the technical possibilities of PUP then I may eat my words, but only time will tell. Whatever......you can NEVER have too many LEGO trains
-
Aha.....we have a breakthrough! Following the latest missive from TLG appears to have done the trick! Here is the method, which took a couple of attempts, but appears to solve the problem. 1. Reset both hubs to 'factory reset' by holding the power button for five or six seconds until the LED starts flashing purple. This clears out any pairing data and resets the hubs to default status. 2. Pair a train to a controller by pressing the hub button and the controller green button simultaneously. Both the hub and the controller will flash white a couple of times and then they will pair. Make a note of the colour they pair on. 3. Power off by pressing and holding the green button on the controller. When the controller powers down, the hub will lose communication and switch itself off. Wait until the hub finishes flashing and then powers down. 4. Repeat the above with the second train and the same controller. Make a note of the colour they pair on. 5. If the pairing is a different colour, press the hub button to cycle through the five 'channels' until the colour matches the first pairing. 6. Switch off the system by pushing and holding the green button on the controller until the second hub powers down. 7. And this is the bit where timing is everything...power up the first hub and controller. They should 'remember' their initial pairing and come up connected within a second or so. Leave the hub and controller paired, then power up the second hub. 8. Allow the second hub to begin searching (LED flashing white) and on the second or third flash, give the green button on the controller a very quick press. 9. All being well, the second hub should pair with the controller on the same colour as the first hub. This may take a couple of attempts as it appears the timing of the button press on the controller is quite critical....you have to do it while the flashing LED on the hub is on, rather than off. 10. When you do get both hubs paired to the controller (and with your motors on each train in opposite ports) you can now control both trains with the same controller. 11. When you have the pairing established, just switch on the second controller. This is the easy bit as it will simply pair automatically with the two hubs and existing controller. So, a lot of email ping pong and a week since I got the trains, but finally I have the PUP working as it should. No firmware update required, but a fairly complicated procedure with the timing of certain button presses seemingly quite critical. Once you have sorted the pairing, as above, then the next time you power everything up, it 'remembers' the settings (FLASH?) and just comes up paired every time, until you want to unpair or change the settings. Now, if LEGO had just set out this process in the instructions, or had instructions on their website, this would have saved me a lot of hassle and messing about but I got there in the end. But.....and this could be an interesting 'but'. Looking at the way I originally got one train paired to one controller (Blue) and the second pair (also Blue) ignored the first, I suspect that the five available channels (Red, Green, Blue, Yellow and Purple) plus the two ports (A and B) giving ten possible control channels could well be expanded. The fact I had a controller and train on Blue and yet they did not interact with the second controller and train on Blue leads me to conclude that the device pairing (device ID?) is important, leading me to think that it is possible to have five hubs paired to one controller (ten channels) and additional hubs paired with a second controller, thus giving ten channels with each possible pairing combination. So one controller and five hubs in one pairing, giving ten channels and then a different set of pairings giving you the same possible ten channels, but independent of the first....and so on and so forth. If that is the case, then this really could be a game changer for multi train control on large layouts.
-
My place is in the middle of nowhere with the nearest neighbour about half a mile away. The only source of RF is my wi-fi router and my wife's laptop, both of which I have turned off to rule out interference, but no improvement. I have no problem pairing any controller with any hub...they just won't pair 2:1 or 1:2. Even with the Cargo and a controller paired on Red and the Passenger and a controller paired on Red, they do not talk to each other. I have had yet another email from Customer Services with yet another suggestion to try but it is all getting a little complicated now. This certainly isn't anywhere near as "Just Plug and Go" as Power Functions was! I shall report back on any developments as soon as I have had my second coffee. As for any additional components required for ID'ing PUP devices, just a simple resistor or two should not add too much to the cost, although I suspect it won't even be that complicated, looking at how the train motor is wired.
-
If they weigh in at less than the £5.49 that the original PF lights sell right now for then this could be a good thing. PF battery box, receiver, train motor and two sets of lights come in at well under £50...which is about the difference in price between the older train sets and the 2018 models. Take the old 7938 Passenger Train at £79.99. Deduct, say, £30 for the bundled Power Functions, and that leaves the 'bare train' costing around £50. The new PUP train at £119.99 gives me the impression that the Smart Hub, controller and train motor together come in at around £60 or higher. Going on that basis, it seems the new PUP is far more expensive as a 'system' than the older PF, so I would expect the lights to cost significantly more than the older PF ones. A price point of $10 in the US usually implies a similar number for pounds or Euro, especially with exchange rates being what they are right now. I'm still struggling with pairing my trains. Ongoing email 'ping pong' with TLG isn't getting me any closer to a solution
-
Just for gag value, I just shot a little video demonstrating my Powered Up system 'not working'. In response to my feedback on the LEGO website regarding the Cargo Train, I got this reply from 'Emily': RESPONSE FROM LEGO:Emily, Customer ServiceAugust 7, 2018 Hi there. I'm sorry to hear that you've had some trouble getting both your trains connected. It is possible to run two trains at the same time from one remote, but the process can get just a bit tricky since it requires several steps. You'll want to make sure that each train has its motor plugged in to a different port. Connect the first train, then disconnect it. After that, connect the second train (don't disconnect!). Once that's done, reconnect the first train. Both trains will then be connected to the same remote! If you'd like to change which channels they're on, you can just press the button on the Hub. I think I had figured out for myself exactly how it is supposed to work. The thing is, it doesn't! Video link here.....sorry it's crap. Webcam jobby, so the quality is not great.
-
I'm holding fire on selling them just yet. As a semi-retired electronics engineer it would be rude not to play with this stuff a little, and it might give some hints to others. 1. Open up the motor, swap the M1 and M2 wires (clearly marked on the PCB) and you now have a 'reversed motor' to put at the other end of a train. All we need now is a 'Y' lead to be able to connect two motors to the same Smart Hub Port. 2. And this may be why I suspect there will not be a 'Y' lead. The Lego Power functions train motor only uses two wires, M1 and M2. The new PU train motor has six wires. 9v, 0v, M1 and M2 as well as 2 ID wires. In the train motor, one wire is taken to 9v (let's call it logic 1) and the other to 0v (let's call that logic 0). Other motors or devices will have these two ID pins wired differently....there are eight possible combinations of ID. The four obvious 'binary' combinations, plus a tri-state or floating combination. Both ID pins floating, or unconnected, gives the same ID as having nothing connected at all. I can forsee a combination of two possible motors (01 and 10) that will effectively short circuit the battery if a Y lead is used. 3. Chopping off a plug and DIY hard-wiring it to two motors, one reversed, would get round the two motors on one train issue. Assuming the H-bridge chip has the same capabilities as the PF receiver, no big problem there. 4. Again, with a little splicing, no reason at all why a conventional PF train motor cannot be used with the Smart Hub connector....other than the ID pins, the internals of both motors are pretty identical. 5. I can see a PF to PU or vice versa lead being very easy to implement. Have a small 'dongle' (like the one on the PF lights) that takes the six wires from PU and converts it to PF to drive LEDs or older train motors. PF can happily drive the new train motor just by using the M1 and M2 wires. 6. By having a couple of small switches on the dongle, similar to the polarity switches on the old PF controller, the signals on the ID pins can then be 'faked'. Without knowing exactly what all the ID combinations are (I will try them later) I'm not sure what the functionality is, but I suspect one of the ID options is for a variable speed reversible motor (i.e., train motor) and another is for a momentary motor where it does not run continuously, but is pulsed only when a switch is pressed...like BOOST. Further to the hassles I am having with the Bluetooth itself, I was sat in the front room last night fiddling with the trains (rather than the LEGO attic) and 'Her Royal Wifeyness' started moaning at me that something funny was happening with her Windows laptop. She kept getting pop-up notifications about 'new hardware detected'. It seems her Bluetooth was in promiscuous mode and it was picking up new Bluetooth devices in range. Namely, a Hub No 4 and a Controller No 2. So....even if LEGO are telling me there are no plans for Windows, at least the hardware is able to be seen by a Windows PC. I then thought about throwing an Android emulator on the PC, downloading the Powered Up! app and doing my firmware update that way, but it would appear that almost all emulators are software only and can't access the PC hardware (Wifi, Bluetooth, etc.) so I am again stumped there. But the fact that Windows can see this stuff means that someone, sooner or later, is going to come up with a PC based control solution.
-
I will concede that. But given that, the system, 'out of the box', is even more limited than Power Functions. With PF, I have eight trains on one controller with no setting up, firmware updates or any messing about necessary. The V2 IR receiver was a specific modification to control two specific motors parallelled on the same channel as I recall...simply a more capable H-bridge driver and only necessary for a specific Technics set. The i-Phone is an i-Phone 4....it has i-OS 7.something or other but does not support the app and even if it did it hasn't got BT4/LE so the hardware isn't compatible either. As the system was only RTM in the last few weeks, I'm surprised that the firmware already needs an update. Anyway, two controllers, two Smart Hubs going on ebay tonight!
-
Yet more testing and yet more issues. I have just managed to rob another set of batteries and now have both remotes and both trains/Smart Hubs running. Again, individually...I cannot pair two trains to one controller or one train with two controllers. If I power up one set (Cargo on Green), the remote controls the train. Pushing the button on the Smart Hub allows me to change channel. If I now power up the second pair (Passenger on Yellow), then the train is controlled by the second remote. A quick press on the green button on the remote is supposed to select between available/active channels. It doesn't. If I use the button on the Smart Hub to change the channel, I can end up with both remotes and both hubs on the same channel, e.g. green. But guess what....the Green channel on one remote won't control the other train, and vice versa. Even on supposedly the same channel, the pairing seems to be one to one between a specific hub and specific controller. By powering everything off, I can get the controllers to swap, but I still can't get them to control more than one train. I was under the assumption that this system had 10 channels. A and B for each of Red, Blue, Green, Yellow and Purple. A transmitter designated as Green would control a Hub designated as green, Red to Red and so on. Nope....the pairing seems to be one controller, one Hub, and the colours have to match each other, but two sets of hub/controller can happily work independently on the same channel, but not control multiple hubs or have more than one controller per hub. So the limitations seem to be as follows. One train per controller. No ability to control two trains from a single controller. One controller per train. Unless you have two motors connected to the same hub, having two sets of buttons on the remote seems pointless. You cannot use two motors (A and B) in the same train running from the same hub because of the cable length and the inability to reverse the polarity of the motor (like you could with PF). Even with hubs and controllers on the same 'channel', they don't talk to each other. Battery life. Regardless of what others seem to have experienced, my battery life is pretty lousy compared to PF. 'Dead' batteries from PU will run PF trains for another afternoon with no worries at all. My 7939 is still running after three hours with batteries that won't even power up the Smart Hub, let alone run a train motor. No lights available (even though they have been mooted by TLG and have an allocated set number). The app is limited to smartphone or tablet users. Even then, the smartphone or tablet has to be a certain OS and can't be more than a year or two old....it doesn't work on an i-Phone or anything other than recent Android or a 2017 vintage i-Pad. No support whatsoever and none planned for PC users. I have rarely been upset by anything TLG have ever done, but this has really got to me. What should (theoretically) be a nice idea has been poorly implemented, is seemingly unsupported and appears to be very retrograde in that everything should just 'work' out of the box, and this really doesn't appear to! The trains themselves are as good as any LEGO have released. They are clearly intended as a 'like for like' replacement/update of the 7938 and 7939...the styling is very similar and the build quality and included accessories are very much in keeping with the 'originals'. I have to give TLG 10 out of 10 for the general, er, 'traininess' of these 2018 trains...in that respect, they have done their usual great job. Retrofitting them with PF to keep them compatible with my existing trains has been a simple task (and I already had plenty of spare PF gear), but for a train enthusiast like me already heavily invested in PF, the 50% extra cost of each train (compared to previous releases) plus another 50% for the cost of replacing the PU with PF (receiver, battery box and motor) is an issue. Obviously, with unmotorised sets like Horizon Express or the Maersk Train, the option to retrofit either control system (once the PU components are available separately) gives more options. If LEGO bring out new Creator or Expert sets in the future without including electronics, then happy days whichever flavour of control you prefer, assuming of course TLG don't now decide to retire PF... I best get some more PF receivers and train motors before they become obsolete!
-
I have emailed TLG and am waiting for a response. I did look at Madaboutlego's channel at his video on the Passenger Train, and his Powered Up doesn't work anything like mine does. It seems he can power up a train remotely by turning on the controller. Mine won't do that. I even tried LEGO's only tip which is to push and hold the buttons for five seconds or more to get a purple flashing light which indicates that pairing has been 'forgotten' and puts the system back into 'reset mode'. I still cannot get two hubs to connect to one controller. Incidentally, NiMh batteries last about 48 hours in a controller. Bearing in mind for 16 hours of those 48 the controllers were powered off (I was asleep). I have PF remotes from 2010 that still have their original alkaline batteries (Duracell Industrial) and still work fine.
-
This Bluetooth stuff is really giving me gyp now! So I now have the Passenger Train and the Cargo Train. Lovely trains, in themselves. It's the Powered Up! that badly lets them down. Power on the Cargo Train and a controller. Flashy-flashy, pairy-pairy. Both light up green and we are good to go. Power both off. Power both on again...paired green. Good to go. Power off. Power up controller and Passenger Train. Flashy-flashy, pairy-pairy. Both light up green and we are good to go. Individually that is. One train is on Port A and the other is on Port B, so logic dictates that I can use one controller for two trains, right? Wrong. I simply cannot get a second hub to be recognised on the same controller. No matter what combination I try and press the buttons in, one or other hub will pair with a controller, but two hubs will not pair with the same controller at the same time. This kind of makes a 2-way (A & B) remote a bit pointless! I tried pairing a train and a controller, and then changing the channel to Yellow. When I power down and power up again, sure enough they pair instantly and remember the hub is on Yellow. If I power down, then power up the controller with the other train (Hub still set to Green), up they both come and pair happily as Green. I just cannot get two hubs to pair with one transmitter! Anyway....unless someone has a fix for this issue, the whole lot of Bluetooth stuff is coming out and being replaced with PF (which fits perfectly) and going on Ebay. This new technology is fine when it 'works'. If it doesn't work out of the box without needing firmware updates or connecting to a smartphone in order to make it work then I'm sorry, but it's not an 'upgrade'. Power Functions works first time every time and doesn't need any fiddling about. It just 'works'. Incidentally, I get around an hour and a bit with the Cargo Train on identical batteries to the Passenger Train. My Passenger train will still not make 40 minutes of continuous running on speed 3. I would have thought the heavier train would load the motor more and last for a shorter duration. I shall swap the motors over and test again just in case I have an iffy motor (this was certainly not uncommon with 4.5v, 12v and PF in the past).