

Tearloch33
-
Posts
68 -
Joined
-
Last visited
Content Type
Profiles
Forums
Gallery
Everything posted by Tearloch33
-
I recognize your points, but what is the benefit of using the PF motor in place of a 9V motor? It takes custom modification to accomplish, and still does not solve the polarity issues with the 9V system. Is the 9V motor that much more expensive? I don't have any 9V motors, so I do not know how much they cost or how available they are currently. Your second point still has the polarity issues of 9V tracks. I get the benefit of running multiple trains on the same track, but you don't need the 9V pick up modification to do that. Just use the PF system as is. Sure, you are limited by the battery life, but that still gives you 3-4 hours of fun time. I read somewhere a story about using a 9V motor with the PF system. What that does is allow powered sections of 9V track to actually charge the battery up as it runs, allowing for almost unlimited run time. By only powering small sections of the track, instead of powering the whole thing, you no longer have the polarity concerns for cross-overs and switche, and still get all the benefits of the PF system.
-
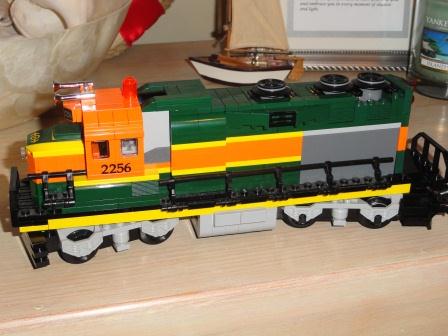
OK, so I finally got around to taking some pictures of my BNSF MOD. It is still incomplete, but I should have the final parts from BL later this week. Here is one pic showing the general arrangement of the PF set up. I began working on the decals last night, and I am having a hard time matching the dark green and the orange colors. I have found various RGB codes on the internet, and none seem to be working out well. I have the yellow matched perfectly, so that is not the issue. I even scanned tiles of dark green and orange to try to match those colors, but even that method does not come out right. I may try to scan the LEGO provided dark green sticker for the hood of the BNSF train to see if that yeilds better results. If any has successfully matched the dark green and orange LEGO colors on an inkjet printer, could you please provide the RGB code used.
-
I don't really understand the point of that. Doesn't that completely defeat the purpose of the PF system? You still have to have the 9V tracks. You still have to apply power to the 9V track from an AC wall outlet. You still have to deal with track polarity issues at cross-overs and swithches. Granted, you can use the remote control instead of the 9V controller (which is still required to energize the tracks). So to me it makes more sense just to stick with the 9V setup completely, instead of buying an IR receiver, the remote control, and essentially destroying the PF motor. Just buy a 9V motor and be done with it. Please explain how this is a useful solution? The true utility of the PF system is that you do not need an AC wall outlet, meaning you could set up your track anywhere, if you so choose. You do not need to buy 9V tracks on the resale market, which are expensive and hard to come by, at times. You do not need to worry about complex wiring to deal with track polarity if your setup is anything other than a single loop. If you have a big enough set up, you could run multiple trains on the same track at different speed settings (say a long train and a short one) such that the actual speed of the two trains are matched.
-
I actually think this test would be just fine to make a comparison. The point is to determine (by experiment) if a PF setup will run longer at a slow speed than at a high speed. The conditions of the experiment really do not matter as long as the two tests are done under the same conditions. Having the train elevated or even upside will be fine to determine the battery life vs. train speed setting. Now if you want to figure out how long a particular train on a particular track setup will last (like for a train show), this will not tell you much, unless you actually set up the tracks and run the train on it. As long as the controllable factors of the experiment for both cases are the same (load on the motor ie. weight being pulled, and friction from track setup), it will do to answer this paricular question. In terms of electrical theory, the one thing you have to consider is that a 9V system essentially has an unlimited energy supply. For the case of PF, whether its the standard battery pack (with new, non-rechargable batteries or rechargable batteries) or the LiPO battery pack, the battery itself has a LIMITED supply of total energy in it. The potential energy of the battery (stored energy that will be converted to run the train) is a simple calculation of voltage times ampere hours (To get it to a known unit, like Joules, you need to convert the hours to seconds, but its trivial for this case). The LiPo battery is 7.2V with 1100mAH. That is a total stored energy of 28.5 kJ. For the motor, it consumes the bulk of the energy in the system. Its power is simply Voltage times current. Since power is simply energy per unit time, the you can consider 1 W as 1 J/sec. Using hoeij's current and voltage measurements (knowing they may not be accurate based on his equipment and PWM issues), on speed setting 1, you get 3.0V x 210 mA = 0.63 W (or J/sec). That means if the battery was allowed to completely drain (which the PF LiPO will not allow by design), you get a theoretical max run time of 12.5 hours. At speed setting 4, you get 6.6V x 210 mA = 1.39 W (J/sec), and a max theoretical run time of 5.7 hours. Now of course the LiPO battery will not allow a full discharge, as it will cause the LiPO battery to explode (from what I have read). You also have energy consumed in other ways, such as heat generation, noise as pointed out, and of course frictional forces. So the max theoretical run time is probably about twice as long as you will really get out of your PF setup, depending on the overall size of your train, the amount of curves in your track set up, etc. But based on an energy perspective, the speed of the train most definitely will affect the run time of the system. It all comes down to understanding that a battery provides a fixed amount of stored energy, and that is the real factor in this. Comparisons to 9V systems are completely irrelavent as teh 9V system has an unlimited supply of energy.
-
Wow, great poll question. The Super Chief is the most "iconic" of the 3. The EMD F and E series trains defined a generation in American railroad history. The design is great, and needs very little custom modifications to make it look realistic. The BNSF train was the evolution of American rairoad history. It symbolized the giant mergers, and the color scheme is classic. The design itself was the most simple of the 3, and needs a few modifications to make it look realistic. The Maersk is the culmination of many previous trains. It is the most realistic of all the Lego train designs, and incorporated many fan modifications from previous sets to make an incredible design. I have sentimental attachment to the BNSF train, since I worked for BN at the time of the merger with ATSF, and that paint scheme and also that particular train was the companies image during that time.
-
I am kind of old school in my electrical theory, being a mechanical engineer with military power generation experience. PWM was not considered by me until pointed out. Makes sense based on size constraints for PF parts. My understanding of PWM is that it basically turns a DC source (ie battery) into an AC source by rapid on/off cycles. The pseudo AC signal is just periods of source voltage followed by periods of no voltage. So I get your point about it not being a variable resistance circuit in nature. Basically the speed control in the IR Reciever or the LiPo battery itself changes the effective frequency by altering the duty cycle of the on/off periods, thus controlling the speed at which the motor operates at (speed of the train). It also makes sense how LEGO was able to up the power/torque output of the PF motor while lowering its consumption (based on their words). Once the motor is at speed, energy consumption is only to overcome frictional losses.
-
The problem with your statement is that the 9V and 12V systems are not battery systems. Basic electrical theory tells us that in a closed DC electrical circuit, Voltage (V) = Current (I) * Resistance ®. Voltage is not controllable for a battery system without some fancy stuff, which I do not believe is part of the PF system. So the voltage in this case is constant. The circuit, either inside the IR Reciever, or that LiPo battery itself with its built in control, alter the circuits resistance, thus controlling the current. The variations you see for turns or based on weight is due to a concept where a motor actually creates a counter current (acts as a generator) when turning. The resistance to the motor turning (in this case, caused by turns or the amount of weight it pulls) varies the amount of counter current generated in the motor, which must be overcome by the battery, making the output current of the battery go up. Also, please try testing your statement of the battery not lasting longer for slower speeds.
-
LEGO customer service told me that the new PF train motor (88002?) draws less current than the older RC motor, yet has a higher power and torque output. I guess the upgraded the motor itself, making it more efficient. I have not conducted full scale testing, but I do know that the PF motor has much better speed response than the older RC motor, and the battery lasts considerably longer under the same conditions for the PF motor.
-
Here is what I think I know on the subject: There are 2 ways to control the speed in PF set ups. One is through the IR controller. Since the voltage from the battery is only the driving force, and the current delivered from the battery, through the IR reciever, to the motor is really what drives the speed of the motor. DC current goes up, the motor runs faster. DC current goes down, the motor runs slower. The IR reciever has something in it that I know limits the current that leaves it to a threshold (not sure what that number is). But the IR Reciever, when used, controls the current in the circuit. The second way is with the PF LiPo battery. It has a dial on top that can control the current output from the battery directly without the use of the IR reciever. You may actually be able to get a higher top end speed out of the set up by eliminating the IR Receiver, since I do not know if the battery itself has the same current limit (if any). Its not really a matter of discipating energy. The battery stores a set amount of energy. The energy is discipated from the battery as the current leaves the cell. If that energy was being "wasted" somewhere to control the speed, then the life of the battery (time it takes to drain it) would be constant regardless of the speed you operate the train. One other thing that comes into some play here is that battery life is also dependant on discharge rate. If you discharge the battery at a high rate, you get a lower total amount of energy out of it that is usable (to the train) as you would at a lower discharge rate. In this case, the "wasted" energy is lost due to heat, as a battery heats up more at higher discharge rates (every use a 15 min charger on rechargables?) I think that may be part of the rationale of putting in a current limiting device in the IR Reciever, as it may be a safety concern with heat generation in plastic parts. In the 9V world, the controller dial controlled the current applied to the rails by using a rheostat. It is essentially a long coil of wire that acts as a variable resistor. The position of the dial controls how far the current travels in the coil before it leaves to the rest of the circuit (everything after the pick up is not used). Increasing speed makes the length of the coil shorter (less resistance), resulting in higher current for the same voltage. With a constant applied voltage (from the wall), the rheostat varied the resistance of the circuit, thus varying the current, and subsequently the speed of the train on the tracks.
-
I am working on a complex modification to the BNSF GP-38. I'm adding PF (including putting the battery box and IR receiver in the actual body), as well as altering the roof, cab, back of body, and hood to be more realistic, and adding in steps on the front and back. Anyway, I have multiple needs to create decals for this project (covering battery box and IR reciever, adding pin stripes in a few locations). I have water slide decal paper, and have found several sites that list RGB colors that "match" the LEGO colors. Most of the sites use different RGB codes, and they match OK (atleast the yellow), but the orange and dark greens are off a bit. I was thinking about using my scanner on some tiles of the colors I need and using those as my color source. Anyone have any other suggestions? Anyone know of a place to get adhesive sticker sheets that I can print on instead of water slides? Do you have a preference?
-
TRULY AMAZING LAYOUT! Well done. Now I have inspiration of what I can do with limited space. WOW!
-
I am working on a mod to add PF to my BNSF GP-38. For the external on/off switch, I essentially copied the on/off switch from the Cargo Train #7939. All I have to do is push down on the rear fan blade on the roof. I am even making most of the mechanism with clear bricks so that hopefully the green light will shine through enough to see it (so I don't have to pull it apart to verify the battery is off). I'm still waiting on a few parts from BrickLink, so I am not sure if the clear parts will actually accomplish my goal. But a similar mod to the Maersk should work as well. The whole mechanism attaches to the top of the battery, and then you just have to "build it up" to match the roof line.
-
That is just plain sick! WOW.
-
I was just wondering if anyone has MOCs (or know of any) for track repair equipment? I used to work for a US railroad (BNSF) and did alot of work with track repair. I would love to make up some track repair machines, like a Tamper (lifts ties up, shakes ballast underneath to level the track), Spike Drivers, Tie Replacers, etc. I do have the Level Crossing set that came with a little crane on high-wheels, which is nice. But I would definitely like to see some other ideas. It would make a yard layout fun. http://www.qualitytrackequipment.com/the-new-jhs-mark-ii-tamper/ This is a small tamper, but there are plenty of bigger ones that are used for precision leveling of the track. This one is most likely used for leveling ties after repairs (rail/tie replacement). http://www.nordco.com/New-Machines.aspx This site has a bunch of equipment. Cheers!
-
Does anybody have any information on the battery box used in the 3677 set. Is it molded in red plastic, or is it just a sticker/decal on the normal battery box?
-
Nice MOC. What do you make your decals from?
-
Thanks for pointing out the explanation. Still fairly new to BrickLink. Much thanks. Thanks for the endorsement of Dads. Off US sellers, he has the most number of parts I am looking for. I will probably use him for this project.
-
I am working on a wanted list on BrickLink for some modifications I am making to my BNSF GP-38. I found some 2x4 plates from a seller (one particular one, but I saw it from others as well) that had 2 listings for the same part. One of them listed the acronym EBP after the part. Example: Orange Plate 2 x 4 EBP instead of just Orange Plate 2 x 4. Does anyone know what that means? Shameless plug: I have recently returned to Lego after years of being "too old". I absolutely love the concept and execution of BrickLink. Being able to search for parts worldwide is great, but being able to make a wanted list, and then search for just that list against the worldwide market, including identifying which stores have the most unique parts that I am looking for is just incredible. LOVE IT! P.S. Hoping to get my Maersk set for father's day, but probably will have to wait for Christmas :(
-
How do you tackle the issue of the gap between the custom base on the boogie plate on the trucks. The thing I like about the molded bases is how the bottom is recessed, allowing the boogie plate to be essentially hidden from sight, as well as limiting how far the trucks can turn (still within capacity of TLG curves)? I tried a custom base once and it looked odd.
-
My calculations were using the assumption that you cannot change the gauge of the track, or the size of a minifig. Since LEGO makes all of their train products based on the 6 stud wide model, that is what I based it on.
-
I just wanted to share this with everyone. A question posed on another post brought up whether users would put the new Maesk train with the older BNSF train, due to the difference in length. I did a bit of research, and here is what I found. Assuming the width is set at 6 studs (or 10 ft) based on track gage, that sets a ratio of 1.67 ft per stud. Maersk SD-40 dimensions are 6 studs by 38 studs. Actual SD-40 dimensions are 10 ft by 68 ft. That puts the to scale lego length at 40.8 studs. BNSF GP-38 dimensions are 6 studs by 32 studs. Actual GP-38 dimensions are 10 ft by 59 ft. That puts the to scale lego length at 35.4 studs. ATSF F-9 dimension are 6 studs by 30 2/3 studs. Actual F-9 dimensions are 10 ft by 50 ft. That puts the to scale lego length at 30 studs. So the Super Chief has the best actual scale in terms of length vs. width of the 3 examined. The BNSF GP-38 could be easily extended to 34 studs by adding in better steps on the front and rear (similar to what the Maersk has). Extending the Maesk by 2 studs may be difficult since it already is extended well past the 28 stud long train base. If you want to disgard the width scale, since it is set for current tracks, then the GP-38 and SD-40 scales are around 1.8 ft per stud. That would make the F-9 scale a bit long (should be 28 studs long). Since the nose section is 2 2/3 studs, this could be easily done by using the 6x24 red train base and extending it by 2 studs on the back in place of the 6x28 train base that the set comes with. Is realism important to you?
-
What carriages do you use with BNSF & SFSC?
Tearloch33 replied to thegurumb's topic in LEGO Train Tech
I have actually be looking into creating an old BN passenger train, modeled after the ATSF Super Chief. BN used the E9 instead of the F9 (or older versions) for their passenger trains, and had the nice green with white "hockey stick" paint scheme. Since I grew up near Burlington, and actually worked for BNSF right after the merger (at former BN yard in Galesburg, IL), my affection is to the BN side of things, even back to the old Burlington Route stuff. This will be a long MOC process, but will be well worth it when complete. Here is a pic of the BN E9A used for passenger service: http://archive.trainpix.com/BN/EMDORIG/E9A/9925.HTM One note is that the E9 is significantly longer than it F9 counterpart (F9 is 50ft long; E9 is 70ft long). Now I have to go back in and alter my LDD MOC. I was starting to think the Super Chief was not scaled correctly, but I think its consistent. Yesterday I did some looking and found the GP-38 (BNSF) and the new SD-40 (Maersk) have a consistent scale. Based on my calculations, the Super Chief should be about 27-28 studs long to be consistent with other MOCs, and an E9 build would have to be the same length as the Maersk (38 studs long) to be consistent. Just looked throught the Super Chief instructions, and it is scaled to a length of about 31 studs, making it a bit longer than it should be to be realistic (or consistent with other LEGO trains). -
I actually have one that I am working on. I did not modify the overall shape of the engine, and accomplished adding the battery and IR receiver by using decals (still have to make them, but have the stuff for it). I feel better about the decals since seeing the pictures of the new cargo train set that will come out sometime that uses decals to make the battery box red (assuming its a decal, since I doubt TLG would make a red battery box just for that set, but I could be wrong on that one). I put the battery all the way at the rear, and the IR reciever just behind the cab (so that the wires are in the cab). This gives me room in the middle of the train to add the PF switch if I want to add a second motor (to reverse direction of the front motor). I still have to make some changes, like raising the height of the IR reciever so that the sensor is not covered, since right now the response from the IR reciever is sluggish (depends on angle). I have be procrastinating b/c I wanted to see the instructions for the Maersk, since I want to make other mods to the BNSF, like steps on front and back, as well as modifying the roofline to be more realistic. One interesting thing I was able to accomplish with my design is I was able to make it so that one of the fan blades on top is above the on/off switch of battery, so I can simply push it to turn the battery on/off (similar to the 7939 cargo train, for those that have that one). I still have to take the back off and a few other pieces to charge the LiPo battery, but that is OK in my mind since charging is fairly infrequent with my limited run times. I still need to order some parts from BL to complete my mods, so it is a work in progress. I will try to post pics tonight to hopefully give you some more ideas. The only issue I see with your MOC is that the BNSF decal on the side will be difficult to get on with the varied widths.
-
American Diesel Engines Sold Separately
Tearloch33 replied to legotrainfan's topic in LEGO Train Tech
Here is a perfect (and real) example of what your talking about. picture Since really only one of the Maersk trains really existed, the realism based fans would not want a second one if making a longer train. -
Guess I should have read the caption below the picture, or just looked at the cab numbers. Thanks for correcting me. And thanks for supporting my point that the difference in lengths of the GP-38 and SD-40 are pretty well scaled by TLG, and should not deter users from pairing the 2.