mred
-
Posts
42 -
Joined
-
Last visited
Content Type
Profiles
Forums
Gallery
Everything posted by mred
-
Yeah, I thought of that, and almost posted that suggestion, and figured I may as well try it first.... not possible, as the little bulges on each end of the motor are different sizes, so the motor only fits one way.
-
Here is the final level of destruction: From left to right on the PCB, we have the pins for the PF connector, the contacts for the slide switch, the power switch, and the LED. In the lighter piece, we have the slide switch, then power switch, and then the LED lens, with corresponding holes underneath...
-
Is that what you're after, or one more level of destruction (undoing the two screws that hold the PCB on?)
-
I had the screws all the way out, they are fairly tight though. But even with them out, the pieces hold together quite firmly.....
-
As promised, a couple of photos First off, the dismantled box. Note the two sections and the connecting wire which goes to the PCB. Dismantling. I found it best to try to pull the top parts of the outer piece away from the inner, it seems like there is high friction caused by the back of the metal strips. Removing the inner portion will make more room inside, but the outer part will still be needed in order the screw the cover on.... Actually, I need to take that back. It is part of the inner portion that holds the screws which hold the whole box together, although I feel that the outer portion could be modified to take the screws, with a little hot melt glue or similar..... Now, if anyone wants to suggest the best rechargable system that could be put in here, I'm all ears
-
Jimbo, the secret is the darker grey piece is not just one piece. So what you need to do is remove the endmost bits, which is one piece that goes across the bottom too, the part that hold the batteries with the metal contacts is a seperate piece, and is attached to the pcb under the lid by wire. I'll upload a photo in a minute.
-
I pulled the wire clip out, and removed the outer two wires for about an inch or so longer, and seperated the middle two, which effectively gave me enough wire to not have to solder in another piece, doing away with the heat shrink. Then I swapped the wires on the motor and tucked it all around the left side of the R in the photos above. No modifications necessary to the housing, which means it's a simple case of pull the motor apart and reverse the wires again if I want to go back to normal. The lead going into the motor is now about one inch shorter, which serves as a way to identify reversed motors, and lets face it, mostly the leads are eccessively long anyway, so it is a win win situation So now my Maersk has two motor.... I'll have to buy some more to do the same to my Cargo trains!
-

LDD MOC/WIP: BR Intercity 125 - 1970s Livery
mred replied to whosscruffylookin's topic in LEGO Train Tech
I presume by Countrylink Blue you mean the current livery? Would love to see that! -
LDD MOC/WIP: BR Intercity 125 - 1970s Livery
mred replied to whosscruffylookin's topic in LEGO Train Tech
Funny that you should be working on an Intercity 125, I've been working on an XPT which is based on the Intercity 125. I've found it quite difficult to reproduce the current colour scheme, but have had more success with the colour scheme from it's introduction, so that is what I've stuck to. I found that using rocker bearings on the top edge, I was able to get the illusion of the curve, especially when using a couple of curved pieces to break up the grills...... As you can see, I did not worry about doors..... I would love to make the front a little more like the original, but will probably end up using stickers if I end up buildiung it..... if only I had more money to spend on lego! -
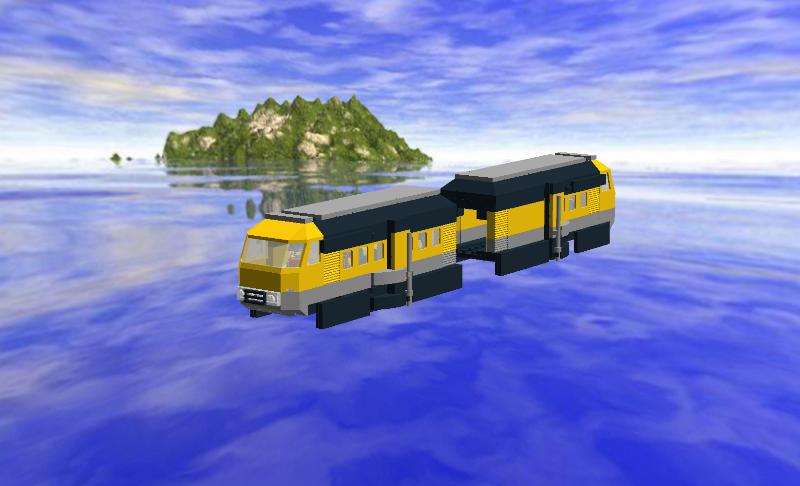
Hi Guys, While waiting on some parts from BrickLink to finish off my monorail, I thought I would have a go at a locomotive. So here is my LDD take on a NSW 44 class loco, and the model I based the model from. The wheel set behind will be the front wheelset, LDD doesn't seem to have the train wheel with the technic pin anymore....... The rear wheelset is a motor, and the battery box and IR reciever are hidden inside for PF gear. This is the model I based it off, which can be found here. Haven't checked whether it can actually be built yet, but I'm hoping it can. If not, I guess I will have to change some colours..... Feel free to leave suggestions and comments
-
Ah, worry no more, there is absolutely no way I would let my treasured lego anywhere near her mouth I have told her that she can play with it with me when she is 16 years old.... until then it'll be duplo for her I feel! She only gets to hold lego under VERY close supervision I agree, sorting through a diaper for anything would not be fun!
-
Most pieces have arrived from BrickLink, now to start putting it all together :) In other news, have had a baby daughter arrive a week ago, already have a photo of her holding lego........ Good sign I guess?
-
I have: 1 Green Emerald Night 1 Red Emerald Night 1 x 10219 Maersk 1 x 7939 Cargo train + 2 extra engines 1 x 7938 Passenger train 1 x 7597 Toy Story train 1 x 7989 Cargo train 1 x 3677 Cargo train 1 x 7897 Passenger train plus a couple of Hogwarts trains...... And a few MOCs in progress Maybe my wife is right, I have too many trains..... Nah, no such thing
-
Have recieved some parts, just waiting on some others before I can get building Will keep you guys posted
-
Ok guys, I have uploaded some better quality pictures, and tried a few of the changes suggested... Check them out! I thought they would look better with a rail underneath them, so I created something similar... I have made the windows one plate higher, and it does improve it. Thanks for the suggestion roamingstudio. Here is an alternative, using the windscreen you suggested. The only big issue with this one is that the windscreen is somewhat more difficult to source. Here is the tram based one. I would love to redesign it so that it is about one brick shorter, anyone have any great ideas? Please resize your imagea within our site guidelines of 800x600 -TheBrickster
-
You're right, it certainly does look good in the flesh! That one seems a little shorter than mine, I sort of combined all of the tram to make the two monorail cars, and then hid the battery in one. That one looks a bit neater actually.... I wonder, is it powered?
-
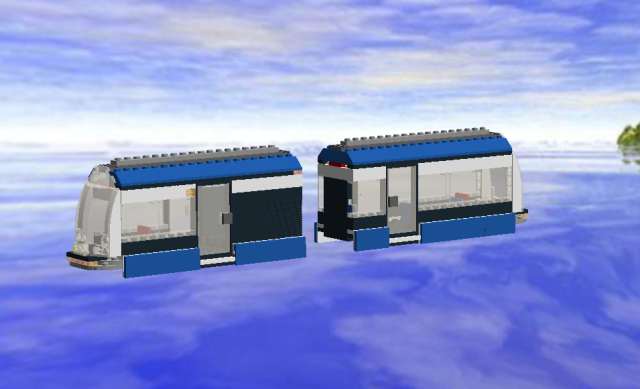
Yes, the windows are a little too low, but I am a bit challenged by height, that is an issue I am working on. I will post some other variations later In the meantime...... Here is a screenshot of the tram based monorail I built. My built version of it is unfortunately missing a few pieces, and so doesn't look as tidy. When I find my camera I will take some photos of it too
-
Not sure if this is the right forum to post this to, so admins, if not, feel free to move it..... It is fairly heavily train based though..... At BrickExpo in Canberra this year, I took a monorail based on the tram from the public transport set. It was a hit with lots of people, and I thought I would have a go at building a few more. I never really liked the proportions of the space series monorails, which were all I have managed to get second hand from ebay, So I had a go at building my own. I will upload some photos of the tram based one later, but here is a screenshot from LDD on my current model I am working on, and when the parts arrive, I will build it and show it off too. As you can probably see, it shares it's heritage with the 7939 Cargo train..... I was going to build the monorail to use PF, but you just can't beat the simplicity of the 9v battery box system monorail used, and it takes up a lot less room too, so for the moment, I'm sticking with that. You'll just have to imagine the monorail track under it as I cannot find it, or the monorail base, in LDD. It will end up being about 2 studs longer than the monorail base, and should be able to go under other tracks. One half or one car is taken up with the battery, leaving the rest of the area for passengers or whatever else. If you want to see more pictures, let me know.