
me00rjb
-
Posts
61 -
Joined
-
Last visited
Content Type
Profiles
Forums
Gallery
Everything posted by me00rjb
-
 Wow! I was expecting this to be a £70, maybe £80 set. I like it, but not sure I'm going to rush out and buy one for £100. Or am I....?!
 -
I think all we can deduce from this, is that I spend far too much time on the internet, and not enough time building! Ah yes, I see the Jeep Hurricane now you mention it - I thought that was an official B model for some reason the first time I looked, not quite sure what though...it looks a bit like a hot rod from that angle. So what else is on the list to be added to the MOC hall of fame?
-
I'll have a shot then! I can only get 27 :( 1. Annihilator, CP5670 2. Truck 8x4 Low-loader, Designer Han 3. Articulated Hauler, Designer Han 4. Dump Truck 10x4, Deisgner Han 5. Drawbar Trailer, Designer Han 6. Wheel Loader, Nico71 7. US Truck, 2LegoOrNot2Lego 8. Tow Truck, grazi 9. TeknoMeka, Brian Cooper 10. Prinoth Leitwolf, Designer-Han 11. V8 Engine, Barman 12. Jeep Rubicon, Sariel 13. Silver Car, Nathanael Kuipers 14. JS220 Excavtor, Jennifer Clark 15. Little Devil, Jurgen Krooshoop 16. Zonda, Erik Leppen 17. Delux Supercar, Crowkillers 18. Concept Car, Nathanael Kuipers 19. Roadster Supercar, Nico71 20. Sunbeam, Jurgen Krooshoop 21. Big Foot, grazi 22. Skidsteer Loader, Jennifer Clark 23. Lamborghini Murcielago, Crowkillers 24. Lamborghini Gallardo, Crowkillers 25. Lamborghini Countach, Skyliner 26. Black Dragon, Jovel 27. Avatar Samson Vehicle, Barman What did I miss? Richard.
-
Thank you - although clearly I take no credit for the overall good looks of the original! The bits I have added stick out like a sore thumb to my eyes, so I’m glad you think it still looks ok! I built the doors and wing mirrors out of bricks as well, rather than cutting the what are now very rare doors Jennifer used originally. That was the hardest challenge I set myself – placing them wasn’t too bad, but finding room for the converter wire connections with the 9V cables was a nightmare! And it resulted in having to build a custom enclosure behind the cab to conceal the receivers for the chassis. Now I’m the one who’s surprised! I’ve also just noticed that it’s almost 10 years since you posted the original on your website. I can’t say I’ve been working on my version for that long, but as soon as I saw it I knew I had to build it myself! I’m very pleased and slightly relieved that you approve of the modifications. I’ll be sure to post some further pictures once I’ve completely finished it. It’s nearly there now and the lifting cylinder was the last big hurdle. I don’t have a lathe myself, but luckily I know someone that does. I tried to design my linear actuator in the style of the Lego version, so in that respect it’s not a million miles away from what is now available (albeit metal and not plastic). It fits directly into the Lego linear actuator bracket, so no modified Lego parts are involved. The only modified parts at all are the ones that interface with the lead-screw that drives the boom extension. I agree that these concessions to an all Lego solution result in a far better model, that can actually be precisely positioned and lift a decent sized load. Plus it gives me an excuse to mix engineering and Lego, so things have come full circle as no doubt Lego is partly to blame for me becoming an Engineer in the first place! In terms of operation, it should be identical to the original. I have not modified any of the transmissions, I’ve just plugged the IR receivers in rather than the custom RC system you used. It works well so there was no need for any modification! Now if only I could figure out how you braced the gearing in the mini-excavator, and convince Eric to share his CAD file for the JS220, I’d have a full set! Richard.
-
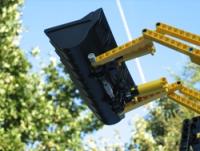
OK, you twisted my arm! I was considering posting it once complete, but here's a preview (sorry about the terrible photo!): I think that's the logic I used to justify my changes - had Jennifer built them today, I'm sure she would have taken advantage of the parts available. However I still wanted my version to be instantly recognisable as the original. So I maintained the older style 9V motors, but used conversion wires and 4x IR receivers, 1x PF battery box and one old-style 9V battery box (with the silver-foil trick to make it work with PF). I used Light Bluish Grey rather than old grey - and surprisingly all the required parts are available. I had to build a lump behind the cab to house the chassis IR receivers - this is in my mind the biggest deviation from the original, but I just couldn't fit them in anywhere else. Not sure I'm happy with it, but there are similar features on other cranes, so I don't think it's stretching reality too far. I almost daren't use the word 'improve', but I think I have improved on the boom lifting mechanism, using the newer LA brackets, with which mine interfaces. I redesigned the lead screw to look more like a hydraulic cylinder (it needs painting still, I only test-fitted it yesterday), the actual lead screw is totally hidden inside the piston and the cosmetic casing. This would never have been possible without the CAD files Jennifer posted on the website, even though incomplete. I did fill in most of the missing bits in CAD, although there are some areas I'm sure she changed during the build that don't quite match up. I tried to stay as close as possible to the original where possible, however I had to design certain areas myself, for instance the area under the superstructure, around the turntable. It gets very complicated in there, so I gave up on CAD at some point and made the necessary changes in the brick. So yes, there is a CAD file, but it's not complete and isn't exactly as-built (either my version or the original)! The build started easy but it took me an eternity to work out some bits, and routing the wires and hiding them took longer than the build! How someone designs something like this in the first place is beyond me. I’m still not sure if I have ruined a design classic or not! (Apologies for the thread-hijack) Richard.
-
I have literally just finished reproducing Jennifer's crane - it's taken a while and is the most complex of her models I have attempted. I've managed the skid-steer loader and the skip-truck so far, but got stumped by the mini-excavator. Her models are also the reason I returned to Lego. I know Eric has reproduced the larger excavator, so that’s nearly a full set! In terms of the points you raise, it's the 1x7 thin liftarms that still aren't made in white, but you can now get them in blue, which I felt was an acceptable compromise. I made a custom lead-screw for raising the boom, as I don't think there is an acceptable Lego solution. This won't be to everyone's tastes, but I can live with it. I did feel when reproducing it, that I may be taking something away from the original! Especially considering I have incorporated power functions receivers, to use the IR controllers, and not RC like Jennifer used. Again, an acceptable compromise to me, but some people may consider it desecration! For that reason, I'm a bit reluctant to post pictures! Richard.
-
8043 for £99.99!
me00rjb replied to junglistjoey's topic in LEGO Technic, Mindstorms, Model Team and Scale Modeling
Thanks for the heads-up! Luckily all the stores near me still had stocks. And there's still some left if anyone would like me to pick one up for them. Richard. -
Yes, universal joints should be in-line, as is standard practice for vehicle drive shafts with a u-joint each end. Universal joints are not constant velocity joints, therefore the rotational motion is not uniform when transmitted through a u-joint, but varies sinusoidally. By putting the yokes in-line, this variation is cancelled out (for each pair of joints, at least). Richard.
-
Since BrickLink did away with the all time price guide when the multiple currency system was implemented, one-time sales of rare parts disappear into history! This is one of those parts that was once available, but hasn't sold in the last 6 months. Doesn't mean there isn't another one out there somewhere! I substituted the blue bar for a black one, and don't think it looks too bad at all. As others have said, parts not available in official sets show up for sale regularly on BrickLink. One source I have heard quoted is the model makers at the LEGO Land parks can order elements in one-off colours, and no doubt some of these find their way onto the market one way or another. I can't remember any other colour substitutions I had to make, other than opting for Light Bluish Grey and not Chrome / Metallic Silver for some parts. Richard.
-
Excellent post, and another excellent model. To me, this is what Technic / Model Team is all about. While I enjoy looking at images of finished models, it's the mechanisms that interest me the most. I like to understand what a model does and how it works; very often you can't see this without videos, a good description or WIP / partially dismantled images, or a combination of both. It's also nice to know why something is a certain way, or why it wasn't done differently - therefore I appreciate it when people take the time to explain details and features that wouldn't otherwise be obvious or visible. Videos are also a great way of differentiating between a model that looks good, and a model that looks good and performs smoothly and reliably, which is perhaps the main challenge in building a good Technic model. Looking forward to further updates! Richard.
-
No problem at all, the render looks excellent, looking forward to seeing the rest (you even spotted all the bits I didn't put in)! In fact, I have to agree with jantjeuh, it almost does look better than the real thing! There's just something about this model that sets it apart from the rest; I think a lot of it is down to the colour scheme. Well, I suppose it does need something to pull...can't promise anything immediately, but it is on the to-do list! Should be fairly straightforward after the truck itself... Richard.
-
Hi Squizz, I made it as close to the original as I could (except I cheated and used light bluish grey parts rather than chrome, due to cost). The rubber bands are easily available from BrickLink (some of the other parts are a bit more difficult to find though). It would be possible to build a rigid chassis and keep the same bodywork to simplify things I would have thought. I only have some very poor pictures which don't do it justice: I built the model in MLCAD first:
-
I managed to build a copy of the blue, white and red US truck from the pictures posted, so it can be done! I've not got around to ironing out all the bugs yet, but they are amazing models!