
Hod Carrier
-
Posts
1,007 -
Joined
-
Last visited
Content Type
Profiles
Forums
Gallery
Everything posted by Hod Carrier
-
Thanks for the positive feedback, guys. It's always great to receive constructive comments. :o) Lego Dino 500: I agree that there are many possibilities to be explored in microscale, including track. I'm not sure whether it's possible to have a properly mated track and train system at 1 stud width, but I'll confess to not having tried yet. The design is a shameless copy of the previous MOCs I've seen online and, to my eye at least, look right enough. dr_spock: I think I might just bring this one to reality, although I may have to wait until after payday. I've just blown my budget getting the rest of the parts together for the remaining 3 cars of my 4-wide DD-VIRM and would like to make a start on an SLT in the same scale at some point. However, this is a little different and I think I can wait for the SLT. Man with a Hat: Thanks. The windmill took a while to get right because of the size. My first efforts kept coming out over scale so I had to keep going back and starting again. The sails are poseable but are mounted on a stud rather than an axle so they don't actually turn. Likewise, the body of the mill is fixed, although with the addition of a 2x2 turntable the top section at least could also be made poseable. The supports at the back are not properly modelled either. The white 1x4 tile should really be a bar with diagonal supports running down towards ground level forming a triangle. I take your comments about the greenhouse on board but, as Duq points out, there are quite a few dotted around the Dutch countryside, even in the bulb-growing areas. I'm going to keep trying to make a typical Dutch cottage to go into that space because that's what I'd prefer, but the greenhouse was much simpler to model and isn't entirely out of place. Duq: Ha ha!! Don't worry, I wasn't going to take my diorama down that route.
-
Hi Railco, I'm in a similar situation, although I don't even have the space for a loop to run trains hence my interest in sub-scale static models. This diorama is just 50 x 16 studs including the black frame, so there's plenty of scope to create a scene that you can enjoy.
-
Been tinkering in LDD again and am still stuck in my Netherlands phase. Inspired by some microscale MOCs I've seen elsewhere on the internet I decided to have a little crack myself and see what I could come up with. The result is this little diorama of a rural scene set in the spring somewhere in the Netherlands. My apologies go to any Dutch readers for buying into all the stereotypes of your fine country. I don't think there needs much explanation from me as it's fairly self-evident from the images what it includes, but I'll run through the checklist anyway. There's a windmill, a multi-coloured field of tulips and hyacinths, land drainage channels and a greenhouse (although I would have preferred to model a Dutch house, although it was seemingly impossible to achieve at such a small size) and, passing it all, a 3 car NS ICM Koploper EMU. As to the train itself, the model is one (yes, one) stud wide and each car is six studs long. It's surely as small as a train can be. I've played some to see what else can be achieved with this ridiculously small scale and while some things are clearly impossible there's still a reasonable amount that can still be achieved. Anyway, here's the model. I hope you like this slightly different take on a railway MOC.
-
Another 4-wide practitioner. Welcome along. That's a very nice MOC indeed. It's perhaps a little cutesy, but it's packed full of detail that makes it instantly recognisable. I like it very much indeed. I particularly like that you have it running on rails. What wheels are you using?
-
Thanks for the interesting link. I think my brain has just melted. Ha ha!! The problem with gravity alone is that the top edges of the sides are a shallow vee with a gap just under two studs wide. I've had a play with the model and the existing roof just won't sit right. Adding a plate to the underside doesn't help because it slips into the vee on one side of the other. What I've come up with is a 90 degree bracket attached to the frame that carries a 1x2 technic brick with two holes. Through these holes I'll slide a couple of technic axles with studs on the top that attach to the underside of the roof. This should locate the roof section into one position even though it will still be held on my gravity. LDD is happy with it but it's not an exact match with the studs, however it's close enough. When the parts arrive it may work out better. ...or worse.
-
Yes, I've found a few weak points in the design and have added some reinforcement in some places but have been able to remove it from others where I expected there to be weaknesses. However, it's a good way of cooking up a basic recipe and checking how things should look.
-
Hi deraven, Thanks for the reply. That neatly summarised what I imagined the feelings would be, and it's pretty much what I expected. I have to say that I'm in agreement with this sentiment. I have been thinking and tinkering with the problem to come up with a "legal" solution, and I think I've come up with a workable solution. Well, as far as LDD is concerned at least. It might work out differently when I get the bricks. Ha ha!!
-
...and now to build it. And so, let us hasten unto Bricklink with sweaty palms and a lengthy shopping list. I'll do it tomorrow. Ha ha!!
-
zephyr1934: Thanks for the praise. I'm still fairly new as an AFOL and am still learning the techniques, so it's really encouraging to get positive feedback. As you might be able to tell, I'm a bit of a perfectionist and will keep working on a project until I'm completely satisfied with the result. Gravity is certainly one option, but I think I would prefer the roof section to be held on (or at least located) somehow, even if it's not conventionally joined. Another possibility would be to use friction between vertical pieces on the frame and the underside of the roof, although by the strict rules of LEGO construction this might render the build "illegal". Unfortunately this is something that I can't try with LDD first because it doesn't seem to recognise either of these otherwise well-known forces. Ha ha!! THERIZE: I thought all the 3 car units had been rebuilt and lengthened, but I defer to your greater knowledge on this point. Clearly my sources are incorrect. I certainly don't recall seeing any during my brief visit to The Netherlands, so maybe they don't operate along the Amsterdam to Den Haag corridor. It certainly gives me a nice growth progression, from 3 to 4 and eventually to 6 cars. If you had the option, wouldn't you build the longest formation possible...? Who knows, maybe I'll eventually build a double set of 8 or even 10 cars length.
-
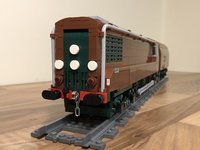
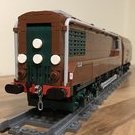
Well, here it is I guess. VIRM v1.1. While this can be attached in the same way as the existing roof the profile is less than optimal. I would prefer to build the entire roof to the same profile as the front section but this just can't be done due to the size of the gap at the top of the body. The compromise to be made here was either a break in the profile or a large gap all around the edge due to the need to add an additional tile along the underside of the roof to permit attachment to the supports. As you can see from the next image, I decided to go for a break in the profile in order to prevent the model growing any taller. A little sneaky peek inside...? Oh, go on then.
-
Yes, I agree. It really would be the last resort. As it stands, there is the option to go for a slightly less optimal roof profile that could be attached in the same way as the existing roof. This might have to be the option I take.
-
Hello, First of all, apologies if this topic has already been covered. Apologies too if I'm stoking controversy with my question. I was just wondering what the general consensus was on the topic of modifying bricks, by which I specifically mean cutting them down to fit as necessary. I understand that this would render any build effectively "illegal", but I'm interested to know how widespread and acceptable this practice is among the AFOL community at large. My reason for asking is that a build I'm currently working on may only be resolved by these means if all other methods fail. Over to you.
-
Hello chaps, Thanks for the feedback. :o) zephyr1934: The real trains are either 4 or 6 cars in length and I will be adding more cars to make up a complete unit in due course. However, I want to make sure that I'm happy with the prototype car first and that all issues are addressed and changes are made before I start to add cars. I think a 4 car unit will be sufficient, at least at the moment. There is also a 4-wide Sprinter Light Train (SLT) currently sitting on the drawing board. It's still being worked on in LDD and is a little way off being prototyped, but watch this space as they say. Duq: I've taken your comments on board about the shape of the cab roof and have gone away and re-profiled the entire roof, which actually brings it a bit closer to that of the real trains. This has also made it possible to give a better shape but it does bring a raft of new problems, chief among which is how to attach the roof to the rest of the model. More work is still required and raises the possibility of having to "modify" bricks. What do you think?
-
Thanks Richie. I think I probably underestimated the complexity of the shape and therefore the build, but I'm feeling happy with the outcome. I'm hoping the other three cars will follow on in due course. Duq: I did have quite a long play with the front end but the small size of the model makes it tricky. The first arch on the roof is straight but the windscreen section is tilted. Therefore the space is not 1x1 which limits the type and shape of parts that will fit into the space without fouling.
-
A few weeks back my girlfriend and I spent a little time in the Netherlands visiting the tulip fields and other attractions. We based ourselves in the Ibis opposite Leiden Centraal station where we had an uninterrupted view of the comings and goings in the station. As a railwayman myself I found it all quite interesting to see how things worked differently from the UK, especially the double-deck trains. Principle among these were the DubbeldeksInterregiomaterieel or Verlengd InterRegio Matrieel (DD-VIRM) operated by Nederlandse Spoorwegen (NS) that formed the backbone of the intercity services. In fact, all of the train services we caught during our stay were of this type. All this got the creative juices flowing and had me wondering whether or not it could be rendered in LEGO. There are already a number of excellent Dutch trains rendered in glorious 8-wide so I thought I would try the more modest size of 4-wide purely as a static model. As I'm sure some of you might have realised, a smaller size actually raises more issues than a larger size. It took two weeks of tinkering with LDD to come up with a shape that I was happy with, primarily because to me the signature of these trains is the body profile and a lot of work was required coming up with a way of making square bricks follow this profile. There then followed two weeks of waiting for the postman and another week of trying to fit all these bits together. The design is not entirely perfect as the structure is not strong until all the various parts are joined into a whole, but no amount of head-scratching could come up with a better solution. So here it is. A 4-wide DD-VIRM car. A close-up view is a little unforgiving. This is just a single vehicle at the moment, built as a prototype. There are improvements to come, but mostly in the form of efficient brick usage, structural strength and ease of construction. The appearance is likely to remain unchanged, unless anyone can see areas for improvement.
-
A number of the key parts for this MOC simply don't exist, therefore there is no parts list as such never mind a way of cross-referencing it against Bricklink or the LEGO shop. I think that this MOC is going to have to remain a sort of digital art project while it remains unbuildable. Sorry. HC
-
Outlines on Bricks - LDD 4.3.8
Hod Carrier replied to Hod Carrier's topic in Digital LEGO: Tools, Techniques, and Projects
Ah, OK. So it's a hardware issue. Fair enough. Thanks. :o) -
I'm sure that this must have been covered somewhere before but a search of the forum doesn't seem to yield any answers. I can't seem to turn on the Outlines on Bricks function. It's "greyed out" on the preferences menu, together with the High-Quality Rendering options. Apart from that, LDD runs just fine and dandy. Any ideas...? HD
-
Hi, Yes it's my first effort. Thanks for the kind words, but in my inexperience it appears that I have designed something that is in effect unbuildable. I'll have to do better next time. HC
-
Point taken. A running model is just one option, but I'll be honest and say that I don't have any space to run something of this size and at present am just interested to see how it looks. Although I've included a motor bogie you can see that I haven't added a battery pack, so a running version is still a little way off. The next challenge is now to see whether or not I can modify the model so that it can actually be built with commercially available parts. Hod Carrier
-
Thanks for all the feedback so far. Sadly no, those curved bricks I've used for windscreens do not exist. The windscreen part suggested by Dr Spock is sadly too large. I'm still tinkering to see if I can come up with something else that looks OK, but I'm still going to be hobbled by the lack of body parts in Light Stone Grey. As for running it, yes I am aware that the cars are too closely coupled to negotiate any sort of curves but the bars can be swapped for longer ones. There's no reason why they shouldn't work when coupled directly to the car ends rather than between the bogies provided there is sufficient clearance for the required degree of articulation as that is what happens with real trains. Mounting the car ends on a shared bogie would certainly give a very nice, workable close coupling but this practice is not used in British trains. Hod Carrier
-
Evening All, Been having a little play to see what manner of trains can be replicated in LEGO. It seems that some designs lend themselves more than others, but I think the UK version of the Siemens Desiro EMU seems to work quite well. This is a Class 350 EMU in London Midland colours rendered in LDD. It's 8 studs wide and each car is 50 studs long. Yup, it's a 4 car unit. Some impression of the length of the model. One of the driving cars. Driving cab. You can just see seating and grab handles represented inside too. Detail of the lower front end showing dummy Delner autocoupler, obstacle deflector and anti-climbers. The pantograph well and associated power transmission equipment. The pantograph is perhaps a tad oversize, but it looks acceptable to my eyes. Although it's made of a number of hinged parts I anticipate that it would be fixed due to the way that they've been arranged. The pantograph car. More roof detail including the roof-mounted air conditioning unit. For comparison, here is a real one. The original idea was to actually use the LDD renders as the design stage ahead of actually building the thing and then showing it off a little, but a good rummage through the official LEGO store and various online marketplaces shows that the design seems to rely on bricks in colours that simply don't exist, most notably the transparent curved bricks that I've used to represent the curved windscreens. Also, the livery relies heavily on Light Stone Grey/Very Light Bluish Grey which doesn't appear to be well supported. I've tried rendering it in the next darker shade but it simply doesn't look right. Anyway, I'm offering the virtual model up for your appraisal. I hope you enjoy it. Hod Carrier
-
Some LDD Questions from a Newbie
Hod Carrier replied to Hod Carrier's topic in Digital LEGO: Tools, Techniques, and Projects
Thanks for the quick reply. I'd always thought that Lego was about creativity and innovation and wasn't aware that there were such things as illegal building techniques. As a kid I'd always made the tail fins of Lego airplanes by wedging plates edge-on between brick studs because it worked and looked better than trying to build them up. I expect that officially this would be frowned upon also. Still, at least it explains LDD's reluctance to see the world my way. HC -
Hello, First time poster but lifelong Lego fan. I've downloaded LDD as a tool to help design a project that maybe one day will see the light of day. I've been using this in conjunction with a box of old Lego and Technic parts to help prototype some aspects. As a result of my tinkering with real bricks I've come up with a way of joining some of the major parts together, but this technique appear not to be supported by LDD. This is to join a brick horizontally to a Technic piece by joining the knobs on the top of the brick to the holes on the side of the Technic piece. Sadly there is no other way to get around the issue due to limited space. I've proved that this method works experimentally but can't seem to persuade LDD of this which is throwing something of a spanner into the works. Has anyone else come across this issue or a way around it? Also, is there any way that LDD can generate a parts list? Ta!! HC