b5nutcase
-
Posts
3 -
Joined
-
Last visited
About b5nutcase

Recent Profile Visitors
611 profile views
-
Is custom track for everyone? I doubt it. Whether or not it's for you depends on what you're trying to do with your lego train set. Me, I'm trying to replicate some real life layouts (so it's pretty much a must). Other people seem have been driven by a desire for greater play opportunities, or to squeeze more layout into a limited space. Taking a hacksaw to your beloved (and expensive) lego is a leap of faith, so it depends what motivates you. I didn't start on curves, but on the 90-degree crossover out of 2 straight tracks (for the simple, right angle cuts). Only after a couple of those did I progress to the single crossover. I haven't tried the stubby-switch approach, but again it depends what you're after. I've included a couple of links below to point you in the right direction (it's where I started - just reading up on what others have done), but I guess my tips are: - Think it through first (the what, why and how you'll do it). - Measure twice, cut once; and use a decent hobby saw at that. - Don't panic! Even if you do mess up, it's only plastic. A bit of superglue and some off-cuts make for a decent repair job. http://www.eurobricks.com/forum/index.php?showtopic=38423 http://www.brickpile.com/lego-ideas/track-layout-geometry/
-
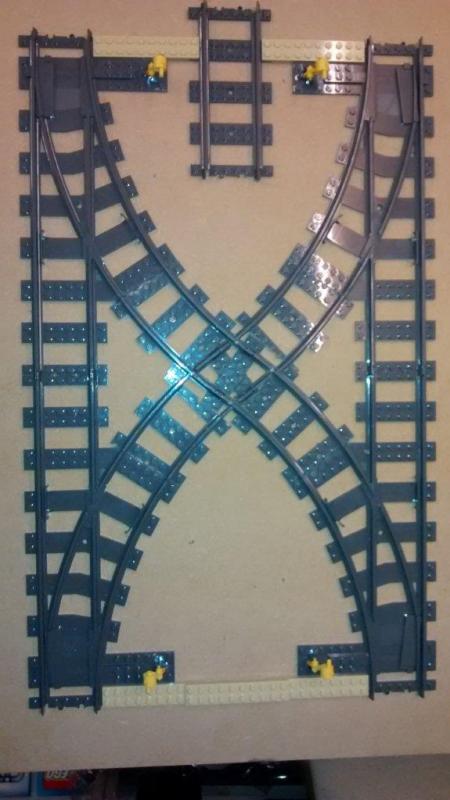
I don't have an emerald night with which to test, but it doesn't give any problems with a horizon express. It gives tram/RRV size wheels a bit of a jolt, but still works OK. Apart from the screwy angles, its a copy of the technique for 90 degree crossovers. If anyones wondering how I got it to line up... just lay all the pieces out on top of each other (this is really critical, and included fasteing to other track to keep the geometry), mark where they overlap, cut (conseratively), and then file down to shim them to fit.
-
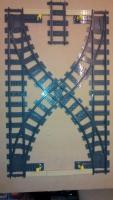
Hi everyone, I've been lurking around reading these forums for a while, gathering inspiration, copying a few of the ideas for 90-degree and single-crossover designs etc. I finally took the plunge with trying the create a double crossover, one which doesn't cost £80 on ebay, and which allows fully flexible route setting. The base parts are 4x points and 4x curves, and while the result is geometry compatible it takes up 3 track widths, and will give any purists (those who object to hackwaws and superglue) kittens - or possibly full grown cats, it's pretty extreme. To be fair, I was also a purist until I got into trains and decided that the number of different types of track piece just didn't cut it. I present the results in images, one included, a couple more detail shots at: http://www.sealhaven.force9.co.uk/ Questions & comments welcome.