
LoneBrickerSG
-
Posts
112 -
Joined
-
Last visited
Content Type
Profiles
Forums
Gallery
Everything posted by LoneBrickerSG
-
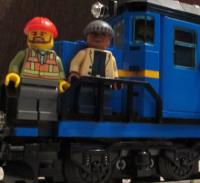
Sure. So to start with, I changed the roof and built a lamp housing using a typical black 1x2 single-hole Technic brick. The roof, as I said before, Is a 4x6 plate on top of two 2x4 slope bricks and two 2x2 slope bricks. The lamp housing is built according to this photo: So that part is done and you have a place to route the light to. So now, let's get to the installation. You will need to remove the battery box and the two white plates that it rests on and route the light wires underneath the battery box just like the IR receiver wire. Fortunately, the designer of this loco left a nice channel along the bottom of the cab to route the wires through, but the large chunky brick on the string will have to be fastened down between the two brown 1x6 bricks in order to keep the wire string from moving around. I've been playing around with different options for mounting one of the two lights in the nose, but for now we'll just leave it tucked away in the nose. Most of the wiring will be left here, except for a short bit that needs to be pulled out to reach to the housing. I should also point out that the new cab roof can be sort of fragile, so I raised up the flat 1x1 tiles next to the gray slope brick to help support the 2x2 slope roof bricks. Now, put the cab floor in. The wire needs to pass over the floor (unless you re-do the floor to make a hole for it) The cab can be assembled now. The light wire will want to bend wherever it wants, but make sure it sticks out into the 2x6 channel in the cab roof and not being pinched somewhere. And that's it. here is a side-shot of mine all complete. While installing the lights, I also decided to change a few things on mine to make it look more like a real GP-series diesel loco.
-
I want to point out that if you're intending your 60052 engine to look like a legit American diesel, the real headlights should be above the cab, at the top of the nose, or both. I currently have mine set up to use one of the PF LED's in an over-cab setup. Adding headlights to 60052 is pretty easy, and in a over-cab setup like mine only requires a few extra common pieces to pull off. The stock roof will have to be changed to 2x2 and 2x4 slope bricks with a 4x6 plate as the roof. The design of the engine means you will have to pack most of the extra wiring into the nose, because there will not be enough room in the engine compartment. I have to leave right now, but I will post better photos of my wiring setup in a few hours if anyone is interested.
-
Those are the exact same engine. The Daylight is really the Freedom Train in disguise, like a superhero.
-

Top Lego trains and newbe first impressions.
LoneBrickerSG replied to davidmull's topic in LEGO Train Tech
First I want to say I think you picked the right time to jump aboard. I started with train set 4565 a long time ago, and I've felt that both passenger and freight train sets since then have been lacking until 7939 and 7938. 60052 and 60051 are two more train sets are another step in the right direction. Also, I am envious that you have the Maersk train. I really want the locomotive from that, but the prices even now are a little too steep for me. The Horizon Express is a beautiful train when running (and surprisingly quiet), but unfortunately doesn't look very good unless there's a loco at either end. The HE was my first big set in a long time and I enjoyed assembling it. The Super Chief is one of the few 9v-era trains that can easily be carried on to Power Functions. See mine here. The roof will need to be modified so that it fits over the connector on the batt box and so that the sensor can receive commands. If you mounted it right behind the driver it may work through the windows. The motor I used is the same 9v motor this train has always had, and it works just as well as my PF motors do. The sensor will also have to sit higher than it does in this picture. That was a change I made later on. I actually had a harder time installing PF guts in my 7939 and 60052 locos than I did with the sturdier Super Chief. -
He means the end user would have to make a sleeve insert for the wheel that would engage a technic axle like normal plastic loco wheels do.
-
Oh man, If you make blind standard-size train wheels in the future I would for sure buy like 30 of them. I like a lot of three-axle diesel loco's.
-
I'm interested in these wheels. How much smaller is the flange compared to standard technic axle train wheels? I'm wondering if I could put a pair of these between two pair of normal train wheels to make a 3-axle truck and not have any issues with wheels rubbing against eachother.
-
Advice on displaying a layout at a local train show
LoneBrickerSG replied to ecmo47's topic in LEGO Train Tech
Your photos are really making me wish I had the space for a more permanent Lego train layout. That station of yours is pretty sweet. -
I see some potential for a machine like that if it were incorporated into the layout of someone who does some legit simulation railroading with Lego Trains.
-
I am with Redimus. He's asking, if you have three trains running under control by the GT system, can you assume direct control of one train and route it into a different track without affecting the other trains? Scale model trains can do that for the purpose of "operating sessions" where users adhere to a schedule and have to stay clear of other traffic to complete their jobs.
-
I would agree with you on the handrails, but on most american diesels I can think of the handrails along the side also attatch to the cab at an angle. Mine could probably stand to be shortened. I know mine was a heavy modification, but I've spent much of my life looking at the diesels rolling through my country so I really enjoyed tweaking 60052. I never had the BNSF engine so I personally wouldn't be surprised if some deeper part of my mind wants 60052 to fill that hole.
-
dr_spock I think you made a good effort at detailing the 60052 engine, and it certainly deserves some fancy looks. I also like your Conrail stickers, as I've only seen CSX stickers meant for it. I still like my own version more, though. And PaperBallpark, I think your modified one looks really good. Here is mine rendered in LDD, made to look like a GP-20 locomotive, but I may up it to GP30 at some point.