Pictorial Review: 8868 Air Tech Claw Rig/Materials Handler
After being introduced to the wonder that is the Lego pneumatic system with sets like 8862 Backhoe, Universal Pneumatic Set and the Power Crane, this set raised the bar even further. 8868 was released in 1992 as the biggest set to that date.It was literally packed with pneumatics, featuring an electric air pump(no, the Unimog wasn't the first one to have this), working rotating claw with operator's cabin, and an engine of course. More on this in the conclusion of the review. It was 140$ on release according to Brickset, I paid 100$ for mine in excellent condition with box. The average used price on Bricklink is 100 as well.
The box
The box is the same size as last years 9397 Logging Truck, and the 8880 Super Car.
The front shows the main model, along with an explanation of how the compressor works.
The back shows the secondary model, which works along the ways of 8479 Bar Code Multi Sets main model. If you look at the bottom left image, the different steering angles for the front axles is indicated.
The inside shows the rest of the features of the main model, along with a schematic outline of the pneumatic circuit.
The parts
This was the first Technic set to include a motor and a battery box, other than the 9V Motor set and the Set=8064-1'>Universal Motor set from 1990. The Electric Plate is also present in this set. It was only seen in this and the Space Shuttle.
The tires is this set are the old 20x30 solid ones, and this is the only set that has got 6 of them. They sit on 20x30 rims. There are quite a few sets from the early days of Technic that uses these wheels, including 8862 Backhe Grader and 8848 Power Truck/Unimog.
Nearly all of the pneumatic parts in this set are new this year; the smaller cylinder and the pump are all introduced with this set. The only common part, set aside the tubing and t-pieces, is the switch and the Pneumatic cylinder(pump).
The turntable was present in no less than 4 sets this year, being a major improvement to its predecessor. There is also two differentials, and a Steering pulley to drive the compressor.
A weight brick is also provided, only seen in one other (Technic) set, the 8862 Backhoe. It weighs 55 grams.
These are Technic cylinders. They only serve aesthetic purposes in this set, but it is possible to upgrade the set with Air Tanks, availible as of 2008 with the 9641 Pneumatics Add-On Set. I didn't bother, because it'll cost me nearly 100 Euros. You can buy the tanks separately on Bricklink for about 7 Euros each.
Last, but not least, the triangle was introduced this year to the family of thin liftarms.
Well, on with building, starting with
A model: Claw Rig
The main model starts with the bottom of the chassis. The driveshaft connects with both the rear differentials. In a 6-wheeled vehicle, both rear axles needs a differential, since they turn at different speed through a sweeping turn. The diffs are mounted opposite ways, because of the connecting axle inbetween. Each diff holds 3 14t spur gears.
Two universal joints are used to extend the driveshaft to the front. Axle connectors hadn't been invented yet.
Here you can see the gears for the engine(24T), and the input axle for the steering(8T).
It's time to start with pneumatics. The first two cylinders rotates the crane assembly. The inlet of the first is routed to the outlet of the other, making them turn in the opposite direction of each other.
Still with me? I've labeled all the hoses to remember what color they are in the instructions. The next step will make it all easier.
Ta-dah! That black brick holds all the hoses in the right place, no more need of marking each one. The transparent tubing is the heart of the system, and runs to all the switches soon to be placed.
Here is a wonderful mechanic for you. The turntable in this model is actually pneumatic driven. As the two cylinders retract/expand, they push two gear racks which, in turn, rotates the center axle of the turntable. The switches are currently only held in place by the tubing underneath them. Some support will be built soon.
The hoses are carefully routed through the turntable. Further ahead you can see how the switches are held in place by modified plates.
A fake air tank is placed on each side. The transparent hose is the inlet hose for the pneumatic system.
The frame for the crane is built as a separate unit, then placed on the turntable. The big black brick in the back(left) is the counterweight.
When the crane chassis is placed, it's locked by a passing 12L axle, which goes through the axle and pin connector in the center of the turntable. It was hard to get a pic of this, so I had to up the contrast a bit.
The crane is starting to take shape. You can see the operators seat in the back, and the electric motor contacts (black 2x4 plate) along with the inlet hose in the front.
The operator's cabin is complete, and the compressor is taking shape.
Now the compressor is complete. The Universal Joint to the left leads to the HOG steering.
Nearly finished now, with the engine compartment and windshield forming. The crane boom is almost its full length. Rigid hoses with clips extends the tubing to the end.
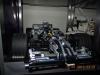
A V6 engine is fitted in the front boot, and the final piece of the boom is added. The claw utilizes a small cylinder to work. The sleeping unit of the cab is made out of bricks, and will also house the battery box later.
Speaking of battery box, here it is. The roof has been completed with a HOG light, signal horns and exhaust pipes.
The finished model looks stunning, and the functions work well too:
1) Mechanical 1: The two rear differentials drive the engine with fan.
2) Mechanical 2: Turning the trans-yellow HOG steers the truck.
3) Mechanical 3: Turning on the battery box drives the motor, and the compressor.
4) Pneumatic 1: Raising/lowering 1st arm section.
5) Pneumatic 2: Raising/lowering 2nd section of arm.
6) Pneumatic 3: Slewing by pushing the two gear racks underneath the turntable.
7) Pneumatic 4: Opening/closing claw.
When the crane is not in used, it can grab the rear bumper like this:
For additional playability, the truck is Technic fig compatible, and allows two in the cocpit and
one in the crane.
While testing it's strenght, I ended up grabbing a 8067 Mini Mobile Crane which it was able to lift, and stretch out. What amazing strenght! According to Brickset, the crane weighs 0,48 kgs.
That's it for the features, now let's take a look at the size, compared to
8446 Crane Truck:
8436 Truck:
That's it for the main model, moving on to the alternate:
B-model: Materials Handler
The secondary model also starts at the bottom, but it doesn't use the differential, making the drivetrain much simpler. The first cylinder is controlled by a switch at the right side. When I built this model, I realized how you have to cut the original tubing to fit. Glad I got some spare tubing from a previous order. Unfortunately this means the B-models trans tubing will be (mostly) of the grey kind.
The white thin liftarms here will attached to the rear axle later on. An electrical extension wire runs all the way along the chassis.
The compressor is made by using both rubber bands from the half-bush on the motor to a pulley wheel. An engine crankshaft piece is then fixed to the pulley, giving the pneumatic pump an input stroke of 1 stud .
Next is attaching the cylinders for the front boom's elevation. The rear end of the chassis is locked by two vertical bricks, and the 4 smooth grey 1x2 plates are positioned where the steering racks will go. I know this image looks confusing, but the main part is quite simple; The grey tubing connects to the compressor, and provides input to the two switches. The black tubes connects all the cylinders to their respective outputs.
Custom steering hubs are made for the two steered front axles.
The rear end of the chassis is reinforced by bricks, and the steering rack is finished. Because the 2nd axle's connection point is further from the wheelhub, is turns at a lower angle.
This contraption is attached to the control axle of the front pneumatic switch. It makes the switch turn when the motor has driven the mechanism to the end.
The front is reinforced by multiple vertical bricks. The vertical axle serves as a HOG.
The second long pneumatic hose will retract the front cylinders. Rather than having two "air tanks", this model combines four elements into one bigger, situated behind the drivers cabin.
The bed is nearly finished, and you can see the battery box where the sleep cabin normally would be.
Cab finished, moving on to the arm. The arm works similar to that of 8479 Barcode Multi-Set.
The claw is very simple, like the one of the main model. Two axles are joined with a set of 14T bevel gears, with an intermeshing 14T gear on each side. The claw's teeth are fixed at an angle on each axle. As either one of the axles turns, the claw is closed.
All done! The only feature is grabbing somehing, and tossing it in the bed, which doesn't tilt. This would be fixed in the next model, the 8479.
Comparison
8479:
8110:
The verdict
The main model works fantastic, looks almost like a real truck, and is as solid as a brick. The pneumatic functions are a joy to use, and this remains as my most played-with set to date. The only thing I missed was the in-cab steering wheel, but I don't think there would be any room for it.
The secondary model is somewhat of a letdown. It takes a lot of time to build, but doesn't have an engine, and lacks the number of functions the main model has. Still, it is a good looking truck, and the 4 wheel steering is a nice touch. Too bad you'll have to cut the tubing twice to make both models, but maybe pneumatic tubing was cheaper in 1992.
What a fantastic way of demonstrating the possibilities of the Lego pneumatic system! All the features are used in these two models, utilizing piston expansion as well as contraction to power different functions. The way the main models compressor is made is widely used by todays AFOLs. This set ranks among my top 10, and is certainly worth the 100 bucks I paid. I would even say it would be worth an Unimog on its own!
Thanks for reading/watching pics. As always, big pics are availible @ Brickshelf.