gbshuler Posted March 24, 2014 Posted March 24, 2014 Cabin Fever I need some help with my Technic Logo 42009 Mobile Crane MK II. I am working on the "cabin" section of the vehicle. I will refer to Book 4 (of 6) here. Everything is good through Step 17 on Page 8. Take a look at the tan bevel gear attached to the long black rod. At this point I am saying things are "good" because rotating the black rod with my fingers freely rotates the bevel gear - which, in-turn freely rotates the black spur gear. Excellent.. Moving on to Step 18 we make a separate assembly. The black "T" shaped piece will begin the problem. After mating the two assemblies (see below) the gears no longer turn without significant friction. I thought the problem would just go away so I proceeded. A few steps later, the black rod is now under so much pressure it tilts up significantly. Game over. I took it apart and retried assembly three times. I cannot figure out what I am doing wrong. Any ideas out there? Anyone else run into this? Thanks Brad Quote
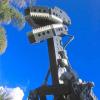
EvilEnderman Posted March 24, 2014 Posted March 24, 2014 (edited) It looks to me like you've left too much space between the tan gear and the 1/2 liftarm. I doubt it's as simple as pushing it up a bit, but that's all I can see from here really Hope this helps :) PS. Could you show us all some nice pics of the instruction booklet or something too? Perhaps some more angles on that picture? Edited March 24, 2014 by EvilEnderman Quote
Captainowie Posted March 24, 2014 Posted March 24, 2014 Make sure that the bracket that holds the troublesome gear is secure - it looks somewhat tilted. There is a tan 3/4 pin that holds it to the frame that's pinned to the turntable, but I can't see it in your picture - if it's there at all it's not properly seated. Quote
S.I Posted March 24, 2014 Posted March 24, 2014 It looks like the tan 1.5 pin is mounted backwards, or the bracket isn't pushed into the pin properly. That is offseting the bracket. Quote
gbshuler Posted March 24, 2014 Author Posted March 24, 2014 It looks to me like you've left too much space between the tan gear and the 1/2 liftarm. I doubt it's as simple as pushing it up a bit, but that's all I can see from here really Hope this helps :) PS. Could you show us all some nice pics of the instruction booklet or something too? Perhaps some more angles on that picture? I would love to show more pictures!. But how does one show multiple pictures here? I have several other pictures of the assembly, but was caught by the "100k total limit" for images. Do I put throwaway photos in a gallery? I tried linking to images in Flickr, but no luck. Thanks Quote
zux Posted March 24, 2014 Posted March 24, 2014 I would love to show more pictures!. But how does one show multiple pictures here? I have several other pictures of the assembly, but was caught by the "100k total limit" for images. Do I put throwaway photos in a gallery? I tried linking to images in Flickr, but no luck.Thanks Not sure what issue you have, but you could try posting just links to those pictures. Quote
gbshuler Posted March 24, 2014 Author Posted March 24, 2014 Not sure what issue you have, but you could try posting just links to those pictures. Well... In edit mode, clicking on ""Image" (insert image) prompts for a URL. I'll work something out.after I try some of the ideas here out. Quote
Lakop Posted March 24, 2014 Posted March 24, 2014 To me it looks like your small gear needs sliding back on the axle. It looks to be jammed. H Quote
Blakbird Posted March 24, 2014 Posted March 24, 2014 I would love to show more pictures!. But how does one show multiple pictures here? I have several other pictures of the assembly, but was caught by the "100k total limit" for images. Do I put throwaway photos in a gallery? I tried linking to images in Flickr, but no luck. Flickr works fine, but you can also use an image hosting service like Bricksafe. Remember that you have to link an image file (such as *.jpg) not a web page. Quote
gbshuler Posted March 25, 2014 Author Posted March 25, 2014 (edited) It looks like the tan 1.5 pin is mounted backwards, or the bracket isn't pushed into the pin properly. That is offseting the bracket. DING DING DING DING! GIve that CITIZEN a cigar. Reversing the tan pin solved the problem! The tan pin is added on Book 4, page 6, step 4. Thank you so much S.I.! Edited March 25, 2014 by gbshuler Quote
Recommended Posts
Join the conversation
You can post now and register later. If you have an account, sign in now to post with your account.