zephyr1934 Posted January 24, 2015 Posted January 24, 2015 My track arrived today, only got the the R104 loop together so far. Here's a shot with my 52 stud long Superliners. On normal track they are one car per quarter turn. A few more pictures will show up here when moderated. I am happy to say that I have decided to quit attempting to build my own custom track for this much nicer alternative (though that actually happened when the Kickstarter campaign was funded). Here are a few videos of the train going at full speed in the curves, video 1, video 2, video 3. She would go flying off of normal lego curves at two or three speeds lower than this and even then she would slow in the curves, but not here. Quote
legoman666 Posted January 24, 2015 Posted January 24, 2015 I received mine today too. Quick video: And some photos: (Major rearranging of my city going on) Overall pretty satisfied with the curves. Their clutch power isn't as strong as Lego, but seem to stay together once everything is in place. The beginning and end of the curves don't seem to want to stay attached to the baseplate. It's almost as if the radius of the curve is like 103.5 studs instead of 104. Also, my very first bag I opened of R104 had 17 inners and 15 outers. Still can't run my HE at full speed ;) Quote
Selander Posted January 25, 2015 Posted January 25, 2015 This might be a stupid question: -does one (1) bag/package of ME curves equals to a turn of 90deg or 180deg ? Quote
HoMa Posted January 25, 2015 Posted January 25, 2015 One bag is a half loop / 180 degrees. You will get per bag: R104 16 sections, 4 2x8 plates per section R88 16 sections, 3 2x8 plates per section R72 8 sections, 5 2x8 plates per section R56 8 sections, 4 2x8 plates per section (R40 8 sections ... this is the LEGO Standard) Quote
Legoboy22 Posted January 25, 2015 Posted January 25, 2015 Wow, ME Models did a great job making these turns. They are very practical. Yesterday on a tight turn I did not slow my HE down enough and then it blew of the tracks. After that I had some major rebuilding to do. Luckily I always keep the instructions for all my Lego sets. The way I resolve this issue is to raise the outer edge of the turn to balance the train on the tight turns. I would buy ME Models track but I insist on being a Lego purist so I wi stick with Lego track. Quote
Selander Posted January 25, 2015 Posted January 25, 2015 One bag is a half loop / 180 degrees. You will get per bag: R104 16 sections, 4 2x8 plates per section R88 16 sections, 3 2x8 plates per section R72 8 sections, 5 2x8 plates per section R56 8 sections, 4 2x8 plates per section (R40 8 sections ... this is the LEGO Standard) Thanks Holger ! I'll seriously consider buying R104 and R88. Quote
HoMa Posted January 25, 2015 Posted January 25, 2015 First pictures, movies and impressions ... Today I did my first tests on ME Models Plastic Rails in all 4 radii. I just set up 5 loops on the carpet including R104, R88, R72, R56 and R40 which is the LEGO standard curve. I did not balast the track. First of all, here some pictures: More pictures on http://www.brickshelf.com/cgi-bin/gallery.cgi?f=552359 (when moderated) and And check out some videos at youtube https://www.youtube.com/user/HoMasWorldOfBricks ---- First of all I am very happy that the gap between R40 LEGO curves and large curves made out of straights (http://www.holgermatthes.de/bricks/en/smooth-curves.php) now is filled with new options. If everything is set up, it works! Due to the fact that the ME rails do not come as single track element it takes a while to set up everything. Each section has some fixed points for the connectors and right in the middle there is a little elevation. At all other positions it it up to you, where you put you sleepers/ties. Each bag has enough 2x8 plates to set up a similar 2 studs gap to the next plate as we know it from the LEGO standard track. Each bag of curved track which you can purchase at www.me-models.com contains enough rails, connectors and 2x8 plates for a half loop (180°). Due to the different radii you will find different amount ouf section which are required to set up a 180° half loop: R104 – 16 sections – 4 2x8 plates per section R88 – 16 sections – 3 2x8 plates per section (the middle elevation underneath the rails can be used to adjust the centre plate) R72 – 8 sections – 5 2x8 plates per section (the middle elevation underneath the rails can be used to adjust the centre plate) R56 – 8 sections – 4 2x8 plates per section As mentioned before by some other user, the clutch power for the connectors of the R56 rails is not perfect. While connecting everything the rails seems to pop of the connetors and plates very easily. Setting it all up on the carpet could be come a night mare if you are not patient. While running the trains, no connection failed, which is good. Even without ballasting and just on the carpet. The other radii didn't have these problems, the just work fine, both setting up and running trains on them. Again be careful when moving a bunch of sections from the table down to the floor. The ABS seems to be smoother then LEGO ABS and accedently I droped some sections ... which needs a full rebuild. One little negative thing I have to mention is the quality of packing. I read other post complaining about missing rails. Lucky me, I haven't had a missing rail, I got one R72- Outer extra. But the amount of connetors and plates was not always correct. I the end it turned out that the bags for all 4 radii and each a full loop (8 bags in total) had a few connectors and one plate as left overs. ME, please make sure that peoble ordering just one or two bags get enough rails, connetors and plates. Or add two connetors and plates as extra in each bad. Connection with older metal rails I got from ME Models (from 2011) and standard LEGO 9V track pieces (I just used straight pieces only) works fine. Running trains works fine, as you can see in my videos at youtube https://www.youtube.com/user/HoMasWorldOfBricks A standard 6-wide train powered with one PF train motors can run at high speed all the time in all curves. I also tested some steamers which uses either Emerald Night LEGO spoked wheels or BigBenBricks train wheels. Power Function powered BigBenBrick wheels on smooth ME rails does not make a lot of grip and my BR 23 (with XL BBB wheels and a XL Power Function motor, http://www.holgermatthes.de/bricks/en/br23.php) could only pull a three heavy cars. I can assume that this configuration will not work if the trains wants to go uphill. My ICE 3 is still powered by 4 9V motors, so I had no option to run it on ME rails. But I wanted to see, how it looks like on the R104. See yourself on the picture above ... Now I need to convert my ICE 3 into PF (maybe using the SBrick for remote control) or I have to wait till ME Models makes all radii also in metal. Wouldn't this be nice? Both for the visual effect (rails are metal in real live ;-) and also to use the old 9V system with ME rails. But I am not complaining ... Rather then metal track I would love to see ME models making swithes/points which uses either the R104, R88, R72 and R56 radii for the outgoing track. Mike and Eric, thanks again making all this possible! Holger Quote
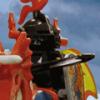
legoman666 Posted January 25, 2015 Posted January 25, 2015 (edited) For your enjoyment, my souped up Horizon Express running at full speed on some R104 track: Apologies for general crappiness of the video, it is difficult to hold the camera and control the train at the same time. I can still make it derail if I remove a couple of the cars. EDIT: scratch that, can still derail. The trailing loco is top heavy and likes to tip over occasionally. Ask me how I know.... Perhaps I can add some weights to lower the center of gravity. Edited January 25, 2015 by legoman666 Quote
Ex cinno Posted January 25, 2015 Posted January 25, 2015 Thank you for your great job: I like both photos and videos that I just watched. I think I'll buy some R88/R72 soon. Quote
HoMa Posted January 25, 2015 Posted January 25, 2015 Great to see your Horizon Express on R104! Questions: How is this train powered? How is it controlled? Using a smartphone and an app like SBrick? Do you have some more pics of the red arched bridge? Holger Quote
Aaron Posted January 25, 2015 Posted January 25, 2015 I hope some of my longer cars (85 studs) at least function on R104s. I guess I'll find out soon enough. Quote
legoman666 Posted January 25, 2015 Posted January 25, 2015 Great to see your Horizon Express on R104! Questions: How is this train powered? How is it controlled? Using a smartphone and an app like SBrick? Do you have some more pics of the red arched bridge? Holger The first car trailing the leading locomotive has custom steel wheels that pick up 24V from the track (only the straights are powered). There is a DC-DC converter to output 10.8V to a homemade Bluetooth motor controller that is powering two PF train motors. Additionally, there are 2 AAA battery packs connected in parallel that provide the juice when there is no track power. Batteries are protected by a diode, and power from the track is rectified. So the motor controller gets 10.8V no matter what. It is indeed controlled by an android app. More details about the Bluetooth controller here: http://www.eurobricks.com/forum/index.php?showtopic=87340 More pictures of the bridge here, although they are old: http://www.eurobricks.com/forum/index.php?showtopic=97760 Quote
SavaTheAggie Posted January 25, 2015 Author Posted January 25, 2015 Yesterday Texas Brick Railroad set up a display at CreekCon 2015. We fielded a fully ballasted ME Models corner with R104s and R88s. After running all day we had several accidents, but we were running without stanchions so several of those accidents were kid-related. Trains that were run consisted of: Emerald Night (with additional coaches - not in the video) The Princess Train (light weight, one motor) TSRR #500 (rigid frame, medium load) Daylight #4449 (fast passenger train) Allegheny (ultra heavyweight train pulling huge load) The rails performed extremely well. After an entire day of constant use, the rails did not shift, budge, or break. We could notice no additional friction, loss of traction, or any issues with the transition between official rails (Ed said the transition felt no different than going through a switch or a rough connection between two pieces of track). The ME Models directly caused one accident with the #4449. We have to keep her from running at top speed because she'll derail through LEGO's turns. I typically run her right at the edge just before she's running too fast. Well, the ME Models rails weren't slowing her down like the standard LEGO curves do, so after existing a LEGO curve she began to accelerate sooner than expected, inside the ME Curve, so by the time she reached the next LEGO curve she flopped over quite spectacularly. All said the members of TBRR were thoroughly impressed. On a personal note I will begin completely phasing out the official LEGO curves in lieu of the ME Models curves. --Tony Quote
Cale Posted January 26, 2015 Posted January 26, 2015 Yesterday Texas Brick Railroad set up a display at CreekCon 2015. We fielded a fully ballasted ME Models corner with R104s and R88s. After running all day we had several accidents, but we were running without stanchions so several of those accidents were kid-related. Trains that were run consisted of: Emerald Night (with additional coaches - not in the video) The Princess Train (light weight, one motor) TSRR #500 (rigid frame, medium load) Daylight #4449 (fast passenger train) Allegheny (ultra heavyweight train pulling huge load) The rails performed extremely well. After an entire day of constant use, the rails did not shift, budge, or break. We could notice no additional friction, loss of traction, or any issues with the transition between official rails (Ed said the transition felt no different than going through a switch or a rough connection between two pieces of track). The ME Models directly caused one accident with the #4449. We have to keep her from running at top speed because she'll derail through LEGO's turns. I typically run her right at the edge just before she's running too fast. Well, the ME Models rails weren't slowing her down like the standard LEGO curves do, so after existing a LEGO curve she began to accelerate sooner than expected, inside the ME Curve, so by the time she reached the next LEGO curve she flopped over quite spectacularly. All said the members of TBRR were thoroughly impressed. On a personal note I will begin completely phasing out the official LEGO curves in lieu of the ME Models curves. --Tony I'm happy to here of the good performance so far. Looking forward to getting my hands on the new rails. I already have plans of how PennLUG can integrate them into our layout. Cale Quote
Recommended Posts
Join the conversation
You can post now and register later. If you have an account, sign in now to post with your account.