

nickjan
-
Posts
10 -
Joined
-
Last visited
About nickjan

- Birthday 12/07/1983
Recent Profile Visitors
940 profile views
-
Since the ucs gunship is not in minifig scale I tried my hand at moccing some figures. the result is cody, an airborne trooper and clone trooper. also part of the moc design I used for two clone pilots in the cockpit. just to share https://www.deviantart.com/nickjan01/gallery/81340664/lego-212th-troopers
-
This is an overview of the minifigs that will make up my roman army, that is being raised. As it stands now, it has enlisted centurions, praetorians an optio and an emperor, accompanied by some legionairs. Here is a line up of the different member types. The standard bearers, horn blowers are in the making and the emperor and the praetorian guard's backs also need to be finished. The Army is assembled from series 10 collectible minifigure and brickwarrior accessories, hand/brush painted emperor and general centurion with brass cuirass legionair optio front; I intentionally gave it crooked paint to resemble old leather breastplate praetorian centurion with a metallic painted and goldwashed cuirass praetorian guardsmen; left with fully covering paint and the right one with two washes over a white surface praetorian legionair
-
Thank you for the great compliment. I am not experienced on painting lego as this was my second and I m just trying out the different techniques I find on internet. nonetheless, what I ve learned sofar, I ll share happily. First off I switched from oil based paint to waterbased acryllic from Tamiya. I found it to be more cohesive and thus I am able to get a smoother coverage (eventhough I don't have an airbrush). The second is getting the colour right. There are several available, but even the ones that seem right may have to be altered. Also you can choose between gloss and flat (this is a peronal preference) This is quite easy, but depends on what ground layer/base colour you use. Personally i first make the object grey, black or white. logically the darker the base colour, the more darker tone the second layer will have. (if your object is already red and you just want to alter the red, this is not required with acryllic paint). Once you have the correct base colour you can mix you paint with a bit of black or white (depending on whether you want a darker or lighter red). be careful not to use too much or it ll ruin the mix. I would advise to test the colour on a piece with the same base colour that you are not using. Also make sure to mix it in sufficient quantity, since you ll never get the exact same mix twice. Once the colour is right, the painting itself starts. Use minimum amounts of paint on your brush, so that you can create a smooth surface. it is preferable to paint two thin layers (allowing the first layer to dry before applying the second one) rather than one thick layer. (In my latest figure I used too much for a dust effect and had a hard time correcting it and still didn't manage to completely undo my mistake.) if you just want to colour a basic colour for the brick this is sufficient. After this you might want to finish it off with clear paint (also available in gloss or flat) for better protection of the paint. If you do, make sure you use oil based for oil based paint and acryllic for acryllic paint. This is my limited experience, hopefully it is helpful and maybe others with more experience can add to this. Also I only have traditional brushes and no airbrush, so as for airbrush techniques I am not able to help you. good luck
-
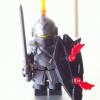
Little experiment using weathering techniques. The armor came out a little overdone, as I used too much pain for the drybrush, but for me the second attempt (helmet) came out ok. Quite difficult getting all the details right with just a brush. If anybody can give me tips on weathering with a brush, I d much appreciate it. Theme for this one was a first generation space marine, with minimum weaponry and bulky equipment.
-
My second painted minifig. This time I tried to layer the paint, especially on the armor. First I applied a grey layer, second a gunmetal layer. then two black washes, one red wash and I finished with one more gunmetal on the shoulders for extra contrast. the picture is also a link to m mocpage, where I have all my pics.
-
This is my first painted minifig custom, using bickwarrior weapons and a lego cape. This was just a basic paint job. Next one I am planning to try out some weathering or battle damage painting, but I have to google on how to do that first.
-
BrickWarriors - New City Watch Items
nickjan replied to Thrash's topic in Minifig Customisation Workshop
I also loved these parts. picked some up, while I was ordering the lorica segmentata for my roman army (hopefully sometime soon MOC). I did'nt get the helmets, but used other ones (lego and brickwarrior alike) to create some heavy infantry instead of city watch. The halberd is also very beautiful, but a bit too short for the orcs. I find the lego halberds more appropriate. Especially when forming the wall against the horses coming from the mountain at helm's deep. The brickwarrior sarissa spear has the better length for that also. -
Took some headaches, but after finding out Flickr link doesn't work and mocpages via a workaround, finally a descent picture with an emedded link.
-
the photo was just for some visual. I added a link to the Flickr page with the better pics, since I can't seem to get the pictures inside the 100k limit. The one posted now is almost 100k. Guess there is some peium account required for more upload?
-
This is my first attempt at a castle moc. Tried to use some techniques I spotted in the various posts, but was very much restricted by the parts I had available.Any comments or tips would be great, so for future moc's I can order some specific parts and try out different building techniques.I added a link to my flickr account for better pics, because of the size limit.