

fredrigl
-
Posts
8 -
Joined
-
Last visited
About fredrigl

-
MOC: RC 4x4 Skid Steer Loader
fredrigl replied to fredrigl's topic in LEGO Technic, Mindstorms, Model Team and Scale Modeling
Thanks for the comments. The instructions are not as clear as in the LEGO models you can buy in the shops, but by looking at several of the images, it should be possible to recreate it. -
MOC: RC 4x4 Skid Steer Loader
fredrigl replied to fredrigl's topic in LEGO Technic, Mindstorms, Model Team and Scale Modeling
I have described the model in this blog post: http://lego-technique.blogspot.no/ -
MOC: RC 4x4 Skid Steer Loader
fredrigl replied to fredrigl's topic in LEGO Technic, Mindstorms, Model Team and Scale Modeling
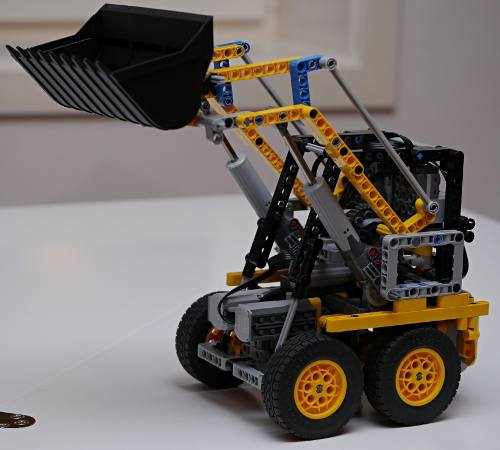
Thanks for your comments. This model was built and refined over a period of one year, although only with some handful of hours per month. The transmission was fairly easy to finish, but getting the boom/tilt geometry correct took a lot of trial and error. It's still not perfect, I would have preferred that it tilted further backwards in the lower boom position. But it works quite well. The connection between the chassis and the superstructure also took some refinement. It needs to be solid, and well integrated with the transmission and boom/tilt mechanisms, to avoid a too large footprint. Also, the weight balance was a challenge. Originally, I wanted to place the battery box further back, but the vehicle would tip backwards when accelerating. Hence, both the drive motors and the battery box were put as far forward as possible. -
It uses the electronics and actuators from 8043, and the wheels from 8264. Here is a video which explains how it works, with some basic instructions: This model was built and refined over a period of one year, although only with some handful of hours per month. The transmission was fairly easy to finish, but getting the boom/tilt geometry correct took a lot of trial and error. It's still not perfect, I would have preferred that it tilted further backwards in the lower boom position. But it works quite well. The connection between the chassis and the superstructure also took some refinement. It needs to be solid, and well integrated with the transmission and boom/tilt mechanisms, to avoid a too large footprint. Also, the weight balance was a challenge. Originally, I wanted to place the battery box further back, but the vehicle would tip backwards when accelerating. Hence, both the drive motors and the battery box were put as far forward as possible.
-
MOC: Skid Steer Loader
fredrigl replied to fredrigl's topic in LEGO Technic, Mindstorms, Model Team and Scale Modeling
Aha! So someone did see my YouTube video and made a post on Eurobricks about it. That was very flattering, I have to say. -
MOC: Skid Steer Loader
fredrigl replied to fredrigl's topic in LEGO Technic, Mindstorms, Model Team and Scale Modeling
That's an interesting comment! I have had several unfinished versions of it available on my YouTube account. And I uploaded the video about one week before posting in this forum. So it may well be that you've seen it already. -
MOC: Skid Steer Loader
fredrigl replied to fredrigl's topic in LEGO Technic, Mindstorms, Model Team and Scale Modeling
Thanks for your comments. I don't have a very large upload quota, but I have compressed these two images to include them: <IMG SRC="http://www.eurobricks.com/forum/uploads/monthly_12_2011/post-23551-132497072335.jpg"> <IMG SRC="http://www.eurobricks.com/forum/uploads/monthly_12_2011/post-23551-13249709255.jpg">
-
I thought a skid steer loader would be a nice MOC to build based on the 8043 electronic parts. It can be made to steer quickly, and with rubber wheels, there's no skidding on normal surfaces. Unlike the 8043 tracks. For me, it was important to have the bucket level while lifting. This made the boom construction extra challenging, as I needed an extra linkage. Many days of tinkering went into fine tuning boom/tipper mechanism. Here is a video demonstration: