gheneli
-
Posts
10 -
Joined
-
Last visited
Content Type
Profiles
Forums
Gallery
Everything posted by gheneli
-
 I mean, if we're talking about a display model like the P1, compared to a bike, what else does it have? Steering, suspension, a gearbox, this is basic and both have them, then the opening doors (I guess... which a bike doesn't have) and the raising spoiler, which is nice, sure, but nothing crazy complex. So, I'd say both of these are meant to do well on display and most points go to esthetics. The P1 gearbox is a lot more complex that anything you'd be able to put on a bike, true, but for me, it feels pointless, especially when you have no idea what gear you're in, not to mention it jams sometimes and fails to shift, and on top of all that it takes a lot of space and limits the details you can add to the engine. And, damn, that's a beautiful looking engine on a P1. I'm especially referring to that godawful way of representing the gold pipes using those sloped bricks, damn I was super disappointed when I saw that. The big 2x2 round elbow pieces would've been fantastic for those pipes, but I guess there was no room because of all the crazy gearbox taking up all the space. I understand some people like to build crazy mechanisms that don't do much in the end, but if you're building a display piece and you sacrifice important details from the engine just to put on a gearbox nobody is gonna use more than once, it just feels weird to me. At least on my chopper bike you can see the 2 different chains move at different speeds, it's a joy to go shift gears and see how the chain changes move speeds. I think that's what we're missing nowadays, be able to see the mechanisms in action, see the pistons moving, not cover them like they do in some sets, the G Wagon, for example. As I was saying above, I don't think you expect a high number of complex functions from a set like the P1 (except for the crazy gearbox - even though it COULD'VE HAD adjustable suspension, which would've been really cool to see when going into race mode the spoiler raising and ride height lowering), or Ford GT / GT40? Or even the Rexy set, it has the integrated jacks, but that's about it, not even a simple gearbox. So then why is a motorcycle viewed as less interesting or having less expectations from it? And then, if you're comparing a utility vehicle, like a crane (that has a crazy amount of movable parts and functions) to a display set like a racecar, I don't think that's a fair comparison, these should be into different categories. Yeah, that's a corporation for you, always playing it safe because they have to go for profit first. Seeing they're releasing yet another Technic F1 set is super disappointing to me. Also, that orange recolor for the tuxedo cat, how lazy can you get? That's why I think we need more good MOC designers, to compensate for what TLG is afraid of doing. Yeah, I realized I'd never be happy if I didn't share my designs and just built them for myself. Sharing seems to be a very important part. And yes, I'm probably gonna do the same, I'd absolutely hate designing something just because it's a trend now. Actually, I'd probably even go the opposite way of what the trend is. We're missing a lot of vehicle types, and I'd love to fill that gap, like a backhoe for instance, I haven't seen one from Lego in ages, except for that 10$ mini set, which I can't really count in. Happy to hear! I lowered the price as well, since I don't think I'm gonna become a millionaire yet from selling these, haha, but I don't want to give them away completely free either, since I have a belief that people don't usually appreciate free things and take them for granted. If you build it, I hope you enjoy the process and hope you can share your thoughts here, what you liked / didn't like about it. I noticed that, too. I rarely get any comments related to the building technique or a certain part usage outside of EB, only the usual "great job!" types. I'm actually pleasantly surprised by the interactions happening here.
 -
Yes, I know it was a bold decision to take this risk, but it was based on the stuff I saw around, being built by the community. And I saw a huge room for improvement. Even some official sets lack the proper design quality, like the Technic Bugatti Bolide or the Toyota Supra, two of the worst sets in existence, in my opinion. I've actually built the Bolide and the building process is also pretty bad, especially when you want to take it apart. And yes, I know that AMG GTR MOC is a very popular build, I believe even stolen and sold on Chinese websites. But you can't possibly say that design is the best Lego can offer. No offense to the designer, but that's average at best. Even the CaDA GT3 is too busy for my tastes, too many parts cluttered in the front end design, for example. If I can give credit to TLG for something, it's for designing (most of the times) very clean shapes and good flow between parts / panels. You rarely see clutter in TLG designs. The goal is to recreate the required shapes with as few parts as possible, not stack 100 parts just to make sure your shape is 100% accurate. So, if you design stuff for a living, you can definitely recognize that TLG actually know what they're doing. Compared to a lot of the MOCs out there, which are a clutter fest. I realized that for me, it's pretty pointless if I don't show my designs. And not only show, but get people to experience building them. I think the building process represents more than half of the whole experience and it's a pity if people don't get the opportunity to build it and just see it in a picture. Thank you! I'd be super happy if people would understand the building techniques used, and why everything works, for example the Harley chopper frame, because everything lines up perfectly, it's not forcing any parts together like I've seen in so many MOCs. What I find funny is that even reviewers like RacingBrick on YT are now EXPECTING MOC-ers to FIX the problems that the sets might arrive with. Wouldn't it be better for TLG to do their job properly? But I think the most annoying issue for me is the plastic quality, which has dropped significantly. I'm literally scared of manipulating some of the parts because I fear they could break at any moment, especially the half-beams with axle holes on each end. Those constantly break and become unusable, yet I haven't seen TLG come up with any sort of redesign / reinforcement solution. I've even had sets built and left on the shelf for display, and a few months later when I tried to disassemble them, the parts literally came out broken, so they actually break while being connected on the model, which is absolutely insane to me.
-
Thanks! Yeah, that was a project I actually wanted to see displayed on my desk. Maybe I'll finish it as a passion project. Yeah, something tells me it's not that easy. Also, the limitations the official designers work with are pretty scary. Yeah, I didn't imagine I'd make crazy money, but I didn't think it would be pennies either. I don't know anyone working for Lego, but I imagine it's pretty sad, after all, it's a corporation that doesn't care what customers think (see how many people ask for wider rear tires and they simply ignore it and keep doing what they do) Now they said people asked for an orange cat (allegedly, because I'm not exactly sure who they're asking) and they're re-releasing the same tuxedo cat set but in orange. If that's not disrespecting the customers, I don't know what is. Someone commented on a post saying "I'd be ashamed to come in and have to do a presentation for that" Anyway, thanks for your feedback, I'll probably go back to doing my job thing, forget about getting any revenue from Lego, and just do it for myself. I'd probably be fine with the outcome I got if I didn't need to pay bills. Yeah, I think you're talking about your Corvette ZR1, I've seen that one. I can't imagine working on such a big model while also being limited by the existing parts of a certain Lego set. That's crazy to me and you have my respect for that. I'll never be able to design something I'm not passionate about, because I go all in with all the details and research, and I think you truly need to see it differently in order to perfectly capture the essence of the subject. Yeah, I've always asked myself what would I build if I had a passive income and didn't need to worry about getting some money out of these. Because most of these models I'm building mainly because I think they'd be popular. I think maybe the Chopper was the most balanced project: simple, not too many parts, not too much time spent on it, looks good, has some cool functions and it feels very nice on display. We'll see, maybe I'll manage to properly answer that question one day, because "why am I doing this?" seems to be something I often ask myself. The only answer I can think of right now is I want to introduce some quality models to the community, raise the bar if possible. But if people are not interested, my goal is suddenly pointless. Oh yeah, I totally hate B models, I'd hate myself constantly if I had to design any of those. Lego itself has a ton of limitations, I can't imagine adding to those limitations even more by having to use just some specific parts, and, basically, doing it only because people find it too difficult to order some parts online. I also feel like many of the B models are just parts slapped in randomly just to create yet another build from the same set. Very few of them look decent, even fewer are exceptional models that are at least the same quality as the main set and that I'd actually want to build. So, do I think we need more quantity of building material? No. As I said above, my goal was to bring some more quality to the community, try to raise the bar, and I think it's really hard to do that if you limit yourself further by sticking to the specific set parts. I totally get that people don't want to make an effort to acquire the parts when they're not passionate about a certain model or they don't find it appealing (I mean, I'd feel the same), but saying you'd rather build an average or even ugly B-model, rather than building a full-fledged and carefully designed stand-alone model, just because you already have the parts at home and you don't have to spend the time ordering parts is quite hard for me to understand. So I'm thinking maybe some people are simply happy to build a model just for the action of putting parts together, it seems it doesn't matter what comes out of it. At least that's my impression. Probably why B models in general are more popular.
-
I'm happy you found it useful! Yeah, I don't think it's about actually owning a chopper in order to enjoy a Lego toy that sits on your shelf. I've never ridden one and I don't care about the ride position, comfort or how much money it costs. All I care is it's an amazing build, it looks good on my shelf and has interesting functions to show when friends come over. On top of that, it's a 650 piece build, and the only actual rare part is the rear tire + rear wheels so I call that pretty accessible, price wise. I tried optimizing the part lots, so I don't use different color parts unnecessarily. I don't really get this "it's too niche for people to be interested" thing. I'd be interested in many things that are well designed out of Lego, even Creator, and I'm not a Creator designer. I bought the medium size Millennium Falcon because I thought it looks really cool for display. I'd buy tanks, fighter jets, all sorts of bikes. That doesn't mean I have to own or drive a tank, or pilot a jet to be able to enjoy a beautiful piece of design and engineering. That's probably what drives me to design Lego, the human ingenuity behind some of the existing vehicles. That's what we should appreciate first, in my opinion.
-
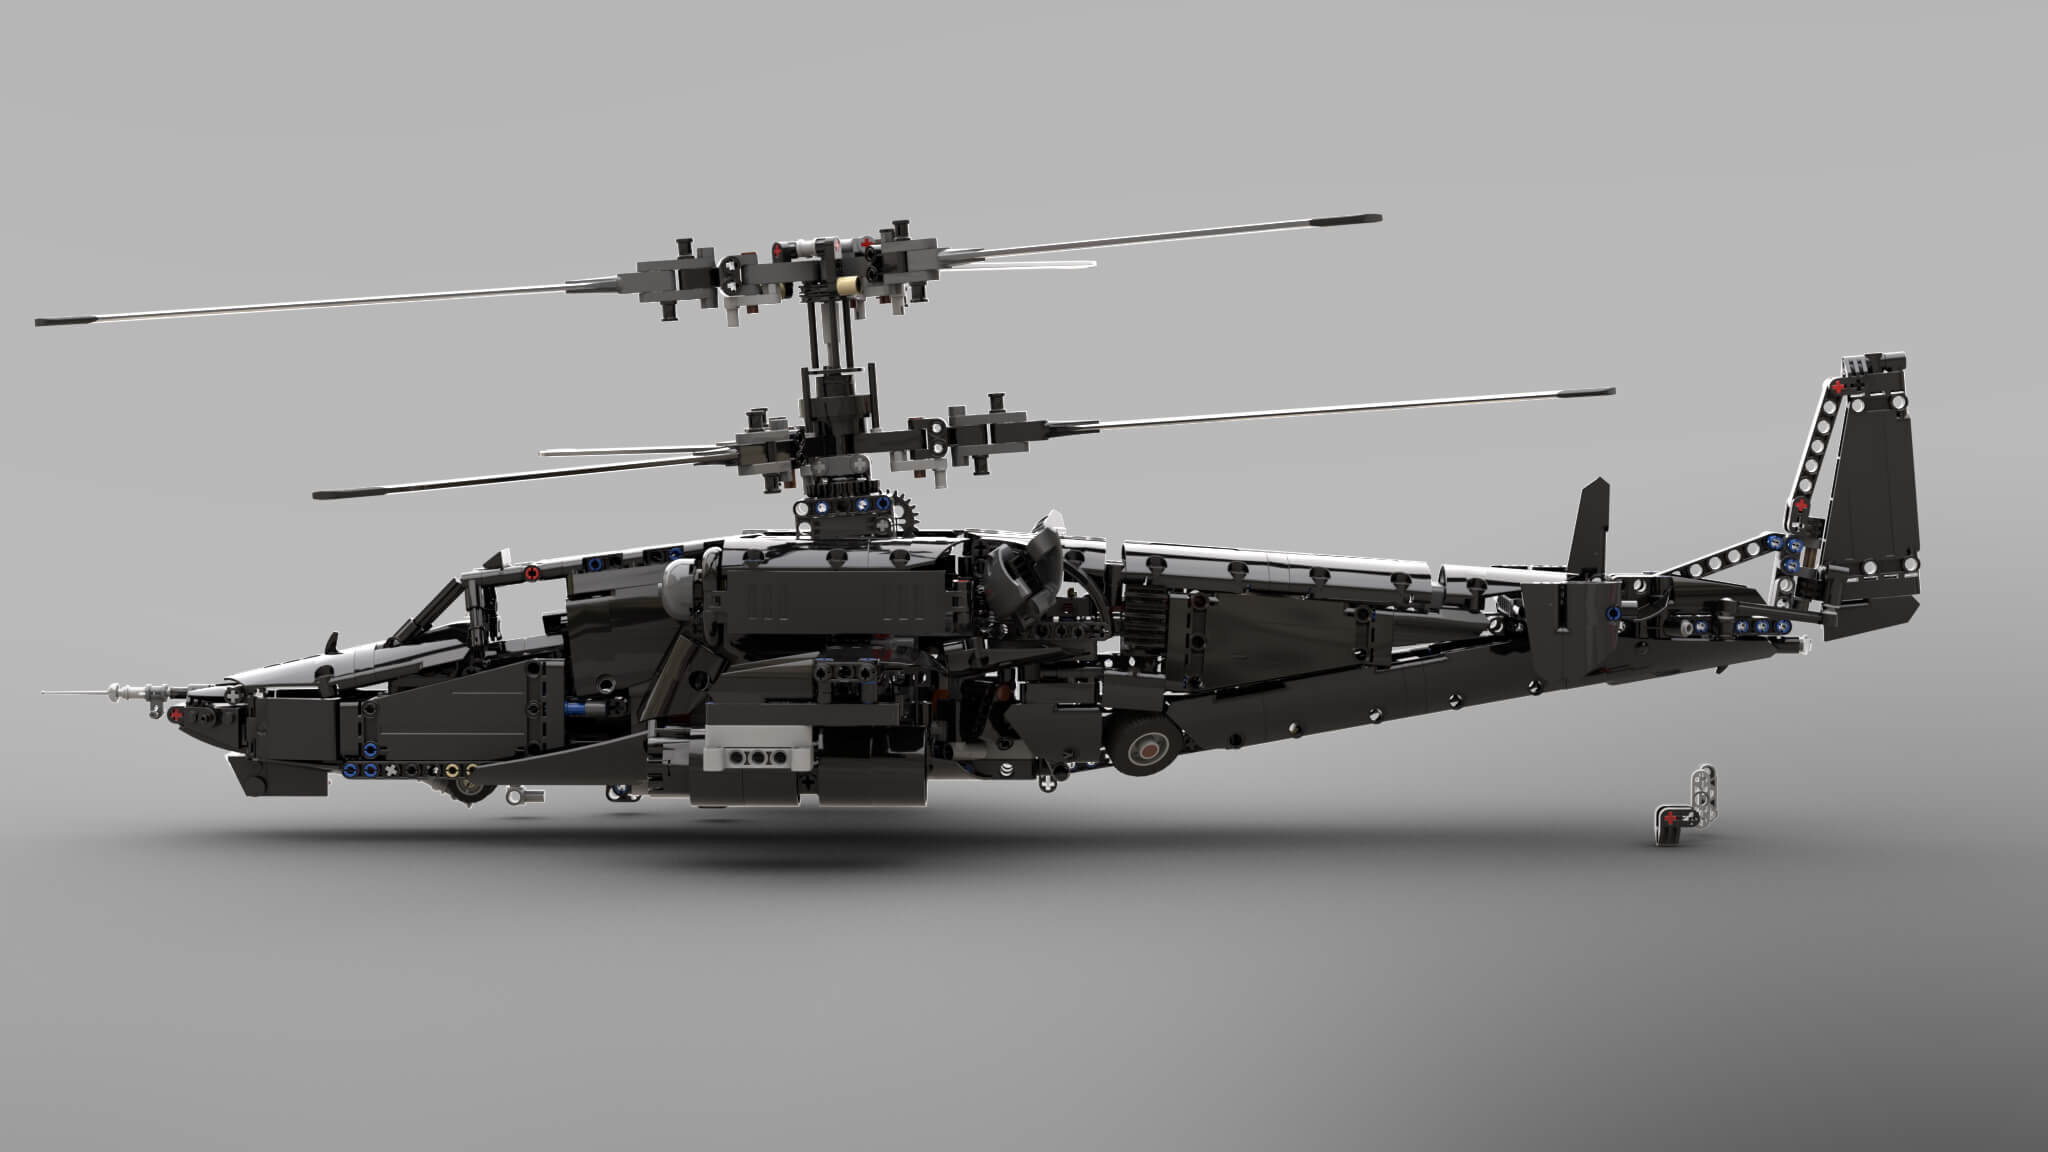
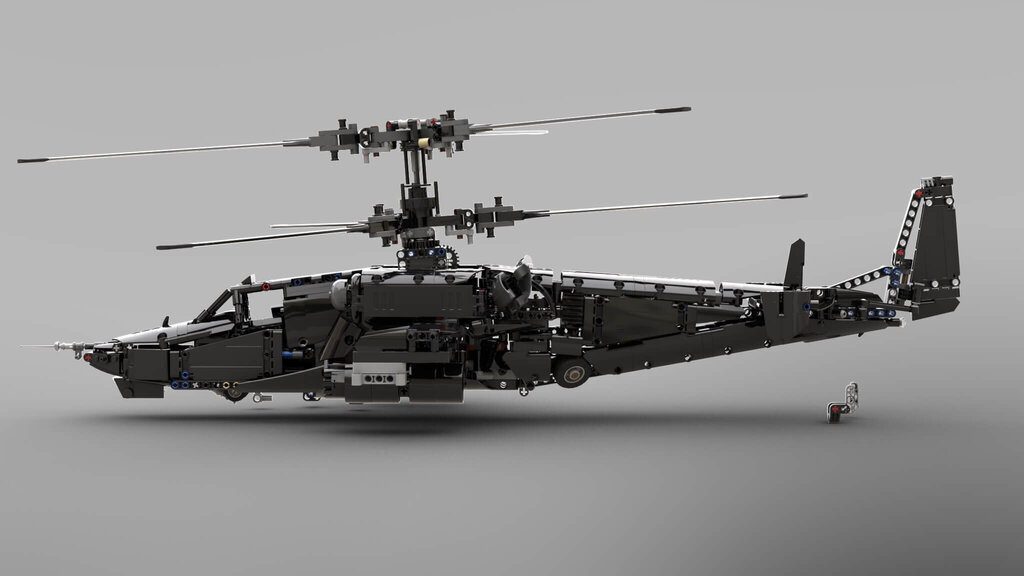
I could barely sleep last night, because of all the frustration. To start from the beginning, I've spent 2 years learning how to design Technic, studying the techniques from official sets, learning about structure, how to make sturdy builds. All that while having a creative day job that consumed almost all my mental energy. Sure, knowing all the design rules, knowing how things should flow and having all the experience from working with designing stuff on my day job actually helps me come up with even better designs, at least in theory. That was my initial thought, so I've managed to put some money aside and stop taking any paid projects for almost a year, and decided I'm gonna focus on designing Technic full-time. I thought if I design something that stands out, I could maybe get enough money to at least pay the bills, if not to cover what I've spent on buying parts for my MOCs. In almost 12 months, I managed to finalize my Nascar Camaro, which was an incredibly complicated design and building the 500-page instructions PDF took 3 months, because I also had to figure out how to work with Studio instruction maker, edit almost all the pages in Photoshop, add as many arrows as possible (maybe even more than official instructions), secondary views etc. Then another 2 months spent on designing the Harley chopper, which is a very dear project to me, I consider it absolutely flawless, within the limitations of Lego, of course. Looking at it now, there's absolutely nothing I would change, or want to improve. I absolutely love how it looks on my shelf. I imagine this is pretty much the quality of an official Lego set when it reaches production stage. Tried to promote these everywhere, Facebook groups, Reddit, here on the forums, told everyone about it, even tried to boost posts on Instagram. And after all this work, after carefully considered the tiniest of details, my reward is around 20 bucks, in 2 months. I really wish I could pay my bills with 20$. So yeah, this pretty much feels pointless, all the effort, all the time spent, all the frustrations that come with working in Bricklink Studio, the lost files, the starting over, the limitations of the Lego parts, the money spent on buying parts to test the builds. Everyone is like "oh, that looks really cool, but I'm not interested" Great! So without further ado, I've decided I'm gonna dump here all the current work-in-progress projects I have, that will probably never be finalized, or they'll take a few more years, because I don't have a passive income to be able to focus all my energy into building Lego everyday, even thought I'd love to. I hope you enjoy! Lancia Delta S4 - 1:12 scale Kamov Ka-50 Attack Helicopter - 2 motorized functions, landing gear and coaxial rotor. - manual functions include a lever for moving the machinegun up-down / left-right, and a lever for turning the rudder BMW S1000R (naked version) 1:5 scale Mercedes DTM (2014) 1:10 scale - probably my favorite Would've probably been the first MOC released, but I had a very frustrating time trying to design the cantilever suspensions at this scale. Also tried using the big shock absorbers from the P1 and they're simply too strong for such a compact mechanism. AMG GT Black Series - 1:8 scale
-
42228 McLaren F1
gheneli replied to Auroralampinen's topic in LEGO Technic, Mindstorms, Model Team and Scale Modeling
Another F1? Really? I imagined people had enough of F1 cars last year, both in Technic and Creator / Icons... Have they really run out of ideas? -
This is a 1:8 scale custom Harley CHOPPER (motorcycle) It features a visually impactful 2-speed gearbox, using two chains (gold and black) that move at different speeds depending on the selected gear, all while being connected using a shared (yellow) axle. This is very close to how a real Harley transmission works, and it was the main thing that made me design this bike in the first place, as I haven't seen anyone use this type of dual-chain gearbox before. The gear selector uses the old style switch, so it doesn't require a 90 degree rotation to shift, as is the case with the relatively recent Lego bikes (such as the 1:8 scale Ducati or Kawasaki sets), making it more accurate to how the real bike shifts gears. I also think it's pretty annoying, visually, to have the lever turn 90 degree for shifting, so I'm pretty happy with this one. The shifter also works perfectly fine 100% of the time, after I switched the old style tow ball + connector assembly with the new style connector. For some reason, it seems to have more grip and more force to shift properly. The old one would fail sometimes, being unable to shift, no matter how much you pull the lever. Gear ratio: 1st GEAR (down) - 1:1.6 - gold chain moves 1.6 times faster than the black chain N (middle) - gold chain doesn't move 2nd GEAR (up) - 1:1 - gold chain moves at the same speed as the black chain The second feature I'm proud of is the suspension. And, while the springer fork (front) shouldn't feel like such an outstanding achievement, the rear pullrod system certainly is. The modern chopper designs tend to hide their rear shock absorber to replicate the classic rigid / hard tail style bikes, while offering the comfort of a modern bike. Initially, the idea was to use a simple hard spring under the seat, but I couldn't properly fit it, so I ended up positioning it under the frame. That came with a problem, because now that the suspension assembly is underneath, it has to pull the spring, not push it. So, I had to design a whole pullrod system. I'm using a wishbone from the 2025 Technic Formula 1 sets to connect the swingarms to the spring assembly, and I'm very happy with the final results. I think it has a very clean, satisfying look. The real difficulty came from the fact that I wanted the swingarms in a perfectly horizontal position when in neutral, mainly because the pivot attaching to the frame could not move too far, because it was positioned just one stud away from the frame, so I had to position it vertically, to make sure I could get full range of motion from it. This position was made difficult by the design of the spring itself, which is 6,5 long, for some reason still unknown to me. That meant I had to attach the spring at a half-stud on the rear side, so that it wouldn't be forced to stay half-stud compressed at all times (because I really believe keeping the spring compressed at all times will eventually damage its range). I can tell from experience that designing a strong half-stud attachment is quite hard, especially in a tight place. So, the solution came with the engine block connector. Imagine my satisfaction when I realized I could use a single connector to solve my half-stud issue, while also helping make the frame sturdy because of all the attachment points this connector has available. The third and the most fun challenge was solving the frame geometry. I wend crazy with this one, as every single attachment point on this frame is a strong, sturdy one. None of the parts can rotate or move once attached to the frame. I especially wanted to use those links in the front (the A pillar links from the P1 set) as, again, I haven't seen any chopper design use those, and it's a pity because they're absolutely perfectly creating the iconic triangular front supports. The only problem was fitting them in the right position. Below you get to see my thought process when designing the frame geometry. Basically, starting with the Pythagorean triangle rule and extending from there. See how you can combine multiple triangles of various sizes. Either that, or the mirrored triangles principle. This below is not the final version, but an older frame prototype. Still, the applied principle remains the same. The rest of the features include: ~50 degree turning / steering radius V-Twin engine with working pistons brake disks with calipers and front brake cable simulated brake pedal using rubber connector (right side) indicated ignition switch, oil tank, oil radiator, air filter and ignition coil with sparkplug cables (which you can't see here because I'm still missing 2 antenna pieces) kickstand Instructions are available on Rebrickable Thank you for reading till the end! If you like this design, I'd appreciate a share! It seems very few people engage beyond a generic comment nowadays.
-
Thank you! Yes, I was amazed myself to see how many details I was able to incorporate. The downside is that the part count stacks up and the costs of building it increase. I can't really argue with that. I also noticed some weird angle deformations in my photos and it's probably because of the camera lens. I don't have any professional equipment and it's probably the first time I had to photograph a product for a presentation. As for the renders, I'm using Bricklink Studio, which is not exactly rich in options when it comes to lighting and such. Without heavy editing, you can't really get anything nice in Studio. I wanted to try Mecabricks but when I imported my model from Studio, I had a ton of missing parts and it seemed too much of a struggle. Thank you! Thank you! I was eager to share all the info I've learned throughout my countless hours of research. I'm really happy you found it interesting! Thank you! Yes, hopefully I can get more color options for the panels as well (a green Porsche is coming next year, maybe that will add more color options) and hopefully manage to get some stickers designed. I've seen many people have so much trouble with matching the part colors, so, at least for the moment, the stickers part gives me anxiety. Thanks! Thanks! I appreciate it!
-
This MOC was designed mainly as a display model. I started with the intention of designing a livery for it and creating stickers, but that turned out to be quite a handful. If anyone here is more experienced with stickers and is willing to collaborate on a livery design for this car, let me know. This design started back in 2023, it was one of my early projects when I decided I'm gonna focus on learning how to design Lego Technic. I knew this once I realized I've always been more excited to design my own things rather than building sets or other people's MOCs. Unfortunately, back then I could only work on my Lego projects in my spare time, as I had to work full time, but in the last 6 months, I've been able to take a break from other projects and fully focus on finishing a Lego design. So this Camaro happened to be the first of many. I'm also a big fan of compact builds, utilizing as much of the available model space as cleverly as possible (a good example of that is the 42209 Volvo L120 Electric Wheel Loader), as I love displaying them around my apartment and I find 1:8 scale cars ridiculously big, so you'll probably see a lot of medium sized designs from me in the future. Still, that doesn't mean I will never release a 1:8 car. But today is all about this NASCAR Camaro ZL1, so I will do my best to present every single feature here. Enjoy! PROPORTIONS The most challenging part on the profile of the car was, of course, matching the side window and roof angle. The roof starts in the front a bit more curved upwards (and taller) than the street car version, so the curved panels work very well here and also help connect the sun strip flawlessly, without any gap. To match the proportion and height of the side window, I had to lower the top of it by half a stud, since leaving the window line at the same level as the roof didn't feel quite right. Below you can see how the panels connect to form the front of the roof. The sun strip had to be connected with gray pins because the middle panel piece (where the antenna sits) has that hole which conflicts a bit with the angle of the sun strip, but the gray pins allow enough wiggle to negate that problem. The roof flaps were an important feature and another challenging thing was to design the negative space after positioning the flaps (basically designing the hole shapes they insert into when they're closed) For the left side flap, things are pretty straight forward, since it's positioned horizontally, but the right side one sits at a 45 degree angle, so I had to use the new 3x3 triangle panel to create that gap angle. The hole you see on the new triangle panel also helps because it is used to insert the knob for the HOG steering. So yes, I was pretty happy with that one. ENGINE The engine (fake) is a regular V8 with working pistons, nothing fancy about it. And yes, I managed to fit the usual Lego engine blocks, even thought a V8 feels too big for the 1:12 scale if we compare it to the size of the real engine, so it reaches a bit too far into the cabin. A V6 would've been the perfect size. But I thought since there's enough room, why not? The hood is propped with a rod that automatically locks in place after you open the hood. Yes, it's not exactly the same as the real car, unfortunately, as I didn't have enough room (even if I'd opted for the smaller engine) to recreate the hinged props used on the real car, because they need a lot of room to close. You can also see the airbox sitting above the engine and the safety tethers made using the string with end studs. The hood design was completed using the new mudguard panel from the 2025 Bronco set, which is only available in red, for now. This new panel helps perfectly complete the curvature of the gray panel assembly in the middle, while also allowing enough room for the blue gear, used for connecting the steering rack to the HOG knob on the roof. The front grille and headlights assembly was especially hard to design. I used curved slopes to recreate the curved headlight areas while also managing to place them in between the lines of angled panels. The whole assembly is also slightly tilted forward, recreating the headlight angle of the real car from the side view. Since I had to use a hinge in the middle, to connect the slopes, there was no way of adding the Chevrolet logo, unfortunately. But, you can add stickers to recreate the real headlights and grille prints. Pretty accurate, since the real car has prints as well (fake headlights). TRUNK The trunk can also be opened to reveal the red fuel cell. A rod can be used to prop it open, this time an accurate design, as I've seen this used in many stock car trunks. Of course, there's also the fuel inlet that uses the two-hose system that leads to the fuel cell. One hose for the fuel, the other for venting the air from the fuel cell, thus allowing for a fast refueling. Pretty smart. I love how human ingenuity helps create better and better designs. Once the fuel reaches the cell, it goes out through the fuel line, designed here using a Lego flexible whip, going through a fuel filter (also red) and then moving on through the cabin all the way to the engine bay. On the left side of the trunk, you can see the (vapor) breather tank, connected to the oil tank through a breather line. You can also notice the fire hose nozzle (in dark red color), part of the automatic fire suppression system. And of course, the safety tethers, same as with the hood. SUSPENSIONS Front: double wishbone Rear: realistic truck arms with Panhard rod Again, I'm pretty happy with the design of the truck arms, even though again, the whole thing is based on the wiggle room of a gray pin, so there's very little range of motion. But, the good news is we don't need much suspension travel here, since the ride height of this car is very low, so, it works. I also love how I managed to align the gray sloped panels underneath with the angle of the truck arms themselves (see below). Besides the differential, you can also spot the oil tank and also the gear cooler on the opposite side of it. And of course, you can also see the exhaust pipes going from the engine to the right side skirt. FULL ROLL CAGE It was quite important for me to capture the real full roll cage as accurately as possible and incorporate as many bars as I could. I particularly like the long 16 link bars connecting the roof to the trunk. Even thought they're not that sturdy, they kinda contribute to the structure of the frame. Of course, using liftarms instead of those links would've made the structure crazy strong, but it was too much of a compromise in terms of visuals, as the liftarms looked too bulky. The side protection plates of the real car are also a bit curved on the ends, I tried using some panels in the early prototype stages, but the structure was lacking, so I had to use those gray frames instead. Below you can see an early version of the roll cage design. Notice the side anti-intrusion plates were more accurate to the real thing, but I needed a more solid frame. NACA DUCTS & DRIVER COOLING SYSTEMS Two NACA ducts are used for rear brake cooling (one on each side) and another one (on the right hand side) used for the gear cooler underneath. For the driver, two more NACA ducts are used on the right side of the cabin to help with cooling. You can also find one of the ducts going behind the driver seat, where the air is being cooled and filtered, then taken through a hose that connects to the driver's helmet. Below, in this view through the rear windshield, you can notice the breather line on the left and the brake cooling hoses, but also the wedge adjustment tubes running from the roof to the rear suspension. In real life, you can adjust the tension on each of the rear suspensions to balance the car and improve handling. Unfortunately, the 1:12 scale is way too small to include a functional mechanism of such. Below you can also notice the ECU (Engine Control Unit) on the dashboard. Below you can see the two fire bottles positioned inside the cabin, one is manual and can be used by the driver, the other one is automatic and uses two fire nozzles, one for the engine bay, one for the trunk. You've already seen the trunk nozzle a bit earlier. BUCKET SEAT I consider this seat design to be a happy accident, since I never would have thought of such a way to connect those side panels to the main seat assembly, but one day it simply clicked into place. I was mind blown. I'm not gonna spoil how the panels are connected, but I guarantee you'll love it. Below you can see an earlier version of the bucket seat. I also noticed some of the real head surround designs are asymmetrical, the left side being shorter, and I believe it's so that the driver can have an easier time climbing into the car. And here's the whole assembly including the leg protection and the pad in between the driver's knees (yes, another 3x3 triangle panel), to hold his/her legs in place in case of a rough collision. There's also a simulated H-pattern gear shifter, using a rubber connector to hold the stick. FINAL DETAILS To end this presentation, I'll leave a few more renders and photos of the car. Some are from quite early development, some are from late stages, and the photos are of the final design. If you've read the whole thing, I hope you enjoyed all the details I've managed to incorporate into this design and thank you for taking the time to check my MOC. Don't forget that you can find this design on Rebrickable (PDF instructions).