cozzie4d
-
Posts
39 -
Joined
-
Last visited
Content Type
Profiles
Forums
Gallery
Everything posted by cozzie4d
-
Thanks @zephyr1934 will give it a shot. Do you maybe also know about the 2 tracks with one transformer?
-
Here's some creative copy/pasting to show you what I mean: http://www.sierracosworth.nl/img/7777-shed-turning.jpg
-
Thanks @Murdoch17. I wonder then why you can turn half of the shed, with cables. In the book it looks like they let a locomotive drive into the 2nd part of the shed, stop it, then manually rotate the 2nd half of the shed and connector it to the other rails. So it’s basically turned around but on a different track.
-
A bit late to the party, but how does the yellow shed that folds, actually works to turn the train around?
-
One more question, if it would keep 2 tracks separated from each other, would I be able to power them using a single transformer? With cables from the transformer going to both tracks
-
Wow, great. Thanks for the advice and examples. Clear on the curves not being 4 pieces each
-
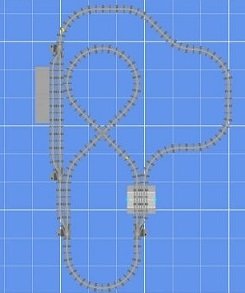
I played around a bit with Bluebrick and came up with this layout: http://www.sierracosworth.nl/img/2024-04-03-layout4-test.jpg But somehow at the top left (the 2 yellow circles), it doesn't perfectly fit/connect. Any idea what I might be doing wrong? Some context; I'm planning for a track with up to 4 switches, 1 or 2 crosses and 1 or 2 signal/ stop lights (currently have one). Total of 3 trains, 2 on separated tracks (by switches) and one at the station likely (where I'd put my for now single signal/stop light).
-
Do blue or yellow 12v motors/housings exists?
-
Thanks, I'll give it a shot and drop some tests here, curious on what you think
-
Hi, Almost done cleaning up the attick for my 80s city, built up around trains as the 'master piece'. In time I've collected a whole bunch of rails, so I was wondering if there are tools to help you create a neat 12v track. I've looked at the 7777 ideas book, but most of them leave me with mainly a lot of curves left. I have: about 40 straight about 80 corners 2 crossings 4 switches (electrical) 1 signal light/post (might get a 2nd one) Any ideas?
-
Cleaning 12v rails conductors (not the metal)
cozzie4d replied to cozzie4d's topic in LEGO Train Tech
Thanks both. Indeed the plastic. I used semi warm water (sopje dreft) and a sponge, rough side for the metal for 1st dirt removal. Afterwards properly dried them with cloth, to prevent rust. Looking pretty good now, will use alcohol and cloth for proper conducting -
Hi all, I've bought a bunch of rails, including the middle conductors, but they look awfull. I know how to the clean the conducting part (alcohol - cotton wool), but ideally I want to try and clean the whole parts/ conductors. Any ideas on how to do that, without 'harming' the parts? I guess alcohol or gasoline is not good for the lego plastic part of the conductors. Any input is appreciated.
-
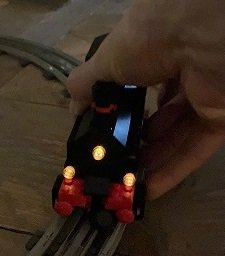
I managed to light it up, both the 3 lights at the front as well as the back, using 3 original lego lighting bricks and hiding all the cables in the center :) Let me know what you think. http://www.sierracosworth.nl/img/lego7710lit1.jpg http://www.sierracosworth.nl/img/lego7710lit2.jpg http://www.sierracosworth.nl/img/lego7710lit.mov
-
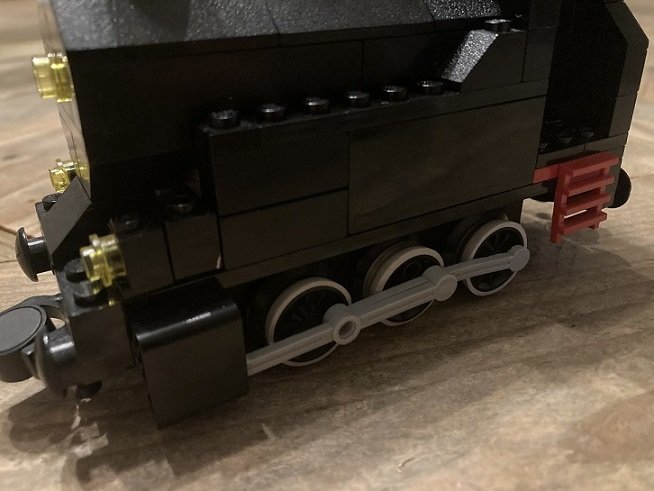
Hi all, Cris here, new to the forum. I'm motorizing my 7710 locomotive, inspired by the nice options and renders in this topic. So first of all thanks for that I've decided to go for a black motor and have both a black and red base to try out, starting with black. Combined with the rods and grey rubber tires it actually looks pretty good. My question; how in earth do you light this thing? :) I mean, using 12v lego lighting. I tried using a 1x6 with prisms for the lower 2 lights and a 12v light block behind the centered higher light. This will likely work, but it leaves an annoying seam behind the 1x6 with the prisms. I'm also afraid light will bleed out from the sides. To light the rear I guess is easy with a 1x6 and prisms, but in that case you'll likely want doors or another way to prevent seeing the white light brick. Curious on your thoughts, here's a photo where you can see the seems at the front (1x6 with prisms) http://www.sierracosworth.nl/img/7710loc12v-a.jpg http://www.sierracosworth.nl/img/7710loc12v-b.jpg