
Roses
-
Posts
77 -
Joined
-
Last visited
Content Type
Profiles
Forums
Gallery
Everything posted by Roses
-

How do you keep track of which pieces you have?
Roses replied to 1Ruben's topic in General LEGO Discussion
Are these bins of sets you've previously owned / do you know what disassembled sets are in the bin? If so, I always use Bricklink to search for the specific piece I need and see if it is in any set that I have built on display or disassembled in a bin somewhere. I think the website Rebrickable has an option to keep track of all the sets you own, which in turn keeps track of the pieces you own (I think? I don't have much experience with Rebrickable. It might just keep track of the sets / mocs you can build with the pieces from the sets you own). Otherwise to get a comprehensive idea of all the pieces one owns, plain ol' sorting is the best option. Bricks, plates, slopes, jumpers, bars, clips, beams, etc, etc, etc. -
Thanks! It was a pretty fun way of learning a bit about Photoshop Thank you! That looks quite good, I appreciate the added mobility and stability from the Technic ratchet joints. My version is a pain and a half to pose, balance and display Sorry, I don't have any plans on making instructions for this model.
-
Thank you! Thank you - I almost always start off with looking for seed parts that'll make for nice piece usage on a character build. I have a bit of a limited parts selection, but there are a few sets from the early 2000s that use highly specialized pieces that sometimes strike a chord to build a certain kind of character, for example. It sometimes sucks to have to ditch a preconceived character concept because the pieces one has in hand don't work for it, but I think it's worth it if it's in favor of using pieces in a different, weird and interesting way. If I had stuck to this character's original idea, it would have been wearing much simpler, sleeker clothes!
-
Thank you! First thing I did was rebuild the model on Bricklink Studio, which was a very quick process. The program has an instructions mode that allows you to modify and rearrange steps. It wasn't until after finishing building the model that I noticed that the instructions mode isn't automatic like Lego Digital Designer, which was the only other digital building software I had a tiny bit of experience with. In Bricklink Studio, while you are building the model, each brick placement you make counts as a "step", which are kept on record in a small window on the bottom right of the screen. If you build your whole model without paying attention to the steps (that is, without creating any new steps), when you go to the instructions mode, your instructions will have one single step, asking you to place all the pieces in the model at the same time. You need to create new steps in the steps window as you are building your model, so that when you go to the instructions mode, you have as many steps as you created while building. I'd recommend watching a short tutorial on Youtube, I skimmed a few and got the hang of it pretty quickly.
-
Free instructions + Studio file for the DF.9 are now available on Rebrickable: https://rebrickable.com/mocs/MOC-111749/RosesMustBuild/hoth-df9-turret/ I'd love to listen to any feedback for future instructions, since this is the first time I'm making any for a MOC. I'm planning on making some for the dish turret next.
-
Thank you - it was a bit trickier than I thought lining up all the roller skates, since they leave a noticeable gap when placed at half-stud widths apart. They're connected to 1x1 clips, which are then spaced out freely on a 4L bar. Thank you! Good eye , I was noticing some possibly weird proportions at the legs while taking pictures of the character. I see the boots as being knee-high, so the calves never really worried me, but I'm not 100% happy with the way the hips turned out - since I see those as being a couple studs too tall. I tried for a while to have the crotch end two studs higher than it is now, but that left a very noticeable gap just above it that was particularly tricky to cover up, so I left the 2x4 wedge in and added the two 2x2 curved slopes to make it seem like the thighs are taller, elongating the legs a bit. I was also thinking about the who's-leaning-on-whom aspect while taking pics! I have the character displayed on a shelf with the stud at the butt-end of the bat connected to the 2x2 plate with holes on the elbows, giving it increased stability and a more realistic leaning pose. The bat is posed like it is to be able to give the forearm a downward angle in the pictures, otherwise the arm would bend into itself and mess around with the silhouette. In hindsight, it could be fixed by making the bat one worm-gear shorter - I'd rather shorten the grip than the barrel to avoid a stubby look. It should be an easy fix... mmmmh... be right back
-
Thank you - Yes! I had to resort to an illegal technique with a drill to be able to tighten the bracelet enough to properly fit the character's waist size.
-
Thank you! It's the same technique I used for the Fly Samurai. It makes for pretty solid, posable & easy-to-build hands, and there's the possibility of customization like with the ring on the left hand.
-
You should be so happy. You should be so glad. I was inspired by Electric Light Orchestra's Time album to make a humanoid character with a computer monitor in place of a head. I wanted to make the character fully-clothed, even if the first idea was to give it a sleek, cyberpunk bodysuit. After making the boots, though, and adding a pair of jeans, I stuck to the idea of just contemporary-looking clothes. I got the idea of a semi-open leather jacket from combining minifigure roller- and ice-skates to make a zipper. I'm really happy with the final look and I'm glad that the character displays different layers of clothing - I think it gives it a realistic amount of depth. I knew I wanted the character to be leaning against something for the main pose - to take advantage of the slight knee articulation, for increased stability, and just to have him look cool in a more playful way than my Dragon Hunter character, which is just mean and sassy. I would have loved to make the baseball bat in metallic silver with the Hubble Telescope's 2x2 curved slopes, but attempts with those pieces ended up looking too bulky and sloppy. The 2x2-round-bricks solution is super simple, but for this scale I think it's perfect. I spent a good couple hours posing the guy and taking pictures. There are more poses and close-ups on my Flickr and on Instagram! This one also has a backside! I'm learning to keep inner structures very compact to make characters displayable from any angle. It was fun imitating present-day clothes. I wish tires came in different colours, though, even if there aren't really any official sets for them to justifiably be any other colour than black. They're just so versatile for characters!
-
I did consider various legal solutions to the cockpit turret, but I ended up going with the small tooth to give it a veeery slight upward angle, so that it points forward instead of downwards like the rest of the cockpit. I think tooth pieces are made with a different kind of plastic than normal bricks, making them slightly more rubbery and malleable. The tooth is just jammed into the Technic piece and the connection is quite secure.
-
Thank you! It's pretty quiet in this corner of the forum, but it's always a treat when the occasional new topic pops in I interpret the hands and feet as being bones themselves - as if the character had worn down the skin and muscle of those regions to the bone. Then again, I think of the head and shoulders as a helmet and shoulder pads, so it's partly wearing bone armor and partly being the character's bones themselves!
-
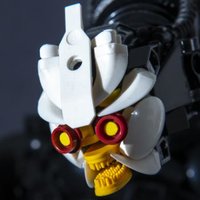
Another heavy-set character following the Lizard Wizard, the idea for this one came from wanting to use the Mosasaurus jaw piece as a helmet. The shape of the jaw piece and the concept of a skull helmet immediately reminded me of the Pokemon Cubone and its stout shape. Thankfully I had many 2x6 curved slope wedges lying around from the Geonosian fighter + cannon from 2012, which I have found to be incredibly useful for character building recently. It seemed obvious to give the character a bone-like weapon, like Cubone's, but a simple club seemed a tad too boring. Instead, he's wielding a donkey's jawbone. I'm particularly happy with the hilt, which uses 12-tooth gears for a furry kind of wrap. I thought about integrating the hand with the hilt for increased stability, like with the Dragon Hunter, but the hand always turned out too bulky and the hilt too hidden. It's a logistical nightmare trying to get a character to hold up a weapon as large as them! I think the final pose is menacing enough, though. The character can also be seen from any angle! While building the body I forced myself to think ahead and make the inner structure as compact as possible to be able to accommodate a backside. I'm trying to get a hold of a motorized display turntable for a 360-degree view, but in the meantime I've got all pictures on Flickr (https://www.flickr.com/photos/rosesmustbuild/albums/72177720298614608) or on Instagram (https://www.instagram.com/p/CdD9O0drNZf/?utm_source=ig_web_copy_link) A lot of the dark orange was also sourced from 10295 Porsche 911's & 70618 Destiny's Bounty's interiors. It's a lovely color paired with tan!
-
Thank you, that snake was the very last thing I added to the character before taking pictures! It's hooked onto the belt with a black droid arm, and an elastic band wrapped around its tail for extra ropy detail. The flasks were pretty relaxing to build, I built way more than I ended up using. There was once even a love potion using these two pieces and some 1x1 round plates with hole: (in pink) and
-
[MOC] The Great Shogun (Samurai MOC 2022)
Roses replied to Mohamed Marei's topic in LEGO Action Figures
This build is absolutely insane. What I admire most is the variety in piece types and building techniques used that still create a very aesthetically cohesive character. The little bits of Bionicle on the shins, the tracks on the elbows, the animal tails on the shoulder pads, the Monkey King cape on the sword and even the extra bits of plastic from Ninjago shurikens! It's chock-full of beautiful textures from top to bottom. -
Thank you both! I'm really happy with these character builds because they're so open to the use of weird pieces like the KK2 torso, which I would never know how to use in another context. The little details are also a great opportunity to put strange parts to good use!
-
Delicious, the illusion on these desserts is perfect. I particularly like the use of various sizes of black round pieces on the second picture to simulate molten chocolate, but the piece choice on all three creations is wonderful.
-
He turns frogs into people! This one came about as I was rummaging through my Knights' Kingdom 2 pieces after having finished the Dragon Hunter and finding Sir Santis' (8794) torso piece. I've been loving the 1x1 Technic ball (32474) lately, particularly to make eyes, and I thought they fit perfectly on the sockets of the KK2 body's hips. I'm using the same technique as the Fly Samurai's eyes with the small Racers tires here. Initially the character was meant to have both legs, but after running out of red boat studs I thought I'd give him a wooden leg for some flair. Since it looked odd with just the wooden leg, I added some potions and knick-knacks to give it a sort of traveling, hoarder-wizard allure. The first version of the character also had a staff, but I opted for a simple cane for the "Mad-Eye Moody" kind of vibe. I used to be pretty picky when taking pieces from built sets in my collection to use for MOCs, but I've started to care less and less about keeping sets in pristine condition and am now favoring taking pieces from sets in display to use in MOCs. The sets that were cannibalized to build this character are 40338 Christmas Tree for the red 1x1 Technic balls (32474) and the four "Red Brick, Round Corner 5x5x1 without studs" (24599); as well as 75978 Diagon Alley for the black and yellowish green 2x2 spheres with stud used for the potions.
-
Thank you! I tried different solutions for the grip where the gun and the hand stayed separate, but eventually I settled on an integrated grip mainly for stability purposes. The closed hand with finger on trigger effect does end up looking quite good, though! Hehe... no back pictures is a running theme for my characters, since inner structures end up being very bulky to hold up the front details. I always use this image to describe the back of my MOCs: I'm trying to pay more attention to the backside and the posability of future characters! One day I'll make one with 360-degree displayability
-
I keep a little notepad on my desk where I write down any pieces to buy or any ideas for things to build in the future. One of the first things I wrote down was to make something inspired by the weapons in the Ratchet & Clank video game series, which I grew up with in the PS2 era. Checking out my parts collection I came across a horse helmet from 4819 Rebel Chariot and some other dragon pieces from 4818 Dragon Rider, which are some of the oldest sets I own, but whose pieces I never knew how to put to good use. I knew I wanted to build a weapon with something like a dragon skin covering it, but after finishing it I didn't know what kind of character should wield it. Why not some weird cyberpunk, gladiatorial dragon-humanoid?
-
You can achieve half-plate heights using bracket pieces, but using that technique might lead to rather thick walls to accommodate all the SNOT behind the facade. A lot of gabled roofs in MOCs have a little bit of an overhang to put something in front of that unsightly gap and cover it up: (TT - ReplicasOfLife' Medieval Townhouse) There's also half-plate heights with headlight bricks. Here's a very useful picture I found from this website https://toweringbrickcreations.com/category/building-techniques/: I think going with the headlight solution might be the easiest way while keeping walls at ~1 brick thickness.
-
Thank you, the head and torso are rather sturdy, if picked up from the right places, but the connection between the legs and the hips is rather flimsy. Stability and posability are the weakest aspects of my characters , but I'm working towards making stronger builds that can be displayed in different poses (it's hard to sacrifice looks for functionality, though!)
-
Thank you! The rubber band helps keep the 1x4 tiles with studs at a slight angle. The tiles themselves alternate between two steering wheels stacked on top of each other (part 2819 - https://www.bricklink.com/v2/catalog/catalogitem.page?P=2819&idColor=86#T=C&C=86) and are connected with 1x1 clips. It's tricky to get all the tiles lined up, but the rubber band helps with that. Wanting to use Geonosian wings was the reason I started building a regular fly! It quickly turned into a full humanoid character, though, so the minifigure wings were too small to use. I don't have any large, soft, transparent plastic wings, so I tried using some silver Bionicle wing elements, but they stuck out too much so I left them out. I'd like to make a second version of this character with increased mobility, wings & unsheathed Katana at some point. Perhaps they could be brick-built with some 3mm hoses and a whole bunch of droid arms and minifigure hands...?
-
I think mine is at a slightly bigger scale than your version - it's about 50 x 29cm. Nevertheless, the 6x6 domes are the closest solution to stay within minifigure-ish-scale. 8-wide domes would result in a much larger than minifigure-scale Y-Wing, though. I wouldn't be surprised if TLG went with that solution if they were to re-re-remake it as a UCS model I only noticed the slight, gradual inward curve of the cockpit section when I was already done with it. I checked out your model and tried to whip something up using mainly the sides of the cockpit like you did, while keeping the straight line of the angled panels, but since the sides sections are built upside down, the anti-studs showed, so I just left it as is. The underside is plain-ish, compared to the top, and the few details use similar solutions to the UCS, mainly the center of the body with the 2x2 dish & 1x4 arches (is that the missile launcher tube? I'm not sure what detail you're referring to). Thank you! I love working with tiny pieces so building the whole body was a blast.
-
Thank you! I've never watched Jin-Roh but I'm pretty sure I've seen those Wolf Brigade characters in passing before, and I absolutely see the resemblance. This is the second time I'm making a gas mask / insect proboscis-type head and using Technic ball joints to make red eyes - I guess the image of the beady red eyes against the black gas mask stuck with me as super creepy & menacing Thank you , I gotta find a use for those minifig accessories somehow!
-
After a few months of Star Wars MOCs, it feels good to build a character again. I wanted to get back in the mood slowly and build something small like a normal fly, but the head turned out pretty human-like, so I just went with the full character route. It's been a while since I worked with organic shapes, but finding a use for those minifigure mustaches, an old knight helmet and a nanofigure was a lot of fun. Who knew those dozens of tiny Racers tires would come in handy some day?