

ObiWanGinobili
-
Posts
2 -
Joined
-
Last visited
Content Type
Profiles
Forums
Gallery
Everything posted by ObiWanGinobili
-
[MOC] UCS Venator-Class Star Destroyer Instructions
ObiWanGinobili replied to Ellisss_2's topic in LEGO Star Wars
Here is a picture of the venator being angled cause of the different socket heights. I only had light bluish gray technic brocks for the one sockets, I will replace them in the future. Apart from that it looks really cool that way imo. The older gray pieces in the bridge are bearly visible during normal light, if you look closely or light it up with bright light you will notice it. Here are some other pictures I couldnt upload because of the max file size. https://imgur.com/a/PxSOvmC https://imgur.com/a/EQ7tcTe https://imgur.com/a/45KeOIr https://imgur.com/a/IXlXTwB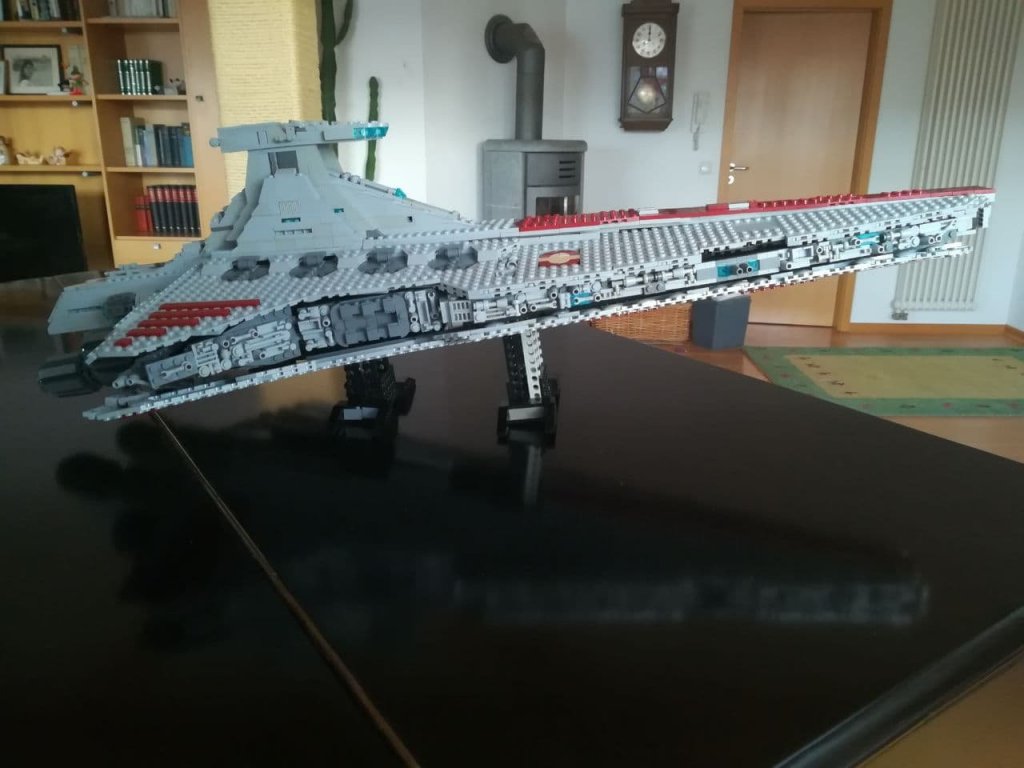
-
[MOC] UCS Venator-Class Star Destroyer Instructions
ObiWanGinobili replied to Ellisss_2's topic in LEGO Star Wars
Hi everyone, I finally built this amazing set and wanted to share a few experiences/issues. I hope to upload some pictures late this week. First of all, I am no native english speaker, but I try my best to write understandable english :D 1) I searched my existing Lego parts and got around half the pieces already in stock. The first problem was, that I have a very high amount of 'older' lego pieces in the older gray tones (light gray instead of light bluish and dark gray). I didnt exactly know where i could use the older gray (where it would not show, e.g. in the bottom wing parts) but I wanted to use as many owned parts as I could to save money. Therefore, especially the bridge consists of some older gray bricks, which tbh adds a nice little weariness to the model and makes it a bit more realistic in a sense I guess. The wings and large plates are all in the newer gray tones tho. 2) I had all the technic bricks, just miscounted some of them, leading to two 10x1 technic bricks being used for the frame instead of two 12x1 which worked fine tho (I only used the second knob on the Hinge Plate 1 x 4 Swivel Base with Same Top on each side to hold the technic brick in form). I also used technic bricks of different colors which is totally fine as you wont see any color shining through when the model is finished. The miscounting also led to not enough 12x1 technic bricks for the socket. I didnt want to wait another week and didnt want to buy new bricks, so i decided to make the two socket feet at different heights. The effect is, that the whole model is inclined with the top heading upwards, which looks really cool. I can recommend this type of display as you see a bit more of the bottom wings. The sockets are not flat fooded on the ground now (cause they have different lenghts) but I might adjust that in the future. 3) As someone already mentioned before, the main difficulty was, sorting all the parts ( I ordered from 5 different shops which each had different sorted bags going along with my pre-sorted parts that I already owned). For one part I searched about 2 freaking hours and I lost hope and thought maybe I didnt get it, but in the end I find it. If you dont find some of the smaller parts used for the decoration on the sides, you can get creative and just invent some pattern yourself, in the end no one will notice. 4) The building experience itself was very fun and diversified. Sometimes you stumble across some steps, sometimes bricks or plates are being added sneakily and in rare occasions not visible (for example if you have to attach two plates on each side, but the camera angle only shows one side). 5) For the parts being used, it is mostly standard parts. Two piece types were so expensive for me to get via bricklink auto select, namely the Slope 45 2 x 1 Double - with Inside Bar (you need that one 8 times for the rear wings) and the Tool Box Wrench ( 8 times needed for the side cannons), that I didnt buy them. If I had included those 2 lots in my orders it would have cost around 120€ more, so I just left them out. I will order those maybe in the future, but especially the slopes are not really that important imo, as it is at the back of the ship and you could just use regular slopes. I have to point out one specific item that I kind of dislike in the build and it is the Slope, Curved 3 x 2 x 2/3 with Two Studs, Wing End. It is, both times very visible, used on the top of the middle section of the wings and in the back behind the bridge. I never really like this lego piece and I think the shape of this piece (especially the curvy wing end) doesnt fit the lego style build for this one. I just left it out at the end. You can just place a normal 2x2 tile as a replacement. 6) Coming to the main problem: The attachment of the wings and the middle part with the bridge. Damn, that was something I tell you. The way it is explained in the instructions doesnt really work for the bottom wings. The resistance of the ball sockets is to strong, to push 4 (!) ball bricks of them simultaneously into it. I needed a second person to help me and we ended up attaching the bricks with the ball into the sockets first and then attaching the wings onto the bricks. You really have to get the bricks in the right direction, otherwise the gap between the wings and the border is to big. I think it took me and my friend 30 minutes, just to attach one bottom wing. The long hangar 'wing' with the bridge also took me quite a while, as it was not clear for me at all, where exactly i should attach it and how far it reaches out at the top. The instructions dont give any conclusion about that. The 2 1x1 bricks on the end of the back side of the whole piece confused at they are just floating in the air (I guess they are there to diminish the gap?). The end on the side of the bridge really just floats around and is not really attached, it looks fine in the end tho, I was just confused at the start. The top wings are easier to attach with the clips, you just need a second person, as you once again need to attach all three clips simulatenously. I only got it to go at the front and the back clip, the middle one is not attached leading to a small gap between the middle part and the panels. I am not risking to take it off tho, as I am most certain, that some other parts will come off. It isnt that much of a deal, but unfortunate anyways. 7) I really like the look of the engines and the building techniques being used are really innovative and fun to build so big props here. 8) There is an error in the instructions on page 254 and 292 respectively. You don't need to use the 2x1 double clip piece but the counterpart instead to attach the rear wings. Apart from all the criticsm, I had a blast building the Venator and it looks awesome, shoutout to @Ellisss_2 and @thire5 . Always wanted to have one and the offical lego set is just so disgustingly unproportional. I hope someone finds this review helpful, it got a bit lenghty in the end, but I wanted to share as many problems/difficulties I encountered to make the build easier for people who are planning to build the same. I can only recommend it.
