jelockwood
-
Posts
23 -
Joined
-
Last visited
About jelockwood

-
It is I believe indeed bigger than other Tantiv MOCs especially in length. Excluding the ceiling, it is 13 bricks tall. (The ceiling is a single brick thick.) This was necessary in order to fit the two arches top and bottom, the two wall containers and the SNOT solution I used which was as thin as possible being a single brick in height or three plates. The door(s) used however are the same height as other MOCs and therefore overall I feel the extra size is minimal. Also if you compare the image of my MOC with Picture 3 it is an excellent match in proportions. I might have been able to make it slightly less tall but then I would not have been able to fit the red 'lights' above the door which was the main dictating requirement for height - indeed it caused me to need to add an additional 1 brick in overall height, it also would not have had the right proportions otherwise. If you download pictures 3 and 4 and flip between them quickly you can get a better idea of how closely my MOC matches the film set image. My next project is Docking Bay 94 and a significant portion of Mos Eisley. This also is larger than other peoples MOCs and again I am finding this necessary to produce a more realistic result but again it seems to work well even for minifigures. (It will eventually have a lot of minifigures as it will include many sub-scenes from Episode IV.) My aim with this next project will be to produce photos of sections of my MOC arranged to replicate stills from the film so that again they look as similar as possible. This project apart from being much bigger is proving a lot more difficult in that even the film sets are not consistent, for example it is well known that the Docking Bay film set was not actually constructed as a complete circle due to inadequate space on the Elstree studios set. Even so called official sources like an official illustrated guide shows an artists image with one of the staircases angling in the opposite direction to what is in the film. This is the staircase going up from the base of the Docking Bay up to the surface where the entrance from the street is. As the film cuts between positions as Luke and Obi-wan walk towards the Docking bay you also do not get a picture of all of the streets and I will therefore have to fill in gaps by making invented connections. Not to mention Lego itself hugely limits things. Lego prefers 90˚ angles but one significant street junction just outside the entrance to docking bay is more like 135˚
-
As I approach a slightly early retirement, I have been buying Lego Star Wars UCS sets to later build, and started working on some MOCs/Dioramas. I have deliberately not worked on these MOCs as fast as I could for several reasons, other time commitments including work, to give time to refine the designs, to lengthen the enjoyment period, and to spread out the costs. However I have now completed my first significant project as below. The inspiration was originally a printed canvas artwork I also purchased for my Lego man cave. However other inspirations were the photo from the Star Wars Episode IV film scene, what I believe to not be another photo but an artwork with actors, smoke and debris removed, and of course various other peoples MOCs. Whilst I did review various existing Tantiv corridor MOCs my focus was on achieving maximum accuracy compared to the the film set and not 'playability'. I did make some recent changes to the pillars based on the relatively recently released official Lego 75387 Tantiv IV Corridor set. Whilst I have used a lot of SNOT the only potential 'cheat' I have used is to fold up a piece of white paper and squeeze it between the two vertical red tiles above the door to give the impression they are separated as it was not possible to do this with tiles and have the right spacing. Unlike most/all other Tantiv corridor MOCs I have used translucent/pearl Lego 1x6x5 panels part number 35286 as part of the ceiling, I have also used genuine Lego slope bricks part number 60186 to create the grills in the pillars but via SNOT I have been able to use them upside down since there is no inverted version of this brick. I have also bought genuine Lego minifigures of Darth Vader, Storm Troopers and Rebel Fleet Troopers. (Not shown.) Picture 1 = canvas artwork Picture 2 = film photo Picture 3 = cleaned up artwork rendition of picture 2 Picture 4 = my completed MOC
-
@MaximillianRebo Excellent models! I have been looking for a decent Ronto to include in a diorama. Would you be able to provide a complete parts list for each? [UPDATE - Found it on Rebrickable! see https://rebrickable.com/mocs/MOC-191049/MaximillianBricks/ronto/#details ] I had hoped that Lego would make an official Ronto minifigure like the artwork shown on the following page. (Scroll down to find it.) However this has not happened despite there being as a relevant example an official Dewback minifigure. https://www.artstation.com/artwork/xDr6B4
-
Auto stop motors?
jelockwood replied to jelockwood's topic in LEGO Technic, Mindstorms, Model Team and Scale Modeling
It would likely make a noticeable noise and of course continue to draw power. The answer below seems what I was looking for. I will therefore buy a PF polarity switch via Bricklink and explore designs for pulling the switch back to the centre off position at top/bottom. I will also try and make it harder for a 'guest' to accidently try to use up when already at the top and down when already at the bottom. -
Auto stop motors?
jelockwood replied to jelockwood's topic in LEGO Technic, Mindstorms, Model Team and Scale Modeling
I accidently posted originally in the Star Wars theme forum and as advised posted (then) in the Technics forum. It looks like someone kindly then moved the original post also to the Technics forum so we ended up with two in their. (I could not move it myself.) -
Auto stop motors?
jelockwood replied to jelockwood's topic in LEGO Technic, Mindstorms, Model Team and Scale Modeling
Thanks, I also found a video demonstrating the PF polarity switch. Its name had led me to believe it only did polarity reversal and not also on/off but the video clearly shows the mid-position is off and top/bottom are the reversed positions. -
Auto stop motors?
jelockwood replied to jelockwood's topic in LEGO Technic, Mindstorms, Model Team and Scale Modeling
It would be manually operated. How do I link the leaver to the battery box to turn it off? What parts would be involved? This sounds like what I am looking for if it triggers automatically when the lift reaches top or bottom. -
Auto stop motors?
jelockwood replied to jelockwood's topic in LEGO Technic, Mindstorms, Model Team and Scale Modeling
I am intending to use a Lego power functions motor as part of custom lego build and ideally need a way for it to auto stop. The motor will be used to power a lift and when it reaches the top or bottom I need it to stop rather than mindlessly grinding itself to death when it reaches the end. This is different to if you use a motor to rotate something which could rotate indefinitely. For the lift I was planning using either a worm gear with Lego 3743 gear rack bricks or a standard gear and Lego rack and pinion. I did think about using a clutch gear wheel but need something more effective than that as the clutch gear wheel would be not be really suited to fit in the build. -
I am intending to use a Lego power functions motor as part of custom lego build and ideally need a way for it to auto stop. The motor will be used to power a lift and when it reaches the top or bottom I need it to stop rather than mindlessly grinding itself to death when it reaches the end. This different to if you use a motor to rotate something which could rotate indefinitely. For the lift I was planning using either a worm gear with Lego 3743 gear rack bricks, a standard gear and Lego rack and pinion. I did think about using a clutch gear wheel but need something more effective than that as the clutch gear wheel would be not be really suited to fit in the build.
-
I have not watched that video but this is not I feel startup teething problems. As I mentioned overnight several days ago 75% of the bricks I had in my basket changed to out of stock. That means they were previously all in stock or I would not have been able to add them to my basket. This includes common and popular bestseller bricks and not so popular standard bricks. Again as Lego claim Standard and Bestseller bricks are processed by different warehouses with logically Bestseller bricks being the ones that they sell most of and either should be more likely to go out of stock or to be ones Lego work harder to keep in stock. The results I am seeing suggest neither and that vast numbers of bricks of all types have simultaneously gone out of stock.
-
The examples from František Hajdekr are way better than I thought was possible with consumer level 3D printing equipment but I also share the opinion that technology is not yet good enough for this. I had however thought that Lego should be looking at this themselves as a way of offering a 'print on demand' service for discontinued bricks. Lego would be able to buy industrial level 3D printing systems which should be much better and faster but even there I would still feel technology is not yet advanced enough.
-
Connect lego motor(s) to wall-socket?
jelockwood replied to h3ctic's topic in General LEGO Discussion
I am surprised no-one else has mentioned this yet. You can buy a product called a 'battery eliminator'. This is an AC to DC transformer but rather than a standard one that might have a USB or mini jack connector, this type of product terminates in a dummy battery and includes one or more additional dummy batteries so as to be inserted in to the standard battery compartment. You could therefore buy one of these for use with a Lego battery case. -
Lego (had) two website methods of buying bricks, one was focused on buying additional stock of common bricks, and one that was focused on 'replacing' missing bricks - although I like many also used this as a mechanism for buying additional stock of a wider range of bricks. These have now been merged and whilst it is likely the result on average will be a little more expensive that is not my issue. I had been building up a shopping basket for my next order as I try to buy enough at a time to make the shipping costs etc. more palatable and since the reorganisation this is more important as bricks now are listed in two categories - 'Bestseller' and 'Standard' and each has their own additional shipping charges if you don't order a certain amount. I am also used to and expect that from time to time some bricks will go out of stock. When out of stock you of course could not add them to your shopping cart but previously if you had already added them it was still possible to complete the order although this would obviously delay their shipping the order to you. This time however practically overnight about three quarters of my pending shopping basket was wiped out - that is removed from my shopping basket. This was not a random error but was due to these items going out of stock as I confirmed by searching for them. Again I expect from time to time individual bricks to go out of stock but this time a huge proportion of bricks have all gone out of stock at the same time. This suggests something more significant has happened as there is no way overnight that many different bricks would have genuinely simultaneously gone out of stock. Has their factory or warehouse burnt down? Has Lego suddenly discontinued dozens of different bricks? Is Lego phasing out the entire 'Pick a brick' feature? Note: It was the 'Standard' i.e. less common choice of brick that was most affected but not exclusively so as also many 'Bestseller' bricks are now also out of stock. Supposedly these are stored and processed at different warehouses as this is the excuse Lego use for having two categories each with their own additional shipping charges. As an example Plate 8x16 (part number 92438) is now out of stock except for a single colour meaning eighteen colours are out of stock.
-
@MaximillianRebo Thanks for the idea for the WED-9-M1 droid. That is a very good start and better than I thought might be possible. Your choice of arms and upper torso particularly look a good choice. It does also inspires me to realise that since the WED-9-M1 is made by the same droid manufacturer as the Treadwell that Luke initially buys from a Jawa in A New Hope before it blows up. Therefore one could use a base similar to the SW0550 Treadwell minifigure. Could you list the parts used for the head and neck? Also what you used for the shoulders - probably 31561 on top of a half pin.
-
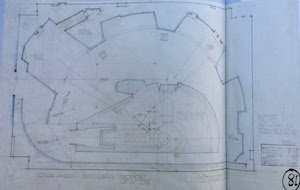
Just as an example of the difficulty in trying to get images to use to help provide guidance on the layout and appearance of Mos Eisley and Docking Bay 94. The following link is to the official site of John R. Mullaney who was an officially appointed artist who illustrated many official Star Wars books. On the page I linked to is an image of Docking Bay 94 in cut-away view. This view is going to be helpful but to me having already done a lot of research it instantly shows several errors. https://www.thetopdraw.com/artwork-galleries/sci-fi/star-wars If you look at the following image which is the official film set plan for the docking bay you can see the staircase skewed in the opposite direction to the image on the above page. Note that even though the following image is an official plan for the film set the actual built set is slightly different, the film set plan also confirms effectively only half the docking ring was actually built. This is the sort of problem I have been facing with the physical film set images, the CGI special edition images, the images from various computer games and various other sources having contradictions. In the case of John R. Mullaney's image one major error is that the staircase shown in the bottom left of his image is skewed to the left i.e. pointing away from the centre of the docking back, in the actual film it is absolutely clear it is skewed in the opposite direction, he also has some storage crates in the wrong side bay and has distorted the size of the large bays to shrink them to the same size as the other bays, as have other existing user Lego models. Going back to the staircase, having closely studied actual film images, I can see that when one goes through the docking bay 94 entrance on the street level, there is a short corridor, then a right turn that is at the top of the stairs, you go down the stairs (skewed the right way) to the below ground level base of the docking bay and enter one of the two large side bays. I have already built all this section and even skewed the staircase correctly. (By stressing alignment of bricks illegally by exactly one stud difference in length between the two sides.)