

adultlegouser
-
Posts
9 -
Joined
-
Last visited
About adultlegouser

-
Pretty good solution there. i may have to order those orange parts to try this.
-
Finally got the stickers in and on. Ended up getting both sets so I could get the Spoiler sticker. Word to the wise, the spoiler sticker rides right down the inset in the middle making it hard to seat. Use something soft (not finger nails) to work it down. I ended up slightly rubbing off a line with my nails... then started using the end of my T-shirt. I took the doors off to place the long one. Put them back on and then placed the small ones with the doors lined up. Even came with a rear plate. Used an Exacto blade to cut the pieces separate once applied. Overall sticker quality - 6 out of 10. Overall design - 10 out of 10. They really pop the model out! Only thing I would like to do is fill in the gaps at the headlights somehow.
-
75181 UCS Y-Wing Starfighter cockpit mod
adultlegouser replied to Dragunov2's topic in LEGO Star Wars
That's a must in my book. Those corner ones work well at the edge. I used the nose piece stickers too, but placed them tight to the edge as well there... look much better. I do like the sloped tile version above with stripe better though. I hate how short Lego cuts them back from the edges and how they always have a gap at a "continuous" sticker on the their model photos. i suppose it makes it easier for kids to apply... less precision needed? That's all i can think. -
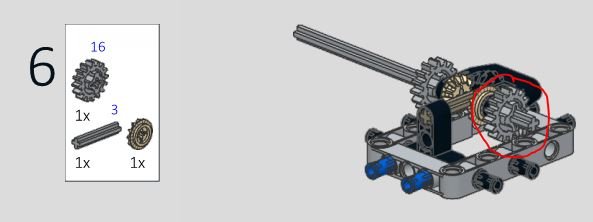
Forgot to follow up on this, My engine nor gears turn in Reverse. ...after investigating, it looks like I omitted the grey gear way back in step 6. No wonder nothing is spinning!!!! So I have that to fix. I am interested to see them mounted on the vehicle and a closer up shot as well. Did you use hardware store paint or hobby paint? Sanding/priming?
-
Oh wow, thanks so much. That small detail is hard to pick up on. An easy fix though. Just shifted into 4th, put it in N, pulled the (2) orange 2L pieces and rotated them correctly as shown. Makes much more sense shifting in order from left to right, 1 to 4 now! Thanks so much for the quick help!
-
So I haven't started the body build portion just yet. I cant' seem to quit playing with the rolling chassis. This thing is so cool and so large! I just want to confirm a few things: -When shifting through gears, the count on the shift pointer is from far right (1st) to far left (4th) - correct? Feels like mine goes (4,3,1,2) from L to R. -When rolling it in gear, it seems to roll easily for a second before the red diffs catch and fully engage... and then it rolls at a rate/resistance to the gearing that is selected. - is this normal? (I assume this is just how the mechanism works... takes a second to fully engage.) -When shifted in reverse, it can still shift through gears and roll forward as well, but looks to act the same as when in neutral - with no gears engaged. is this normal? Otherwise, everything seems to test fine. This is definitely a challenging build. A couple times I had to go back a step or 2 and flip something. You really have to pay close attention without the fly-in or highlighted graphics (like Lego instructions) - but that makes it that much more fun. And I don't know about everyone else, but the slower the build the more fun for me. Once it's built... it is all but over. Oh... I also broke down and ordered the custom Sticker set for the side doors and spoiler! This kit is costing me so much money... its hard to imagine owning a real Porsche.
-
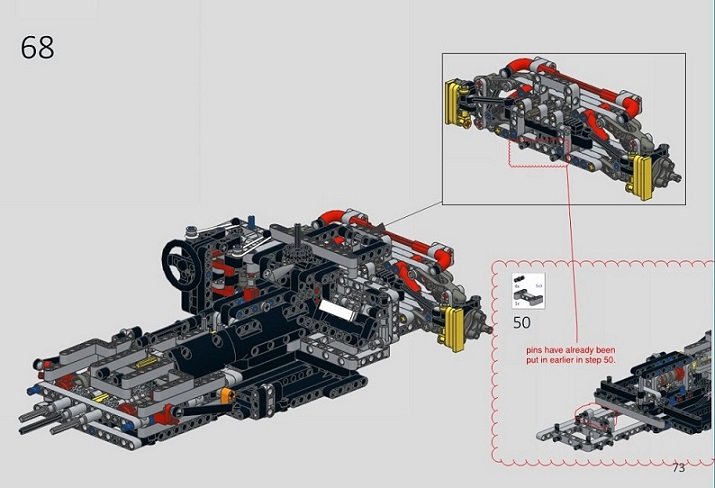
I just finished building the chassis last night and think i may have found a small error in the newly modified V1.4 instructions. Not a huge deal. See below image. it seems 2 black pins are put in twice (4 total). They get put in the chassis early in step 50. Then in the front suspension later. At step 68, you cannot marry the pieces without removing 2 of the pins from one side. Just requires picking which step to install just the 2.
-
I exported the V1.4 parts list to my a new wanted list. Then i use the Apply feature to apply my 2 previous orders of V1.3 to it. Then just bought the remaining pieces left. (Of course, i was starting with the Lego 42056 kit, so I had to use Compare Sets with the V1.3 set (or V1.4 the second time) initially to just order the remaining few parts i needed.)
-
@jb70 Dang you are fast at updating those instructions! i just had to order more parts for the V1.4 (i had just ordered V1.3 last week). Anyway, I am new here... having just purchased the Porsche 42056. After doing so, I thought... hey wonder if there are any mods - well, long story short, I was brink-linking parts that night for the Pimp up My Porsche after sifting through all these threads of mods and fixes. Almost lucky to have gotten the show late, you guys have already done all the heavy lifting! Anyways, much appreciation to all the engineers that made this happen. I am looking forward to completing it once all the extra parts arrive. My background after coming out of the dark ages is mostly Star Wars UCS sets (Falcon!), and some other larger sets (911 RSR, 007 Aston, Hulkbuster, Saturn V, etc.). I have been drooling over the large Technics 911 and more recently the Bugatti since they were released. Hope to find more valuable insight on the forum here!