Plastic_Goth
-
Posts
19 -
Joined
-
Last visited
Content Type
Profiles
Forums
Gallery
Everything posted by Plastic_Goth
-
 Thanks all for the encouraging comments. @ivanlan9: Glad you like the wagontop. There are too few ribs for it to be a very accurate model compared to the proto, but I am content with how it looks as a LEGO System interpretation of the thing. That's a fair criticism of the GP30. I recall deciding against wedge plates for that distinctive arrow-shaped clerestory part on top of the cab in favor of 1 x 2 x 3 sloped bricks. Too tall maybe, but the geometry resolves neatly otherwise. @SD100: I studied photos of what is known as the PT-5 tender built for NYC steam locos. I'm not so familiar with the operations of the real thing, but there were some spigot-looking things among the sideframe greeblies that I approximated with LEGO pistol nozzles. They're a little too long in one dimension, and I didn't place as many of them as would be prototypical for how the bogies are articulated, but if someone is familiar with those long-distance coal tenders and they're looking for an analog represented on my LEGO build, at least they'll see something.
 -
This is the first train I'm endeavoring to make instructions for in Bricklink Studio. It's kind of a dear locomotive to me. I have had an operational, in-brick example that I've been toying with for the last couple of years. It's seven wide at the cab and running boards; the pistons go out to 8 but overall it's not bad fit for any consist of smaller-scale LEGO trains. Here's some renders of other trains that I've either recently modelled up or tweaked. I'm not ready to make instructions or build them in real life, though. New York Central Niagara, 8-wide. Chicago & Northwestern GP30, 7-wide. Postwar toy-inspired tanker, non-prototyical. An ALCO RS3 navigates Bricktracks curves on an L-Gauge module. The locomotive and rolling stock are 7-wide.
-
Hello, thanks all for the comments. I have not yet made changes to the model based on your input, but I have produced some updated images since yesterday: Regarding the wheels, the model currently uses XL sized drivers. I agree one size up will better suite the scale. Are Ldraw files available from anyone for these parts? I am using Bricklink Studio to make these models and images on my flickr. Thanks also for the complements regarding my recent diorama. Somehow, I am addicted to making designs and images with this software. The renders that come out of the software are quite good, but I always sharpen them up and add a little impurities to be a little artistic. It is satisfying to keep people guessing whether or not what they are seeing is photographic. The accuracy of the boiler size is something I might contest. Via the schematic posted above, I estimated the height of the smokebox, excluding what I'm guessing is a water heater, is about 1.7 meters. Calculating for scale, this is about 24 plates. The result is about 25 plates, which is a little large, but satisfyingly rounded via compounding different curved slope elements. The cross section @Tenderlok provides is 21 plates across, which could be boosted by a plate in all directions for a 23 plate diameter, though I think the resulting kinks in each quadrant would be an aesthetic casualty of this solution. (Other considerations regarding 1:22 scaling can be seen on this spreadsheet) Perhaps now that I have added pipe greeblies to the boiler, the visual mass of the surface is divided enough to look... less massive? Lastly, I like rendering these preliminary images in grey, for the same reason that the real locomotive manufacturers did. It just looks cool! A majority of the parts have been checked for availability in black, however.
-
It's pure L-gauge! Here's a pretty comprehensive video of an example running:
-
Sunday building.
-
Hi, Stopping by to say great work with this. I too am attracted to this locomotive and have been building one of my own on and off for the past couple of years, though at a smaller scale for use with six and seven wide stock. I envy the details you are able to include!
-
Here's some color schemes that probably don't need to be guessed at:
-
I prefer to build smaller. It's a space and expense thing. Six wide would be nice, but given that LEGO track gauge is six wide itself it's not so aesthetically viable for me. Also, I don't see myself giving up the 40 radius curves, and narrower trains also means shorter train cars that don't over hang as much when going 'round.
-
Not exactly, I wasn't opting for a prototypical paint scheme on either. I did try to approximate, if not replicate, a CSX livery on the switcher, and I guess I was successful if I lead you to think such. Here's some elevation views and a dissection of the nose, for those that are curious:
-
I really do love this. I got this set from my folks in addition to the first wave Hogwarts castle in Christmas of 2001. This really strikes the nostalgia nerve. I like that you've included the 2x2 scroll print. I must have that somewhere.
-
Hi, These are some models I designed last year but haven't shared here, and until today hadn't made renders of in the renderer included in the new Studio program from Bricklink. So here we are. The cabins and frames are 7 studs wide per my standard of doing things. The F unit can house a full motorization suite up to and including a Power Functions 1 IR receiver. The hump at the rear of the roof shows where I've placed the receiver. However, neither model here as rendered includes motorized trucks.
-
1:25 Eritrean 0-4-0T Locomotive "202 series"
Plastic_Goth replied to Plastic_Goth's topic in LEGO Train Tech
Understood, thanks. It remains to be seen how well the model will hold together in real life. I used a pair of 8 tooth gears set on the interiors of the rear drivers to off-phase the eccentric crank, otherwise, I'd have the motors transmit to the rear axle. I am curious what other solutions have been toyed with by others for creating the eccentric motion? -
1:25 Eritrean 0-4-0T Locomotive "202 series"
Plastic_Goth replied to Plastic_Goth's topic in LEGO Train Tech
Hi everyone, I've put a PF2.0 battery box and receiver (or rather an assembly that's equivalent volume-wise) and two motors into the engine. I'm not sure how reversing polarity works on the new system, or if it's needed for running two synchronized motors?? -
Very handsome, in a utilitarian way. I like the cabin a lot. The crane reminds me of a boom lift MOC I made a long while ago: https://www.flickr.com/photos/lemon_boy/4508854060/
-
1:25 Eritrean 0-4-0T Locomotive "202 series"
Plastic_Goth replied to Plastic_Goth's topic in LEGO Train Tech
Sven, it is validating to hear your praise for my model. As well, thank you for your correction regarding the scale. A part of my mind knew that truth about track gauging, but I had forgotten it as I leaped into this model. Rather than numbers I use my eyeballs primarily, so I am happy to hear that the overall proportions are well received. I looked for such a reference that would give me the diameter of the real locomotive's wheels, but failed, so I am also thankful that you were able to find one for me. If I go ahead and design the Mallet types that operate on the main line of this railway, it will benefit the accuracy of the model to know their driver diameter. My main issue of building out the pistons and steam chests one brick is that they are no longer in line with the steam pipes, thus detracting from the proportionality I've been able to keep throughout. It's a trade off but it might be worth it. I have revised the model and I think I like them with the longer pistons. I've used brackets to put round plates on their fronts . Erik -
My parents recently visited Brooklyn, N.Y. where I live and we got lunch at an Ethiopian restaurant and coffee house in the neighborhood of Bushwick. There they had a book on their shelf (African Train - Hugues Fontaine) which was in the French and mostly illegible to me. However, it renewed my interest in European-built rail hardware on the African continent. As well, after purchasing some 1990s vintage Model Team sets on the aftermarket, I have an interest in larger-than-minifig scale models. The garden gauge LEGO models of user Tenderlok are a real inspiration as well. I decided to pursue a project that would use official LEGO track as narrow gauge and scale the rolling stock accordingly. I decided on a prototype built by Italian manufacturing company Breda for export to and use by Eritrea. Engines dating to the 1920s are still operational on the Eritrean rail link between the capital of Asmara and the port city of Massawa. It is well for my reference that high definition videos of the locomotives in action exist! http://railpictures.net/photo/525923/ My model, in virtual: I hope soon to build this model in real bricks. I should add more detail that is not possible in bricklink's Studio, such as pipes around the boiler with flexible rods. I would also like to accommodate a battery with two motors working in tandem somewhere in the cab. The valve gear is exaggerated somewhat for kinetic aesthetics. I am open to ideas for improving the detail of the piston faces. They are plain to allow the axles to move in and out of the technic bricks, but I feel some of the character of the locomotive is lost there. Edit: I originally titled this as a 1:20 model but Sven has informed me that the actual scale, referencing the LEGO track gauge of 37.5 mm, is 1:25 Thank you for your attention, Erik Frobom
-
Here's a comparison between an illustration created with POV-ray, and one created with the new renderer.
-
Here's a render of one of my SW builds that I did in Lego Digital Designer some years back. I've since imported it into Studio and fired up the renderer. The above scene uses the Mechanic setting. It turns out I suspected right when I thought the long shadows would do well to bring out details. It suits a grey, greebly model fantastically. I adjusted the colors and levels in photoshop only a little. It really is exciting to see my models in new imaging software.
-
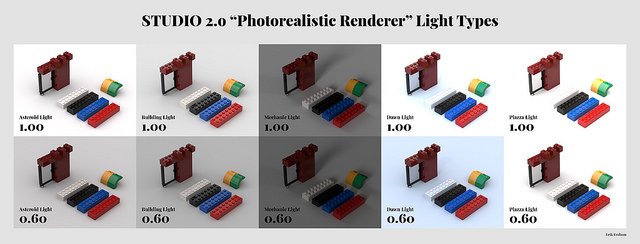
The 2.0 version has a new rendering engine option, and it comes with some lighting presets that I've put together here. I've rendered these parts at full and 60% intensity. Light is coming from two sources via the front and left light source setting. Also, I have rendered the scene against a "floor" of a very light grey. My thoughts on each: Asteroid - makes for a good balance of brightness and contrast. The render is very "legible". Building - There's some light coming from above that illuminates the top faces of the bricks. This resulting sheen may be distracting, unless intentional. Mechanic - The dimness of this setting makes me wonder if it is best used where the background is simply transparent pixels. The light is a bit "harder". Notice the oblique shadows that have the potential to highlight surface details such as studs. Dawn - It is not likely that I will use this because of the bluing effect. Otherwise, the results are similar to Asteroid except for slightly more contrast. Notice that at full intensity the white brick is being lost to the background. Piazza - This is a blinding, high contrast setting. At full intensity the shadows nearly vanish, and definition is lost on lightly colored pieces such as white and medium orange, as I have used in the scene. Lessening the intensity brings back some definition, but at a cost to the color saturation. Notice how the blue and red pieces look less lively at 0.60. Conclusion: I have been using Studio for a year now, and it has become my main tool for Lego building. That these render options are more powerful than what is possible with POV-ray, yet are now just accessible by being bundled with Studio 2.0, makes me a very excited builder. Based on these tests I would recommend the Asteroid setting at an intensity between and .6 and 1 for most scenes. I would like to try the Mechanic setting against a transparent field for showing off things like technic assemblies where the goal of the illustration is showing off construction. The Building setting may suit illustrations emphasizing the overall form of a build.