ScottishDave Posted April 8, 2014 Posted April 8, 2014 I just finished bricklinking a 10212 UCS Imperial Shuttle - the last order arrived today. Obviously, I plan to modify it. I'm hoping to add: - motorised wings - boarding ramp - folding (motorised?) landing gear For one extra wish, I'm also hoping to cram in an interior: but as I have not yet passed the advanced course in trans-dimensional engineering, I may have to settle for just the motors. I recall that back when the shuttle was released, there were a few people on this forum who were planning to put in motors... has anyone done so? Would they be willing to share construction pictures? Also, does anyone have any other good mods for this set? As a starter for ten, I have found some nice mods already: All studs replaced by tiles. It's an easy win, so I'm doing this first! Cockpit shortened and heatsink/grille added under nose. I'm not convinced by making the nose shorter, but the grille under the nose looks really good. Lowlead's engine mods. Much, much better! DMAC's Imperial Shuttle - not so much a MOD, as the original AFOL design which Lego based the UCS model on: but it contains some good ideas. (BTW, before anyone gets too excited: Lego used DMAC's design by agreement, it was all very friendly. ) On a similar vein, Cavegod's model, which he based on DMAC's... BTW Cavegod, if you are reading this: I know you recycled your model, but do you happen to have pictures of the internal workings of the landing gear mechanism? it looked really cool, and I bet it would fit the UCS kit. Thanks in advance! Quote
cavegod Posted April 8, 2014 Posted April 8, 2014 I dont sorry but it was based on the old stabilzer leg mechanism on the first technic Jcb. To do it now i would use linear actuators Quote
HanShotFirst Posted April 9, 2014 Posted April 9, 2014 All right, once I've got the final 50 parts for my UCS Falcon I'll tackle this. Awesome mods, never seen any before! Quote
ScottishDave Posted April 9, 2014 Author Posted April 9, 2014 I dont sorry but it was based on the old stabilzer leg mechanism on the first technic Jcb. To do it now i would use linear actuators Ah well, it was worth a shot. Thanks for the tip about the linear actuators - I've never seen them before. They do look ideal. All right, once I've got the final 50 parts for my UCS Falcon I'll tackle this. Awesome mods, never seen any before! I'm always happy to spread the affliction . By the way, I can't completely recommend bricklinking this one in parts. There are some expensive and hard-to-find pieces in this set. The most problematic for me (in the UK), were: 2x2x3 75 degree white double slopes (3685) (need 6 for just the shuttle) 1x9 white liftarms (40490). (need 30) Not as individually expensive as bley boat rigging or printed Falcon dishes , but unless you have a few crates of white parts lying around, including at least some of the ones mentioned, you might be better off buying one of the many fine mint boxed examples still available on Bricklink or eBay. Of course, I would not dream of suggesting that you spray any parts white. That would be wrong. Quote
BrickieB Posted April 11, 2014 Posted April 11, 2014 I motorised my shuttle's wings. I think I may have some pics somewhere, I'll have to look for them. I do remember that it was hard to create a structure that held together when lowering / raising the wings.There's tremendous strain on the gearbox and it's bricks come apart easily when moving. Also I had to opt for the XL motor, which was the only one that had enough power to lift the wings. Also, the empty, spacious interiour room is all but gone now, couldn't add an interiour anymore, or a landing gear/ramp... I did use the original system (which I like) and just motorised that. So apart from adding a drivetrain, motor, and gears I didn't actually mod anything. I'll see about those pics, and post them if I find them. Quote
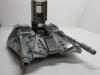
BrickieB Posted April 11, 2014 Posted April 11, 2014 Okay, I'm stunned by the lack of pics I took of this project. I basically only found one! You're looking at the rear gearbox. This is probably version 8 or so I made, this is the only one that kept together when moving the wings. The XL motor is mounted on top of the gearbox. It uses a compact reduction gearbox before going to the central shaft, which runs smack down through the middle of the gearbox. The reduction is done in the front as there is no room to reduce it in the rear, and no way to mount the motor straight onto the rear gearbox because the third wing mount is in the way. The display stand was very slightly modded to accommodate the shaft that passes in the middle. This shaft comes out in the centre at the rear of the gearbox, which is the pic you see here. Another transfer case distributes the movement to the 2 drivelines - but no further reduction is done here. Hope this helps - good luck with your project! Quote
ScottishDave Posted April 12, 2014 Author Posted April 12, 2014 Many thanks for taking the time to look out a picture. Your explanation is nice and clear, and I can replicate your work from that photo. Your mechanism looks robust, and I do like the approach of making as few changes as possible to the original model. I also like the idea of using a single motor. A few questions, if I may...? I was thinking of using two smaller motors directly coupled at the back. Did you ever explore that method? When you say, "Compact reduction gearbox", do you mean one of these, or some other mechanism? Can you recall which gears you used, or even roughly what the ratio was? Where did you put the battery? Was it at the front, with the motor? Many thanks! Quote
BrickieB Posted April 13, 2014 Posted April 13, 2014 Sure, use my work as inspiration :) I usually find it much more interesting to come up with my own solutions, though. But use mine, if you like. I did not try with 2 smaller motors. I think the small ones will never generate enough power, but perhaps 2 L motors is possible. You won't save much space or gain much torque so I really don't see the point. But I'd be interested to see if you can get it to work. I don't recall the ratio as it was built and re-built 20 times until I had something that worked. I needed to increase torque, decrease rotating speed, and move the rotating bit from the motor down to the axle that goes between the original gearboxes. There was not nearly enough space left to get the battery mounted inside the model. So that stays outside. I still need to bring the power cable outside in a cleaner fashion. I have taken a few additional pictures for you - although you can't really see a lot without completely disassembling the model. This is where I mounted the battery box. I believe there was very little or no modding needed. This is a temporary spot. I have included a switch to change the direction of the motors. This is (now) not needed as I could also just switch the battery box's switch, but the idea is to move the box somewhere else... One chair was removed to accommodate the knob, and I modded a bit of the rear of the cockpit. Here is a bit of the reduction unit. You can just see the tan second gear. You can also just see a part of my switch. This also shows just how little space is left over in there, after the motor and reduction gear is included. There is maybe one stud of space between the rear of the motor and the vertical wing mounting structure. The black small gear drives a tan gear which is on the same shaft as another black gear, and it goes down from there. Quote
ScottishDave Posted April 13, 2014 Author Posted April 13, 2014 Sure, use my work as inspiration :) I usually find it much more interesting to come up with my own solutions, though. But use mine, if you like. Thank you! I do appreciate your kind permission. I have taken a few additional pictures for you - although you can't really see a lot without completely disassembling the model. Thank you for the pictures and the information :-). I did not try with 2 smaller motors. I think the small ones will never generate enough power, but perhaps 2 L motors is possible. You won't save much space or gain much torque so I really don't see the point. But I'd be interested to see if you can get it to work. two "M" motors work fine. Quote
BrickieB Posted April 13, 2014 Posted April 13, 2014 Ah, nice mod with the 2 M motors. He probably moified the gearbox quit a bit. But I do like the way he managed to get everythig in there. Quote
ScottishDave Posted April 16, 2014 Author Posted April 16, 2014 Just as an experiment, I coupled my one and only motor, which happens to be an "M", to one of the crank handle axles. I made no changes at all to the original gearbox: It works very nicely. It's a bit jerky, but that might be the nature of the mechanism. Video is here The motor sticks out the back of the ship by a stud's length. I am not too bothered by that: as lowlead pointed out, the shuttle needs to be built up in that area anyway. Added bonus: since, with this system I don't need to fill the body of the shuttle with batteries, motors and gears to power the wings, I was able to build the "play" interior that my son has been wanting: The floor of the troop compartment is sitting right on top of the gearbox - I removed everything down to and including the the yellow technic bricks and blue beams which support the top fin. I also moved the bricks underneath the side walls out a stud to make room for the seating. The compartment at the rear is for a AAA battery box. I still have to work out how to make the landing gear fold up, but that is a problem for another time! More pictures are in the flickr set. I shall resume building on this in a month or two, when finances allow. Quote
merak Posted May 4, 2014 Posted May 4, 2014 (edited) One of the most beautiful UCS models Edited February 13, 2016 by merak Quote
Wonderpants Posted April 2, 2019 Posted April 2, 2019 On 4/16/2014 at 10:30 PM, ScottishDave said: Just as an experiment, I coupled my one and only motor, which happens to be an "M", to one of the crank handle axles. I made no changes at all to the original gearbox: It works very nicely. It's a bit jerky, but that might be the nature of the mechanism. Video is here The motor sticks out the back of the ship by a stud's length. I am not too bothered by that: as lowlead pointed out, the shuttle needs to be built up in that area anyway. Added bonus: since, with this system I don't need to fill the body of the shuttle with batteries, motors and gears to power the wings, I was able to build the "play" interior that my son has been wanting: The floor of the troop compartment is sitting right on top of the gearbox - I removed everything down to and including the the yellow technic bricks and blue beams which support the top fin. I also moved the bricks underneath the side walls out a stud to make room for the seating. The compartment at the rear is for a AAA battery box. I still have to work out how to make the landing gear fold up, but that is a problem for another time! More pictures are in the flickr set. I shall resume building on this in a month or two, when finances allow. Necrobump! scottishdave, did you ever get the landing gear to fold up? Just scored a cheapo 75094, and am looking at using it for parts to MOC an interior for 10212 and connect the cockpit and main body. Maybe even a boarding ramp... Quote
Cylo Posted April 2, 2019 Posted April 2, 2019 13 minutes ago, Wonderpants said: Necrobump! scottishdave, did you ever get the landing gear to fold up? Just scored a cheapo 75094, and am looking at using it for parts to MOC an interior for 10212 and connect the cockpit and main body. Maybe even a boarding ramp... Redbird11 has some good mods, you might want to check out his thread. Quote
Wonderpants Posted April 2, 2019 Posted April 2, 2019 8 minutes ago, Reaper said: Redbird11 has some good mods, you might want to check out his thread. Thanks, I thought I’d seen some other threads on modding 10212 than this one! Quote
Recommended Posts
Join the conversation
You can post now and register later. If you have an account, sign in now to post with your account.