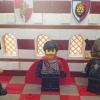
Maxim I Posted April 13, 2013 Posted April 13, 2013 (edited) How to decorate a wall with shields (A very easy decoration technic by Damaximus) So in other words, how can you create this effect: "Not really an unexpected journey - Chall VI - (WIP)" by Damaximus No shields jumping out of the wall, they are smoothly a part of the wall. First of all, I put the "A very easy decoration technic by Damaximus" because I never saw someone else using it. Even in the MOC's of the greatest builders of this time, I see many times how they struggle fitting the shields on the wall. So hopefully this can help them. And most of all, hopefully this technic can help all the other builders too! So what do you need? 1 panel 1x2x1 (bricklinkpart 4685) 1 brick arch 1x4x2 (or 1 brick arch 1x4x1 + 2 bricks 1x1x1) 1 shield and that's all if you only do interiors. So let's start: note: to show the total result, I also incorporated some bricks 1x4x1 in the tutorial The easiest way is that you first put the shield on the panel and then put the arch on top. But you can also do it like in the pictures and place the shield in the end. Warning, this way, you will have to rotate the shield almost 90 degrees in order to place it. Once the shield is inside the gap (created by the panel and the arch), you have to rotate it back. So the rotating is just to put it in the gap. Once the shield is placed, the backside will look like this: next section is edited: It leaves 2 really really really small gaps, impossible to see on pictures. So if you really want to do it perfectly, you can use a Panel 1x1x1 with an arch (a brick arch 1x3x2 or a brick arch 1x3x1 with 2 bricks 1x1x1 under it) or even without an arch!. Now you have no gaps at all! result can be seen here: In this build (my gatehouse) it is without arches. There are a lot of other possibilities as well based on the panel technic (for example: inverted slopes instead of arches , a 1x1x1 brick together with a 1x3x1 arch instead of a 1x4x1 arch , ...) No arches for the panel 1x2x1? Check the spoiler. The only thing you will always need is a panel. If you don't have an arch, you can create almost the same effect by replacing the arch * by 1 brick 1x4x1 and 4 bricks 1x1x1. Only remark here is that you will have some small gaps. * by 2 inverted slopes (1x2x1 I think). If it are new pieces, it will keep hanging straight, even after shaking the MOC. If the pieces are used, you have the chance of slightly rotating after shaking. So always check it before taking pictures So it is up to you to play with it! Hope I could help you guys and girls! Damaximus Edited April 14, 2013 by Damaximus Quote
Darkdragon Posted April 13, 2013 Posted April 13, 2013 Wow thanks for the tutorial. That is so much simpler than my solution and leaves no gap! Quote
Maxim I Posted April 13, 2013 Author Posted April 13, 2013 Wow thanks for the tutorial. That is so much simpler than my solution and leaves no gap! You're welcome Like I just edited in the tutorial, it leaves 2 very small gaps (<1mm²). But those are only visable with the eye, almost never with a camera. To avoid that, you can use the panel 1x1x1 (see tutorial ) Quote
songwm Posted April 13, 2013 Posted April 13, 2013 Good to learn his technique. Thanks for sharing! Quote
Gideon Posted April 13, 2013 Posted April 13, 2013 Thank you! This looks really simple and efficient :) But how stable is the rotation of the shield? Is it hanging straight by gravity or do you need to adjust it prior to shooting your pics? Quote
Maxim I Posted April 13, 2013 Author Posted April 13, 2013 (edited) Thank you! This looks really simple and efficient :) But how stable is the rotation of the shield? Is it hanging straight by gravity or do you need to adjust it prior to shooting your pics? It is hanging straight thanks to the gravity. But maybe by used shields or panels, it can be a bit loose, so always check before shooting Edited April 13, 2013 by Damaximus Quote
Brickington Posted April 13, 2013 Posted April 13, 2013 This is a so much better way than I have been doing. Thanks for sharing! Quote
soccerkid6 Posted April 13, 2013 Posted April 13, 2013 I knew you used the panel, but didn't realize you needed an arch as well. Thanks for the technique Quote
Maxim I Posted April 13, 2013 Author Posted April 13, 2013 I knew you used the panel, but didn't realize you needed an arch as well. Thanks for the technique My first ones where without arch as well. But by using an arch, the gaps disappear (and it's much more solid) Quote
Infernum Posted April 13, 2013 Posted April 13, 2013 Wow! Great technique! Thanks for the tutorial! Quote
kabel Posted April 13, 2013 Posted April 13, 2013 thanks man, I've been bending my mind about this for ages, now I'll see how I can use that on my current ship moc! Quote
-Carson Haupt- Posted April 13, 2013 Posted April 13, 2013 Thanks, I've been wondering how to do this for ages! Quote
gedren_y Posted April 13, 2013 Posted April 13, 2013 Thanks, Damaximus. To avoid the gap issue, I would simply use plates to make the space for the horizontal bar, as you don't really need two perpendicular stud spaces. Other than that, I would like to say that I'm not fond of using the theme name 'Technic' in place of the English word 'technique'. But that's just the writer in me wanting the language to be correct. Quote
Maxim I Posted April 13, 2013 Author Posted April 13, 2013 (edited) Thanks, Damaximus. To avoid the gap issue, I would simply use plates to make the space for the horizontal bar, as you don't really need two perpendicular stud spaces. Other than that, I would like to say that I'm not fond of using the theme name 'Technic' in place of the English word 'technique'. But that's just the writer in me wanting the language to be correct. There are indeed a lot of other variatons on the panel technique as well, it will all depend on how many arches/plates/bricks you have And I always thought it was only in french that they said "technique" Edited April 13, 2013 by Damaximus Quote
Mark of Falworth Posted April 14, 2013 Posted April 14, 2013 And I always thought it was only in french that they said "technique" English is an odd language. Great solution! Next time I need to put shields on a wall I will remember this! Quote
aemil Posted April 14, 2013 Posted April 14, 2013 Indeed, a nice and elegant technique! Thanks for sharing! Quote
Wedge09 Posted April 14, 2013 Posted April 14, 2013 Interesting tutorial, thanks for sharing :thumbup: Quote
Captain BeerBeard Posted April 15, 2013 Posted April 15, 2013 Hell yeah! Thanks for sharing. The thing I love about it is how easy it is. Quote
Kristel Posted April 15, 2013 Posted April 15, 2013 Thanks for sharing, Damaximus. I struggled with this for ages for the lobby of my Lion Heart Hotel and ended giving up and doing an abstract art piece instead. The solution is so elegant! Quote
Alcarin Posted April 15, 2013 Posted April 15, 2013 Never thought of such technique.... dig it alot... Will try it out one day. Quote
Dragonator Posted April 16, 2013 Posted April 16, 2013 Nifty little trick Damaximus, thanks for sharing! That is a useful technique that I shall remember. Quote
Recommended Posts
Join the conversation
You can post now and register later. If you have an account, sign in now to post with your account.