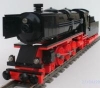
ust60 Posted December 18, 2011 Posted December 18, 2011 Hello forum community, I want to show you the LDD design a small (German) "shunting locomotive" (switcher) It is not the correct wheels. There are only a "placeholder" is inserted I still have not found suitable compressed air tank (air boiler) Oversized image removed by moderator The scale is 1:87. track H0 An similar original. Sincerely, Udo PS:I'm mad at myself (I am angry at myself) as it is Korekt???? I should have learn better in my school English! I try to communicate with people around the globe. But what translates the Google translation tool???? English into German. cruel word salad. Fragments that do not fit together German into English just so cruel???? Misunderstandings are inevitable! Bu.. sh.. , a nightmare I'll have to upload all the pictures to my posts a picture says more than words Quote
LEGO Train 12 Volts Posted December 18, 2011 Posted December 18, 2011 (edited) This work looks really nice! The origninal model is very imposing and so do the cad file ...if you are looking for a bigger air tank you have to rise a little bit the roof and (maybe) use the pieces ref. n. 4081b and ref. n. 62462. Great switcher! Edited December 18, 2011 by LEGO Train 12 Volts Quote
AussieJimbo Posted December 18, 2011 Posted December 18, 2011 But what translates the Google translation tool???? English into German. cruel word salad. ROFL. That's hilarious. I like your design too. :classic: Quote
lightningtiger Posted December 18, 2011 Posted December 18, 2011 Nice digital design there 'ust60' and cruel word salad....interesting.....Goggle Translate is quite weird at times.....are you going to brick build one of these shunters ? Brick On 'ust60' ! Quote
ust60 Posted December 18, 2011 Author Posted December 18, 2011 This work looks really nice! The origninal model is very imposing and so do the cad file ...if you are looking for a bigger air tank you have to rise a little bit the roof and (maybe) use the pieces ref. n. 4081b and ref. n. 62462. Great switcher! Buon giorno per l'Italia Good day to Italy Hello LEGO Train 12 Volts I'm sure you can help me with my problem you recognize the model train Please take a look at the pictures Big red wheels and red axes wait in the basement. Instead of wheels is just a placeholder always the same problem LEGO DD is not designed for trains how do I get the coal tender chassis on the trainchassis LEGO Train 12 Volts I need your help, please Sincerely Udo Nice digital design there 'ust60' and cruel word salad....interesting.....Goggle Translate is quite weird at times.....are you going to brick build one of these shunters ? Brick On 'ust60' ! I do not need to buy everything at BrickLink you get directly from Lego for about 42, - € without chassis and engine Sincerely udo Quote
LEGO Train 12 Volts Posted December 18, 2011 Posted December 18, 2011 Oh wow this is the BR01! Are you trying to create your own copy of this beutiful Teddy's work? Normally I use the: MLCad so you can try with this program You need to download also some extra parts to update your version (you certainly need the digital version of BBB wheels from BBB site), but I think that this CAD allow you to realize everything! Good luck! Quote
ust60 Posted December 18, 2011 Author Posted December 18, 2011 (edited) Oh wow this is the BR01! Are you trying to create your own copy of this beutiful Teddy's work? Normally I use the: MLCad so you can try with this program You need to download also some extra parts to update your version (you certainly need the digital version of BBB wheels from BBB site), but I think that this CAD allow you to realize everything! Good luck! Hallo LEGO Train 12 Volts i miei complimenti my compliments you have it immediately recognized it is the BR 01 by Teddy (Johan van den Heuvel) the steam boiler,the cab,teh tender, The drive concept that I understand everything but not as tender chassis and the steam locomotive chassis are connected Can you give me one or two pictures of BR01 Pictures are a big help Sincerely Udo Edited December 18, 2011 by ust60 Quote
WesternOutlaw Posted December 18, 2011 Posted December 18, 2011 Nice job Udo. I've renamed this topic to make it a little more meaningful to our Train Tech members. Also, please be aware that our image guidelines are 800x600 max. I replaced the LGB train image with a link. Quote
_bIG_fM_ Posted December 18, 2011 Posted December 18, 2011 Hallo LEGO Train 12 Volts i miei complimenti my compliments you have it immediately recognized it is the BR 01 by Teddy (Johan van den Heuvel) the steam boiler,the cab,teh tender, The drive concept that I understand everything but not as tender chassis and the steam locomotive chassis are connected Can you give me one or two pictures of BR01 Pictures are a big help Sincerely Udo You have a Problem to connect the Coal Chassis and the lokomotive, am I right? I think a Solution is to Build a Connection with bricks, get the Chassis in the right Position and delete the Connection then. Oder auf Deutsch: Bau einfach einen Stein als "Ankerpunkt" und bring so den Kohletender in die richtige Position. Dann einfach den Stein löschen und fertig. Gruß Felipe Quote
3D LEGO Posted December 19, 2011 Posted December 19, 2011 (edited) I believe he is having some difficulty in understanding how the locomotive and the tender in the mentioned model are connected. Correct? Perhaps someone with knowledge of the model can help him in this. ust60, Your model of the KÖF II is well done. It is easy to recognize and reminds me of the ones I saw while in Germany. Google translate produces nonsense from the original source material/Übersetzer gibt man Obstsalat von der original eingefügte Texte. The forum correspondence is normally in English, however you are welcome to PM (private message) members in another language whenever you like or you may ask occasional questions in your native language if needed. What works best for you? 3D LEGO Edited December 19, 2011 by 3D LEGO Quote
Hrw-Amen Posted December 19, 2011 Posted December 19, 2011 Nice little shunter. I am confused, what is all this about salad? Quote
Sjuip Posted December 19, 2011 Posted December 19, 2011 Nice work on the Köf! Can you share the lxf file on this model? Just for your information: the Köf was also part of the models that you could build with LEGO Set 10183 - Hobby Train. The lxf for that model of the Köf can be found here: http://www.brickshelf.com/gallery/AndyC/LDD/Trains/10183/27_loco.lxf See also http://www.eurobricks.com/forum/index.php?showtopic=62820&view=findpost&p=911742 Quote
clcwong Posted December 20, 2011 Posted December 20, 2011 Makes me thing of the LEGO one in their factory! Quote
ust60 Posted December 20, 2011 Author Posted December 20, 2011 Nice work on the Köf! Can you share the lxf file on this model? Just for your information: the Köf was also part of the models that you could build with LEGO Set 10183 - Hobby Train. The lxf for that model of the Köf can be found here: http://www.brickshelf.com/gallery/AndyC/LDD/Trains/10183/27_loco.lxf See also http://www.eurobricks.com/forum/index.php?showtopic=62820&view=findpost&p=911742 Hallo Sjuip und Forumsgemeinde Hello Sjuip and community forum das ist kein Problem, ich bin gerne bereit, meine Version der Köv, anderen zur Verfügung, zu stellen. that's no problem. I'm ready. my version of Köv. to share with others. Das Problem ist das übersetzen, und meine fehlenden englisch Kenntnisse, im Moment, denke ich, habe ich noch nicht, die Möglichkeit, alle Funktionen, des Forums zu nutzen The problem is the translating. And my lack of english skills. At the moment. I think. I have not yet. The possibility. all features to use the forum. Wenn jemand bereit ist, und mir alles Schritt für Schritt, am besten in Deutsch erklärt, teile ich meine Entwürfe,(lxf Dateien ) mit allen Forumsbenutzern. Aber bitte nicht, dutzende mal per PM If someone is willing, and me everything step by step, Is best explained in German, I share my designs,( lxf files ) with all forum users. But please do not, dozens of times by PM Ich habe noch keine PM bekommen, und habe keine Ahnung, wo ich mein Postfach finde, und wie kann ich sie öffnen. I have not received a PM, and have no idea, where can I find my mailbox, and how can I open it. Ich habe auch noch die LEGO-DD (lxf Dateien ) von diesen Entwürfen. I also have the LEGO-DD (lxf Files ) of these designs. Also wenn 1.) der Chef ( Phantom Rider of Train Tech " TheBrickster " ) sagt OK. So when 1.) the chief ( Phantom Rider of Train Tech " TheBrickster " )says OK. 2.) Jemand mir hilft, in meiner Muttersprache deutsch, stelle ich die ( lxf Dateien ), für die Allgemeinheit, hier im Forum, zur allgemeinen Verfügung. 2.) Someone help me, in my native language German, I put the ( lxf files ), for the general public, here in the forum, available for general use. Wer Hilfe braucht, muss auch andern Hilfe geben. Those who have need help, must also, Help others give Schließlich ist bald Weinachten. Finally, it is Christmas soon Ein friedliches Weihnachtsfest für alle Menschen rund um den Globus. A Peaceful Christmas, for all people, around the globe. Udo Sincerely, Udo Quote
3D LEGO Posted December 21, 2011 Posted December 21, 2011 After a little back and forth communication I have a clear understanding of what Udo's question is. As previously stated, he is trying to build his own version of a BR01 steam engine based on the BR01-1075 design built by Teddy and the slightly modified version by LEGO Train 12 Volts. He is however stumped as to how the double-pivot articulation between the locomotive and tender was built. My understanding is that there is a draw-bar attached by means of a pivot point to the main frame right behind the last driving axle. This is attached with another pivot point on the other end to the front truck of the tender. The medium guide wheel is mounted to the draw-bar, but is allowed to slide side to side. And there is another pivot connection between the front tender truck and the tender to complete it all. Am I correct?( See attached schematic drawing.) Perhaps Teddy or LEGO Train 12 Volts could provide us some insight as to how the articulation actually functions. Thanks for your input. Reference pictures of Teddy's model with notes concerning locomotive - tender articulation: Teddy's BR01-1075: slide 14 Teddy's BR01-1075: slide 15 My reverse engineering attempt: (Orange represents axis of rotation (IE Pivot points) and yellow is my understanding of the draw-bar's geometry.) Sorry for the spartan drawing. I was too lazy to plug in my Wacom tablet and do things the right way in Inkscape. Udo, Your diesel locomotive MOCs are very well done. I can easily recognise them as being from the DB and DRB respectively. Though the last one reminds me of a BR 294. 3D LEGO Quote
ust60 Posted December 21, 2011 Author Posted December 21, 2011 (edited) Hallo 3D LEGO du hast meinem Problem, fast erkannt, kannst du auf Seite 16, die rote Kachel ( 1X4 ? 1X 6 ? 1X 8 ?)sehen ?. Sie ist direkt unter dem Führerstand, aber über dem Aufstieg, die rote Kachel, ist parallel ( zum Führerstand ), und nach links versetzt. ( Logisch Links kurve ). You have my problem, recognized almost, you can see on page 16 , the red FLAT TIEL ( 1X4 ? 1X 6 ? 1X 8 ?) It is directly under the driver's cab But over the stairs, the red FLAT TIEL, is parallel with the driver's cab, and shifted to the left. (Logical left curve ) Auf Seite18, ist dieselbe rote Kachel, kaum noch zu sehen, dieses Mal nach rechts versetzt ( Logisch Rechts kurve ). On page 18, the same red tile, hardly be seen even, this time shifted to the right ( Logical right curve ) Aber für mich sieht es so aus ( auf diesem Bild ) sie liegt nicht parallel mit dem Führerstand, sondern parallel mit dem Kohlen Tender. And for me it looks like (In this picture) it is not parallel, with the driver's cab, but in parallel with the coal Tender. Siehst du das auch sehen? Ich verstehe die Logik nicht, oder ich muss zum Augenarzt. Can you see the same? I do not understand the logic, or I need to ophthalmologist. Da muss noch ein Drehpunkt sein, There must still be a Pivot, Sincerely Udo Edited December 21, 2011 by ust60 Quote
Teddy Posted December 26, 2011 Posted December 26, 2011 Dear ust60, thank you for liking my BR01-1075 design. The answer is the pivot point of the front bogie of the coal car: Link to slide 14. Link to slide 15. Link to slide 16. The trick is that the front-bogie-of-the-coal-car is not connected to the coal-car itself directly. It can move completely freely under the coal-car. The coal-car rests only on the tiles that are on top of the front-bogie-of-the-coal-car. The front pivot point of the coal-car is underneath the driver-cabin of the locomotive. This is close to the back-bogie-of-the-locomotive and slightly further than halfway of the beam that connects the front-bogie-of-the-coal-car to the six-driving-wheels-of-the-locomotive. The back-bogie-of-the-coal-car is connected directly to the back of the coal-car: Link to slide 13. By arranging the pivot points this way, the spacing between coal car and locomotive can be reduced to just 1 stud. Hope this helps. Kind regards, Teddy Changed 3D LEGO his attachment: Quote
ust60 Posted December 27, 2011 Author Posted December 27, 2011 Hallo Teddy, it's great, that you present yourself, I did not have the courage, you to write to, in your BR 01, I am in love, (Like a school boy) when I saw her the first time. Thank you, that you, the image, have revised. Now I understand better your design, I hope in a few weeks or several months, I can finish my own BR 01. Maybe not as beautiful as your original, but my, inspired by your beautiful original. Can I contact you again, and hope for help when I need help again ? es ist großartig, das du dich meldest, ich hatte nicht den Mut, dich an zu schreiben, in deine BR 01, habe ich mich verliebt, ( wie ein Schuljunge ) als ich sie das erste Mal gesehen habe. Danke, dass du, das Bild, überarbeitet hast. Jetzt verstehe ich, deine Konstruktion besser, ich hoffe in einigen Wochen, oder einigen Monaten, werde ich meine eigene BR 01 fertigstellen können. Vielleicht nicht so schön wie dein Original, aber meine, an deinem schönen Original angelehnt. Kann ich, dich noch einmal kontaktieren, und auf Hilfe hoffen wenn ich noch mal Hilfe brauche ? Mit freundlichen Grüßen Udo Quote
Legoist Posted December 27, 2011 Posted December 27, 2011 Great work!! The Köf locos have always been my favourite shunters and I already knew one day I will build my own version. In the meantime I'll bookmark your thread for hints and inspiration ;) Quote
3D LEGO Posted December 30, 2011 Posted December 30, 2011 At Teddy, Thanks for posting the solution to the pivot points. So in truth I was close, but not 100%. Now I understand what you did so your description makes sense. 3D LEGO Quote
Teddy Posted December 30, 2011 Posted December 30, 2011 Hallo Teddy, it's great, that you present yourself, I did not have the courage, you to write to, in your BR 01, I am in love, (Like a school boy) when I saw her the first time. Thank you, that you, the image, have revised. Now I understand better your design, I hope in a few weeks or several months, I can finish my own BR 01. Maybe not as beautiful as your original, but my, inspired by your beautiful original. Can I contact you again, and hope for help when I need help again ? Mit freundlichen Grüßen Udo Dear Udo, thank you for your post. You can send me a PM (personal message) if you have a question. If I have time I will surely respond. At the moment I am a bit busy as my Ph.D. defense is in two weeks. After that I will go on a short Holiday. Kind regards, Teddy At Teddy, Thanks for posting the solution to the pivot points. So in truth I was close, but not 100%. Now I understand what you did so your description makes sense. 3D LEGO Dear 3D LEGO, thank you for your reply. It took me some time to come up with this method. I was trying to reduce the gap between the tender and locomotive as much as possible. By arranging the pivots in this way I could reduce it to 1 stud. I had an alternative method to reduce the gap further, but that experienced too much friction when cornering. Kind regards, Teddy Quote
Recommended Posts
Join the conversation
You can post now and register later. If you have an account, sign in now to post with your account.