Search the Community
Showing results for tags 'snowmobile'.
Found 10 results
-

[MOC] RC Snowmobile "Trident" - Control+ / testing in snow
cyberdyne systems posted a topic in LEGO Technic, Mindstorms, Model Team and Scale Modeling
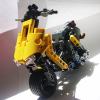
Good day, everyone! Each winter I hope to build some offroader to drive in snow, and each winter something goes off. Finally in 2022 I,ve finally built what I wanted - big orange snowmobile with control+ electrics and sprockets from Liebherr/ SNOWMOBILE "TRIDENT" Two main parts are the chassis and the body. Let's start with former. Front side - as it is snowmobile it is fitted with two steerable skis. Suspension consists of parallel levers with two big yellow shock absobers and two hard small shock absorbers between the levers. Suspension is strong enough to bear the weigh of control+ smart hub with 6 battries, body parts and optionally Darth Vader as the driver. Skis are 5M wide and each one has two small rubber wheels inside to add traction on smooth surfaces (with them you can steer even on smooth floor - without only on snow) front suspension has positive castor angle. Which looks cool, but required some tricky techniques to implement steering - for example - for steering I used Large Angular Motor (or simply LAM) it is in parallel with suspension levers, but connected to chassis and smarthub with angle. Next - rear part - all driving motors (2 XL) are inside the tracks. Reduction gear is 28:36 (or 1:1,29) - keeping motors inside the tracks reduces the weigh of body which is good for suspension travel. Long shock absorbers work for vertical movement of only rear part of vehicle, whereas short sh.a. are used for vertical movemnet of whole body (long sh.a. act as parallel levers) And finally - the bodywork. I think this is for now the best bodywork I've ever made for MOC - it is orange, it looks good and its reliable and rigid enough so you can grab this Snowmobile by most of it's orange sections and nothing will fall away. Furthermore, all panel are locked in places and don't wiggle at all. I've even used aquaman's trident from brickhead as mascot when I figured out that Snowmobile looks a lot like trident from above. For everything else that you need to know i invite you to watch the video: P.S. I wanted this snowmobile to look loke a fish. But it turned out to be closer to shrimp or prawn :) -

[LDD MOC] Ninjago - Reimagining of Zane´s Snowmobile
badchriss posted a topic in LEGO Action and Adventure Themes
I´ve never been the biggest fan of oversized motorcycles in Lego sets (i´m looking at you, various Ninjago sets and especially 2019 Captain America Cycle!) so i decided to shake things up a bit and reimagine the weird bike/snowmobile thingy from the recent Ninjago set 70667 into some sort of hotrodded Ice Trike. I tried using most of the parts that are characteristic to the original build and/or get stickers. What do you think of this remoddeling? Better or worse than the original? -

[MOC] Snowmobile RC
Hogwartus posted a topic in LEGO Technic, Mindstorms, Model Team and Scale Modeling
I' ve made a model of a Snowmobile. I've tried to make it as detailed as possible. Video: Functions: - Driven tracks (L motor) - Steered skids linked to handlebar with Ackermann geometry and positive caster angle (M motor) - Front double wishbone suspension - Realistic rear suspension Everything is controlled remotely using SBrick. Please watch the video to see this machine in action and for more details. I hope you liked this model. -

[MOC] Snowmobile With SBrick
KevinMoo posted a topic in LEGO Technic, Mindstorms, Model Team and Scale Modeling
EDIT: Building instructions available: HERE -------- I always wanted to build something different. Something not seen too much on EB. Introducing my latest MOC: Snowmobile With SBrick. Inspiration About two years ago I saw a video about Ski-Doo snowmobiles on YouTube. I really like the exterior design of its product and thought maybe I could build one in LEGO. But I wasn’t skilled enough to finish it at that time so the project got suspended for a long time. This finished MOC is not based on a specific model of Ski-Doo. It’s more like a combination of all my favorite parts from several models with my own thoughts blent in. Challenge: External Design Unlike most conventional wheeled vehicles, a snowmobile usually has a more complex bodywork (except for supercars). Considering its relatively small size, it’s even more difficult to recreate its aesthetics authentically. Some “illegal” connections are inevitable. Challenge: Internal Design An unconventional vehicle needs an unconventional framework. Here is a screenshot from LDD showcasing the frame. Servo Motor is used as part of the structure. Another problem goes to Power Functions. How do I stack them inside the frame? Here is a cross section view of the model: 2 L Motors geared 3:5 for propulsion. 2 pairs of LEDs utilized for headlights and taillights. Space is very limited, I have to use a pair of tweezers to tuck those cables. Performance Let’s take a look at a video: On hard snows it works fine for most of the time. Also, front suspension responds quite well. Compromises Due to aesthetics concern, Power Function parts were located at the front, which makes the model a bit front-heavy, resulting a relatively poor traction. I wouldn’t dare try testing it on soft snow... Also, the color scheme is a bummer. The white one is imperfect. Black one looks much better, but a bit dull. I still haven’t decided which color should I choose to make building instructions for... Last But Not Least This is a little off-topic talk: I just got to know about the Chinese company “LEPIN” and those dirty things they’ve done recently. As one of the very few Mainland China users on Eurobricks myself, I feel sorry for what my fellow people have done to this world. I feel sorry for Madoka. The only thing I can do is to share my original works with you guys, That’s the least I can contribute to this fantastic community. Anyway, so much for the sentiment. Hope you enjoy this MOC and stay tuned for the instructions. -

[MOC] Snowmobile Mk I
syclone posted a topic in LEGO Technic, Mindstorms, Model Team and Scale Modeling
Good day! Today I present to you my newest MOC - a Snowmobile! This MOC uses my Heavy Duty Track cocept , which looks to perform really well on carpet. There's not much to tell , it is under-powered by 2 m-motors and steering by another m-motor. The drive motors can be changed to l-motors without any problems , it should perform much better with them. There's no snow where I live , so I wasn't able to test it outside Here's the LDD file ( click! ) and Bricksafe gallery Any remarks or opinions are welcome -
Snowmobile (failed) project
miguev posted a topic in LEGO Technic, Mindstorms, Model Team and Scale Modeling
Hi all, I'm about to disappear for several months, but before I go I'd like to leave something here for your amusement... and hopefully get some advice It all started with , best one I've seen so far. I wanted to do something similar, preferrably with a softer rear suspension that would behave realistically on a bumpy ride (piterx setup seems stiff). Trouble was, I had no clue how these work. I had to like a gazillion times, to finally make sense out of photos and other models. In the end, I think I got a reasonable setup, using custom shocks also inspired by piterx Ford Fiesta. Now, for the fun part: I'm new to snow. I grew up in Tenerife, where you'd only ever see snow when it was old, unless snow caught you by surprise above 2,000 m. and then you'd be stuck there for days. No kidding, my dad used to work in the telescopes up there, when it snows there, you better not be there. And I never travelled much. So I'm utterly clueless about the different states / kinds of snow, let alone which ones are good or bad for what. I just took my protoype for a quick ride in the only moment I had a chance. The result is rather embarrasing, but I hope you find it amusing: I guess snow was too soft.. how should it be to ride a Lego snowmobile this size? And what weight would be reasonable for the model? Should I first build a snowgroomer and use it to prepare snow for the snowmobile? Some improvements I've been thinking of (but not sure they're good ideas): Longer, wider (4L) skies, specially at the front. Longer suspension arms (6-7L), to separate skies for better sidewise stability. Move weight to the rear, for better traction on the tracks. Center weight sidewise, this prototype was always leaning towards the right. Reduce weight, this prototype was already ~700 g. without any bodywork! Use outer output from Buggy motors, which is stronger. If you're curious about the targeted aesthetics, it'd be something like this: And if anyone knows the physics behind , I have an itching curiosity: how light should a snowmobile should be to be able to ride on water with the inner (fast) output of 2 buggy motors? (my guess is: lighter than the motors plus a PP3 9V battery) -

[REVIEW] 42021 Snowmobile
EvilEnderman posted a topic in LEGO Technic, Mindstorms, Model Team and Scale Modeling
Review - Snowmobile 'Ello all Recently purchased the snowmobile, and wish to try my hand at this reviewing lark. It costs £14.99, and for non teadrinkers, USD $19.99 and EUR €14.99. This set appeals to me greatly, due to the plethora of interesting peices, and great angular design. Not to forget, those tracked peices too, especially as these are the first in my collection. Nonetheless, does it provide a nice set of skids for your quids? Let's find out! The box Here's the box, quite small, with a nice image of the set. Well presented so far - Shows suspension function in the corner Ashens fans will be relatively amused, 0-3 sad onions here! (Not the rare 0-8 we seldom see) Contents Out of the box came three polybags, one for tracks, one for small nitbits, and other for main elements - exciting bits can be seen already! Comes with instructions for A and B model, which is always great - to TLG for that. Upon opening the bags, we see some great pieces, new suspension arms that are compatible with this new small steering knob, and the larger one, making it great for all scales of vehicle. There's also a connector with the two cross axle holes coming out of it, as depicted as Hrafn's forum avatar - very useful piece. additionally, the dog bone I frame, another useful piece. But, most importantly for me, 6 of the thin 4x2 plates in black - I've always wanted a pair of those! The steering link here comes with no stoppers, which is always useful - especially after building Kuipers' pony car, which uses both sides. Not to forget the 3l pin with cross axle, which this set has 2 of! The Build Instructions are well laid out, had no issue distinguishing colours, although some steps were very simplified. We begin making the suspension assembly, with a clever use of the I frame. Turning radius is a little short, however. Another instruction shot, however I've highlighted the frictionless pin there, as I've perused the instructions with great effort, and haven't found anything that connects to it. If anyone does fathom its purpose, let me know Cool technique is used here, hat goes off ! Leftovers . Completed Model The finished model stands proudly on the desk, after about half an hour of building, helped along by some 80's rock, and a good cup of tea, it's looking great. Especially love the colour scheme of the black on green, and those angles are truly astounding. Note the pin on the L beam that stops the track from tipping up when being held, and the white gives it that sporty look. Great model! Stickers do compliment the model, but I found it looked great without too. They won't be staying on for long, however, as I have plans to use the panels! Front looks very 'gnarly' , and the suspension is plush, and fun to compress - also note that the chassis does not hit the ground when the spring bottoms out! The skids themselves feel a bit wobbly, but they do not come apart easily - those red pins were a bugger to get in, and I don't look forward to getting them out Track rolls freely, and satisfyingly, as well as being nigh on impossible to derail. steering lacks a bit on a hard surface like my desk, however, it's a lot better on the carpet. I doubt next year will bring any snow to test this on either, us Essex folk never have any luck with that The Verdict The functions of the set work perfectly for the price you pay, which isn't big! IT looks great, feels great in the hand, has great pieces that can be used for MOCs. So hats off to designer Mike Jeppeson! PROS Suspension Steering Great aesthetics Good colour scheme No STAMP CONS Could have had a few more functions Playability is limited on hard surfaces Skids are a tad flimsy Design 8.5/10 Looks absolutely stunning Build process 7.5/10 Nothing interesting, but not much repetition Functions 8/10 Functions work well, however there is a lot of empty space in the model Playability 7/10 Works wonders on carpet, but hard surfaces not so much, which could be a drawback for some Parts 9.5/10 Spectacular part selection Value for money 8.5/10 You get a good set of skids for your quids Total: 8/10 Cheers for reading, and apologies for not including a poll - I haven't got the ability to do so (if any staff could add one on, I'd be extremely thankful) This is my first review, so tips are greatly welcome! Also, if anyone found the reason for that frictionless pin, do share with us! Cheers again, Enderman -
Well, I couldn't resist, my local toy store not only had 10% off, but were just putting the new 2014 sets on the shelves and the big orange white and blue box was shouting "buy me, buy me!" from its shelf. So whithout further ado here is my review of the 60036 Arctic Base Camp. Arctic Base Camp Set #: 60036 Year Released: 2014 Piece Count: 733 Minifigs: 7, plus 4 dogs, 2 fish and 1 bear RRP: $89.99, £59.99 (according to Brickset, but UK retail seems to be £69.99 at the moment). As the set is a collection of models rather than one big construction, I will break the review down per the instruction booklets before giving my overall impressions at the end. So in this post enjoy Part 1: The Box the Snowmobile and the Dogsled (the less popular rip-off of the lion, the witch and the wardrobe!) The Box: Pretty big, as you might expect for a set of this price: The front shows nicely all the models and minifigs packed into the set and everything is in full action mode hinting at the playability of this set. The base is perched at the edge of an ice shelf, with snow covered mountains in the background. Just in case we forgot this was part of the City line the logo looms above the base and there are skyscrapers on the far horizon in the top right. The back has a standard 'hey' guy, but in arctic gear showing us a few of the models and play features of the set., the left side tells us this is a numbered build with pretty much one bag per model. The bottom left corner tells us to go online to play the LEGO City game, though our arctic player is dressed a little warm for downtown; also he appears to be making off with some money being chased by the police- maybe it is only so long before we get arctic police and fire sets!? The top edge shows the 7 minifigs we get with the set along with a couple of the new huskies and polar bear. The Contents We get 8 bags, and a cardboard backed deck of instructions along with a single sticker sheet. Loose in the box is a 16x16 plate (not baseplate) and conveyor belt. Disappointingly we aren't trusted to build a conveyor belt, it comes as a permanently assembled moving POOP. As it is split into mini builds, I'm going to deal with each as it comes as I explained above. Her you can see the DSS and the instructions for build 1; the dog sled and snow-mobile. First page of the instructions gives us the open bags in order comic strip and an advert espousing the virtues of the brick separator. Random instruction shot: The pale white/blue snowscape background shows up the models well and generally colour distinction is good; though occasionally the white parts look a little bley. Despite this, with the bagged nature of the build and clear part callouts, you're pretty unlikely to be confusing parts. There are also quite a number of single part steps, so this should be easy for even the youngest lego fans to put together. The Parts (Bag 1) Already new, or at least interesting, bits everywhere, inverted 1x3 cursed slopes, new skis, 2x2 tiles with studs, the parka hood, husky, handlebar type bits and an orange brick separator. The Minifigs In this bag we get 1 male and 1 female researcher, with male and female specific torsos; note the 'hourglass' shading on the female and different pocket configuration. Both seem to have some kind of GPS, temperature sensor or stopwatch on their person- the girl's reading '4^' the guy's '3^'. The different coloured ski goggles are a nice touch, though unfortunately having printed goggles rather than a goggle piece makes these heads theme specific. Legs have various climbing gear printed on them and the rear torso has a nice mission patch. The Build and Model: Snowmobile Part way in: Here you can see the use of the SNOT tiles and inverted curves to make the model a healthy carpet-runner; an interesting step away from the usual 2x2 round dish pieces you see on most LEGO boats (and in fact on the dog-sled in this set). Bam!: Here we are, finished, and I like it. The front curves come together nicely with clever parts usage and, whilst I missed it in the unbagging, the 2x2x2/3 slope on the front is printed, yes, printed! With a friend: Let us compare him with the 1990's offering; you can see the definite 'up-scaling' from 'town' to 'city' era. Whilst the new model has no obvious drive mechanism (though chainsaws probably weren't the best or safest) the shapes possible with the new parts just make it look so much better. My only criticism of this model is the width- due to the car axle used the thing is 6-wide at the skis. Unfortunately due to how the nose is put together it wouldn't be easy to change, but I cant help but feel this might be better with the skis at 4-wide (dry test example below): The Build and Model: The Dog Sled Part way in: After the snowmobile, this disappoints slightly in being a much more traditional vertical brick-stacking affair, we also come to our first sticker- that 1x2 cheese gets a radar screen and radio handset sticker. Finished the sled: Radar you ask? Why yes, here we are with everything but the dogs and you can see a small radar dish so the driver can see everything that's forward and left of the sleigh I guess. The use of a small boat mast to build the dog harness is an interesting feature and quite inventive use of bricks. The dogs! Yes the doggies! A new mold as you can see compared to the standard City dog on the right. Although the face/ear prints are identical the coat colouring appears to be achieved by mixing plastics which gives a subtle variation between dogs and makes them appear like individuals- a nice touch whether intentional or not. Note the traditional City dog is 1 stud taller- so there can be no Disney style city dog becomes sleigh dog scenarios. Finished: As with the snowmobile the 6-wide feels a little on the large side but otherwise I can't fault it, there are lots of play features packed in with the fishing gear and radar. The dog attachments are surprisingly strong and play-able so a race between dogs and snowmobile wouldn't be a question of who falls apart first. Plus dogs, did i mention the dogs? I like the dogs! Scores for Bag 1 Parts: 9 - very good selection for such small models, Lose a point for disappointing me with a sticker after delighting me with printed parts. The figs: 9 - Very nice printing on both figs and their hoods. I don't really see the need for a feminine torso though- I doubt real arctic explorers cinch their waistbands to show of their hourglass figure (if you are an arctic explorer feel free to tell me I'm wrong). Along with the face prints which are only really good for snowy scenarios this isn't quite a perfect 10. I'm still tempted to give it a 10 just for the huskies, they are simply excellent. Build & Model(s): 8 - The builds are short but sweet, and the curves of the snowmobile were satisfying to put together. The models look good if a little wide from some angles and its a shame the snowmobile has no visible means of propulsion. Playbility: 9 - The snowmobile is pretty swoosh-able, though compared to the dog-sled is a one trick pony. The dog sled has fishing gear, a something detector/radar and dogs as well as swooshing pretty well. The separate instructions and bagging also adds to playability as kids of shorter attention span (or simply wanting to prolong fun) can build, play, pause, build more, play more etc...as I am off to now before I bring you Part 2: The Helicopter! Note : value for money score will come with an overall score once I get to the end of part 5...
-
Hey guys! As i've anounced you some days ago, i made a brand new snowmobile wich totally kicks the hell out of the MK I i made two years ago... This is lighter, faster, nicer and mainly better built than the previous one :D I wanted to shoot the video before posting it, but i'm not sure there will be snow tomorrow on the mountain where i'm going to shoot it... so for now here come the pics and i'll cross fingers that i won't make 50km uselessly :D Features: - Power functions - Front independent suspensions - Rear track suspensions - Rc buggy motor for drive and servo for steering - Improved track thread - Custom stickers you can see how i improved the track by adding 1x1 rounded plates in each hole of the threads, now it has way more grip also because i moved backwards the center of mass placing the lipo battery under the seat. In theory it should avoid the front skiis to sink in the snow... the rear suspension also helps pushing the thread against the ground... It performs really nicely on the carpet...but i think it will be fine on the snow too :P there's a lot of ground clearance so it could easily deal with 2 or 3 cm of fresh snow. Front suspension is really soft so it should be stable if one of the skis goes on a bump. as you can see in this picture i've removed every atachment that sticked out of the track and the skis to avoid a braking effect once it's in the snow.. I also placed all the electric components quite high so the snow dragged by the track shouldn't reach 'em detail of the track with 1x1 rounded plates :) i hope you'll like it :)
-
I am in the finishing stages of aking a snowmobile MOC, and thought I'd show the current state of things before I go on holiday, and won't be able to build. I will however bring the model with me, to hopefully shoot a video of it performing on snow It is powered by two RC Buggy motors, through the standard RC Receiver Unit (Gives some range, compared to IR PF RC). It features double wishbone suspension on the skis, and they are steered through the RC Steering Unit. The entire belt/track has a BIG spring for suspension. The belt is driven by the two RC motors directly onto a large sprocket wheel. In it's current configuration it is set on the innermost (fastest) output of the motors, but it is built so that it can be changed fairly easily. I haven't tried this configuration yet, but the "slow" output propelled it nicely along the carpet, and given that the coefficient of friction between smoth plastic and snow is close to zero, I'm not worried. The skis are three studs wide, and made with an upside-down technic brick with tiles on top (bottom), to provide better steering. The skis are also sprung to keep them from digging into the snow, as well as give some flex when driving over obstacles. The steering features ackerman geometry, but that is more du to the available pieces used for suspension/steering, than an actual necessity The steering hadlebars are moved from the front output/input of the RC steering unit, through a lot of U-joints Hey, it works I fitted two 5x11 panels directly under the Receiver Unit, to prevent snow from entering the battery compartment.. (I might have to do something about the motors themselves as well...) There are some more pictures, as well as some VERY high resolution (finally got myself to buying a (cheap) lens for my EOS 50D) versions of the ones I've shown here at my Bricksafe for those interested. Now, I just hope there is some snow in my parents' garden when I get home for Christmas holiday!