Search the Community
Showing results for tags 'railcar'.
Found 6 results
-

[MOC] Chilean "Gondola Carril T-1024" in 1:22.5 scale
Paperinik77pk posted a topic in LEGO Train Tech
Hi all, today I'd like to show you something I'm after since a few months. During the first days of lockdown I saw a documentary on Chile and its people, towns, traditions and lifestyle. One of the main points of the documentary was focusing on the railway running from Los Andes to Rio Blanco valley , a spectacular run between mountains, aside the Rio Blanco river. Originally it connected Chile to Argentina. And this "thing" was presented as the main attraction of the current line - its name is "Gondola Carril T-1024". I sincerely do not know why it is called "T-1024" . The "Gondola Carril" is a railmotor, based on an American built bus, the Yellow Coach Z-26. This time I understood that the letter Z is identifying the chassis type and 26 the number of passengers it could carry . The bus was normally used in Los Andes town, until it was converted into this very nice railcar. Originally used as a cheap inspection vehicle, It is now fully restored and used for touristic travels. And I can say it is an experience I would like to do once in my life. The "Ferrocarril Transandino de Chile" is a narrow gauge (metric) railway, therefore I based the whole project on 1:22.5 scale (good for running in the garden!). It is designed to run on G-Scale track (45mm), but with some modifications it could easily be converted to run also on standard Lego gauge (on large curves, since it is quite long). Since there are no specific technical specifications for the Gondola, I searched for the ones of the Z26 Bus - and tried to adapt the design according to the pictures and videos of the real railcar. The original motor used by Yellow Coaches Bus was replaced by a more modern Cummins Diesel, as nicely "declared" above the radiator. Despite the original railcar is based on a chassis, this one is basically a unibody build with some underside reinforcing (let's say - like the Jeep Cherokee XJ). It's quite light, so a medium motor is sufficient to move it. In the design, I used a PuP motor, placed in the front, under the hood. Then a pair of gears in cascade, cardanic joints and a transmission axle bring the power to the rear wheels. The "gears" I mentioned can be changed easily to have a lower or higher gear ratio, as needed. This railcar not meant to pull anything, so a lower gear ratio could save some batteries. Battery box is placed in the rear part, immediately beyond the rear axle. The small red axle you can see near the T-1024 sticker is used to turn the PuP battery/receiver on and off. The next picture shows the powertrain - it's taken from an alternative blue version of the railcar I prepared , with some freelance solutions which make it more "generic". I hope you like this one, and (more important) take a look to the original one, because it's really nice piece of history. https://www.ferrocarril-trasandino.com.ar/historia/ Ciao! Davide -
Hi all, after a quite long absence from the forum, I'd lilke to show you this small MOC I just prepared. It should have been a model for the Octrainber, but since I've no time to prepare the whole diorama, I'll show you only the little railcar. The Egger-Bahn is a model line created in the 60s, based mainly on fictional freelance rolling stock (even if some models were inspired by real prototypes). These models were in 1:87 scale, running on H0e track - therefore simulating a narrow gauge system. One of the main models was the articulated steam railcar you can see in this picture taken from internet. The lillte railcar is articulated and composed by a steam motor and an half-passenger wagon. It is a very nice model and I've always liked it! Since I'm working a lot on big scales, I wanted to do something different, so I got back to 6-wide on 4-wide track: It's super-deformed as my other small locomotives I made , and it's based on the 9V red MicroMotor. It can run on black Lego narrow-gauge track and on LEMAX Christmas Train track - which is perfect for small Lego models (and features straights and larger curves). Here below you can see the different components, like the MicroMotor, the rear bogie, and body parts (motor and trailer). And here's a detail of the motor and passenger trailer. As you can see, the 9v MicroMotor is mounted upside-down, and moves the rear wheels of the steam motor. The power comes from a 9v battery box, but I succeded to run the Micromotor on small 12v batteries. Some home made electronics may save space! The batteries should be placed near the trailer link, therefore their weight - insisting on the only driven axle - can improve traction. I hope you like it! Ciao! Davide
-

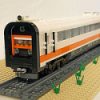
[MOC] Railcar SBB De 4/4 - News of Bricks-on-Rails
Bricks-on-Rails posted a topic in LEGO Train Tech
Hey Community, Finally, after a long time beeing absent, we´re back. And we´re here to re-introduce ourselves and to present something new. Some of you may know us from the time before we disappeared. By the way, we were not away we were just calm. Now, since beginning 2019 we´re back and we´re happy to be back again. Enough to us... ... here is the model. The model, that we like to present isn´t actually a new one. It is more like remake of a previous version (history). It´s a railcar, the "De 4/4 or Fe 4/4" of the SBB (Swiss railroad company). The example was used in the late 1920s in swiss. Overall there were 25 units built in different versions. The model is approx 40cm long, 7.8cm wide and about 12cm high. It is possible to motorise it with up to two Power Functions XL-motors. That will power up all four axles at the two boogies. The IR-Transmitter and the battery-pack will take "a seat" in the cabin. One of the two cabins is equipped with a small interior. The doors protrude a little to convey an impression of functionality, but the doors and the roof could not be opened due to the interlaced-design. The roof, with the extentable pantographs, the boogies and the substructure is highly detailed. During my investigation i found three major designs, that´s why it is possible to build the model in these three designs. - dark-green - brown - light-blue Now it´s enough with texting. Here are some 3D-Renderings. More pictures can be found in the flickr-folder. -
Presenting my Coffee Pot Steam Motor Coach NJAB 1. It is a unique Australian steam engine and passenger coach combined into one. The 2-2-0 steam engine was made in Leeds, England and the coach was built in Birmingham. There were only 2 built. Unit #1 entered service in 1906. For my LEGO version, I selected the dark green one that was displayed in Alice Springs during the 1960s to '80s. It just so happens I have some dark green 1x1 PAB bricks sitting around for ages. Coffee Pot Steam Motor Coach by dr_spock_888, on Flickr I believe this is my first steam MOC. My building technique was look at the picture and mashed it into a LEGO standard 6 wide style with parts on hand. It has Power Functions train motor, AAA battery box and IR receiver. The receiver is easily accessible behind the cab to change channels which is useful for running at our LUG events. With all the coffee the passengers and crew are drinking on my Coffee Pot, my rail outhouse should be included in the train consist.
-
Hi to all, From the MTRkustoms factory we have the pleasure to present the ARDUINO AUTOMATED LEGO RAILCAR Here you can see the Railcar in detail This use modification pass the following phases PF --> 9v --> Arduino Control The original idea was very simple, have an autonomous and continuous Railcar in open circuits. I based the function in a great cheap invent, The Arduino Board, this small, easy programming and low cost, gives me the chance to make it real with a cost below 10€, including a PWM motor controller L298N Only 1 9v cable was "damaged" to convert its connection. The cycle work is very simple, Railcar goes from end to end regulated by the L298N with a PWM velocity. When the Railcar hit the final of the track (switch detection) stops 5sec and go to the other end and stops 10sec (and able to the passengers to go down) Time, velocity and stops time can be easy fixed by the programming. Some pictures of the system Stop No.1 Stop No.2 Switch Detail Cable connection boxes To hide the Arduino board and the L298N I made a modern prefabricated transformation Station Detail of the track connection Interior of the Transformation station All Full resolution pictures here A little video Enjoy it
-
I am pleasant to present my EMT "Charleroi" Madrid Railcar This railcar was a typical railcar in the streets of madrid in the 40s This is the original: Datasheet: Lenght: 26 studs Wide: 7 studs Height: 9 bricks Pieces: 460 aprox, a bit more than expected in LDD File due to technical problems (i need more rigidity than i expected) Weight: 370g without battery PF powered with custom Li-Ion battery Detachable roof, for easy acces to battery Some pictures of the MOC: Detail of one rigidizer and the stairs: Detail of the boguie Detachable roof For more and bigger pics click here Pictures: Panasonic LX5