Search the Community
Showing results for tags 'race'.
Found 68 results
-
Hi, guys! I know that, there is February yet and we're before March release, but let's start new topic! So, at first I want to say that 2023 wave is amazing. New brand, new mudguards, new windscreens! Whoah! And there are my speculation/cars I want to see in Speed Champions 2024: ~ Porsche 911 GT2 RS Clubsport 25 ~ Porsche Taycan ~ Audi e-tron GT ~ BMW M6 ~ BMW M4 GT3 & BMW M3 1991 ~ Ferrari 499p LMH ~ Ford Focus RS 2021 ~ Honda Civic Type R ~ Cadillac LMDH What do you think about my cars? What cars would you like to see? Show your speculation/wishlist.
-
Hi everyone, this is my first post here :) Below is an 8-wide Le Mans race car, which is able to fit a minifigure with helmet in the cockpit. Hope you guys like it ! As I need more funds for my future mocs, this LDD file is now available for sale :) Regards, KMP www.facebook.com/kmpmocs
-
 Lego Technic Ferclaren M23 and S23 Bolides (Free Building Instructions) Those are latest and most advanced M23 and S23 bolides models of Ferclaren Racing Team. Each model has 4 Technic functions: rotation of the front left wheel rotation of the front right wheel rotation of the back left wheel rotation of the back right wheel Overall, those functions give capability to move these models with enormous speed in lego world. Those robust models passed many children quality tests and proved they great playability. If you interested in building those advanced models by yourself the download links are below the images. Lego Technic Ferclaren M23 and S23 Bolides Free Lego Technic Building Instruction download magent link: magnet:?xt=urn:btih:8214FE6D177497EC1976F3091096496E1ED7FB1B
 -
Calling all Technic builders in the Toronto area!
Teo LEGO Technic posted a topic in LEGO Technic, Mindstorms, Model Team and Scale Modeling
Hey Eurobricks Technic enthusiasts! After being asked recently if I would enter my latest MOC in a race, it occurred to me that it would be pretty cool if we could have trial truck races here in Toronto, Canada as they have in parts of Europe, like Sariel and his crew in Poland. @2GodBDGlory and I are both based around Toronto, and we decided to try to organize possibly the first Toronto-based trial truck MOC race, so we're calling on all builders in the area to see how many people we can bring together! Everybody is welcome, and any information anyone has that could help us out is welcome as well -
After some work in my (not so much ) freetime, I almost finished my project for a F1 racetrack with paddocks. I started to work on it some months ago, due to I like F1 and motorsports and I was partially inspired by old LEGO sets I played with when I was a child. First design idea was based on old road plates, but I cannot find a plate that really matched my idea and needs. So I decided to move on to new LEGO modular roads and I think it was a very good choice: they gave you ability to reach high details level. I was able to reproduce racetrack start line, cars positioning lines, pit lane markers and so on. In addiction to it I was able to add studs on pitlane so you can attach mechanics minifigs. The top section of each team-box can be detached easily and can be swapped togheter as you prefer. I designed some race commentary rooms with microphones, race statistics on monitor and so on and a podium part. The podium section is two team-box wide, fully detachable and has a pilots after race interview room on the back. MOC has width compatible with standard 32x32 road plates (2 of them) so it can be easily added to an existing layout. I also tried to imagine some stickers to be placed on podium section top panels. I tried to design this as modular and extendable as possible and now I'm working also on the part for the spectators which will be attached in front of paddocks (where there's the small green grass part) and it will be also compatible with 32x32 road plates. I added my MOC to LEGO Ideas, if you like it you can support me here: https://ideas.lego.com/projects/a914f1ad-f2da-4ec9-80df-009c2073b7c1 NOTE: I cannot edit the project on Ideas yet, so some images here are newer and a bit different. In a couple of weeks I will be able to edit the images on Ideas as well :D
-
Hello everyone! Maybe it's too early, but let it happen. What do you think of the Speed Champions series in 2022? Do you think it will disappear or continue, or will it be under a different name? Anyway, personally, I think they will stay with us for a long time (after all, they have made specially new wheels for 2021). It seems to me that there is a good chance to see in 2022 in the SC series such cars: - BMW M8 (maybe GTE) - Pagani Zonda or Huayra - Ferrari - some F1 car - due to Toyota license can Toyota gr010 (hypercar) - maybe some cars from the DTM or VASC series Post comments about what you think.
-
Hi everyone, Here are the Silver Speeder and the White Witch from the 80's TV show Star Wars: Droids. I wanted to put in figs to show the scale of the vehicles but don't have anything approximating Thall Joben, or a Holiday Special era Boba Fett, so a few substitutions were made. The Silver Speeder (well, light bluish grey speeder) - 286 pieces The White Witch - 261 pieces
-
Drag Brick Wheelie Machines drag racing and music!
-
What do you think will be coming out of the Speed Champions series in 2021? Personally, I think there is a chance for something from IMSA. There may be such sets: Corvette C7.R (small set) Koenigsegg Jesco (small set) Porsche Taycan (small set) Toyota Ts050 Hybrid (double set) Aston Martin Vulcan or Vantage GTE (double set) And maybe something else with hypercar because of the WEC season 2020/2021
-
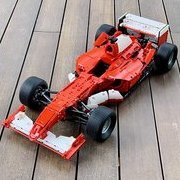
I’m not a “car guy” by any stretch of the imagination. I couldn’t even tell you what type of engine my own car has. However, I like cool-looking sports cars as much as anyone and bought a fair amount of LEGO Racers sets back in the day. And while I haven’t bought any sets from Racers’ spiritual successor, Speed Champions, I’ve had my eye on some of the sets for a while. Each wave seems to be getting better and better, and this latest batch of sets looks especially good, so I was excited to get the opportunity to review the entire wave! So, fasten your seatbelts and join me as I do a full inspection of these race cars, starting with… Set Number: 76906 Name: 1970 Ferrari 512 M Theme: Speed Champions Year of Release: 2022 Ages: 8+ Pieces: 291 Price: $19.99 / 19.99€ Online Shop description: The Box TLG is kicking off the March 2022 wave with a classic from 1970, the Ferrari 512, and not just any version of it, but the modified one (hence the “M”) driven by Jacky Ickx when he won the Kyalami 9 hours race. The box features the same design as the Speed Champions boxes from the previous two years with the theme’s logo on a checkered flag in the upper left corner and the car manufacturer’s logo in the upper right. I’m glad they switched back to this type of background from that boring gray stripe they were using from 2018 to 2019. The flag fades nicely into the background of the box art which shows the 512 racing ahead of two other cars on a racetrack. What’s odd is that it seems to be nighttime in this scene. I don’t know during which 9 hours the Kyalami race took place, but I’m pretty sure it wasn’t at night. Correct me if I’m wrong in the comments. However, they correct this potential inaccuracy on the back of the box where it shows the classic racecar driving down the track during daylight, showing off the rear of the vehicle. It also shows a close up of the cabin and a reference picture of the real car along with another Ferrari logo. The top of the box features a three-quarter view of the car, some copyright info, and one of the shiny golden wheels for scale reference, while the bottom has the usual choking hazard warnings and other info. The same image of the set is shown on one of the sides of the box along with a holographic sticker of authenticity from Ferrari. The other side only has an ad for the Lego Life app. Contents Inside the box there are two numbered bags, a sticker sheet, and one instruction booklet. Instructions This year, Lego is making the instructions for Speed Champions sets available in the Lego Instructions app. They’ve had these interactive instructions for a while now for Lego City, but I guess they have debugged it enough now that they feel comfortable branching out into other themes. And they want you to know about it. Not only does every set list this as one of the features of the set, but they also have a full two-page ad for the app at the beginning of the booklet which shows the different options for instructions using a City ice cream truck as an example. Unfortunately, the instructions for these sets have not been added to the app yet as of this writing, so I can’t test them out for you, but if they are like all the other 3D instruction in the app, they will be a nice alternative to the physical instructions, especially for visually impaired people, as they allow you to zoom in rotate around the model, although the rotating doesn’t always work the way you want. Oh well, I prefer physical instructions anyway. The instructions are easy to read, and like all 2022 sets (AFAIK) feature a progress bar that runs along the bottom and shows you how far along you are in the build. Unlike in the City sets, the progress marker is not a minifig from the set, but a generic dot. However, they still managed to give the bar a unique flavor by making it gray to match the Speed Champions branding. There is an explosion of stars at the end of the instructions for the minifig and the car. Notable Parts There are only a handful of notable parts in this set, but they are good ones. There are three types of parts that are printed in this set: the windshield, a 1x2 tile in trans-black that has the top covered In red, and the 1x1 plate with a tiny Ferrari logo on the side which has shown up in a few other Ferrari sets before. There are six of these plates in the set, even though only two of them are visible in the finished model, so you could switch out the other four with unprinted ones from your collection and use them in your MOCs. This set also comes with the highly anticipated 1x5 plate that debuted last year and shows up in red for the first time here, along with the preexisting black version! The 1x2 plate with vertical clip also comes in red for the first time, and the new 1x2 inverted arch only appears for the second time in red after debuting in the Fender Stratocaster. This set comes with the old style of wheels with the newer dotted brake rotor lines which comes in pearl gold for the first time (although its predecessor with the solid lines did appear in 3 sets in that color). Minifigs This set comes with one minifig to drive this historic vehicle and you’d think that it would be a Lego version of Jacky Ickx considering that this is his car, but if you think that, you will be disappointed. Sadly, Speed Champions sets always come with super-generic drivers which is one of the reasons why I miss Lego Racers. As awkward as their faces may have looked, it was great to get minifigs of real racecar drivers like Michael Schumacher with their respective cars back in the day. So, instead of Jacky, we get this guy with tousled brown hair and a generic smirking face. It doesn’t even come with a wrench accessory like some Speed Champions drivers do. Not only is the face boring, but also misprinted in this copy of the set. The white dots in the eyes are too high, making it look like the minifig is wearing white eye liner. No judgement if the fig likes it that way, but I don’t think it’s intentional. Fortunately, it comes with a great, brand-new Ferrari racing suit that does match Jacky’s to make up for the disappointing head a bit. It’s nicely detailed with a Ferrari logo, zippers, and lines that continue down to the legs and onto the fig’s back. The Build Since I had never built a Speed Champions set before and the only cars I have built in recent years are the crappy ones that are included as an afterthought in Super Heroes sets, I wasn’t sure what to expect, but I was pleasantly surprised by some of the building techniques. It’s interesting how they attached the hinges for the wedge plates behind the cabin and more the headlights and some of the side parts are attached by sticking them onto little bars. The unique shape of the mudguards on the rear wheels is achieved by building sections with the 1x2 inverted arches and clipping them onto the side of the car upside down in order to un-invert them. It would have been nice if they had just made a non-inverted version of this piece, but it’s a clever workaround that works pretty well. Spare Parts There are only a few little bits left over after the build including one of the printed 1x1 Ferrari plates. There is actually one more round tile in trans-orange which isn’t pictured here as it was camera-shy and rolled away before I took the picture. The Complete Set Here is the finished car in all it’s boxy-yet-aerodynamic glory! Aside from the six studs on the wedge plates behind the cabin, there are no exposed studs on the model, making it look nice and smooth. The color scheme and shape of it remind me of the A-Wing. I wonder if Ralph McQuarrie was inspired by this car for the design of that ship? Compared to the real thing, it looks pretty spot-on. The Lego version is only missing the rearview mirror (?) on top and some decals, especially around the back, but I’m not gonna complain about not having to apply more stickers. I like that the headlights are brick-built on this model rather than stickered or printed on like on most Speed Champions cars, although the use of trans-black parts makes them look too dark in my opinion. I think trans-clear would have looked better. It’s interesting how they designed the headlights so that they go all the way to the edge of the car by capping them off on the sides with the translucent tiles with the red printing on top. Unfortunately, as is always the case when they try to print on dark parts, the red color on the print appears darker than that of the red parts around it, and there is a visible dark outline around the print, making the tiles look out of place. It’s a clever idea, but it doesn’t work very well. Otherwise, the nose of the car looks great as they recreated the wedge shape of it excellently by building the entire nose section at an angle. In fact, the entire profile view of the car looks great. Spoiler alert! The two little spoilers at the back of the car which on the real vehicle are only attached at the corners are held on by trans-clear round plates with handle which is a clever solution. What I don’t like, however, is that the back of the driver’s cabin is almost completely open. I’m not sure how they could have fixed this, but it’s not ideal. I like how they executed the air channels on the sides of the car that go down toward the rear wheels, under the hull, and out towards the spoilers. The windshield can be lifted up towards the front, so you can seat the driver inside without having to completely take it off like you do on most Speed Champions cars. This is not how it works on the real 512, but it’s a neat play feature all the same. The interior features a stickered double cheese slope with gauges which adds a welcome bit of detail. We have actually gotten this type of racecar before. Set 75876 included the Ferrari 512’s main competitor, the Porsche 917. Even though the Porsche set came out back when the Speed Champions cars were 6 studs wide and looks much inferior to this set, I think the Ferrari would look good next to the 917K. (Picture courtesy of Brickset) Ratings Design: 8/10 A slick looking vehicle that looks very accurate with only minor design flaws. Build: 8/10 An enjoyable build with several unusual SNOT techniques and not too many stickers. Playability: 6/10 The car is fun to zoom around and the windshield can be lifted up. Figures: 7/10 An exclusive, detailed body is bogged down by an inaccurate, generic, and misprinted head. Parts: 7/10 A few new recolors of fairly new molds and some printed parts. Not too bad! Price: 10/10 At 291 pieces for just 20 bucks, this is easily one of the best values for a Speed Champions set! Overall: 8/10 The March 2022 wave starts out strong with this accurate recreation of a classic LeMans racecar. It’s relatively challenging to build, fun to play with, and it looks good on display. The only things that detract from it are the generic minifig head and some printing quality issues. At such a good value, I can definitely recommend it. Thanks for reading and thanks to TLG for sending me this set for review. What do you think of the set? I’d be curious to hear from Speed Champions fans and car aficionados, so let me know in the comments and in the poll above. The set will release on March 1, 2022: https://www.lego.com/en-us/product/1970-ferrari-512-m-76906 In my next Speed Champions review, we will take a look at a type of car that has never been seen in LEGO before! Until then, may the downforce be with you.
-
[MOC] The Snow Racer
mic8per_ posted a topic in LEGO Technic, Mindstorms, Model Team and Scale Modeling
Skid steer off road vehicle. The PF elements are fully protected from snow, and it actually works on harder snow. Driven by two PF L-motors, one motor per side. As a power source can be used BuWizz or any other 4-port battery box (not in the parts list). Building instructions+parts list: https://reb.li/m/95837 -
[MOC] Mercedes Race Truck with BuWizz 2.0
Teo LEGO Technic posted a topic in LEGO Technic, Mindstorms, Model Team and Scale Modeling
Hey guys, Here's my model of a really basic race truck powered by BuWizz 2.0 as an experiment. The power is amazing, way above expectations. Features of the truck include: Front independent suspension, rear trailing arm suspension Rear wheel drive with 1 buggy motor More pics here: https://bricksafe.com/pages/Teo_LEGO_Technic/mercedes-race-truck And here's the video, edited with music now: Hope you enjoy!! Teo -
 This model based on one of the famous Volvo truck - Iron Knight. The main idea was to replicate this truck in small scale and use for this just parts from Lego set 42123 McLaren Senna. Definitely not all shapes and parts of the original truck I was able to build properly, but I think it is compromise in scope of limited range of parts. Instructions: link to intruction Dimensions: 15x37x15.3 studWeight: 516 gFunctions:1. HoG2. Working V8 engine driven by rear axle3. Openable doors4. Detailed exterior
 -
Ferrari F2004 1:8 MOC (with instruction)
lnteknik posted a topic in LEGO Technic, Mindstorms, Model Team and Scale Modeling
Hello everyone. I would like to share a MOC I have just completed: Ferrari F2004 F1 car It’s in 1:8 scale with 1700+ parts. Some features: working V10, pushrod suspensions, steering wheel, removable front wing, rear wing, headrest, and engine cover I have uploaded some pictures to bricksafe: F2004 Bricksafe Instruction is also available here: F2004 Instruction -
Drag Brick Dragster Race #2. 16 Dragsters start, 1 will be champion!
-
Drag Boat Inaugural Race. Fast racing action between 8 drag boats with pullback motors. Drag Brick is a drag racing series which includes dragsters, drag boats, drag bikes, dragtor pulls and more!
-
LEGO is one of my favorite things to find at a yard sale, and I have collected quite a large amount. I’ve always wanted to build something. So I ended up building my first wheelie pulling dragster, then another one, then 14 more, and then a 19 foot drag strip, drag boats, bikes etc. What am I doing? I’m not sure, but I have some videos here on brick flicks. I just love the whole process of creating. I’ll be sharing some MOCs here as soon as I figure that part out. Please check out my videos if you get a chance, I’d love to hear your feedback. Thanks much, Shawn.
-
Hi, all my friends here! I just posted a contribution on Lego Ideas. That's a cute and creative Lego jet- plane set. Check it out! If you like it, please support it on the official Lego Ideas website https://ideas.lego.com/projects/8f441604-87c1-4768-a5d7-cad0c014fb6a to help me make it real. For getting this set actually into the Lego market, I need to gather at least 10,000 supports. Thank you for your interest and support, and don't forget to share it to your friends!
-

[MOC] F1 Race Car based on 42083
Daniel14 posted a topic in LEGO Technic, Mindstorms, Model Team and Scale Modeling
Hello everyone! First I have to say, that I'm new here and this is my first MOC ever, so it's not as good as I imagined it to be. It's a bit inspired by Crowkillers model 42083 B Model Bugatti Formula 1 Race Car, but most of it are my own ideas. Let's start with a photo! Functions: - Full independent double wishbone suspension - Steering - Fake V8 Engine & RWD - Openable engine hood All the parts are from Chiron 42083 set, as it is the only set I own. I am pretty proud of how it looks, apart from the front suspension. It doesn't look how I wanted it to be, but it's all because of lack of experience and time. There's no gearbox, because I have absolutely zero experience with that and I didn't want to waste a week on that. But maybe in next version... who knows :) I especially like the front wing, which in my opinion is an improvement over Crowkiller's version. Let me know guys what you think! -
Hello, let's start the race! It is my own hypercar concept with a minifigure. I reused some details of my earlier idea called "Hypercar concept 1", but I wanted to build this car even more dynamic. It is a studless model built from standard LEGO elements. The overall size is similar to the Speed Champions sets, but the wheels are from City sets as I wanted to keep the height to length ratio closer to the real sports cars. If you like this car, please share and support it on Lego Ideas: https://ideas.lego.com/projects/146d40fc-49de-4af5-8173-4c73892a003e Many thanks! Street racer 01 by László Torma, on Flickr Street racer 04 by László Torma, on Flickr
-
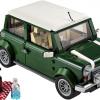
Hello Speed Champions fans, Trabant 601 is a legendary car of Eastern and Central Europe. This is its studless model in Speed Champions scale. If you like it, please keep alive this project and support on Lego Ideas to become a real set (only 3 supporters are missing in the next hours to reach the first milestone): https://ideas.lego.com/projects/77b0428c-c46c-47b0-984c-1fd7c97a2948 I wanted to create a relatively accurate model, and some details were challenging in this small size. Firstly I needed smaller wheels than my other builds in this scale, the size of the actual ones are equal to the Mini Cooper (Lego 75894) ones. It was clear too that the City mudgards will not fit to this size, therefore I created a brickbuilt one. The connection of the wheels are tricky a bit which helps to keep the room between the wheels and the mudguard proportional. I wanted to create an accurate front, and I added simple white stickers to the direction indicator lamps to keep the orange parts visible on the front only. The most common colors of this car are the light blue and white (broken white). I decided to use white pieces as the roof element of Mini Cooper (part 6018101) is ideal as hood and roof, and I have this item only in this color. The rear of the car is a bit tricky too as I wanted tilted lights similarly to the real ones. The back lights could be red transparent elements, but I was not able to buy them in that color. I had to buy some elements of "brick, modified, 6191" to the sides too, and it was available only with "Nitro" stickers, but my son said that these stickers are cool, so I kept them. I wanted to use as less stickers as possible as I don't really like them, because they restrain the applicability the stickered elements in different builds. There is picture without the "Nitro" sticker and an other one without any stickers. The set includes a minifigure with a baseball hat and with an additinal red helmet. Trabant 601 by László Torma, on Flickr 02 Trabant 601 by László Torma, on Flickr 03 Trabant 601 by László Torma, on Flickr 04 Trabant 601 by László Torma, on Flickr 05 Trabant 601 by László Torma, on Flickr 06 Trabant 601 without Nitro sticker by László Torma, on Flickr 07 Trabant 601 without any stickers by László Torma, on Flickr My other Speed Champions scale model in "LEGO Town" forum is the Audi R8:
-
Hello Speed Champions fans, my son asked me to build a white Audi R8. Both of us like the Speed Champions sets, therefore I choosen this scale. If you like it, you can support it on Lego Ideas: https://ideas.lego.com/projects/ead4242e-8bae-440d-930d-0c840d86ce5f It is a studless build from standard lego elements and modified City wheels are used instead of Speed Champions ones to keep the height to length ratio more realistic similarly to my earlier ideas. The front of this car is iconic and it was a real challenge to recreate it in this small size. I made lots of versions and I think the actual one with a tricky solution is the best. I tried more solutions to the black side blades too, the actual one was inspired by "LEGO Audi R8 instructions (MOC #96)" by "Jerry Builds Bricks" on Youtube, however I modifed it a bit as I wanted tilted blades similarly to the real ones. Only one sticker is used which is the Audi logo on the front as I'm generally not a fan of the parts with stickers, because of the lack of flexibility in using them with other builds. The set includes the minifigure shown on the main picture on the Lego Ideas. It comes form the set 75873 but with red helmet. I have added a rear wing to make the car more dynamic. It differs from the custom Audi wings, but I think it fits to the style of the car and to the side mirrors. Audi_R8-04 by László Torma, on Flickr Audi_R8-05 by László Torma, on Flickr Audi_R8-02 by László Torma, on Flickr Audi_R8-03 by László Torma, on Flickr
-
Baby Porsche or VW Beetle tuning? This is a fictitious race car, I hope you like it :) You can support it on Lego Ideas: https://ideas.lego.com/projects/68cb5ef6-6e2c-40fc-9dca-0e4b7f3fe64a It is a studless build in Speed Champions scale, but with City wheels. I used only standard LEGO elements, the slopes with stickers are part of the set called 1968 Ford Mustang. Baby Porsche 01 by László Torma, on Flickr Baby Porsche 02 by László Torma, on Flickr Baby Porsche 03 by László Torma, on Flickr
-
[MOC] Race Truck MkII
Lucio Switch posted a topic in LEGO Technic, Mindstorms, Model Team and Scale Modeling
Hi to everybody I built this moc for the Model Expo Italy, it's simpler compared to what I usually build, but funny to play with. Due to the 2 BuWizz and the 2 Buggy motors it is fast but a bit too much expansive. To avoid this, it's possible to use, as alternatives, SBrick or IR receivers feeded by Li-Po battery or Classic Battery Box, and use 4 L Motors instahed of the 2 Buggy motors, obviously with performance reduction. The instructions of the main model are alkredy available, the "alternatives" are under development, but them will be released in a short time (hopfully). I hope you will enjoy it: More pics here: https://flic.kr/s/aHsmFvvrxX More info here: http://www.lucioswitch.altervista.org/race-truck-mkii.html -

[REVIEW] 42039 - 24 Hours Race Car
Jim posted a topic in LEGO Technic, Mindstorms, Model Team and Scale Modeling
REVIEW - 42039 - 24 HOURS RACE CAR INTRODUCTION When the preliminary images of the "Le Mans Racer" surfaced somewhere last year (2014) it got a lot of praise. This changed dramatically when the final images of the 24 Hours Race Car showed up. The front side of the car, especially the head lights, and the curvature of the side of car had changed a lot. The car obviously still resembled the prototype, but the new design raised a lot of eyebrows. The new design was considered a step back instead of forward. Eventhough I still liked the design, I must admit I liked the earlier design better too. With the emphasis on past tense liked. I am not sure anymore and this review will show you why. Like the Arctic Truck this set has a B-model which is well worth checking out. That's why this review includes both the A-model and B-model. For people who are on the fence, the B-model might actually convince them to buy the set after all. Let's see what this set is all about! Note: All images can be clicked for hi-res versions. SET INFORMATION Number: 42039 Title: 24 Hours Race Car Theme: Technic Released: 2015 Part Count: 1219 Box Weight: 2110 gr Box Dimensions: 47,8 cm x 37,3 cm x 8,7 cm Model Dimensions: 40 cm x 18 cm Set Price (MSRP): €99.99 / $? / £99.99 Price per Part: €0.082 / $? / £0.082 Links: Brickset, Bricklink THE BOX The box measures 47,8 cm x 37,3 cm x 8,7 cm and weighs well over 2kg (2110 gr to be precise). The width of the box is the same as the box of the Arctic Truck. This box also feels like it's filled to the brim. THE FRONT The front shows a picture of the main model in action, with radial blurred wheels to emphasize the motion of the car. The lower right section shows the dimensions of the model. Upon completion, it will measure a length of 40cm and a width of 18 cm. THE BACK Like the front, the back side has exactly the same setup as the box of the Arctic Truck. The top shows the functions of the model, while the lower left side shows the B-model and the lower right side shows the motorization options. The picture of the B-model looks so cool, it could be a model of it's own. At this point I was very eager to build both models and compare them. THE SIDE One of the sides usually shows a part in 1:1 scale. This time it's one of the wheels indicating the size of the model. CONTENT OF THE BOX The box contains: 1 Book(let) 1 Sticker Sheet 13 Bags 4 Tires INSTRUCTION BOOKLET Since I own two copies of the set, I also received two instruction booklets. What's catching my eye is that my second copy is supplied in different packaging than the first one. It's for the first time (that I am aware of) that the instruction booklet and stickers come in a sealed bag, without cardboard back. Hopefully this will be a new standard for all sets with sticker sheets. Instead of multiple booklets, this set contains a single square bound book. In earlier reviews I have epxressed my preference for a single book. I don't see any advantage in having 2, 3 or even up to 6 booklets. STICKER SHEET Like the actual model, the sticker sheet looks very vibrant. The bright green, white and black color combination has found it's way to the stickers as well. Either you love 'em or hate 'em. Since I started writing reviews I have been applying stickers and I am happy I started doing it. Stickers do give the model it's finishing touch. BAGS WITH PARTS Thirteen bags with a total of 1219 parts (give or take a few) are supplied in the densily packed box. The rims and flex are sealed in a bag as well. Sometimes looking at the bags makes you wonder what the logic is, behind the distribution of the various parts across the different bags. Well this time it really got me confused. Take a look at two of the bags below. There's a bag containing all the 3L Blue Pins. Then there's a bag with various parts....and a single 3L Blue Pin. I figured this might be an error, but both of the sets have the same anomaly. TIRES The tires have been supplied unbagged, as usual. HIGHLIGHTED PARTS This chapter describes new and interesting parts. This set actually contains a lot of them. This set also contains an abundance of panels. If you aren't into panels, this isn't the set for you. CHANGEOVER CATCH This year (2015) the new changeover catch parts were released. It's a combination of three parts. The advantage of the new parts is that the red gear is the same on both sides, which avoids mounting it the wrong way around. It also avoids the changeover catch slipping out of the driving ring, like it used to do. You can apply lots of pressure, but the catch doesn't slip out. PINS Some of last year's new pins are also included in this set. 12 x Pin with Pin Hole and 21 x 3L Pin with 1L Axle. Securing Technic Beams can be quite simple with the new Pin with Pin Holes. The new 3L Pin with 1L Axle gives you more possibilities when connecting Beams and other parts. Below are two example situations where the new pins have been used. Granted, the examples below can be accomplished by using other techniques. However, some predicaments from the past can be easily solved by using these new parts. Like me, you will most likely appreciate the ease of use. ENGINE AND SUSPENSION Also included are two Steering Portal Hubs and Steering Portal Hubs with Ball Joint Arms and four Steering Portal Axles for driving and steering the vehicle. These parts are commonly used nowadays. The picture below also shows some other parts, like gear rack, steering arms and suspension. FRAMES This set comes with a single 5x7 Frame and three 5x11 Frames. PANELS This set contains a whopping 47 panels in three different colors. I personally like panels a lot and I do appreciate the variety we have at our disposal lately. This set even contains a new 13x3x2 Curved "Mudguard" Panel. NEW 13x3x2 CURVED PANEL This is the first set to contain the new 13x3x2 Curved Panel. Looking at the pictures doesn't do these panels justice. In real life they are actually quite big. I figured they would be smaller, but they are even longer than the 11 x 5 frame, with a length of 13 (including the attachment points). Hopefully this part will be available in other colors as well, preferably white, for adding variety to your EV3 robot. 19L WHITE FLEX-AXLES The White 19L Flex Axles have only been released in a single set, the 8461 Williams F1 Racer in 2002. Current prices on Bricklink are as high as 15 Euros! Needless to say we are very happy with the return of these White Axles. Now we can build Jeroen Ottens' awesome Alfa Romeo 4C Spider for a decent price as well. I am really happy that useful rare parts are being used more often by TLG designers PART LIST Here's the complete list for all 1219 parts. As you can see in the Highlighted parts section, this set contains a lot of interesting and useful parts. If you don't own sets like the 8070 - Supercar, this might be the set to pick up if you want to start building your own supercar. THE BUILD Enough with all the set and part information, let's build the model. REAR SUSPENSION The build starts with the rear suspension and drivetrain. As you can see in the picture below, the length of the Axle between the Steering CV Joint is 4L, where it usally is 3L. This is an indication that the finished model will be a bit bigger than usual (8070 for example). The finished suspension is one of the cleanest suspension setups I have seen in an official model. It's pretty basic, but it works like a charm. This setup is defintely worth using in your MOC. Here's a video: After attaching the suspension to the frame you rotate the module and secure it. At this stage the rear section of the chassis with suspension is almost finished. V8 MID-ENGINE Extending the chassis forward results in the picture below, where the front spoiler is already visible. What's also visible is the V8 engine placed right in front of the rear axle, resulting in a Mid-engine setup, perfectly suited for sports and race cars. Two exhaust pipes have been fitted on either side of the engine, together with two hoses attaching them to the engine. The instructions are easy to follow, although you sometimes you need to bend the beams a bit. Minor improvements are possible here and there, but nothing shocking. FRONT SUSPENSION The front suspension is a bit more complicated than the rear suspension, which makes sense considering the fact it contains the steering rack. The shock absorbers are placed in a different angle than the rear ones, resulting in a somewhat stiffer front suspension. All in all the front suspension is well designed and the steering rack can be easily powered with a Servo Motor. The picture belows shows the front suspension attached to the chassis. If you follow the official instructions to motorize the model, the area in front of the suspension is used to mount the battery box. When you are modding this model to make it Full RC this area can be used to mount the servo motor. GEARBOX Like the gearbox in the 8070, it's not used to switch gears powering the drivetrain. It's used to switch between two functions, opening the doors and the hood/bonnet. The gearbox is located at the left of the vehicle, near the cockpit. The mechanism to open the doors is located on the left side, while opening the hood/bonnet is taking place at the right side. To accomplish this, some axles traverse under the cockpit to the other side of the vehicle. Following the axles to other side of the vehicle and adding some gears, results in the situation below. The video below shows the gearbox in action. DOOR OPENING MECHANISM The mechanism to open the door is comprised of some Knob Wheels, Links without Stoppers and Pins with Towballs. Take a look at the doors opening and closing. THE FRONT Using the new mudguards and various other panels you finish the front of the car. The front is probably the most controversial part of the car. This is caused by the preliminary pictures shown before the release of this car. In the early pictures the front of the car had smooth curves and beautiful lines, while the final car lost these smooth lines and got a more blocky look in return. I must admit that at a first glance, the new design lost some of it's appeal. However, this model grew on me pretty rapidly. The headlight design can be found, in more or less the same way, on several real Le Mans type race cars. THE REAR The rear of the car looks great, with the stickers continuing from the mudguards to the panels underneath the spoiler. The two exhausts sticking out give some details to the back. I absolutely disagree with all the negativity surrounding this car. Maybe it's one of those models which needs to grow on you. FINISHED MODEL Here it is, the finished model. I know some of you don't like the looks of the car, but I think it looks great. The color scheme is outstanding. The new (for Technic) bright green parts, combined with white and black make this car look very vibrant and colorful. I am not a big fan of the green used in the 42008 - Service Truck, but I do like this bright green a lot. It fits perfectly well with the Mindstorms EV3 set. The curves on the side of the car are not as smooth as some of us hoped, but I still think the car looks more than acceptable from the side. The stickers add some nice details to the car, giving it that characteristic race car look. The model looks great in pictures, but it does even look better in real life. I love this picture of the front of the car. However, I do wonder if a dedicated 24 hour Le Mans Racer has the seat and steering positioned off-center?! Using the good ol' Google Machine I come to the conclusion that they do have centered seating and steering, at least the majority of them. There's ample space in the cabin, which makes me wonder why TLG decided to place the seat off-centered. The rear view looks cool too, with some of the suspension showing and the two exhaust pipes clearly visible. The bottom view is very useful to determine the size of the car in studs. It measures approx 59 x 27 studs. The chassis looks organized and well designed. The engine has been placed close to the ground, which is perfect for the weight distribution. A low center of gravity improves the handling of the car. I really enjoyed building this baby. The build is very clean and organized, although there are some steps where you need to bend the beams a bit to get things into place. Seeing the model come to life and seeing it grow to pretty impressive proportions is very satisfying. For me it was fun, but I reckon kids will go nuts over this set and the build. SIZE COMPARISON What became obvious during the build, but what's emphasized when you have finished the model, is that it's quite big! The size of the car is pretty impressive. The pictures below show the car next to the 42030 - Volvo L350F. The side view emphasizes the size of the car. It's even longer than the Volvo, if you dismiss the bucket. PARTS LEFT Some parts left. Nothing out of the ordinary. FEATURES AND FUNCTIONS Unlike the B-model, this model doesn't implement any unexpected features. The functions it does implement are exactly what you would expect from any car. Steering (HoG) Working fake engine Suspension Opening doors (gullwing style) Opening bonnet/hood Opening trunk Gearbox for switching between functions Unfortunately the steering wheel hasn't been linked to the HoG (Hand of God) steering mechanism. Placing the seat in the center would have provided an easy way to link the steering wheel to the steering mechanism. it's a shame we hardly see actual steering anymore. Opening the hood actually opens up the entire rear section of the car, providing you with easy access to the motor compartment. The mechanism to open the hood works properly, which results in smooth opening and closing of it. The same goes for the gullwing style doors. Both functions are operated manually and you need to switch with the lever to the left of the cockpit. These two functions are also the ones which can be motorized by placing an M-motor near the cockpit and a battery box in the trunk. All things considered I think this car offers lots of playability. The model is solidly built and the functions are easy to operate. I'd say it's pretty safe to let your kids play with it. B-MODEL Unlike the A-model, the B-model for this set received (almost) universal acclaim, and I can see why. Often the B-model is a pale shadow of it's part donor. In this case the model looks so good, it could be a model of it's own. It even incorporates a neat feature, which actually deserves to be in the A-model. There's a lot a variation in the quality of digital building instructions TLG is providing, but these ones are of very high quality. The picture below shows most of the chassis with suspension, fake engine and gearbox in place. FINISHED MODEL Some concessions have been made, but overall the car looks fantastic. The black of the roof has been extrapolated from the hood, which definitely works for me. The rear section of the car feels a bit empty, but the panels do cover up most of it, so it's hardly noticeable. The V8 stickers will be upside down if you use the parts from the A-model. Since I could apply new stickers, I have placed them using the proper orientation. The bottom of the car shows the chassis. It's obviously a bit smaller than the A-model's chassis. FEATURES AND FUNCTIONS Taking the functions into account, this model isn't playing second fiddle to the A-model. Besides the obvious functions like steering, opening doors and hood, this car features folding fog lights, which deserve a better podium than a B-model. Steering (Hog) Working fake engine Suspension Opening doors (manually) Opening hood/bonnet (manually) Opening trunk (operated by gear) Folding fog lights (operated by gear) Gearbox (used to switch functions) FOG LIGHTS One of the most interesting features of the B-model are the folding Fog Lights. It almost feels a bit weird that a feature like this is implemented in the B-model, instead of the A-model. Below are 4 steps showing how the mechanism works. I have also included a video. The mechanism is somewhat reminiscent of fork mechanism used in the 8109 - Flatbed Truck, which has been described in Efferman's Review. Take a look at the video to the fog lights in action. PARTS LEFT A fair number of parts left, which isn't uncommon for a B-model. SUMMARY To summarize how I feel about this set, you need to take a look at the picture below. The combined image reflects the quality of this set....or better yet....sets! You actually get two great models, for the price of one. You don't like the A-model? No problem, you can have lots of fun with the B-model. I can't stop playing with the fog lights, it's mesmarizing. The color scheme on both models is outstanding. I simply can't emphasize enough how well this color scheme pleases the eye. The regular green is dull and boring, but this bright green really pops out, especially when combined with black and white, and possibly some red details. Black, white and a little red?! Sounds familiar? Yes, bright green can easily be combined with your EV3 robots. So while you are combining the bright green with your robot, why not use the great new curved "mudguard" panels. These new panels are introduced in this set and they look great. They open up a lot of possibilities in the design department. The build of the A-model is outstanding. It is fairly simple, but since it's so clean, I really enjoyed it a lot. I think the build should be entertaining, which doesn't mean it needs to be a real challenge. And let's be honest; when is a build really challenging?! The rear suspension is a good example of why I liked the build. It's very simple, yet very effective. Works like a charm. The same goes for the other functions in both models. And the star of the entire show can be found in the B-model. How's that for a surprise?! Being aware of the fact that I like this model a lot better than most of you seem to do, I really encourage you to give this model a chance. The sheer size is impressive, the color scheme is awesome and you get a bonus model, which is actually worth building. SCORE Okay, so how do I grade this set? 8 DESIGN Open to debate, but I like it a lot. 8 BUILDING EXPERIENCE Fun and clean build. 9 FEATURES Superb function in B-model steels the show. 9 PLAYABILITY Both models offer lots of playability 8 PARTS Lots of new parts and cool existing parts. 10 VALUE FOR MONEY Two models for the price of one. 8,7 TWICE THE FUN I hope you enjoyed this review! More pictures can be found on my Flickr page.