Search the Community
Showing results for tags 'modified'.
Found 13 results
-

Eurobricker's share your trucks!!!!
CrazyKreations posted a topic in LEGO Technic, Mindstorms, Model Team and Scale Modeling
Hello everyone, I have been in contact with a few fellow eurobrickers and some of them have wanted a truck topic where we can all share different designs for our trucks and trailers. These designs could also include maybe some clever and effecient suggestions to show others how you made your amazing MOC! All forms of trucks are accepted tow trucks to mighty expedition trucks! Post your truck, or gain inspiration from others! For starters I will share mine: A sporty flatbed truck! -
After about 5 months of work (off and on), I've finally finished my modified C.K. Holliday train (Lego 71044). During high school and college in the 90s, I was a conductor on the DLRR, so this set hits close to home and is something I've wanted for a long, long time. It also means I was keenly aware of where the stock model wasn't quite accurate. This was my first time modifying a Lego set, and I'm pretty happy with how it turned out.The engine was pretty heavily reworked, and I made some changes to the parlor car as well. Approximate mod list includes: Changed boiler jacket to dark blue, inspired by @TJJohn12. Lengthened the engine by two studs. Increased engine width at pistons to 9 studs. Reworked the pilot to use a double-pin system similar to the Constitution. Reworked pistons inspired by @Carefree_Dude. Drive rods by @zephyr1934. Redesigned cab interior. Parlor car extended by 4 studs, additional chair inside. Replaced stock wheels with ball bearings and rods. Custom stickers by OKBrickWorks What do y'all think?
-
Hi there, I have built a modified and illuminated version of the new modular set (10312) and want to share it with you :) I still have to mod the pizzeria, which I don't really like... Do you have any suggestions for me?
-

RC Car with in-wheel brushless motors
janssnet posted a topic in LEGO Technic, Mindstorms, Model Team and Scale Modeling
Finally finished a first version of a LEGO RC Car with 2 in-wheel, brushless motors. While I know some of you hate the combination of RC electronics and LEGO, others enjoy these hybrid models (hence this post). If you are more the purist type and in favour of LEGO only, please skip this. If you like stretching the envelope using (RC) electronics please have look and let me hear your thoughts. While searching for brushless in-wheel motors I ran into the ideal product: Turnigy Multistar 4225-610Kv. It mounts easily onto LEGO (same measurements) and fits almost any 56-rim. The result is spectacular. Great speed, no wear-out, all traction goes to the wheels, no gears necessary. Sadly, it turns out this motor is no longer available (working on an alternative). Car also includes an (adjustable) software differential running on an Arduino Nano, works surprisingly well. When fully applied the car has serious oversteer, when turned to 0 the car has understeer. The body of the car is a 54100 modified boat hull . It took some cutting but ended up nicely. Please have a look at the video here: -
How can I tell if hose parts are cut or not?
Transparency for Effect posted a topic in General LEGO Discussion
I'm not even entirely sure being cut is the case, but I'm comparing two different Hose, Ribbed 7mm D. parts of the same axle length (y'know, these pieces: https://www.bricklink.com/catalogList.asp?catType=P&catString=522) for a Sand Tarakava replica and I think one piece has one more of the rings than the other and thus maybe a little longer. Is this standard for the pieces to be slightly different like that, or has there been piece alteration here? As someone whose purist in the sense that I just want a LEGO set to have the parts as they normally are, can you tell if a hose part has been cut down (and thus not the actual piece) if that's even what's happening here? For all I know the messy-looking ends of the parts may just be the condition or so. I sorta just get OCD over the parts being correct, a similar case if Hose, Rigid 3mm D. parts (https://www.bricklink.com/catalogList.asp?catType=P&catString=528) are cut or distinguishing between the proto minifigure blank heads and regular minifigure heads whose face printing has been rubbed off over time (as well as stuff like if parts are actually bootleg instead of authentic LEGO, but that's another can of worms). EDIT: Looking at some sealed parts from a bag of the Sidorak set, yeah the inconsistent rings seems to be present there too, and a little weird "fraying" at an end where part of the circle is raised above the rest of it. Guessing LEGO's production itself cuts the pieces down from a long length into the right size and the softer plastic is why stuff like that happens? -

[MOC] Dirt Track Modified 42039 C-Model
CF 28 posted a topic in LEGO Technic, Mindstorms, Model Team and Scale Modeling
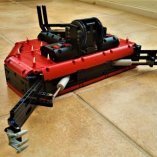
Hello all. Here is my LEGO interpretation of a circle-track dirt Modified, which is popular in the United States. Several similar versions of them race under different sanctioning organizations, the most popular being IMCA and UMP. The car is a C-model of the 42039 "24 Hours Race Car", and thus uses only the parts from that set. 21 studs wide between the hubs, 23 at the widest part of the body, 50 long, and 14 high from the center of the wheels. Has the fake V-8 engine mounted toward the front, but fully behind the front axle, as in the real vehicle. Front suspension is independent double-wishbone, similar to the A-model's design. Rear suspension is a reasonably accurate approximation of the live-axle 3-link with panhard bar that is used in many (but not all) of these cars. Uses a "hand of god" style steering with the finger knob on the roof, but is also connected to the working steering wheel in the left-hand-drive cockpit. Thanks for looking! -
I picked up my new B-Wing a few days ago, and after building it I was left a little underwhelmed. The overall design of the model is OK, given its size, but there was something about it that really bugged me,,, The wings. They seem out of proportion to me, too large for the scale of the ship, and it makes the final model look rather spindly. I've already modified mine to reduce the size of the stabiliser wings, and to let them sit closer to the body when folded. However, this is what I have planned (if I have the necessary parts that is): After making an LDD model of the B-Wing using the official build instructions, I've been having a bit of a tinker with the ship, and I think I've made a few improvements. Modified B-Wing .lxf file Changes... Shortened the s-foils. Redesigned the wing-tip cannons (and got rid of those irritating missile shooters). Shortened the main wing and gave it a straight edge, mimicking the UCS version. Moved the weapons pod a little higher up to make it look a little more sturdy. Altered the lower wing mounting points so that the wing is now aligned with the axis of the ship. Bulked out the body in a few places, and filled the void behind the engines. Things to do... Thicken the 'neck' where the cockpit joins the rest of the ship. Increase the size and move further forward the flare between the cockpit and the two cylinders, to match the flare on the main wing. I'm a loooooooooong way off from making anything as impressive as Jerac's Chimaera, but we all have to start somewhere .
-
OK, so I have never made any secret that I think Emerald Night is crap. Odd proportions, terrible tender, complete lack of understanding of what several parts actually represent, looking *nothing* like the source material,.... I also know (from bitter experience) how difficult (and expensive) making a decent replacement is. After having built some really nice Pullmans, and building a disappointing pacific (which was miles better than EN), taking it apart, starting again, running out of inspiration, then getting made jobless so I couldn't afford to buy bits had I come up with an improved design, I decided to finally do something about my Emerald Night that had been sat in a corner with no wheels for at least 2 years. Things that I wanted to change: Give the front a footplate. Use the cylinder fix. Do something about that god awful (lack of) dome. Raise the cab so it doesn't look too daft with my coaches. Build a completely new tender (seriously, f**k that tender, that city cattle wagon was less lazy). Add lights and S Brick (which I had done a long while ago). So here are the results: Loco The new footplate, added tiles to the front bogie, replaced the green 1x6 plate with a black one, and the improved cylinder innards. New dome with S Brick underneath. Slightly raised cab. Tender The tender was a complete rebuild, but used basically the same chassis. It was however, a little lazy, and relied heavily on what I happened to already have. New Tender Completed Engine with Train. I intend to replace it with an actually good loco one day, but until inspiration and funds allow, this is a vast improvement.
-
[MOD][AMS1] 8258-B Crawler
JTS posted a topic in LEGO Technic, Mindstorms, Model Team and Scale Modeling
Presenting the 8258-B Crawler, Designed and built as an entry for the 'Crawlify your set' contest [AMS1] I'm a huge fan of b-models in general, but the 8258-B has always been one of my favourites due to great looks and an easy to modify. Or so I thought... In the end, I reckon about 85% of the chassis has been custom built. There are two L motors situated just below the cabin. One powers the front axle, one powers the rear. Both axles have differentials because, being independently powered, loss of traction is a lot less likely and it saves my poor pieces from becoming mangled. Because the 8258-B is rather small (read: narrow) I had a lot of trouble designing a front axle that could house a servo motor without limiting the range of suspension travel. Eventually I gave up and ended up modifying this axle to accommodate a differential (well deserved credit to the amazing @Madoca 1977). However with that said, I have made sure the bodywork stays almost 100% true to the original. The only alteration I had to made was to the rear wheelarches to make room for the balloon tyres: Original wheelarch Modified wheelarch: Also, the front winch kept scraping on obstacles I was trying to climb over so I switched this out for a bullbar, however the two are easily interchangeable. Anyways, here's a video of this thing in action. As always, please let me know what you think. Whether it's praise, criticism or telling me off for building ANOTHER red and black model (I have other colours, I swear!!), I'd love to hear it. More images can be found in this bricksafe folder. Enjoy =) -
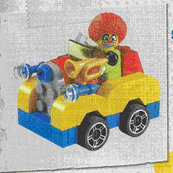
I have finally completed it! Only issue is that eyes looks a little cross-eyed, but hey different posture from red and green. Picture is at bricklink forum https://www.bricklink.com/message.asp?ID=972034 (100k limit here is too small) Bricklink post also has details on parts changes if you wanted dragon in same design.
-
Here a video of my modified modulars, all together in one layout.
-
More pictures >>> https://www.flickr.com/photos/114035403@N02/sets/72157649391483317/ This modified T-47 has both laser cannons moved to the starboard side, which are fed by a large battery on the port-side weapons hardpoint. It has been fitted with an acceptable shield generator, and is well faster than the rebel "Snowspeeder" variants due to its use of light alloys and smaller airframe. The thrust nozzles have been bolstered with blast cones for extra maneuverability at high altitudes, and the exhaust grate shows signs of fouling. Slightly slower than the aformentioned T-47 "Snowspeeders" used at the battle of Hoth, this T-47 has an extended airframe, and twin-linked overcharged E-Web blasters on the weapons hardpoints, as well as a weak shield generator. Same as the last, he thrust nozzles have been bolstered with blast cones for extra maneuverability at high altitudes, and the exhaust grate shows signs of fouling.
-

2L U-joints and new axle lengths
Junpei posted a topic in LEGO Technic, Mindstorms, Model Team and Scale Modeling
I have been thinking about making functional mini-models with technic, but even 3L u-joints are too long for very small models, so I wanted one in 2L. This is my crude prototype for a 2L universal joint: To attach normally through technic liftarms and bricks, it would also need axles in 2.5L, 3.5L, etc., and a 1L axle for attaching them back to back. It would not be for heavy-duty models because of its weaker 1/2 stud connection, but I think it might be a good idea for low-torque applications. Please feel free to add your opinions and criticism!